Welcome

My name is Lisa and I'm a crafty girl with wanderlust working as an engineer by day. My blog chronicles projects in my home as well as pictures and stories from my travels.

Search


Instagram

Blog Index
The journal that this archive was targeting has been deleted. Please update your configuration.
Navigation

Entries in Gifts (36)

Wednesday
Mar112015

Rosemary Sea Salt 

A few months back I made a large batch of rosemary sea salt. It is a great way to use up any rosemary that you have in your herb garden at the end of the growing season and adds something special to your pantry for your cooking. There are a variety of methods out there that you could use but below is the method that works for me.

Ingredients List
- 1/2 cup fresh rosemary leaves
- 4 cups sea salt, divided

Put the rosemary leaves and one cup of sea salt in a food processor.

Pulse the food processor until the rosemary leaves are finely mixed into the salt.

In a bowl combine the rosemary mixture with the remaining three cups of sea salt.

The salt and rosemary mixture will be damp from the moisture in the rosemary leaves so to dry it out, spread it on a a baking sheet and bake it for about half an hour on low heat (200˚F, 95˚C).

After letting the mixture cool, break up any salt that has clumped together and store in jars.

The rosemary sea salt makes a great gift and Frank and I have also have fun using it in our cooking. Enjoy!

Monday
Jun092014

Monogram Baby Blanket

Today I thought that I would share a baby blanket that I made for my friend's little guy a few months back. His room is car themed so I when I found license plate flannel at the fabric store I knew that it would be perfect. I bought some plush red minky fabric to pair with it for the front of the blanket and I was ready to go.

I wanted to add a little bit of interest to the front so I decided to add a monogram to the front using felt. I created a design on the computer (a circle with his initials in it), printed it on the computer and cut it out of white and black felt. 

I cut down the red fabric to the size that I wanted and then worked on the monogram in the bottom right corner. I sewed down the white circle first and then layered the black ring and letters over it attaching it with a tiny hand stitch (like I did with these scarves).

I wanted to use the license plate flannel for both the backing and binding of the blanket so I cut it to be 3" wider and 3" longer than the red fabric.

I spread out the license plate flannel face down and then layered the red fabric over it face up, centered so that there was a 1-1/2" border of the license plate flannel around the perimeter of the red fabric. 

I folded the license plate flannel so that the edge touched the edge of the red fabric and then folded it over again, pinning it in place to make a 3/4" binding.

At the corners I trimmed away a little extra flannel and then folded the licence plate flannel so that it would create a mitered corner and pinned it in place.

I sewed the binding down and the blanket was done. I think that the blanket turned out cute and is definitely warm and snuggly. Perfect for such a sweet little man!

Wednesday
Mar052014

Baby Quilt for Kristen's Little Lady

My friend Kristen just had her first little one last month. She and her husband kept the gender of the baby a surprise so she decorated her nursery to be gender neutral and I drew upon the colors she was using for the baby quilt I made for her. Frank and I got to meet the baby (they had a girl!) a week and a half ago and she was so sweet and beautiful.

I made the quilt using a modified version of a disappearing nine patch. A disappearing nine patch involves making a nine patch block and then cutting it into four smaller blocks. I like to oversize things and then cut it down for a little more accuracy so I adjusted my piecing accordingly.

To make the quilt I used eight different colored fabrics, a patterned white fabric and two different dark turquoise patterns.

Using 44" wide cotton I cut one 5-1/2" wide strip from each of the eight colors, one 5" wide strip from each of the two turquoise fabrics and four 5-1/2" wide and four 5" wide strips from the white fabric.

Next, I started assembling the strips, making four pieced strips by sewing one of the color strips on either side of a 5" wide white strip. I then cut eighteen 5-1/2" tall strips from the pieced color strips.

I then made two turquoise center pieced strips by sewing 5-1/2" wide strips of white on either side of the 5" wide strips of turquoise. I then cut nine 5" tall strips from the pieced turquoise center strips.

To make the nine patches I joined a color strip on either side of a turquoise center strip.

After making nine of the nine patches for the quilt I then cut them apart to make the blocks. I lined up my quilting ruler 2" from each of the seams and cut both vertically and horizontally.

When I was done cutting the nine patch apart the white was 2" wide and the turquoise was a 2" x 2" square.

I then trimmed down the outside edges down to make the disappearing nine patch blocks 7" x 7".

Next I made twelve edge blocks by cutting down the leftover pieced color strips. I cut the blocks 7" tall (5" of color fabric and 2" of white) and 5-1/4" wide.

I started assembling the rows by sewing together five disappearing nine patch blocks (turquoise square to the bottom right) with an edge block on the end (white strip down).

After making seven rows I made the bottom row by sewing together five edge blocks (white strip to the right) with a 5-1/4" x 5-1/4" square from one of the color fabrics on the end.

To finish the quilt top I sewed all of the rows together.

I finished the quilt with a light blue fabric for the backing and bound it with one of the turquoise fabrics that I used. For the quilting I sewed diagonal lines at a random spacing across the quilt.

I am really happy with how the quilt came out. I think it is bright and fun and I hope that Kristen's little girl will enjoy snuggling with it.


Thursday
Feb132014

Ribbon and Medal Display

Frank's (and now my!) middle niece is quite a swimmer and has amassed a ton of ribbons and medals from her swim meets. This year as I was trying to figure out what to make for her for Christmas I thought that building her a wall display so she could show off all of her awards would be fun.

After a little bit of brainstorming I came up with the idea of building a simple frame backed with some beadboard and using dowels inside the frame to hang the ribbons and medals on. I determined the dimensions based on being able to have two rows with a little extra space so it wouldn't look too crowded. If you are interested in building this yourself I have some instructions at the bottom of this post about how you can change the dimesions to fit your needs.

Supply List
- 2 - 1x2 @ 6' long
- 10' length of screen molding
- 2 - 3/8" dowels @ 2' long
- Hardboard double bead wainscot
- Package of 1/2" round wood furniture buttons
- 1/2" drill bit
- Nails
- Wood glue
- Paint

I started by cutting down some 1x2 boards to make the frame. In order to make sure the the opposite sides were the same length I clamped two boards together when making the cuts. I cut the two sides to be 36" and the top and bottom to be 20". 

Keeping the two sides clamped together I used a 1/2" drill bit to drill holes 1-1/2" and 18" from the top. I made the holes an 1/8" larger than the 3/8" dowels so it would be easy to slide them in.

I then used wood glue and my nailer to assemble the frame. I made stoppers for the dowels by plugging the left side holes in the frame by glueing in furniture buttons on the outside.

To add a little more detail I trimmed out the front of the frame using screen molding, mitering the corners for a clean look. I then used wood filler to patch my nail holes and sanded the piece smooth.

I cut down the hardboard to be 1/2" narrower and shorter than the frame and then glued and nailed it to the back.

I cut the 3/8" dowels down to 21" and the glued and nailed a furniture button on one end. This was a bit tricky and I split one of the buttons on my first try so I am glad I had a whole package.

I gave everything a coat of primer followed by two coats of paint. I added the top cleat of a Hangman French Cleat to the back for mounting.

To hang ribbons I put the dowel through the right hole and slipped on the ribbons. Once everything was on the dowel the dowel then slips into the hole on the opposite side of the frame. The furniture buttons act as stoppers and keep the dowel from going all the way through and hide the holes on the outside of the frame.

After opening her gift on Christmas Eve I hung up the display for Frank's niece in her room for her. The French Cleat that I used can hold up to 200 lbs. making it nice and secure. I attached the bottom cleat to the wall using drywall anchors. It has a cool feature where there is a level bubble in it making it very easy to line everything up.

I already had put the top cleat on the back of the display so we were ready to hang it on the wall. We then added all of her medals and ribbons and stood back to see how it all looked.

She loved it and was so proud to have the evidence of all of her hard work on display. She's a special little lady and I am so glad that she enjoyed her Christmas gift.

If you make this at home it is easy to change the dimensions for your needs. The length of your side pieces should be the desired height of your frame and the length of the top and bottom pieces should be 1-1/2" shorter than your desired width. The dowels should be about 1" longer than the top and bottom boards but it is dependant upon the wooden buttons you use so confirm that dimension before you cut. Happy building!

Thursday
Jul252013

Welcome Baskets for our Wedding Guests

One of the things that I wanted to do for our wedding was to prepare welcome baskets for all of our guests. I made up a fun girl themed basket for each of Frank's (and now my) three nieces and then made grown-up baskets for the rest of the wedding guests.

For the nieces (who Frank and I refer to as the Niecelets) I made up a basket in each girl's favorite color of purple, yellow and pink.

I had found the metal baskets at Target in the One Spot a while back. They were all hot pink so I used some spray paint to turn one purple and another one pink. When spray painting metal mesh like these baskets I have found it is important to spray it upside down, right side up and from different angles in order to get coverage over the whole mesh.

To assemble the baskets I crumpled a few sheets of white tissue paper to place in the bottom and then layered the goodies in the basket on top. I had a lot of fun shopping for the color coordinated items for the girls. Here is what each of the baskets contained:

- Flower lei
- Flip flops
- Glow in the dark bracelets
- Water bottles with twisty straws
- Dried Berry Cherry Blend from Traverse Bay Fruit Co.
Double Dark Chocolate Cherry Boomchunka Cookies from Cherry Republic
- Jump rope
- Stuffed animal
- Spiky, wiggle ball
- Three flavored lip glosses

On the front of each basket I wired some nylon flower and butterfly embellishments to dress up the baskets a bit more for fun. I thought they turned out really cute.

For the adults I decided to go with a cherry theme since Northern Michigan is famous for their cherries. In fact the Traverse City airport, which our out of state guests flew in to, is called the Cherry Capital Airport.

I found the baskets in the organization aisle at Meijer. They are woven onto a metal frame so I knew they would be strong enough to support the drinks that I had in the basket. Each of the baskets contained the following:

- Cherry postcard from Cherry Republic
Michigan's Traverse Bays and Mackinac Island Guide Book 
- Greetings from Traverse City postcard
- Bottle of water
- Dried Berry Cherry Blend from Traverse Bay Fruit Co.
- Double Dark Chocolate Cherry Boomchunka Cookies from Cherry Republic
- Henry Weinhard's Black Cherry Cream Soda
- Small tube of 30 SPF sunscreen
- Cherry Almond Oatmeal Soap from Cherry Republic
- Sparkling Cranberry Cherry Juice

To assemble everything I put a layer of white crinkle cut paper on the bottom of the basket and then nestled all of the items inside. I wrote notes to all of our guests and put their names on the outsides of the envelopes using fonts that matched our wedding invitations.

I put together the Niecelet baskets in advance, but since the car was going to be full of wedding items I left the seven adult baskets unassembled so that I could pack everything in a way to save space. Because I did a dry run at home to see how I would put everything together it only took about ten minutes to assemble the baskets once we got to the Inn. I was really happy with how the baskets turned out and all of our guests loved them.

Thursday
Jan032013

Doll Bed with Bedding & Patchwork Quilt

For Frank's youngest niece, who is seven years old, I decided to make a doll bed with bedding and a patchwork quilt to go with her American Girl doll for Christmas this year. 

To make the bed I used the plans from Ana White's amazing website to build the Farmhouse Doll Bed. Her instructions are super clear and it was easy to build. I finished it with spray paint primer and a few coats of white spray paint.

Next I needed to make a mattress and pillow for the bed. I bought some 1" foam and cut it to size to fit the bed frame, 14" x 19". To cover the mattress I cut a rectangle of fabric 17" x 22" to wrap around the sides and have a 1/2" seam allowance. I used a disappearing fabric marker to mark 1-1/2" from the edge of the fabric and then marked up 1/2" from the corner to know where I should stop sewing. I folded over the edges with right sides together and pinned it. 

I sewed along the line, stopping at the 1/2" mark line, clipped the excess fabric and then pressed the seam open. After doing this for all four corners I had created the top of a box for the mattress.

I then cut a piece of fabric 18" x 20" for the bottom and then pinned it to the top of my box, right sides together, lining up the edges. I sewed around the perimeter using a 1/2" seam and left an opening of a few inches. After turning it right side out I stuffed the foam mattress into the mattress cover and used a blind stitch to sew the remaining opening closed.

I made a simple rectangle pillow (two rectangles sewn together and stuffed) to complete the mattress and pillow for my bedding.

Next I made a small quilt for the bed. I chose a few fabrics I liked and cut several 3-1/2" squares from them. I laid out a 5 x 5 grid of the squares in a pattern that I liked.

I decided to add white sashing between the squares. I cut several strips white fabric 1-1/2" wide and then pinned all of the squares, except the right most row to the white strips. I then used a 1/4" seam allowance to sew the squares to the white strips. Next I ironed the seams flat toward the squares and separated the squares by cutting the white fabric between them. 

I sewed each row of the squares together with a 1/4" seam and then pressed the seam allowance flat towards the square. I then sewed a 1-1/2" strip of white to the top of each of the rows except for the top row.

I then joined the rows with a 1/4" seam and then I used white strips 2-1/2" wide to create a border around the quilt.

To prep the quilt for quilting I laid my backing fabric face down on the floor and taped it down. I layered my batting on top and then my quilt top face up. I smoothed everything out and then pinned through all of the layers. For my quilting I just sewed on the diagonal through the center of the squares.

To finish the quilt I trimmed the excess backing and batting and added teal binding around the edge of the quilt. For basics on how to add binding check out my lavender sachet post.

I think the doll quilt turned out really cute and I love how bright and colorful it is.

With the quilt complete I was excited to make the bed and see the final product all together. I think it all turned out great. 


I was so excited for Frank's niece to open the doll bed on Christmas and she really loved it. I had intended it for her American Girl doll, but she is an avid collector of stuffed ducks and within a few minutes of opening her presents she had two of her ducks tucked into the bed. It was so cute and it made me so happy to see her enjoying it.

Friday
Dec282012

Lavender Sachet

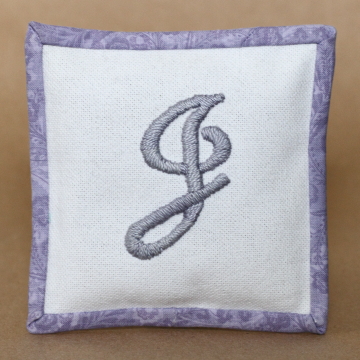
For Christmas this year I made Frank's mom a lavender sachet with her first initial embroidered on the front. I had some lavender that I dried from my garden so I thought that this was a perfect way to use it.

To make this sachet I used dried lavender, white embroidery linen, a fat quarter of cotton for the binding and backing, pearl cotton embroidery thread, white thread, a 4" embroidery hoop, an embroidery needle, a disappearing ink fabric marker, scissors, pins and my sewing machine. If you don't have a sewing machine you could make this completely by hand, it would just take a bit longer.

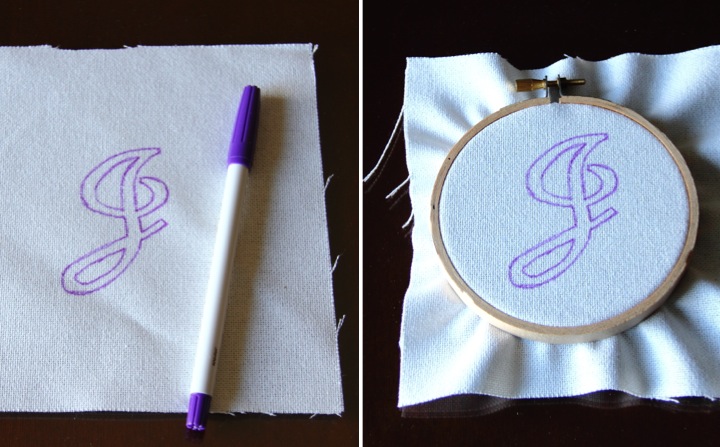
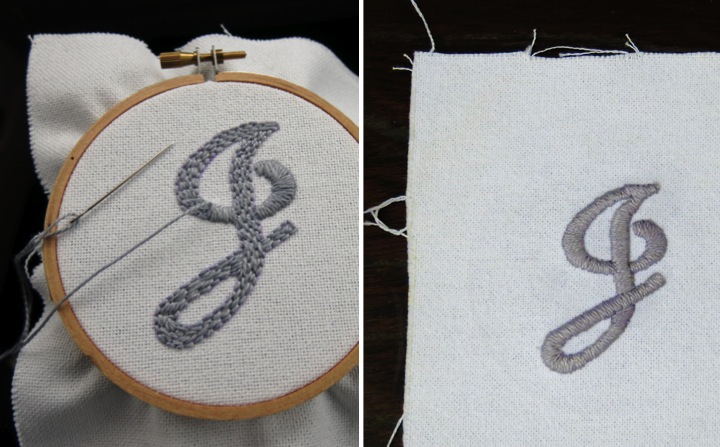
To start I cut a square of white embroidery linen a few inches larger than I wanted the final sachet to be, about 8" square. I then found a capital J in a script that I liked and traced it onto my linen with a disappearing ink fabric marker.

To be honest I just sized it to the way I wanted on my computer screen, held the linen over the screen and then traced it from there. It was not the most elegant solution but it was quick and easy since the screen acted as both my pattern and light box. After that I put the linen in a 4" embroidery hoop to hold the fabric taught while I embroidered the initial.
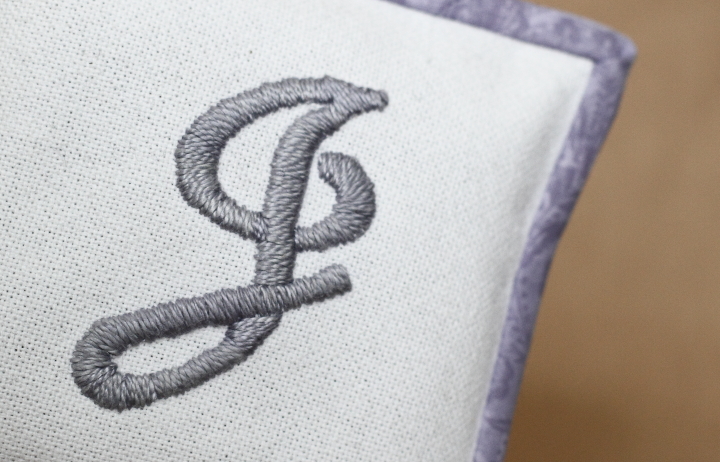
To give the initial a little dimension I decided I wanted to embroider it with a padded satin stitch, a technique where you fill in a shape with stitches before satin stitching over it in order to make the design raised.

I started by using some pearl cotton in a lavender-grey color to back stick around the outline that I had traced on the linen and then continued to fill in the design.
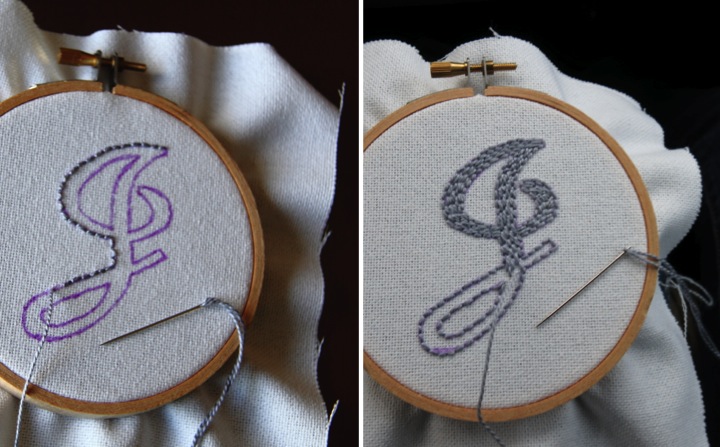
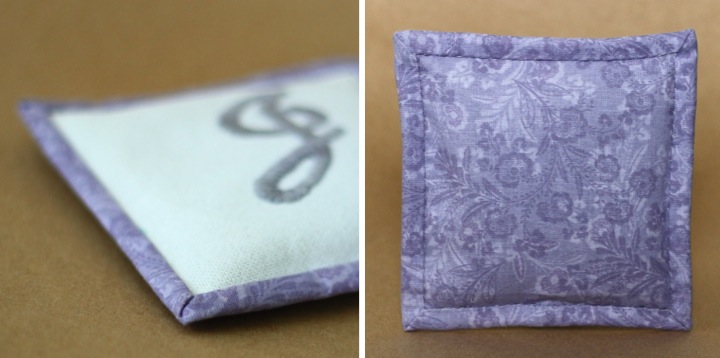
Once my initial was filled in I satin stitched over it, easing around the curves. With the embroidering complete I popped the linen out of the hoop, used a little water to remove any remaining trace of the marking ink, pressed the linen flat and trimmed it down to a 5" square centered on the initial.
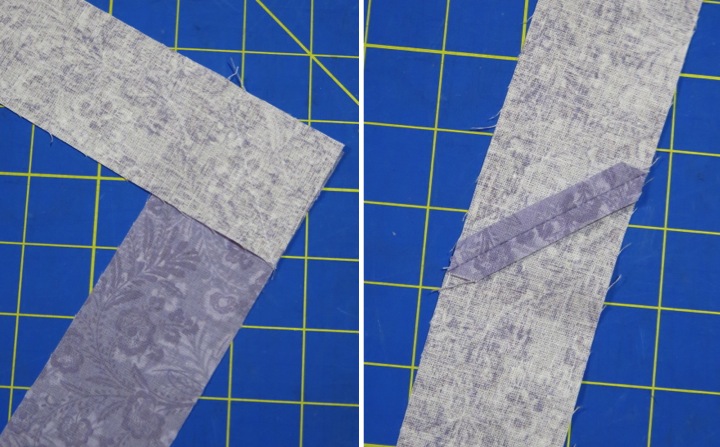
Next I made some binding for the sachet. My lavender-grey patterned fabric that I picked out was from a fat quarter so I needed to join some fabric to make the binding long enough. I cut two strips 22" wide and laid them right sides together perpendicular to each other. I then sewed on the diagonal to join them. After pressing the seam open and clipping the excess fabric I had a nice join. To complete the binding I folded it in half with the right side out and then pressed it flat.   
The next step was to attach the binding to the linen. I pinned it to the linen with the rough edge lined up to the outside edge of the linen. At the corners, I laid it across the top edge, folded the binding back on itself on an angle so it would line up with the side, and then folded it back down along the side edge. It is a little tough to describe in words, but I think it is clear in the pictures. I left several inches of excess tails along the bottom to sew together later. 
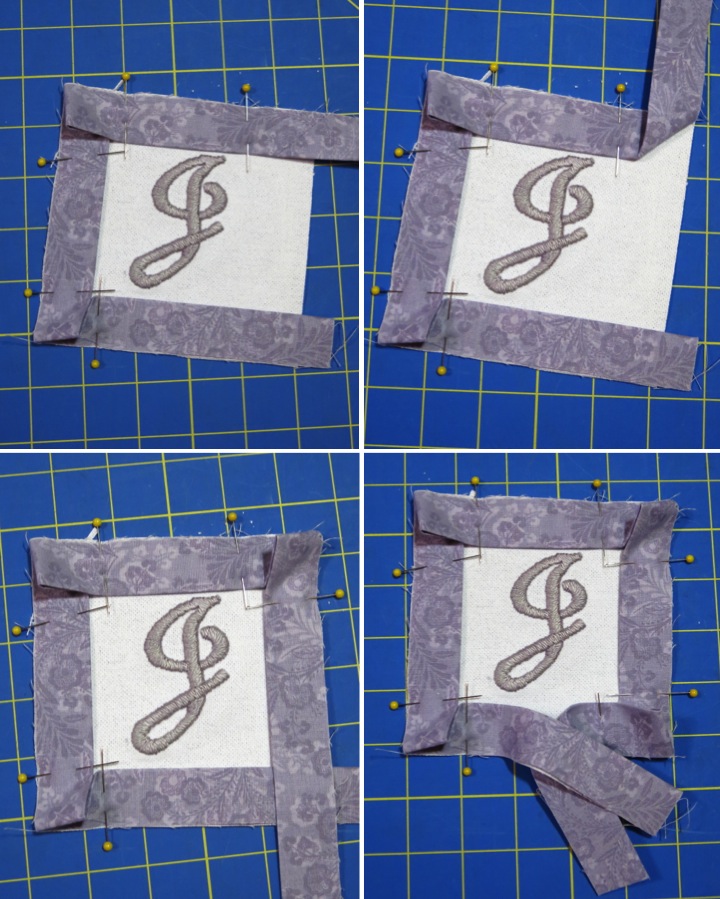
I sewed around the perimeter of the linen with a 1/4" seam. At the corners I did not sew to the edge and moved the flap of binding as I went so as to not trap the extra fabric in the corners. Also, I started and stopped fairly close (less than 1") to the corners on the bottom edge so that I had long enough tails to join my binding on the bottom.

To do the join, I opened up the binding and used my disappearing ink fabric marker to draw a line where the tails would meet. I pinned the tails together and then sewed along the line. I finger pressed the seam open and trimmed the tails. I then folded the binding back down and sewed the last section of binding to the linen. 
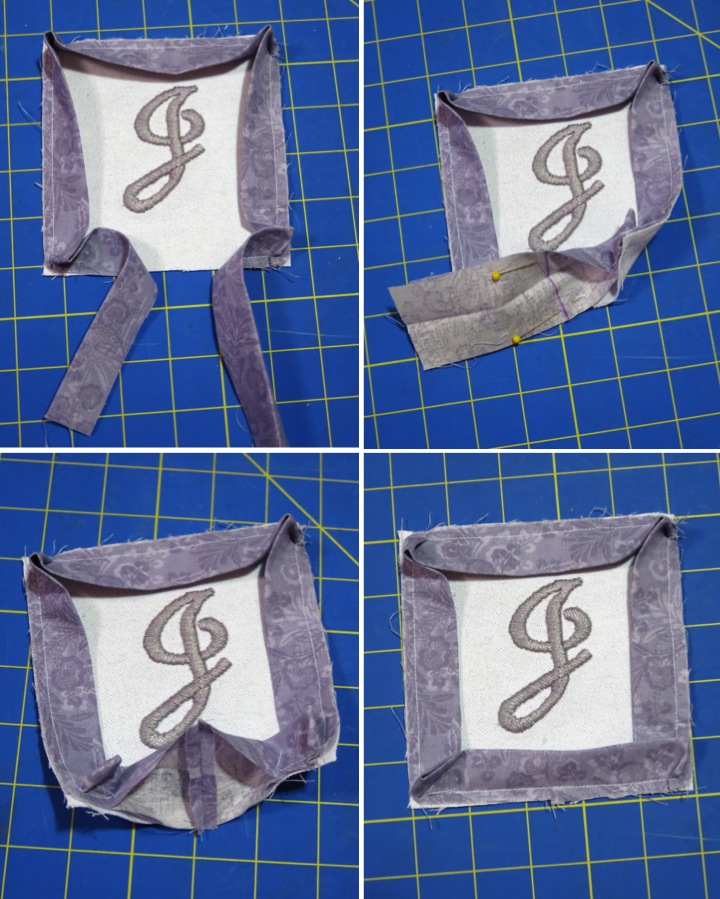
Next, I cut a 5" square out of my lavender-grey patterned fabric for the back. I placed my linen face down on my work surface, layered the back fabric on top, face up, and then pinned it all together. I then sewed around the edge, just inside the stitch line from the binding, leaving about a 2" opening at the bottom to add the lavender.
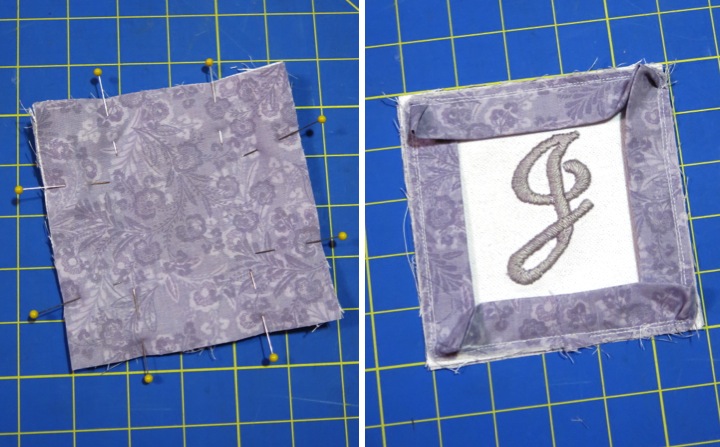
Since it would be hard to press once it was filled, I pressed the binding out flat now that my machine stitching was complete.

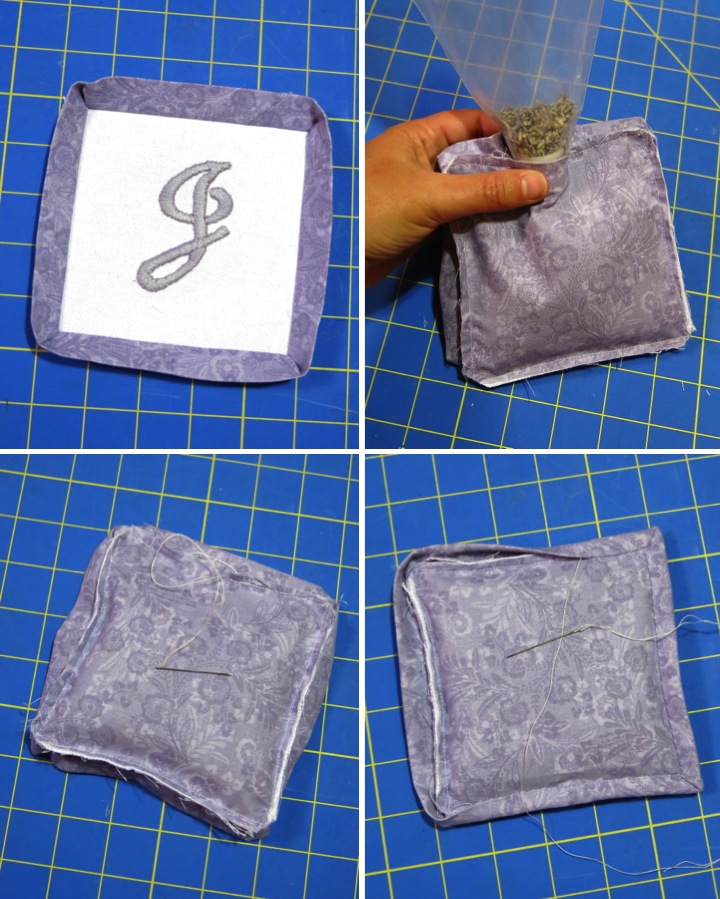
To fill the bag I used one of my disposable icing decorating bags to act as a funnel for the lavender, but you could use a regular funnel or make a cone from paper. Since I made the sachet rather large, I had to augment the lavender from my garden with some store bought in order to fill it. Once the sachet was full I hand stitched the opening shut. 

To complete the sachet I folded the binding over the rough edge and used a blind stitch to hand sew the edge of the binding to the back of the sachet. For the corners I tucked the extra fabric under for a nice clean look.
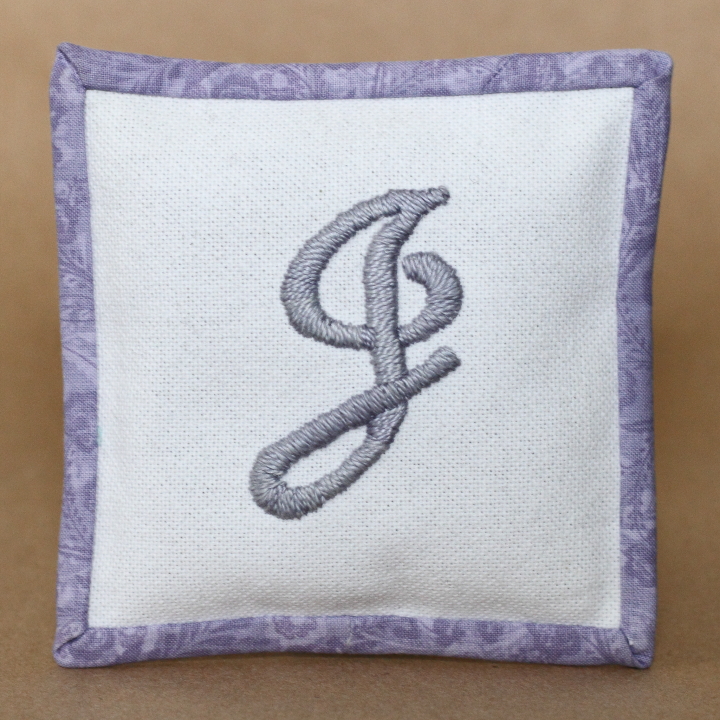
I am quite happy with how the sachet turned out. I think it looks so pretty and smells divine. Leading up to Christmas I had it on my dining room table and gave a light scent to the air. The best part was that Frank's mom loved it which is the most important thing of all.  
Thursday
Dec202012

Cake (and Cupcake) Decorating Kit

Frank's middle niece is ten years old and a pastry chef in the making. She loves to cook and especially loves to bake. She's always asked me a number of questions about cake decorating and even helped me decorate the Thanksgiving cake last year. I thought that for Christmas this year I would put together a beginning collection of her own cake (and cupcake) decorating supplies. 

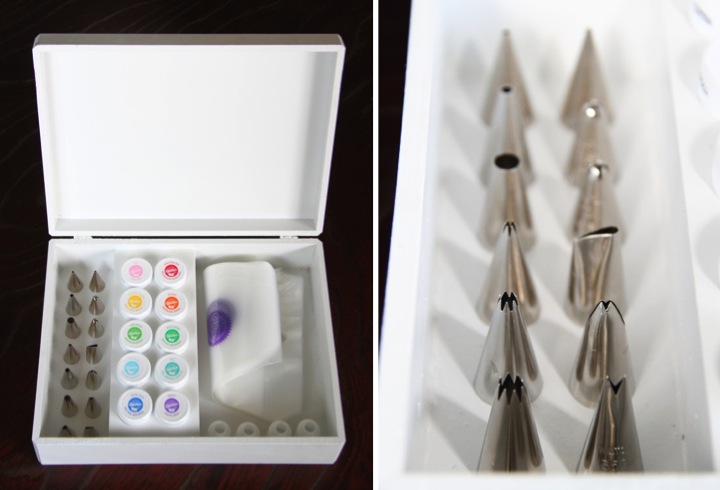
I didn't like any of the plastic decorating toolboxes that I saw available so I decided that I would make my own. Originally I planned on building my own box, but when I saw the perfect sized unfinished wooden box at Michael's I decided to buy it and just build the interior of the box to hold the supplies.

The first thing to build was a little caddy to hold the gel colors. I had a lot of frustration while building this but I'll outline what worked first and then explain what mistakes I learned along the way.

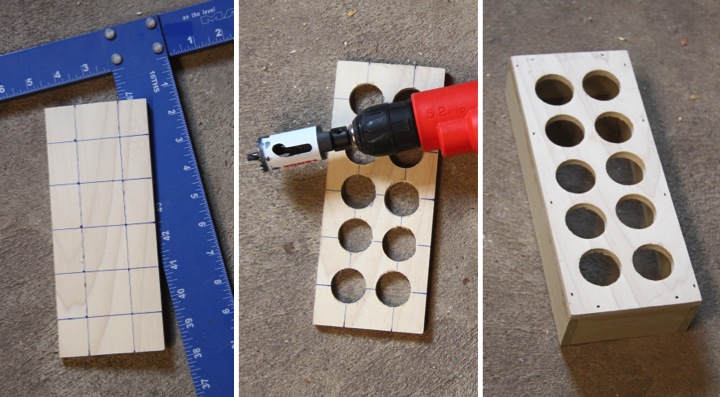
The box was 8-1/2" deep so I cut a piece of 1/4x4 craft board 8-1/2" long. I then marked center points for drilling my holes by drawing lines 1" from the outside edge, 1-1/4" from the top and bottom edge and then 1" spacing vertically between those lines. To make the holes I first pre-drilled a small hole at each line intersection and then used a 1-1/4" hole saw to drill the holes. I then finished up by building a box base with 1/4x2 craft board (2 pieces at 8-1/2" for the sides and 2 at 3" for the ends), attaching everything with wood glue and brad nails.

What I learned didn't work was mis-measuring the size of the gel color containers, using a 1-1/8" hole saw and then not realizing that the gel colors won't fit until you have already finished building the caddy. Also, trying to line up the hole saw without the pre-drilling the pilot hole led to a mess with the holes not lining up properly. All in all I had to build the little caddy three times before I got it right. That's what happens when you are tired and not thinking things through...

I filled the nail holes of the gel color caddy with wood filler and then sanded it and the box smooth. I wiped everything down with a tack cloth and then gave both pieces a coat of white spray paint with primer. I did this because I wasn't sure if I would be able to evenly coat the area under/inside the gel color caddy with paint after it was assembled.

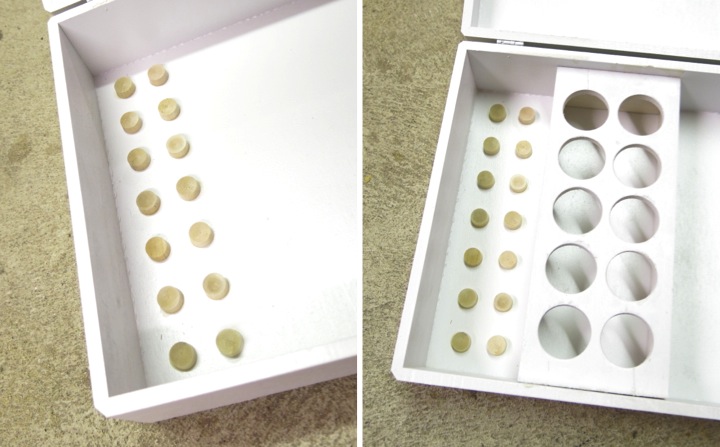
Once everything was dried I moved onto the area to store the decorating tips. At first I thought of cutting down a dowel but then had the idea to use 1/2" wooden hole plugs that I picked up at the hardware store. I lined them up with the wide side down in two rows along the left side of the box using some wood glue to attach them.

After the hole plugs were in place I put the gel color caddy inside the box, securing it with some wood glue and a few brad nails. I used some more wood filler to cover up the nail holes and fill in the seams where caddy met the box and then sanded everything smooth.

With the box built it was time to finish it. I used a few light coats of white spray paint of the inside and outside of the box.

I decided to add a stripe across the top of the box in purple which is Frank's niece's favorite color. I marked off the space with some painter's tape and then used some purple acrylic craft paint and a foam brush to paint the line. Since the color was dark it took three thin coats to get nice coverage.

I used some foam stickers to add the word "decorate" to the top of the box and it was ready to fill up with cake decorating supplies. I picked out a variety of gel colors and a bunch of decorating tips to put in the box. On the right side I added some 12" disposable decorating bags and some couplers.

I am so excited to give this to Frank's niece (along with some pretty decorating books) and show her some techniques. I hope that she likes it!

Tuesday
Dec182012

Triptych Jewelry Stand

For Frank's oldest niece, who is 13, I decided to make a jewelry stand and small DIY earring kit (I'll share it in another post) for Christmas this year. I thought it would be fun to make a triptych with a place for earrings in the middle and necklaces on the sides, sketched out a basic design and got started building.

The first step was to make the frames. I bought some 1x2 pine boards and cut my pieces with a 45 degree mitre on the ends. I cut 6 pieces at 11.5" for the sides, 2 at 10" for the top and bottom of the middle frame and 4 at 8.5" for the top and bottom of the side frames. I did a dry fit to make sure that everything fit together nicely and then used glue and brad nails to assemble the frames.

I used wood putty to fill my holes from the nails, sanded down the frames, wiped them with a tack cloth and gave them a coat of primer.

Next, I tackled adding the necklace hooks to the side frames. I chose tiny white 1/2" cup hooks since I thought they looked cute and dainty. I marked where I wanted my cup hooks to go with a 1" spacing between hooks and 3/4" from each edge and then used a 1/8" drill bit to predrill a hole in each spot. I started each hook with my fingers and then tightened them down using a small pair of vice grips.

My next step was to add the metal mesh to the center frame for the earrings to hang from. I had some leftover perforated metal from making my bathroom vent cover which I thought would be perfect. I used my tin snips to cut a piece of the metal down to the right size and placed it on the back of the frame. I cut some pieces of screen molding to cover the rough edges and then used some wood glue and my brad nailer to attach it over the top of the perforated metal. I used wood filler to fill the nail holes and sanded it smooth.

With each of the frames complete it was time to assemble everything. I used some small 1" hinges to join the frames together. I started by measuring up 1-1/2" from the ends on each side of the middle frame, positioning the hinges, and then marking where the screw would go. I then predrilled holes on the marked spots and used a precision screw driver to attach the screw hinges. Next, I lined up the side frames with the middle frame and repeated the process of marking where the hinge screws would go, predrilling holes and finally screwing in the hinge screws.

With my jewelry stand completed all that was left was a few coats of white spray paint to finish it off. I wanted to keep the perforated metal silver so I masked it off with painter's tape before spray painting.

I think that the jewelry stand turned out cute and I hope that Frank's niece likes it. I know I would have enjoyed it when I was 13!

How are your holiday presents coming along? Are you making anything fun?

Saturday
Dec152012

Terrasini Gift Scrapbook Album 

Earlier this year Frank and I went on vacation to Italy and stopped in the small Sicilian town of Terrasini, which is where Frank's paternal grandfather was born. Frank's great-grandfather and grandfather would head over to Detroit to work long hours in the auto industry and then head back to Sicily bringing money home. Frank's grandfather eventually decided to settle down in America and raise his family in Michigan.

We decided when we were planning our Italian trip that we wanted to see Terrasini. We took a boat from Naples to Palermo and then planned to take a day trip to Terrasini from there. We ran into a snag when we went to went to Palermo Centrale station and discovered that the TrenItalia website's timetable was not correct and the next train wasn't for a few hours. We had not come so far to be deterred and negotiated a good price with a taxi driver to take us to Terrasini. We had a wonderful day exploring the town and it was quite an experience to walk along the streets of his ancestors.

For Christmas this year I decided to make Frank's dad (who has never seen the town where his father was born) an album of the photos I took of Terrasini while we were there. I have a stash of albums and chose a 10" x 10" 7gypsies album with kraft cardstock pages and a kraft chipboard cover with wire binding.

To start I carefully removed the covers and pages from the wire binding so that I could have my pictures extend to the edge of the inside of the pages. I wanted to keep things simple and just used some brown patterned paper and cream cardstock for matting pictures inside the album. After finishing each page I flipped it face down and used an X-acto knife to cut out where my design had covered the square holes for the wire binding. When I finished the everything I reassembled the album.

To decorate the cover I cut up a piece of wrapping paper with a vintage map of Italy on it. Since Terrasini is on Sicily I put that section on the front and used another section of the map for the back. I added a small strip of brown patterned paper that I used throughout the book to set off the map from the chipboard cover. As an accent I cut out a star from a photograph of a statue in Terrasini (more about the statue later) and finished by adding a title with letter stickers.

On the front page of the book I enlarged a photo of one of the streets in Terrasini with the mountains in the background. I also cut out the some sign markers from a picture I took on the outskirts of town and placed them in the right corner.

The first place that Frank and I stopped in Terrasini was Piazza Duomo, the central square in town flanked by shops and cafes with Cathedral of Santa Maria delle Grazie sitting at the end. The stonework of the piazza was being replaced while we were visiting and I am sure it will look quite lovely when completed.

The streets and buildings in town were charming and I loved the small second floor balconies.

We walked out to the coast which was beautifully rocky and impressive, despite the cloudy day. For this section I enlarged a photo to 16" x 20" and trimmed it to span both pages of the spread.

The coolest part of the visit was stumbling upon this statue which has Frank's great-grandfather's name on it. From what we can tell it was erected by citizens of Terrasini who had worked in Detroit (one of those people being Frank's great-grandfather) in honor of a fallen World War I soldier. It was pretty amazing to come halfway around the world and see this.

We next walked a little out of town to try and find a second cousin of Frank's knowing only a street name that he had lived on a few years back. We walked up and down the street looking at the names on the gates but didn't find the name, unfortunately. It was a lovely area though with an abundance of orange trees and beautiful gardens.

We walked back through town with me taking more pictures along the way, of course.

On the final page I put an enlarged photo of some of the shops along Piazza Duomo along with a sign that we saw with Frank's grandmother's first name.

I am happy with the way the album turned out and I hope that Frank's dad enjoys it.

Have you made any scrapbook albums for gifts this holiday season?

1/3/2013 Update: Courtney requested in the comments that I provide an update on Frank's dad's reaction after I gave it to him. He really liked it and I saw him quietly looking through the album several times over the course of the evening as well as pointing out the family name on the statue to each of Frank's nieces.  It made all the effort worthwhile to see him enjoy the album so much.