Welcome

My name is Lisa and I'm a crafty girl with wanderlust working as an engineer by day. My blog chronicles projects in my home as well as pictures and stories from my travels.

Search


Instagram

Blog Index
The journal that this archive was targeting has been deleted. Please update your configuration.
Navigation

Entries in Sewing (19)

Monday
Jun092014

Monogram Baby Blanket

Today I thought that I would share a baby blanket that I made for my friend's little guy a few months back. His room is car themed so I when I found license plate flannel at the fabric store I knew that it would be perfect. I bought some plush red minky fabric to pair with it for the front of the blanket and I was ready to go.

I wanted to add a little bit of interest to the front so I decided to add a monogram to the front using felt. I created a design on the computer (a circle with his initials in it), printed it on the computer and cut it out of white and black felt. 

I cut down the red fabric to the size that I wanted and then worked on the monogram in the bottom right corner. I sewed down the white circle first and then layered the black ring and letters over it attaching it with a tiny hand stitch (like I did with these scarves).

I wanted to use the license plate flannel for both the backing and binding of the blanket so I cut it to be 3" wider and 3" longer than the red fabric.

I spread out the license plate flannel face down and then layered the red fabric over it face up, centered so that there was a 1-1/2" border of the license plate flannel around the perimeter of the red fabric. 

I folded the license plate flannel so that the edge touched the edge of the red fabric and then folded it over again, pinning it in place to make a 3/4" binding.

At the corners I trimmed away a little extra flannel and then folded the licence plate flannel so that it would create a mitered corner and pinned it in place.

I sewed the binding down and the blanket was done. I think that the blanket turned out cute and is definitely warm and snuggly. Perfect for such a sweet little man!

Wednesday
Mar052014

Baby Quilt for Kristen's Little Lady

My friend Kristen just had her first little one last month. She and her husband kept the gender of the baby a surprise so she decorated her nursery to be gender neutral and I drew upon the colors she was using for the baby quilt I made for her. Frank and I got to meet the baby (they had a girl!) a week and a half ago and she was so sweet and beautiful.

I made the quilt using a modified version of a disappearing nine patch. A disappearing nine patch involves making a nine patch block and then cutting it into four smaller blocks. I like to oversize things and then cut it down for a little more accuracy so I adjusted my piecing accordingly.

To make the quilt I used eight different colored fabrics, a patterned white fabric and two different dark turquoise patterns.

Using 44" wide cotton I cut one 5-1/2" wide strip from each of the eight colors, one 5" wide strip from each of the two turquoise fabrics and four 5-1/2" wide and four 5" wide strips from the white fabric.

Next, I started assembling the strips, making four pieced strips by sewing one of the color strips on either side of a 5" wide white strip. I then cut eighteen 5-1/2" tall strips from the pieced color strips.

I then made two turquoise center pieced strips by sewing 5-1/2" wide strips of white on either side of the 5" wide strips of turquoise. I then cut nine 5" tall strips from the pieced turquoise center strips.

To make the nine patches I joined a color strip on either side of a turquoise center strip.

After making nine of the nine patches for the quilt I then cut them apart to make the blocks. I lined up my quilting ruler 2" from each of the seams and cut both vertically and horizontally.

When I was done cutting the nine patch apart the white was 2" wide and the turquoise was a 2" x 2" square.

I then trimmed down the outside edges down to make the disappearing nine patch blocks 7" x 7".

Next I made twelve edge blocks by cutting down the leftover pieced color strips. I cut the blocks 7" tall (5" of color fabric and 2" of white) and 5-1/4" wide.

I started assembling the rows by sewing together five disappearing nine patch blocks (turquoise square to the bottom right) with an edge block on the end (white strip down).

After making seven rows I made the bottom row by sewing together five edge blocks (white strip to the right) with a 5-1/4" x 5-1/4" square from one of the color fabrics on the end.

To finish the quilt top I sewed all of the rows together.

I finished the quilt with a light blue fabric for the backing and bound it with one of the turquoise fabrics that I used. For the quilting I sewed diagonal lines at a random spacing across the quilt.

I am really happy with how the quilt came out. I think it is bright and fun and I hope that Kristen's little girl will enjoy snuggling with it.


Monday
May202013

Owl Baby Quilt for Haneen's Little Man

On Saturday night I went to a baby shower for my friend, Haneen, who is expecting a little boy. I decided to make her a baby quilt and wanted to create something bright and fun. When I stumbled across Forest Life in Retro by Michael Miller I knew it would be perfect to use in the quilt with its vibrant colors and whimsical animals.

With the Forest Life fabric as my inspiration I quickly sketched out a quilt design of a simple patchwork of squares broken up by a strip across the top. For an extra touch I decided I wanted to add an applique patterned after the owls in the fabric. 

I started by digging through my fabric scraps and fat quarters picking out some reds, oranges, yellows, greens and one aqua pattern. Along with some of the Forest Life print, I cut 49 5"x5" squares from my scraps that I had chosen. I arranged them into rows of 7 squares and then joined 2 rows for the top and 5 rows for the bottom of the quilt.

I then cut 2 strips of a coordinating striped fabric at 2" plus a white strip at 5-1/2". I completed joining the quilt together with the two rows of squares on top followed by one of the striped strips, the white strip, the second striped strip and finally the seven rows of squares on the bottom.

With the base of the quilt complete I was ready to make the owl applique. I picked out an owl and branch that I liked from the fabric and then photo copied them, enlarging by 200% to make a pattern.

I used the freezer paper method to make the applique. Using my photo copies as a pattern, I cut out the owl, branch and three leaves from freezer paper with shiny side of the paper face down. I then laid the freezer paper, shiny side face up on the wrong side of the fabric I was using and trimmed the fabric to 1/4" around the freezer paper. Folding the edges of the fabric around the pattern I ironed the fabric to the freezer paper, cutting slits in the fabric when necessary to ease around the edges. 

I placed my applique pieces on the quilt and used my iron again to temporarily tack the pieces in place and then used a blind stitch to permanently attach them. Once the appliques were sewn onto the quilt I turned the quilt over, carefully cut away the center of the area behind the applique and then pulled the freezer paper out.

I basted the quilt top to the batting with the Forest Life print for the quilt back and then quilted it with a straight pattern on either side of the seams.  I completed the quilt by adding brown binding around the edges.

Haneen really liked the quilt and I hope that her little man enjoys snuggling in it. 

This was my first time doing a freezer paper applique and it was really easy and fun, plus I think it turned out cute. I will definitely have to try it again sometime.

If you are interested, check out some of my other baby quilts: Alphabet Quilt, Pastel Patchwork Quilt, Neutral Diamond Quilt, Pink Stack Quilt and Doll Bed with Bedding and Patchwork Quilt

Wednesday
Feb272013

DIY Felt Accented Pillow Cover

I love throw pillows. I have what seems like a million of them and it is fun to have different covers to swap out and change the look of my rooms.

When I saw this pillow cover on Joss and Main I thought it looked really cute and I liked the dimension of the folded material. It reminded me of the first fold in making a cootie catcher when I was a kid. The fuschia color was not my style, but I liked the concept of the pillow so I pinned it to refer to later.

I decided to use the Pinterest Challenge hosted by Sherry, Katie, Michelle and Megan as an excuse to break out my sewing machine and make a throw pillow inspired by this pin.

To start I cut a bunch of 4" squares from various shades of blue and teal felt using my rotary cutter.

I then folded all of the points into the center and pinned them.

I arranged the little felt shapes on the front of a piece of pale tan linen and pinned them in place.

I sewed through the shapes across the centers and then removed the pins. I sewed the sides together (it's just a simple envelope cover), turned the pillow right side out and put a form inside.

I think the pillow turned out really cute and I loved how it looks on my couch. I especially like the fun dimension that the felt accents add. Sweet and simple!

If you are interested, check out my past Pinterest Challenge Projects: Shutter Organizer for My Craft Room & DIY Crown Molding Shoe Organizer for Heels

Thursday
Jan032013

Doll Bed with Bedding & Patchwork Quilt

For Frank's youngest niece, who is seven years old, I decided to make a doll bed with bedding and a patchwork quilt to go with her American Girl doll for Christmas this year. 

To make the bed I used the plans from Ana White's amazing website to build the Farmhouse Doll Bed. Her instructions are super clear and it was easy to build. I finished it with spray paint primer and a few coats of white spray paint.

Next I needed to make a mattress and pillow for the bed. I bought some 1" foam and cut it to size to fit the bed frame, 14" x 19". To cover the mattress I cut a rectangle of fabric 17" x 22" to wrap around the sides and have a 1/2" seam allowance. I used a disappearing fabric marker to mark 1-1/2" from the edge of the fabric and then marked up 1/2" from the corner to know where I should stop sewing. I folded over the edges with right sides together and pinned it. 

I sewed along the line, stopping at the 1/2" mark line, clipped the excess fabric and then pressed the seam open. After doing this for all four corners I had created the top of a box for the mattress.

I then cut a piece of fabric 18" x 20" for the bottom and then pinned it to the top of my box, right sides together, lining up the edges. I sewed around the perimeter using a 1/2" seam and left an opening of a few inches. After turning it right side out I stuffed the foam mattress into the mattress cover and used a blind stitch to sew the remaining opening closed.

I made a simple rectangle pillow (two rectangles sewn together and stuffed) to complete the mattress and pillow for my bedding.

Next I made a small quilt for the bed. I chose a few fabrics I liked and cut several 3-1/2" squares from them. I laid out a 5 x 5 grid of the squares in a pattern that I liked.

I decided to add white sashing between the squares. I cut several strips white fabric 1-1/2" wide and then pinned all of the squares, except the right most row to the white strips. I then used a 1/4" seam allowance to sew the squares to the white strips. Next I ironed the seams flat toward the squares and separated the squares by cutting the white fabric between them. 

I sewed each row of the squares together with a 1/4" seam and then pressed the seam allowance flat towards the square. I then sewed a 1-1/2" strip of white to the top of each of the rows except for the top row.

I then joined the rows with a 1/4" seam and then I used white strips 2-1/2" wide to create a border around the quilt.

To prep the quilt for quilting I laid my backing fabric face down on the floor and taped it down. I layered my batting on top and then my quilt top face up. I smoothed everything out and then pinned through all of the layers. For my quilting I just sewed on the diagonal through the center of the squares.

To finish the quilt I trimmed the excess backing and batting and added teal binding around the edge of the quilt. For basics on how to add binding check out my lavender sachet post.

I think the doll quilt turned out really cute and I love how bright and colorful it is.

With the quilt complete I was excited to make the bed and see the final product all together. I think it all turned out great. 


I was so excited for Frank's niece to open the doll bed on Christmas and she really loved it. I had intended it for her American Girl doll, but she is an avid collector of stuffed ducks and within a few minutes of opening her presents she had two of her ducks tucked into the bed. It was so cute and it made me so happy to see her enjoying it.

Friday
Dec282012

Lavender Sachet

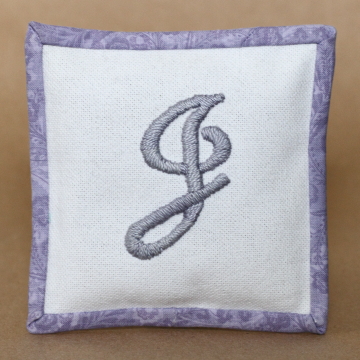
For Christmas this year I made Frank's mom a lavender sachet with her first initial embroidered on the front. I had some lavender that I dried from my garden so I thought that this was a perfect way to use it.

To make this sachet I used dried lavender, white embroidery linen, a fat quarter of cotton for the binding and backing, pearl cotton embroidery thread, white thread, a 4" embroidery hoop, an embroidery needle, a disappearing ink fabric marker, scissors, pins and my sewing machine. If you don't have a sewing machine you could make this completely by hand, it would just take a bit longer.

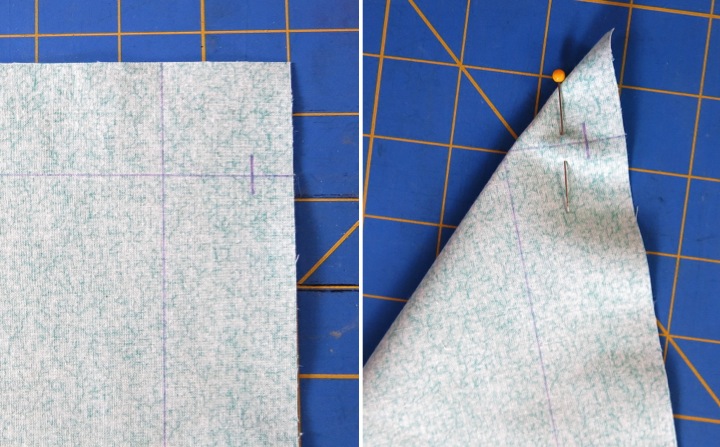
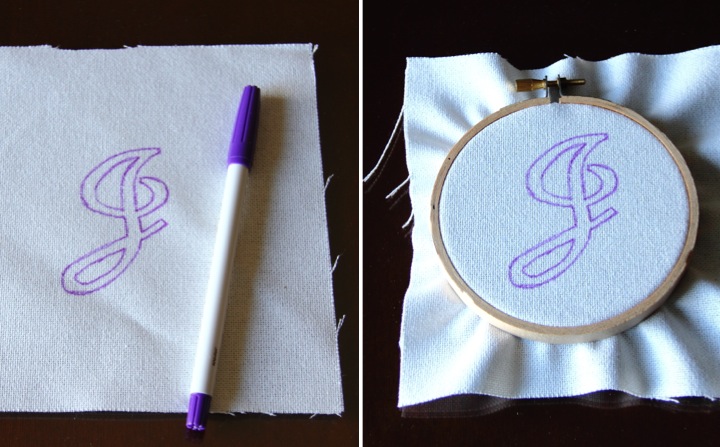
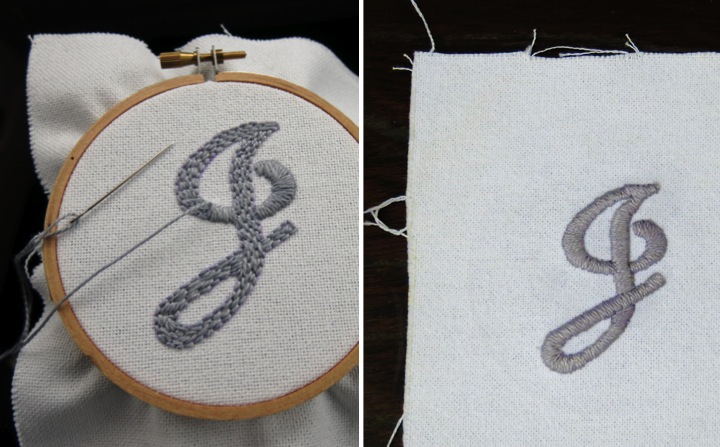
To start I cut a square of white embroidery linen a few inches larger than I wanted the final sachet to be, about 8" square. I then found a capital J in a script that I liked and traced it onto my linen with a disappearing ink fabric marker.

To be honest I just sized it to the way I wanted on my computer screen, held the linen over the screen and then traced it from there. It was not the most elegant solution but it was quick and easy since the screen acted as both my pattern and light box. After that I put the linen in a 4" embroidery hoop to hold the fabric taught while I embroidered the initial.

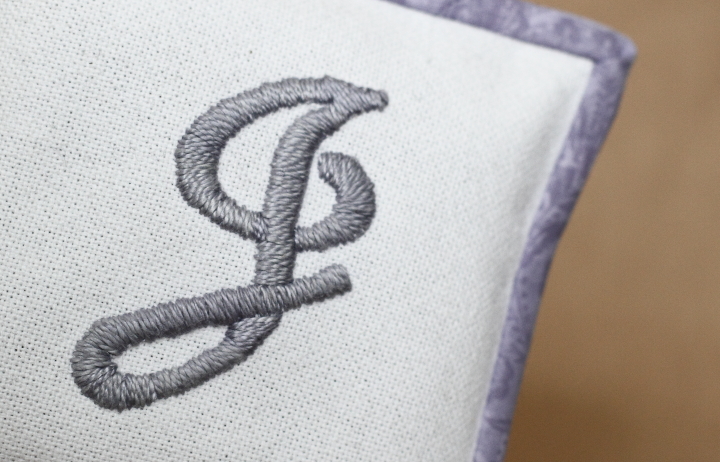
To give the initial a little dimension I decided I wanted to embroider it with a padded satin stitch, a technique where you fill in a shape with stitches before satin stitching over it in order to make the design raised.

I started by using some pearl cotton in a lavender-grey color to back stick around the outline that I had traced on the linen and then continued to fill in the design.

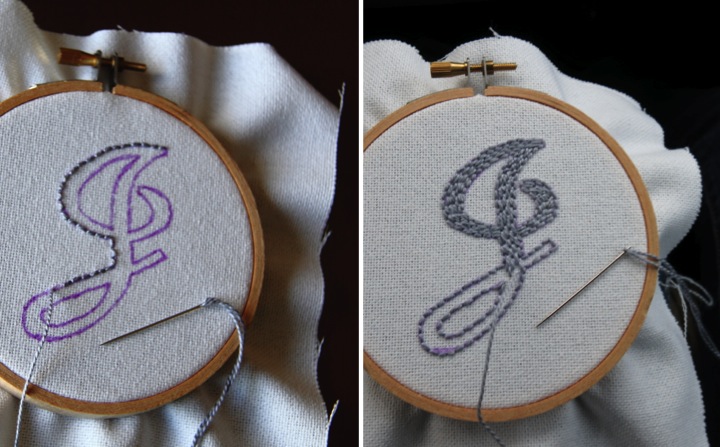
Once my initial was filled in I satin stitched over it, easing around the curves. With the embroidering complete I popped the linen out of the hoop, used a little water to remove any remaining trace of the marking ink, pressed the linen flat and trimmed it down to a 5" square centered on the initial.

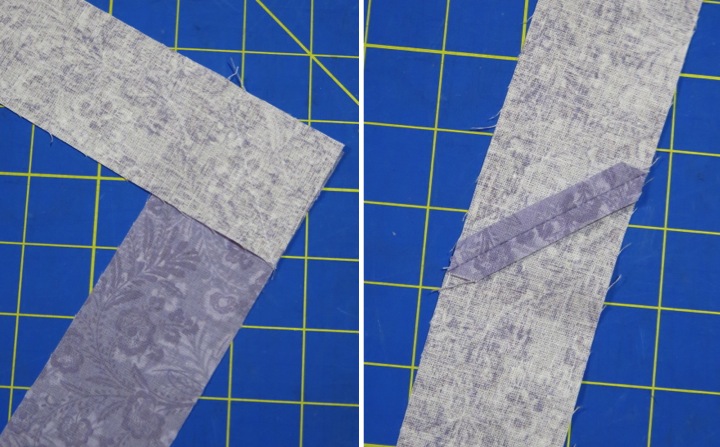
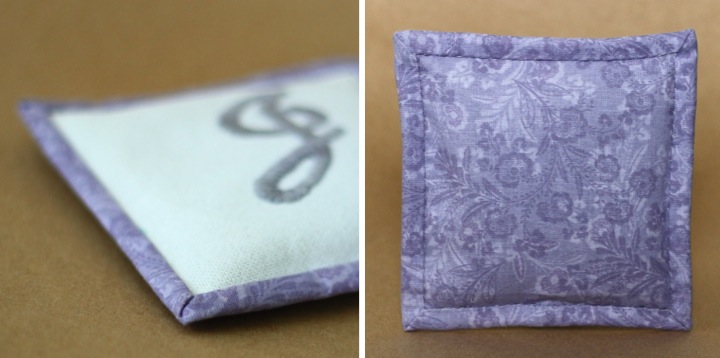
Next I made some binding for the sachet. My lavender-grey patterned fabric that I picked out was from a fat quarter so I needed to join some fabric to make the binding long enough. I cut two strips 22" wide and laid them right sides together perpendicular to each other. I then sewed on the diagonal to join them. After pressing the seam open and clipping the excess fabric I had a nice join. To complete the binding I folded it in half with the right side out and then pressed it flat.   

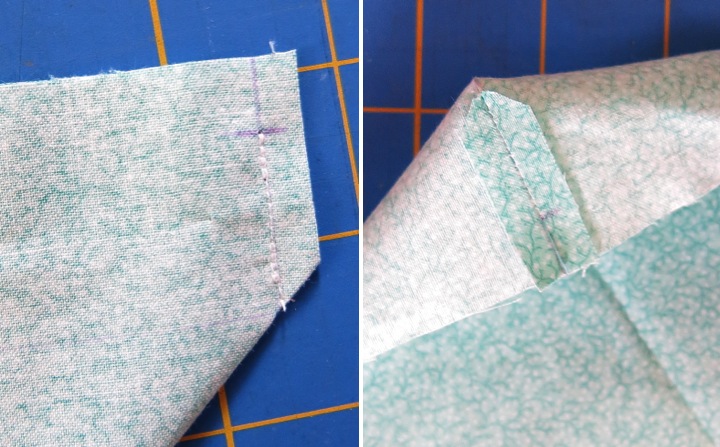
The next step was to attach the binding to the linen. I pinned it to the linen with the rough edge lined up to the outside edge of the linen. At the corners, I laid it across the top edge, folded the binding back on itself on an angle so it would line up with the side, and then folded it back down along the side edge. It is a little tough to describe in words, but I think it is clear in the pictures. I left several inches of excess tails along the bottom to sew together later. 

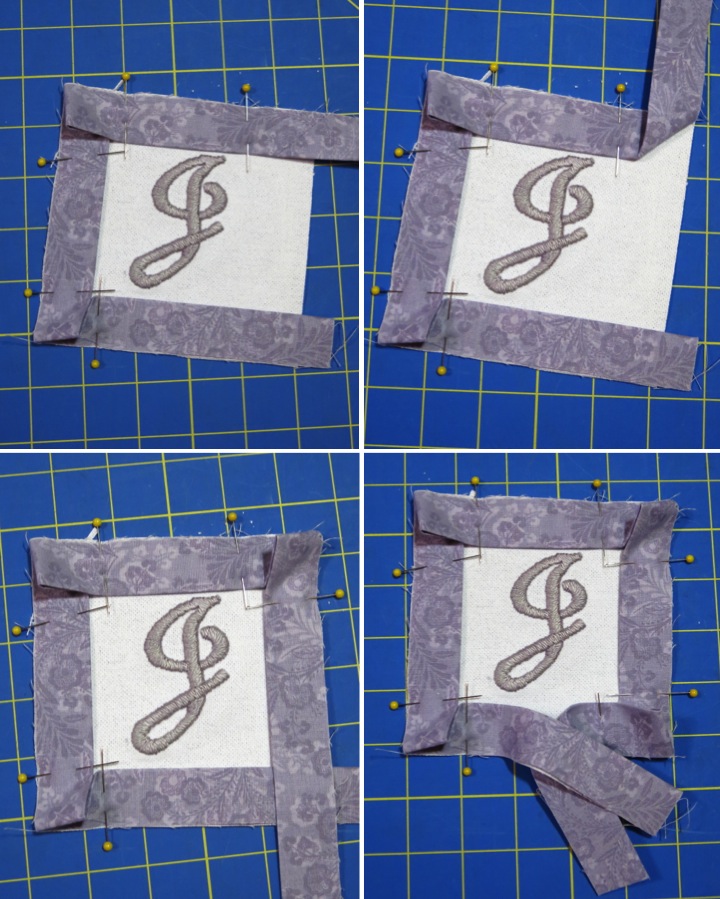
I sewed around the perimeter of the linen with a 1/4" seam. At the corners I did not sew to the edge and moved the flap of binding as I went so as to not trap the extra fabric in the corners. Also, I started and stopped fairly close (less than 1") to the corners on the bottom edge so that I had long enough tails to join my binding on the bottom.

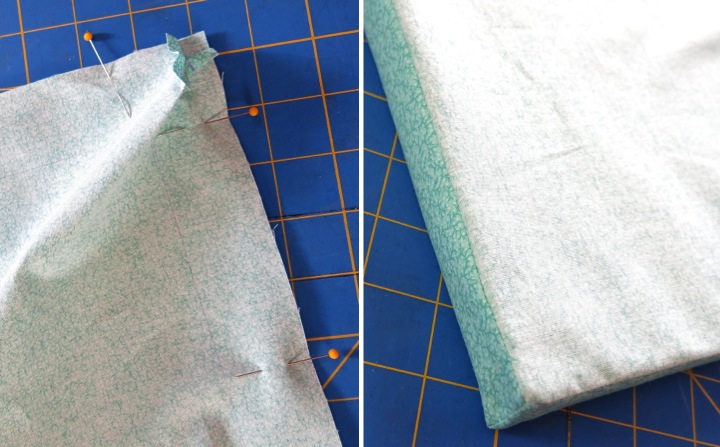
To do the join, I opened up the binding and used my disappearing ink fabric marker to draw a line where the tails would meet. I pinned the tails together and then sewed along the line. I finger pressed the seam open and trimmed the tails. I then folded the binding back down and sewed the last section of binding to the linen. 

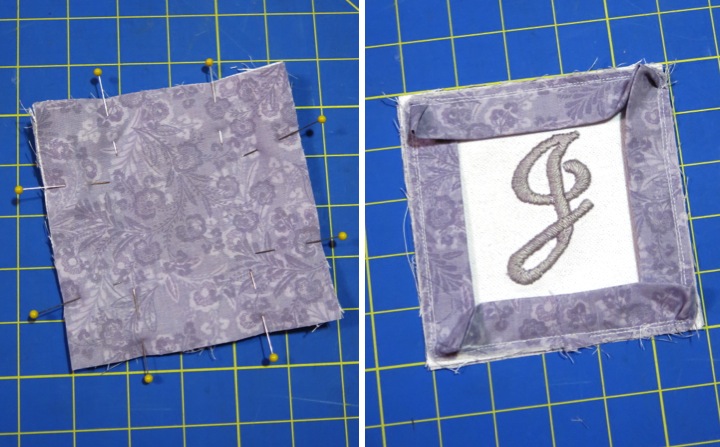
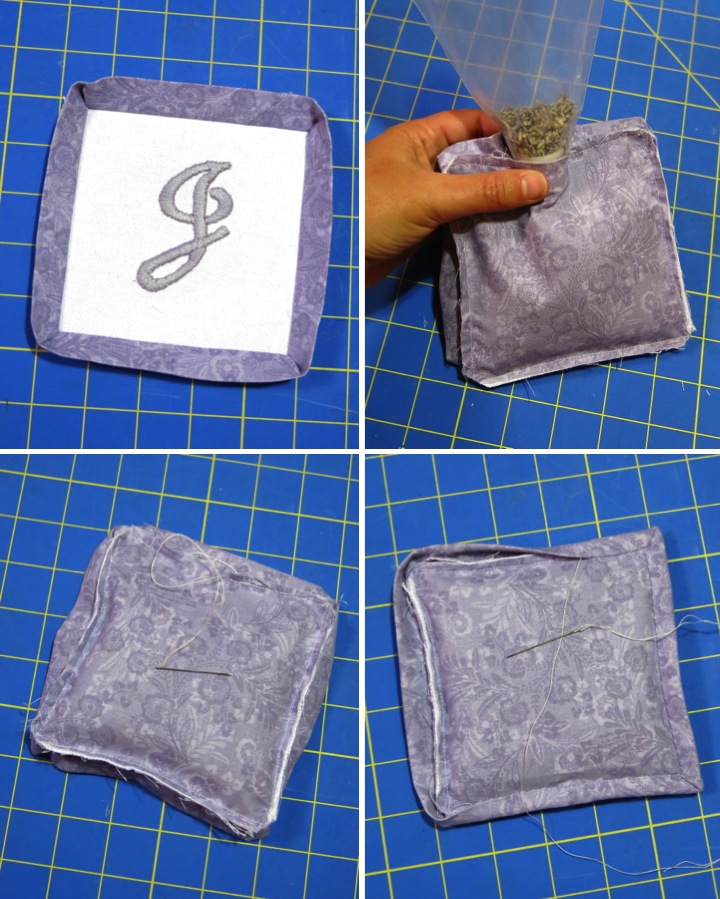
Next, I cut a 5" square out of my lavender-grey patterned fabric for the back. I placed my linen face down on my work surface, layered the back fabric on top, face up, and then pinned it all together. I then sewed around the edge, just inside the stitch line from the binding, leaving about a 2" opening at the bottom to add the lavender.

Since it would be hard to press once it was filled, I pressed the binding out flat now that my machine stitching was complete.

To fill the bag I used one of my disposable icing decorating bags to act as a funnel for the lavender, but you could use a regular funnel or make a cone from paper. Since I made the sachet rather large, I had to augment the lavender from my garden with some store bought in order to fill it. Once the sachet was full I hand stitched the opening shut. 

To complete the sachet I folded the binding over the rough edge and used a blind stitch to hand sew the edge of the binding to the back of the sachet. For the corners I tucked the extra fabric under for a nice clean look.

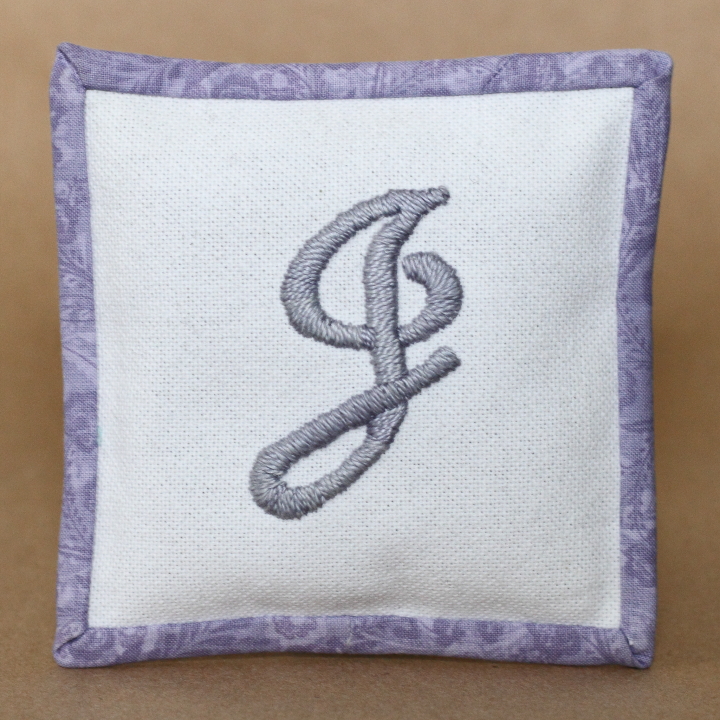
I am quite happy with how the sachet turned out. I think it looks so pretty and smells divine. Leading up to Christmas I had it on my dining room table and gave a light scent to the air. The best part was that Frank's mom loved it which is the most important thing of all.  

Tuesday
Jul032012

Making A Child's Apron from a Tea Towel

A special little lady that I know is turning ten so I decided to make her an apron for her birthday since she loves to cook and help out her mom in the kitchen.

As I was trying to figure out what fabric to use I happened to see this cute tea towel and I thought it would be perfect to turn into the apron. The tea towel is made from durable twill and I love the graphic silverware motif along the bottom.

I started by measuring 6" in from the top of the towel and 10" down on each side and used a disappearing ink marker to draw a line between the marks. I drew a parallel line 1" (my ribbon width plus a little extra for my seam) from the original line and then used my rotary trimmer to cut off the excess 1/2" past the second line.

I placed the tea towel right side down on my ironing board and then ironed over the edge along the outermost line. I then folded over the edge again, ironing along the inner line. I pinned it down and then sewed 7/8" of an inch from the folded edge which gave me a channel for my ribbon. I then repeated the same step for the other side. When I was finished I used some water to rinse away the marking guidelines that I had made.

I cut 7' of ribbon and threaded it from the bottom of one channel up to the top and then from the top of the other channel back down. This gave me a loop to go over the neck and then ties for around the back. I trimmed the ribbon on an angle and then used a dab of fray check to make sure it wouldn't unravel.

The measurements that I used worked for the dimensions of my tea towel and the size of the little lady I am making this for. If you are trying this, you may need to adjust according to your needs to make things proportional. Also, my ribbon is grosgrain and seems to stay in place, but if you use something more satiny that is slippery, you may want to add a stitch or two to keep the ribbon in place or knot the ends of ribbon so it doesn't slide out.

The project was really easy to make and I think it turned out cute. I hope that the birthday girl likes it!

Tuesday
Apr242012

DIY Stuffed Duck

I made this little stuffed duck for a sweet young lady's sixth birthday. She loves ducks and has a stuffed duck collection so I thought that I would make her one to add to her growing flock. 

To make the little duck I started with the pattern from Martha Stewart's washcloth duckies and modified it to fit my needs. I enlarged the pattern by 400% on a photo copier, pinned the pattern to some cream colored fake fur and cut out the pieces. Later when I was piecing the duck together I found that with the pattern enlarged the oval bottom piece was way too big and I had to cut it down to a circle to make it all still work.


Duck Body Assembly

I pinned the right sides of the two duck body pieces together and sewed around the edges, leaving the bottom open. I then pinned the bottom circle to the opening of the body and sewed around the edge leaving an opening for turning. I pulled the body right side out through the opening, stuffed it using polyfill and hand stitched the opening shut. Wherever I had joined two pieces the fur was caught in the seam, so using the eye side of a needle I teased the trapped fur out which made the seam invisible.

Wing Assembly
For the wings I followed the same basic process as the body: pinned right sides together, stitched around the edge leaving a small opening, turned right side out, stuffed with filling and then hand sewed the opening shut. After finishing the wings I hand sewed them to either side of the body and then tweezed out the fur trapped in the wing seams just like I had on the body.

Final Touches
To make the duck bill I cut out an elongated oval from gold felt and then ironed it in half. I then pinned it open onto the front of the duck's head and attached it by backstitching along the iron line. I finished up the duck by sewing on black buttons for eyes.

Have you ever made any stuffed animals? How did they turn out?

Wednesday
Apr112012

Baby Quilt for Audry's Little Lady

Like the baby quilt I made for my friend, Susan, I also made this quilt for Audry while I was living in Japan back in the Spring of 2009. Since Audry's style is a little more modern I was inspired by some quilts I saw online at West Elm to make this baby quilt for her little girl.

To make the quilt I chose five fat quarters in different patterns of pink fabric and sewed a strip of 24" wide cream fabric on either side of the fat quarters. I then cut 3-1/2" strips from the resulting pieces I had made. 

To make the quilt top I then arranged 18 of the strips, staggering the way they lined up to make a fun pattern. Once I had everything the way I liked I sewed the strips together and then trimmed the excess cream fabric off so that the quilt top was a nice rectangle. It came together fast and was probably the simplest design I've ever used for making a quilt.

I finished the quilt with a pink backing fabric and cream binding. I think that the end result was a cute quilt that works with Audry's style. Now I need to get finishing the quilt that I have started for her little boy...

If you are interested, check out some of my other quilts: Baby Quilt for Vanessa's Little ManBaby Quilt for Susan's Little LadyBaby Quilt for Carla's Little Man

Monday
Apr022012

DIY Drink Coasters

As a part of a wedding shower gift for my friend, Kristen, I decided to make drink coasters. I had purchased some bar related items from her wedding registry and thought this would be a nice compliment to the gift.

To make the coasters I used white twill fabric, 3/8" navy grosgrain ribbon and white thread. I wanted the coasters to be 4" square so I started by cutting two 5" squares from my twill (4" plus 1/2" seam allowance) for each coaster.

I cut four 5" lengths of ribbon for each coaster and pinned them to the top of a twill square 1" from the edge. To tack the ribbons in place I sewed around the twill 1/4" from the edge and removed the pins. I then pinned a second twill square to the beribboned square with right sides together. I sewed around the edges with a 1/2" seam allowance leaving a 2" gap for turning the coaster right side out. After I finished sewing I clipped the corners and ironed the seams flat before turning it right side out. I ironed the coaster again and then finished it by using a blind stitch to close up the gap.

The fun thing about the coasters is that if you are using them for wine glasses you can slide the ribbons around the base of the glass and the coaster will stay attached to the glass. For wine glasses with a smaller sized base my pattern would need to be tweaked to place the ribbons closer to each other and for larger ones the ribbon should be a little farther apart. Cheers!