Welcome

My name is Lisa and I'm a crafty girl with wanderlust working as an engineer by day. My blog chronicles projects in my home as well as pictures and stories from my travels.

Search


Instagram

Blog Index
The journal that this archive was targeting has been deleted. Please update your configuration.
Navigation

Entries in Crafts (42)

Monday
May202013

Owl Baby Quilt for Haneen's Little Man

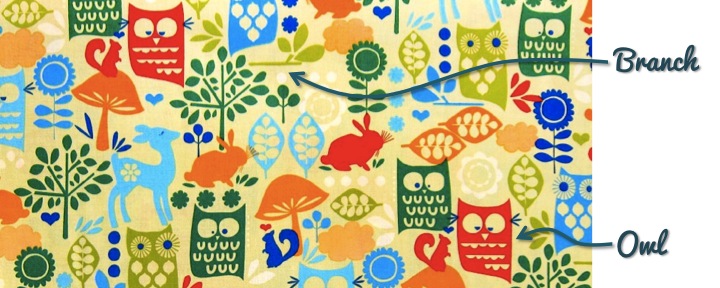
On Saturday night I went to a baby shower for my friend, Haneen, who is expecting a little boy. I decided to make her a baby quilt and wanted to create something bright and fun. When I stumbled across Forest Life in Retro by Michael Miller I knew it would be perfect to use in the quilt with its vibrant colors and whimsical animals.

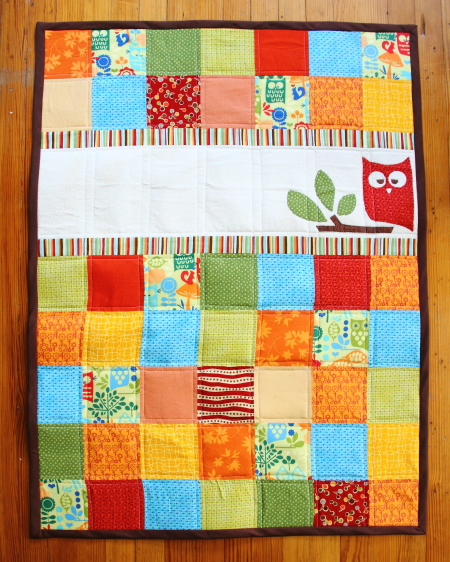
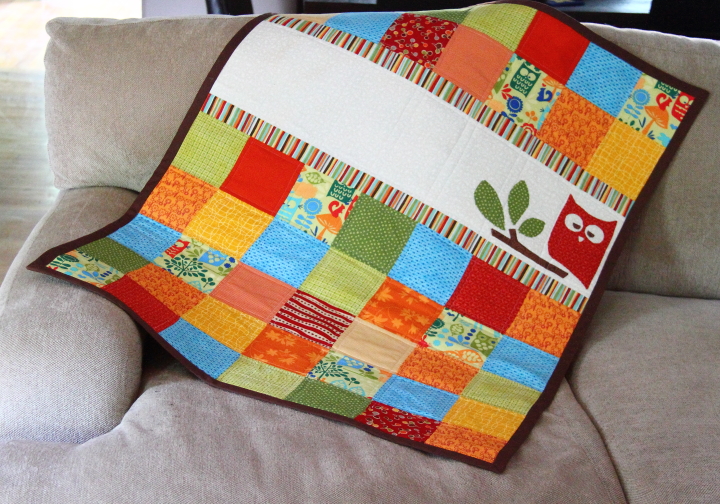
With the Forest Life fabric as my inspiration I quickly sketched out a quilt design of a simple patchwork of squares broken up by a strip across the top. For an extra touch I decided I wanted to add an applique patterned after the owls in the fabric. 

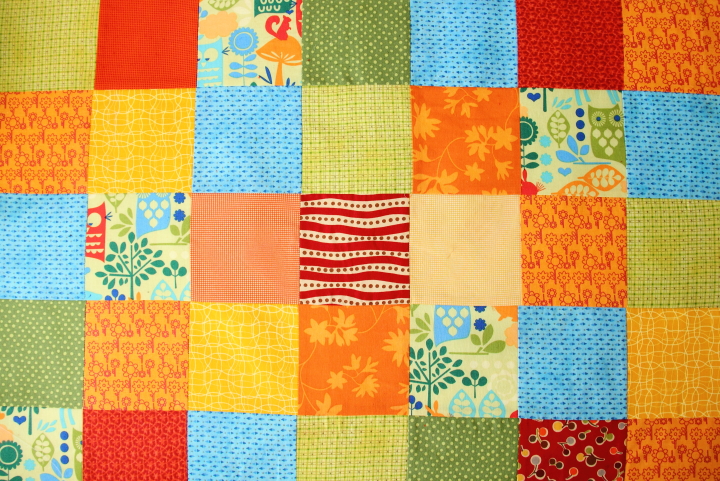
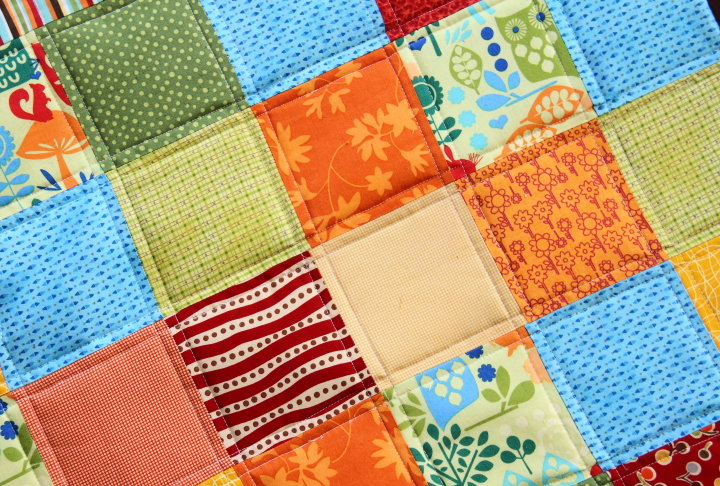
I started by digging through my fabric scraps and fat quarters picking out some reds, oranges, yellows, greens and one aqua pattern. Along with some of the Forest Life print, I cut 49 5"x5" squares from my scraps that I had chosen. I arranged them into rows of 7 squares and then joined 2 rows for the top and 5 rows for the bottom of the quilt.

I then cut 2 strips of a coordinating striped fabric at 2" plus a white strip at 5-1/2". I completed joining the quilt together with the two rows of squares on top followed by one of the striped strips, the white strip, the second striped strip and finally the seven rows of squares on the bottom.

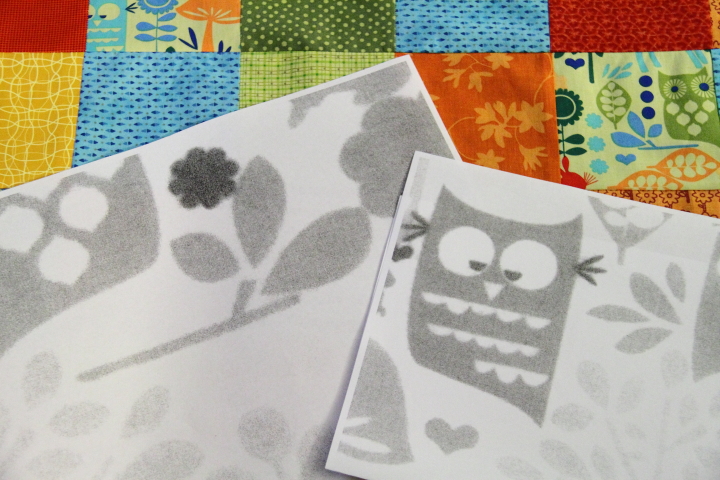
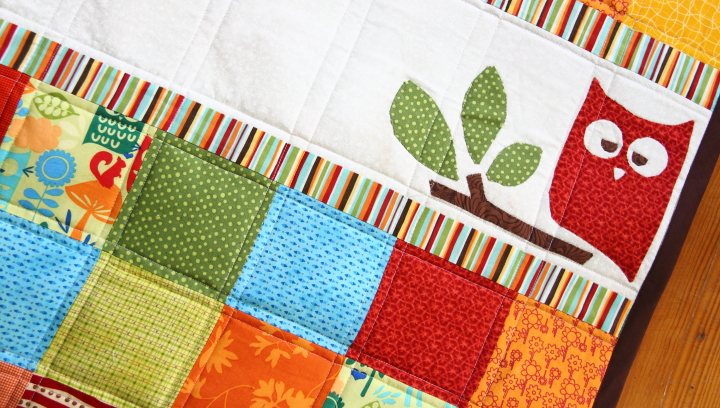
With the base of the quilt complete I was ready to make the owl applique. I picked out an owl and branch that I liked from the fabric and then photo copied them, enlarging by 200% to make a pattern.

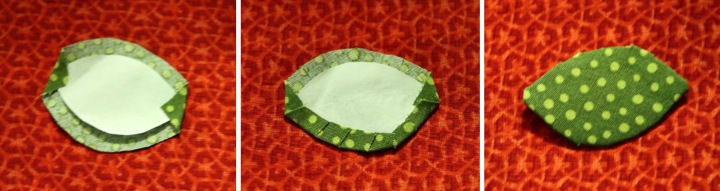
I used the freezer paper method to make the applique. Using my photo copies as a pattern, I cut out the owl, branch and three leaves from freezer paper with shiny side of the paper face down. I then laid the freezer paper, shiny side face up on the wrong side of the fabric I was using and trimmed the fabric to 1/4" around the freezer paper. Folding the edges of the fabric around the pattern I ironed the fabric to the freezer paper, cutting slits in the fabric when necessary to ease around the edges. 

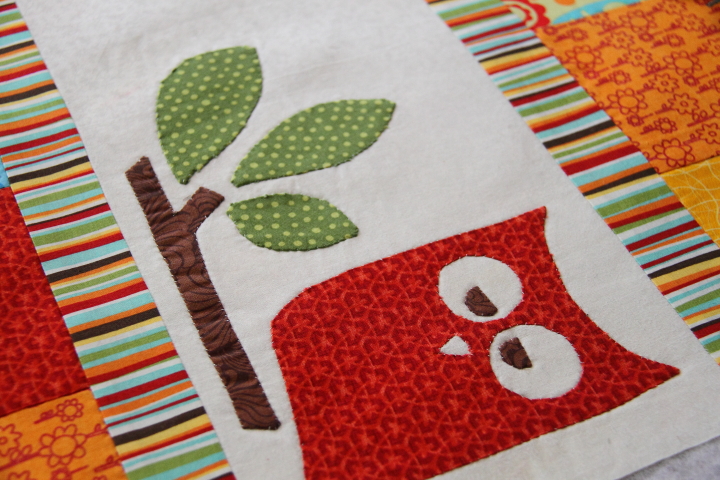
I placed my applique pieces on the quilt and used my iron again to temporarily tack the pieces in place and then used a blind stitch to permanently attach them. Once the appliques were sewn onto the quilt I turned the quilt over, carefully cut away the center of the area behind the applique and then pulled the freezer paper out.

I basted the quilt top to the batting with the Forest Life print for the quilt back and then quilted it with a straight pattern on either side of the seams.  I completed the quilt by adding brown binding around the edges.

Haneen really liked the quilt and I hope that her little man enjoys snuggling in it. 

This was my first time doing a freezer paper applique and it was really easy and fun, plus I think it turned out cute. I will definitely have to try it again sometime.

If you are interested, check out some of my other baby quilts: Alphabet Quilt, Pastel Patchwork Quilt, Neutral Diamond Quilt, Pink Stack Quilt and Doll Bed with Bedding and Patchwork Quilt

Monday
Jan282013

Project Life: Early January

This weekend I finally had a chance to get working on my Project Life album. Instead of doing a spread for every week I am doing a spread every time I have enough pictures to fill up the pockets. This particular layout covers January 2-9. Living alone and not having kids, I am afraid that my daily life spreads (i.e. when I am not traveling) are mostly going to be about food and this layout is no exception.

I purchased the Seafoam Core Kit of Project Life insert cards and while I love the color scheme, it didn't quite go with my photos for this spread. I think what I am going to do to give my album a cohesive look is to use the black, white and grey from the Seafoam Kit and then add in one other accent color for each spread based on my photos. For this particular spread, red seemed an obvious choice to add in.

Starting from the top left corner, I took a photo from a restaurant Frank and I visited and added the name with some foam letter stickers with a band of grey cardstock.

In the top right corner I used a grid 4x6 card for the background and added a title with washi tape and rub-on letters. Since the rub-on letters are not repositionable, I tore off long pieces of the red washi tape and placed them on a piece of waxed paper. Waxed paper works great as a temporary surface because the washi tape will easily peel right off. I added the words to the washi tape with the rub-ons and then was able to adjust the title exactly how I wanted on the card before trimming the excess tape.

Working across the middle row from the left, I made a title block with some letters sticker, metal letters and some black and white washi tape. Next, I wrote some journaling about a favorite place to go on Saturday nights followed by some masala chai teat that I made and my attempts to get my craft room organized.

In the bottom left corner I divided a grid card into quadrants with lines of black cardstock and used red foam stickers to add a title. The little grey icon is from one of the 3x4 Seafoam Kit cards that I cut out to use as an accent.

The bottom right corner has a simple strip of journaling with grey cardstock and a slice of one of the grid cards. The little red dots are periods from the red foam letter stickers I used on the previous pocket card. 

On the right page of the layout, I made an enlargement of one of the photos that I took at the Michigan vs. Nebraska basketball game. We got the tickets last minute and they were pretty far away so the picture isn't the greatest but I still like it.

I downloaded pictures of the Michigan and Nebraska logos and made a design with them and the score in Power Point. I then printed it out on one of the grid cards. Along the bottom I added some grey patterned paper and a strip of black cardstock to make a journaling space under the title block.

This is only my second Project Life spread but I am having fun so far. Hopefully I can keep up for the year!

Supply List
Project Life Core Kit - Seafoam Edition
Project Life 4" x 6" Grid Cards
Project Life 3" x 4" Grid Cards
Project Life Photo Pocket Pages - Design A
Project Life 12" x 12" Page Protectors
Large red letter stickers: Unknown
Small red and grey letter stickers: lily bee design, Picket Fence Collection ABC Stickers
Red foam letter stickers: American Crafts
White foam letter stickers: American Crafts
White rub-on letters: Making Memories
Red washi tape: Target
Black and white washi tape: Love My Tapes, White Diagonal Line On Black Washi Tape
Saturday cardstock sticker: Little Yellow Bicycle
Black cardstock: Bazzill

Have you been doing any scrapbooking lately? What have you been working on? 

Tuesday
Dec182012

Triptych Jewelry Stand

For Frank's oldest niece, who is 13, I decided to make a jewelry stand and small DIY earring kit (I'll share it in another post) for Christmas this year. I thought it would be fun to make a triptych with a place for earrings in the middle and necklaces on the sides, sketched out a basic design and got started building.

The first step was to make the frames. I bought some 1x2 pine boards and cut my pieces with a 45 degree mitre on the ends. I cut 6 pieces at 11.5" for the sides, 2 at 10" for the top and bottom of the middle frame and 4 at 8.5" for the top and bottom of the side frames. I did a dry fit to make sure that everything fit together nicely and then used glue and brad nails to assemble the frames.

I used wood putty to fill my holes from the nails, sanded down the frames, wiped them with a tack cloth and gave them a coat of primer.

Next, I tackled adding the necklace hooks to the side frames. I chose tiny white 1/2" cup hooks since I thought they looked cute and dainty. I marked where I wanted my cup hooks to go with a 1" spacing between hooks and 3/4" from each edge and then used a 1/8" drill bit to predrill a hole in each spot. I started each hook with my fingers and then tightened them down using a small pair of vice grips.

My next step was to add the metal mesh to the center frame for the earrings to hang from. I had some leftover perforated metal from making my bathroom vent cover which I thought would be perfect. I used my tin snips to cut a piece of the metal down to the right size and placed it on the back of the frame. I cut some pieces of screen molding to cover the rough edges and then used some wood glue and my brad nailer to attach it over the top of the perforated metal. I used wood filler to fill the nail holes and sanded it smooth.

With each of the frames complete it was time to assemble everything. I used some small 1" hinges to join the frames together. I started by measuring up 1-1/2" from the ends on each side of the middle frame, positioning the hinges, and then marking where the screw would go. I then predrilled holes on the marked spots and used a precision screw driver to attach the screw hinges. Next, I lined up the side frames with the middle frame and repeated the process of marking where the hinge screws would go, predrilling holes and finally screwing in the hinge screws.

With my jewelry stand completed all that was left was a few coats of white spray paint to finish it off. I wanted to keep the perforated metal silver so I masked it off with painter's tape before spray painting.

I think that the jewelry stand turned out cute and I hope that Frank's niece likes it. I know I would have enjoyed it when I was 13!

How are your holiday presents coming along? Are you making anything fun?

Friday
Dec142012

Small Gift Crate

With Christmas fast approaching I am busy finishing making my holiday gifts.  As a personal touch for some of the purchased items I decided to make little crates to hold the gifts. I used 1/4" poplar craft boards and made them in about half an hour. My dimensions are to fit these spices that I bought for gifts in the Caribbean when I was visiting my sister last month, but the design is so simple that you can easily modify it to fit whatever gift you are giving. 

Cut List:
1 - 1/4x4 @ 7-1/2" for bottom
2 - 1/4x4 @ 2-3/4" for ends 
4 - 1/4x1/2 @ 7-1/2" for side slats 
6 - 1/4x1/4 @ 7-1/2" for side slats  

To start use wood glue to attach a 1/4 x 1/4 slat to each edge of the bottom piece. Next, use more glue to add both ends to the crate. 

Attach a 1/4 x 1/2 slat on each side, aligning them with the top of the ends. Fill in bothe sides with the remaining slats, putting another 1/4 x 1/2 slat centered in the middle with two more 1/4 x 1/4 slats in between.

In addition to the wood glue I used my brad nailer to hold each of the slats and the ends together and make it a little sturdier. If you don't do that be sure to clamp the crate until the the glue has fully dried. 

To finish, I filled the holes with wood putty, sanded everything smooth and gave the crates a coat of navy blue spray paint.

I think the crates turned out great and can be used by the recipient for small storage later. Quick, easy and cute!

Wednesday
Nov142012

Ribbon Organization for My Craft Room

So, as I have mentioned before, my craft room is a hot mess and I am trying to do something about it. Unfortunately, it is turning into a bit more of a marathon rather than a sprint, but at least I am slowly making some progress.

One of those organization projects that I have been working on was to figure out a way to store my ribbons. Previously I have stored them in glass Burken jars from Ikea. It looked pretty sitting on a shelf, but practically it didn't really work for me. The ribbons would get tangled and if I wanted to find a particular ribbon I would need to dump the whole jar out to find what I was looking for.

A few months ago I had pinned an idea to organize embroidery floss by wrapping it around clothespins onto my Organization Board on Pinterest. I thought that the idea would work equally well for my ribbons and decided to give it a shot. I picked up a few packs of clothespins (a set of 50 will run under $3) and I was on my way.

Wrapping the ribbons, especially the wide ones, took a little practice to find a good way to make it work, but once I did I was on a roll and got everything wrapped in no time. I would start and the top of the clothespin and wrap the ribbon back around on itself to secure the end. I would then wrap up and down the clothespin, overlapping the ribbon a little bit for each turn around. Once it was completely wrapped I gently pressed the prongs a bit to open the clothespin and secure the tail end between the prongs. 

To store the ribbons I bought some cute wire bins at Target for $2.50 each and then sorted them into warm colors, cool colors and neutral colors. Now it is super easy to find what I am looking for by rummaging through the bins. I also don't have to deal with tangles and as an added bonus it looks cute, too.

Have you been doing any organizing? Do you have any tips for keeping your craft supplies neat?

Wednesday
Oct312012

Halloween in Japan (With a Hello Kitty Piñata Tutorial, Of Course)

Halloween is such a part of American culture it seemed hard to let it pass unnoticed while I was living in Japan. Another one of the American expats, who was from Arizona, was keen to host a Halloween party at his place and thought a piñata would be a perfect addition. Actually, he really just wanted an excuse to have a piñata and Halloween fit the bill since candy was involved.

He had looked online to see if there was any way to get piñata sent to Japan. When he came up with no leads, he asked me if I knew how to make one knowing I was crafty. I had never done it before but I always like trying new things so I agreed to help out.

Since we were in Japan we quickly settled on Hello Kitty as our piñata subject. To make the form we used two large balloon with the pointed ends tilted out for the ears. To fill in the space and make the head oval we blew up a little balloon and placed it in between the ears using a little bit of tape to hold the balloons together.

Next we paper-mached the balloons. We made paper mache paste mixing together 1 part flour to 2 parts water. We cut up pieces of newspaper into 1" strips, dipped  them into into the paste and layered them over the balloons. In order to get a strong piñata we made sure to cross the strips and put on several layers.

Once the paper mache was dry we popped the balloons, cut a hole in the bottom, filled it with candy and taped the flap back shut. Finally it was time to decorate. We cut up squares of white paper, crinkled them, put a dab of glue on the back of the middle and pressed them onto the form. I used some black duct tape to make eyes and whiskers and an oval of yellow paper for the nose. With a red bow from the Hyaku-en Store the Hello Kitty piñata was complete and ready for the party. If you want to make your own piñata just arrange balloons into the form you want and then follow the rest of my instructions.

My friend lived in an American style apartment complex that had a courtyard and he figured out a way to string up the piñata between two of the buildings and a small tree. I apologize for the crappy pictures but it was nighttime and even I am not so dorky that I would bring a tripod to a party.

The piñata was a big hit (haha, I am punny!) at the party. We had made it a good strength and it took 18 people before it was finally brought down. Most of the people in attendance were not Americans (a mix of Japanese, Europeans and Australians) and so they didn't get the whole "rush to gather the candy after the piñata breaks" part of the tradition. I, of course, love candy so I was gathering it up by myself while everyone else looked on like I was crazy. More for me, right? Well, actually I figured that I had an unfair advantage since this was not my first piñata so I passed the candy around.

All in all it was a really great night and the piñata was a fun, non-traditional addition to the Halloween evening.  

Sunday
Oct282012

Mini Pumpkin Wall Art for Fall

After making my sweater vase I thought I would create some wall art to continue with my Autumn decorating in my living room. I wanted something that would work for both Halloween and Thanksgiving and figured that mini pumpkins would be a perfect fit.

I came up with the idea of mounting the pumpkins in a little three by three grid and headed to Lowes to figure out a good idea of something to serve as a mounting board. I toyed with the idea of planking together some boards, but when I saw that I could get a 1/2" thick 2' x 2' oak plywood panel for $8.50 I was sold on that solution. I picked out the panel with the prettiest grain and picked up some white mini pumpkins on my way home.

With supplies in hand I started by staining the plywood with Watco Danish Oil in Dark Walnut. I like using it because it is really easy and you can't really screw it up. That's my kind of staining! After you prep your surface by sanding and wiping it down, you simply flood it with the Danish Oil and use a rag to spread it around until the whole surface is covered. After letting it penetrate for half an hour you apply the Danish Oil in the same way again. Fifteen minutes later you wipe off the excess and your piece is ready to use eight hours later. Here is my plywood before and after I stained it:

Since I was using plywood I had to figure out a way to cover the rough edges. I decided using some white iron-on melamine banding would be fun and help set it off from the wall. The edging I had was 3/4" thick and I thought it would look neat if the board seemed thicker so I took some scraps that were 1/4" thick and used wood glue to attach them around the perimeter on the back. After that I simply cut the lengths of the banding that I needed and ironed it onto the edge.

Next up I tackled the mini pumpkins. I had purchased white ones, but they are really cream colored and I thought a true white look would be better for my project, especially since I had used the white band for the plywood. That was an easy fix with a can of white spray paint. With two light coats of matte white I think the pumpkins almost look like little ceramic sculptures.

Once everything was dry I was ready to start assembling. On the back of the board I marked the center and then marked the remaining eight locations for pumpkins in a grid with 5" spacing. I drilled pilot holes at each of the locations and then started 2" screws in each hole. To mount the pumpkins I held them over the pilot hole in the front and the drilled the screw from behind the plywood into the pumpkin.

With the pumpkins mounted I thought it looked really cute but needed a little finishing touch. I took some scraps of white vinyl contact paper cut it into 1/4" wide strips and made a border around the pumpkins.

I think my mini pumpkin wall art turned out really cute. It is festive, but the neutral color scheme doesn't clash with the colors in my living room.

Are you doing any decorating for fall? Have you ever spray painted pumpkins?

P.S. If you are interested, I've gathered together a gallery of my autumn related posts: Gallery of Fall Posts & Projects

Friday
Oct262012

DIY Sweater Vase

I've been wanting to do a little fall decorating in my living room but since it is neutral color scheme with light green and teal accents I was a little stumped about what to do until I thought of making this little sweater vase. Since it is definitely sweater weather around here in Michigan it has a fall vibe even though I used a turquoise sweater to match the room.

Making the vase is super simple and doesn't require much time or energy. All you need for supplies is a round vase and a sweater you don't mind cutting up. My vase is a dollar store find and I picked up the sweater at a thrift store. The only thing that you need to be careful about is to make sure that the sleeves of the sweater will slip over the vase snugly and not be too loose.

To make the vase I trimmed one of the sweater sleeves about an inch longer than the glass vase. I then slipped it over the vase aligning the cuff with the top of the vase. To finish it off I tucked the extra edges under along the bottom. Super easy-peasy!

I decided to place some solidago in the vase since it has a lime green color and seemed to evoke fall to me. I paired the sweater vase with a small ornamental kale in a white Ikea pot and a tiny cream colored pumpkin. I think it looks really cute together and is quite seasonal without using traditional autumn colors.

The other thing that I really like about this little sweater vase is that I can easily use this in the winter, perhaps by putting some holly branches or evergreens in the vase and swapping out the pumpkin for a glass ornament.

Are you doing any fall decorating? What seasonal items do you have in your home?

P.S. If you are interested, I've gathered together a gallery of my autumn related posts: Gallery of Fall Posts & Projects

Tuesday
Oct232012

Craft Room Cleanup Giveaway: Fall Supplies

This is what my craft room looks like right now.

Yes, I am embarrassed. Yes, I know it's a hot mess. Yes, I am aware that there is a distinct possibility that house elves have moved into that warren of chaos without my knowledge. It's time for me to get my tush in gear.

I have some small pockets of organization in the room like my shutter organizer and my fabric storage but they are buried behind a wall of clutter right now. I need to clean up, purge and make this a useable work space again.

My hoardng problem is your gain because as I sort out my craft supplies and figure out what I don't really need I am going to give them away. My plan is to fill up USPS Priority Flat Rate boxes and host giveaways here on my blog with the first one happening today.

Since it is Autumn right now I thought I would load this first box up with Fall inspired goodies. I've got lots of papers (over 100 sheets) for scrapbooking or card making in earth tone and jewel tone hues as well as a bunch of embellishments like ribbons, stickers, decorative tape, chipboard shapes, etc. Most of the items are just autumnal by color palette but there are a few specific Thanksgiving and Halloween things thrown in for good measure. Below is a sampling of what is included.

All you have to do to enter is comment on this post telling me a favorite fall memory or what you love about fall.

You can submit additional entries with separate posts doing one of the following:
Like my page on Facebook (Post what name you liked me under)
Follow me on Pinterest (Post what name you followed me under)
- Pin one of my posts to Pinterest (Post a link to your pin)

Only posts on my blog (not on facebook) will count as entries and you can have a maximum of five total entries.

Some Rules:
- To be eligible you must be 18 years of age or older and have a shipping address in the US  (sorry, international shipping for such a heavy box is really pricey)
- Entries will close on Thursday October 25, 2012 at 12:00 Noon EST
- The winner will be chosen by a random number generator based on the posts
- I will notify the winner by email and they will have 72 hours to confirm with a valid US address  
- This prize is being provided by Home and Away With Lisa from my craft room stash and I am not being compensated in any way for this giveaway

Tuesday
Sep252012

Fall Gourd Table Centerpiece

Autumn has hit Ann Arbor with a vengeance. It seems like just yesterday we were dealing with late summer temperatures in the nineties. The last few weeks have become downright chilly and I even had frost on my car yesterday morning.

In embracing the change of seasons I decided to do a little decorating on my dining room table. I have a large glass cloche that I have on my table with a vase under it usually and so I thought I would change out the display with a stack of little gourds on a bed of moss.

A few months back I found an old pillar candle holder for a dollar at the Ann Arbor ReUse Center which I thought would make the perfect base. I cut out a circle of cardboard a little smaller than the inside of the candle holder. I then cut a scrap piece of quilt batting and a piece of craft moss about an inch bigger all around than the cardboard circle. I wrapped the batting around the cardboard circle, attaching it on the back with packing tape. I could have alternatively used my glue gun, but my craft room is a mess and I couldn't find it.

I then wrapped the cardboard circle with the moss, securing it with packing tape just like the batting. I then slipped the moss covered disc into the candle holder for a perfect fit. After stacking a few gourds and placing the glass cloche over top, my simple fall table centerpiece was complete. 

It was super easy to make and I had everything on hand already except the moss and the gourds which made it inexpensive as well.

I am happy with the way it makes my dining room looks festive to welcome the fall season. Now I just need to get myself some cider and doughnuts...

If you are interested in some of my other fall projects, check out how to make a pumpkin vase, how to make pumpkin puree from fresh pie pumpkins and my recipe for curried apple pumpkin soup

Has autumn started where you live? Have you been doing any decorating for fall?