Welcome

My name is Lisa and I'm a crafty girl with wanderlust working as an engineer by day. My blog chronicles projects in my home as well as pictures and stories from my travels.

Search


Instagram

Blog Index
The journal that this archive was targeting has been deleted. Please update your configuration.
Navigation

Entries in Crafts (42)

Wednesday
Aug222012

Basket Night Stands for My Guest Bedroom

While working on my guest room I needed a solution for a pair of nightstands. Looking around it was hard to find a matching pair of anything and anything new that looked decent seemed too pricey. 

I wanted something on the small side since the room isn't very big and there isn't a lot of space. Color and finish was also an issue. With the red headboard I wanted something neutral that wouldn't compete too much. On the otherhand I didn't want wood because the wood from my console table and dresser from Japan seemed like enough in the room.

After thinking about it, floating baskets mounted on the wall seemed like a perfect solution. I hunted around looking for something that was large enough and didn't have angled sides. I also needed to find something with a tight weave that would be flat enough to act as a table top. Finally I found a pair of banana fiber baskets that fit the bill and were only $14.99 each. I couldn't put them in my cart and check out fast enough.

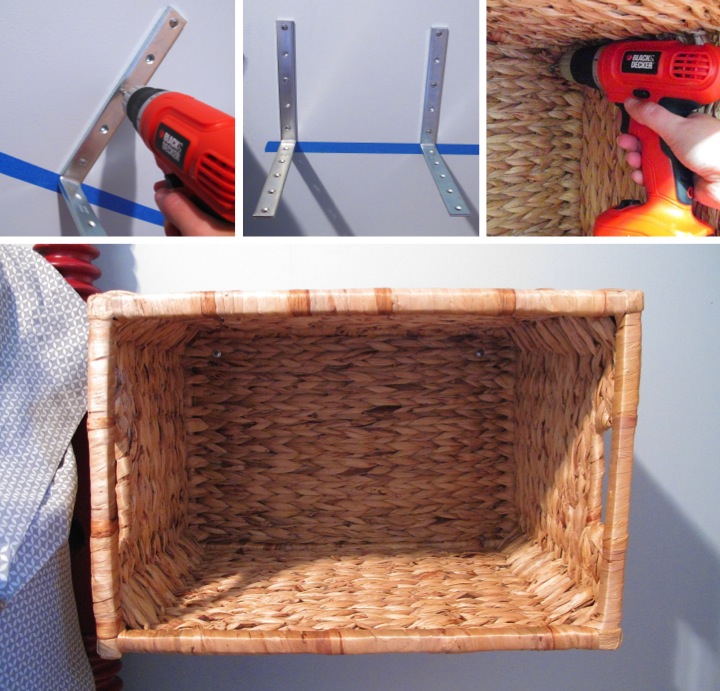
I now needed to figure out a way to secure them to the wall in a sturdy way. I looked around at Lowe's and found some sturdy 10" L brackets. The baskets are 12" deep so it was just the right length to give the baskets enough support without sticking out so far than the brackets would be visible once mounted.

I measured up 16" from the floor and used a level to tape off a level strip of painter's tape. I then used the tape as a guideline to mount the brackets to the wall. For each basket I used two brackets with one screwed into a stud and the other attached to the wall with anchors.

I set the baskets on the brackets and to make sure they didn't tip I secured them by screwing a screw in each of the top inside corners. Unless you look at the basket straight on you can't see the screws or brackets making the baskets look like they are floating on the wall.
With my bedside tables installed I had some fun decorating. On each of the night stands I put a new lamp. I like the apothecary style of the lamps with the adjustable arms and shades. I also like how the oil rubbed bronze finish ties in with the hardware of the console table and dresser from Japan that I have in the room. 

Using the baskets left me some nice open storage space that I wanted to use for some amenities for my guests. On the left side I rolled up some bath towels for guests.

On the right side I found a little red wire basket that I filled up with some wash clothes to match the towels. I also wanted to include some small bath products in case my guests had forgotten something. I took a little white and blue bowl that I made in Seto, Japan and filled with with some fancy hotel samples than I had saved from when Frank and I were in Sicily earlier this year.
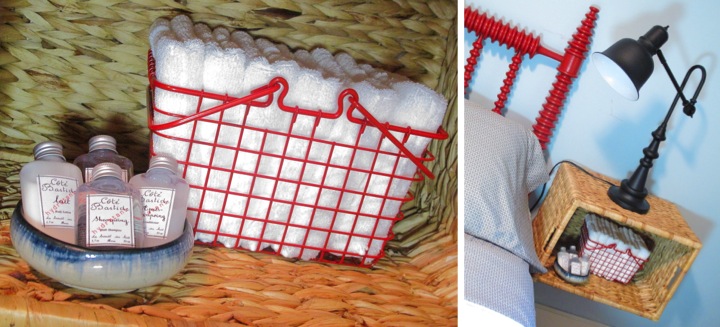
I like how the baskets turned out. The make a great solution that doesn't take up much space. I also like the empty space underneath which keeps the room from looking too cluttered.

The room is starting to come together. I still have more to do, like make some art for above the bed and make some curtains. I can't wait to get it all finished.

Have you been doing any updates on your home? What have you done to make your guest room cozy?

Monday
Aug202012

Simple Pillow Customization

With my headboard painted red in my guest room I have been on the lookout for some throw pillows to add to the bed.

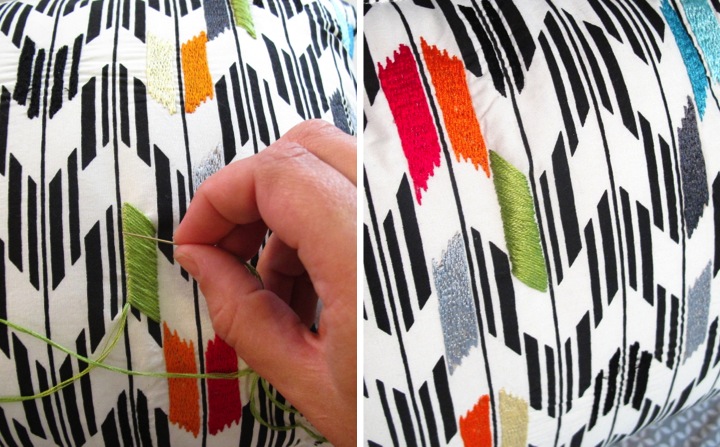
I ran across a cute little rectangular pillow at Target with a black and white design that had some colors embroidered over it. With red, orange, yellow and blue as the accent colors of the pillow it was almost perfect. It only needed a little green to be just right for the room.

I thought about it a bit and decided to buy the pillow. I grabbed some green embroidery thread and used a satin stitch to cover a few of the pattern shapes with green.

The change is a subtle one, but it pulls the pillow together to fit in with the color scheme that I have for the guest room. I'm really happy that I got the pillow and that this simple customization was so easy. Sometimes the little touches are just what is called for.

Have you made any little changes to something store bought recently to customize it for your home?

Wednesday
Aug152012

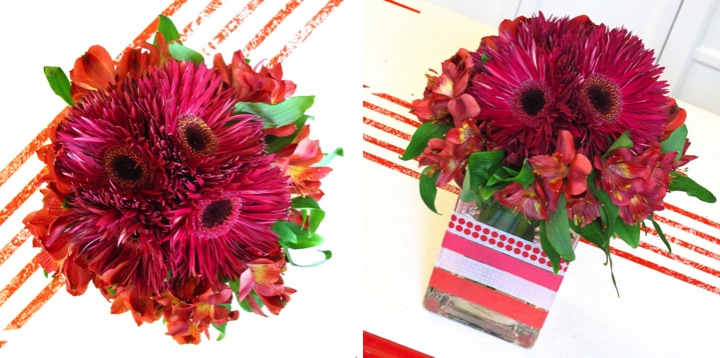
Simple Flower Arrangement With Washi Tape Vase 

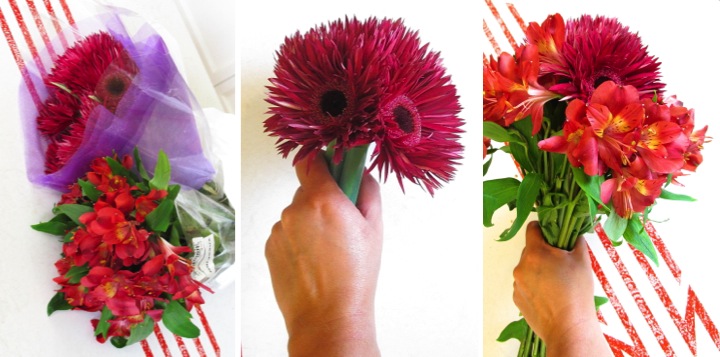
Yesterday I made a simple flower arrangement for someone special who is going through a tough time right now. I went to the grocery store and picked out a bunch of colorful alstroemeria and a bunch of gerbera daisies and set to work.

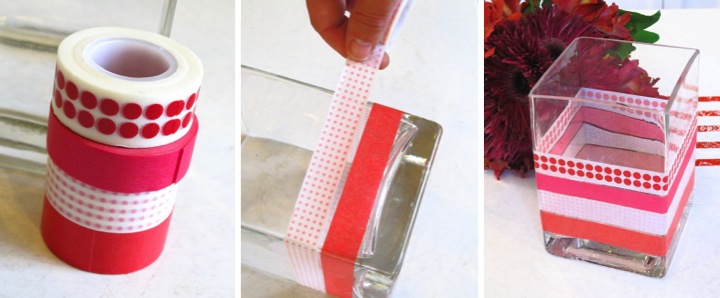
I started by gussying up a plain glass vase to match the flowers that I had purchased. Since the flowers were fuchsia and deep pink I picked out a few different washi tapes from my craft stash in those hues.

Starting from the bottom, I wrapped one of the washi tapes around the vase, careful to keep it straight and even. It took a little bit of effort to make sure that by the time I wrapped it around the ends would meet up.

Once the first line of tape was level it was easy to wrap the remaining tapes, using the tape below as a guideline. I left about 1/4" between each line of tape so that a bit of the stems could peek through. 

With the vase completed I started arranging the flowers. I bunched up the gerbera daisies in the center and then started adding the alstroemeria around the outside edges. I adjusted the stems until I had them the way I wanted then secured them with a rubber band and trimmed them to fit in the vase.

I think that the flower arrangement turned out fun and bright and I hope it brings some cheer to the recipient.

Thursday
Aug092012

Drying Lavender From My Garden

Although I planted my lavender plant in my herb garden a few years ago it has never been big enough to have more than a handful of flowers over the past few summers. This year my lavender plant has finally come into its own and I have quite a good number of flowers. In fact, the lavender flowers are so bountiful this year that it seemed worthwhile to gather and dry them.

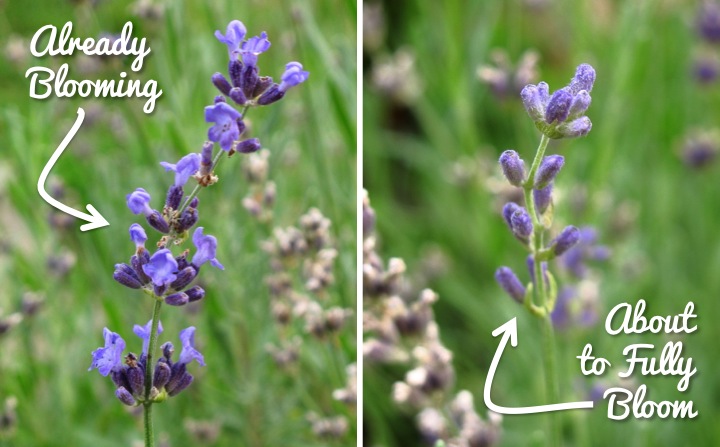
The lavender flowers should be harvested when they are dry and after any morning dew has already evaporated.

It is also good to cut the flowers before they have fully bloomed because then the dried lavender will be more fragrant. Unfortunately due to being out of town a lot of the time this summer I am a little late with gathering my lavender, but I'll just have to make do. I think that my lavender will still be nice.

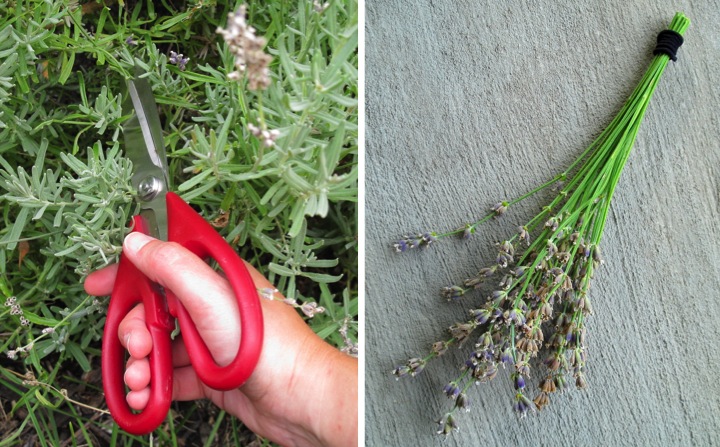
When cutting the lavender I cut as low down as I could to have the longest stem possible. Once I had cut all the flowers I gathered them into several small bunches and secured them with an elastic band on the end. As the stems dry they can shrink so using something stretchy means they will always stay secured. I then tied a bit of twine to the stems to hang the bunches in a cool, dark place which for me meant a spare closet.

A few weeks from now I should have some nice dried lavender for craft projects or recipes. Do you grow lavender in your garden? Do you dry it?

Sunday
Aug052012

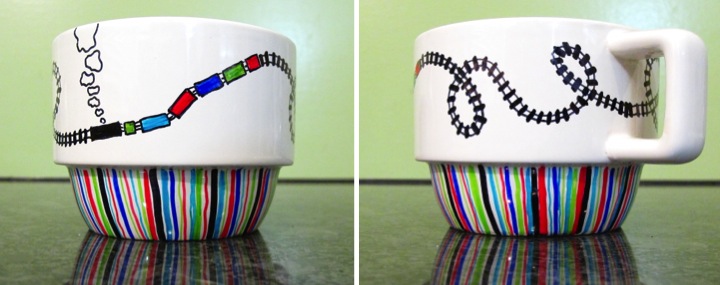
Sharpie Train Coffee Cup For Grandpa's Birthday

My grandpa loves trains so I usually make something train related (like this Soo Line fleece blanket) for him when I give him gifts. 

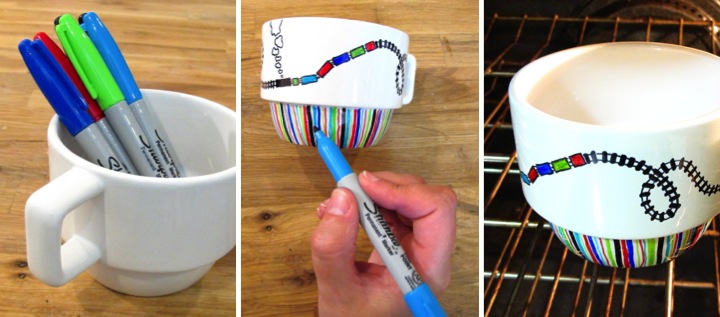
This year as I was trying to figure out what to make him for his birthday I was inspired by all of the links on the internet (like here and here) about customizing ceramics by drawing on them with a black Sharpie marker and then baking them in the oven to set the design. I thought this would be a perfect technique to make a train coffee cup for my grandpa.

I brainstormed about what design I should make and decided that a cartoon aerial view of train tracks would be cute. I started by drawing a set of thin parallel lines for the tracks on the mug. At two spots I stopped and drew a series of rectangles to represent the top view of the train. I went back with a thicker black Sharpie and drew in the railroad ties over the tracks. I wanted a little color so I filled in the train cars with red, blue, green and aqua Sharpies (with the caboose being red of course!). I also added some puffy smoke coming from the train engine.

The cup still looked a little plain to me so I drew in stripes along the bottom part of the cup with the various colored Sharpies. I made a random pattern and alternated thin and thick lines.

Once I was happy with the design I popped the mug in the oven at 350° F for thirty minutes to set the design and then let it cool. The cup seems to hold up well to hand washing, but I've read that the dishwasher can cause the design to fade.

Since I free handed everything there is an inconsistent wave to some of my lines, but I like the look because it shows that it was a handmade gift. Hopefully Grandpa likes it! 

Have you tried customizing anything with a Sharpie? What did you make?

Tuesday
Jul102012

Shutter Organizer for My Craft Room

Ever since I saw the shutter organizer in Martha Stewart Living years ago I thought it was a neat idea. Since then all sorts of variations have popped up in magazines and the internet and I've always wanted to make my own version.

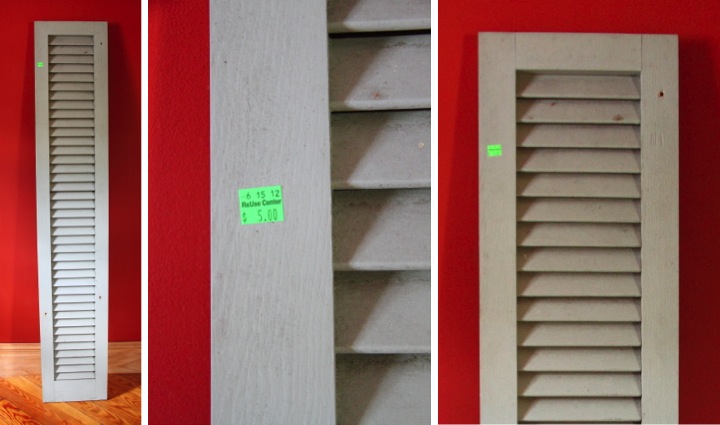
A few weeks ago when I was at the Ann Arbor ReUse Center I found a really tall and narrow wood shutter for $5 and bought it with the intention of making one.

I was drawn to the shutter because it was so tall that it could be free standing and hold a lot of items. Aesthetically I also liked that it didn't have a divider rail and was just uninterrupted louvers the whole height of the shutter. The shutter was solid wood and all of the louvers were solidly attached. It was filthy and a little dinged up, but I knew it had a lot of potential to be fixed up to become an organizer.

Unfortunately after I bought it life has seemed to get in the way and the shutter has just sat in my back room waiting for me to get around to it. The Pinterest Challenge hosted by Sherry, Katie, Michelle and Kate finally motivated to take my project from a pin on my Pinterest board to real life.

To start my shutter needed a little bit of TLC. I used wood filler to patch up some holes and then sanded it down. I wiped it down with a tack cloth and then gave it a few coats of paint with primer in Martha Stewart Living Plumage with an eggshell finish. 

The shutters that Martha Stewart used had moveable louvers and the tilt bar kept items tucked in the organizer from falling through the slats. My shutter has fixed louvers and thus no tilt bar so I had to add a backing to hold things in place. I had some leftover pieces of foam board from making bolts to organize my fabric stash which did the trick. Using my glue gun I attached the pieces to the back and I was done.

Now that my shutter was complete it was time to put it in place and start organizing. I wanted to add some little pails that I had found for a dollar at the Target One Spot to hold some writing implements and other small things. To hang them I simply attached a bobby pin to each of the pail handles and then tucked the bobby pins in between the slats. This easy method securely held the tin buckets in place and allowed me to fill them with all sorts of things.

With the buckets hung I proceeded to tuck a bunch of my small craft items in the louvers. I like that I can easily see everything in just a glance. Now I am one step closer to getting my craft room in some sort of working organized order. 

Did you participate in the Pinterest Challenge? What did you make? Please post a link to your project in my comments so I can check it out.

Sunday
Jul082012

Decorating My Front Porch

Now that I've done a few little things to spruce up my front porch, like make a self-watering planter, spray paint my table teal and lay out a new rug, I thought it was time to decorate a little.

I wanted to add a few cute things, but because it is outside I didn't want to add anything valuable in case they got ruined.

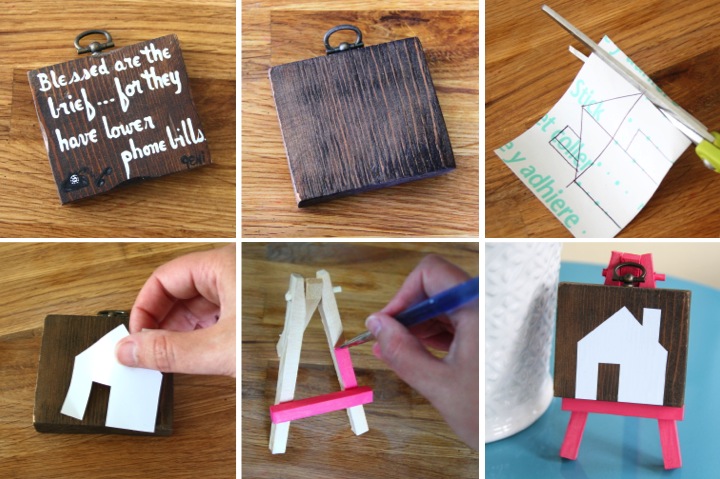
My first addition was inspired while I was perusing the Ann Arbor ReUse Center. I found a tiny wooden plaque that someone had hand painted with the message "Blessed are the brief...for they have fewer phone bills." At first glance it was pretty tacky, but when I flipped it over the backside was a nice already stained plaque in good shape. It was only $0.50 so I was sold.

Once I got home I decided that I wanted to add a little house silhouette on the front of the plaque. I had some extra vinyl left over from when I made my templates for etching my Limoncello bottles so I used that. I sketched out a house outline on the back of the vinyl, cut it out and adhered it to the plaque.

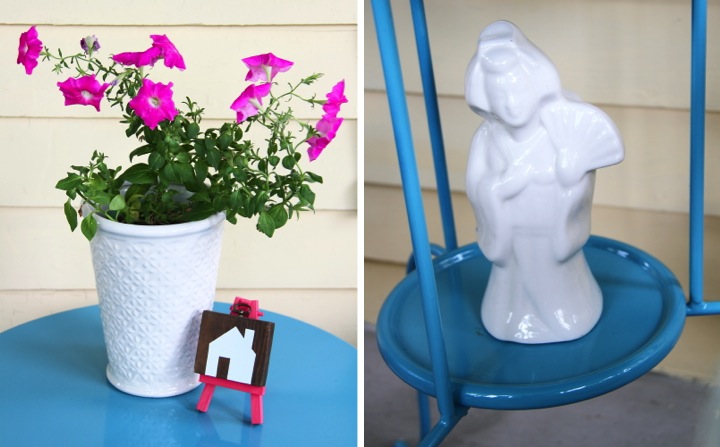
I needed something for the plaque to stand on and a tiny wood easel that I bought for a dollar from Jo-Ann Fabrics did the trick. I wanted to add a little color so I painted it coral pink with some craft paint. Once the paint was dried I set up the easel on my front porch table and placed the little plaque on it.

With my little home plaque joining my self watering petunia plant on the top of the table, I turned to finding something to go on the lower shelf of the table. Rummaging through some old things I came across this white ceramic geisha drink glass and thought it would be perfect. When I turned twenty-one I celebrated by going out to Benihana (yeah, I am a wild one!) for dinner and my very first legal alcoholic drink was a fruity mixed drink in that glass. Over the intervening years I've held onto it but it really hasn't done much other than collect dust. It was just the right size and proportion to fit on the shelf so outside it went.

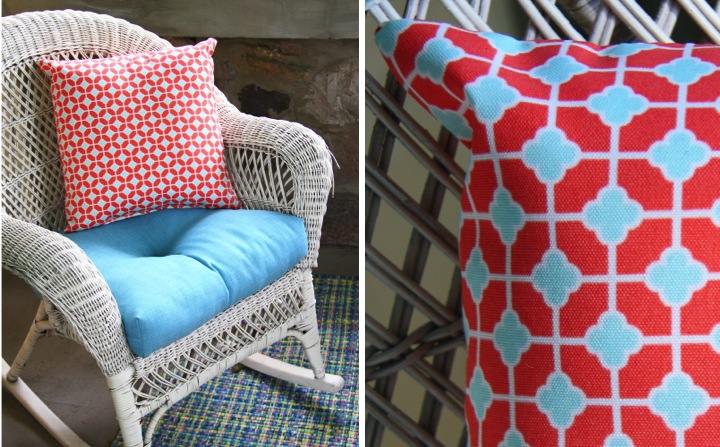
While I was at Home Depot picking up some paint I stumbled across these coral pink and light blue outdoor pillows on sale for $11. The pattern picks up the colors in my scheme and looks bright and cheery. They are also very soft and comfy which will make relaxing on the front porch even better.

I'm pretty happy with how everything has come together and while I am sure that I will probably do some tweaking later, I think it is basically finished...for now.

Are you enjoying your front porch this summer? Is it someplace that you enjoy hanging out? Have you done anything to decorate it? 

Monday
Jun252012

Self Watering Planter Using a Soda Bottle

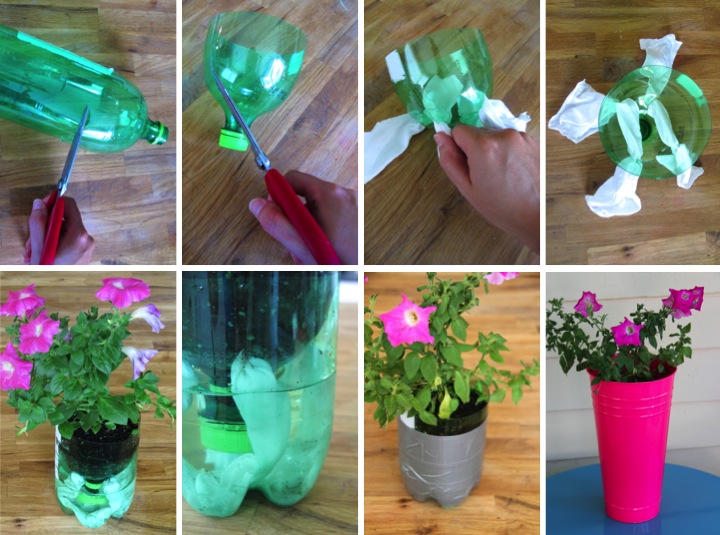
I am terrible at keeping my potted plants alive. A few long days at work where I forget about them or a trip out of town and they are dead as a doornail. I've seen some links about using a soda bottle to make a self watering planter like this one and this one I thought I would make my own variation.

I started by cutting the top third of the bottle off with a pair of scissors. It was a bit tough to get a straight edge but I cleaned it up after the pieces were separated. Next, I needed to have something act as a wick for the water. I cut four small slits in around the neck of the bottle and then took two unused paint rags and poked one end of each rag through the holes. I wet the rag and filled up the bottom of the bottle to act as the water reservoir. It is important that the water is high enough that the ends of the rag will sit in it but not as high as the slits. I then placed the top of the bottle inside of the bottom and then planted a petunia plant inside.

The roots of plants don't do well if exposed to light so I wrapped some duct tape around the bottom of the bottle to block the light. I wanted something that looked a little cuter than the soda bottle and a $2.50 metal floral container that I bought at Target was the perfect fit to place my new self watering planter inside. 

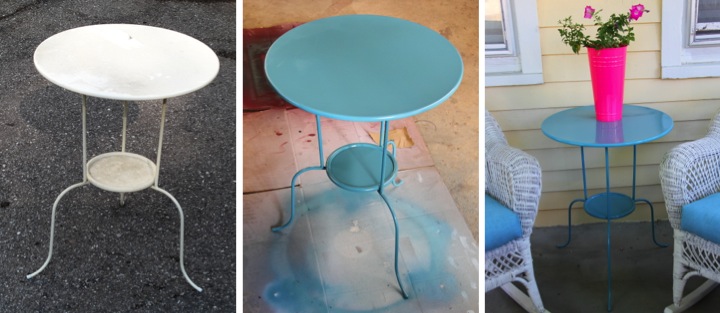
I decided to put the plant outside on my front porch. With the cute plant I decided to also spruce up the little table I have out front. I bought an inexpensive Lindved table from Ikea several years ago and the white finish was showing its age from being exposed to the elements. With a few thin coats of teal outdoor spray paint it looks brand new and makes a great place for my petunia plant. So far it has been a week and the plant is still alive and kicking. I'll have to see how it goes...

Have you had any luck using self watering for your plants? What are your tricks for keeping your plants alive?

Tuesday
Jun192012

How to Mount Photos

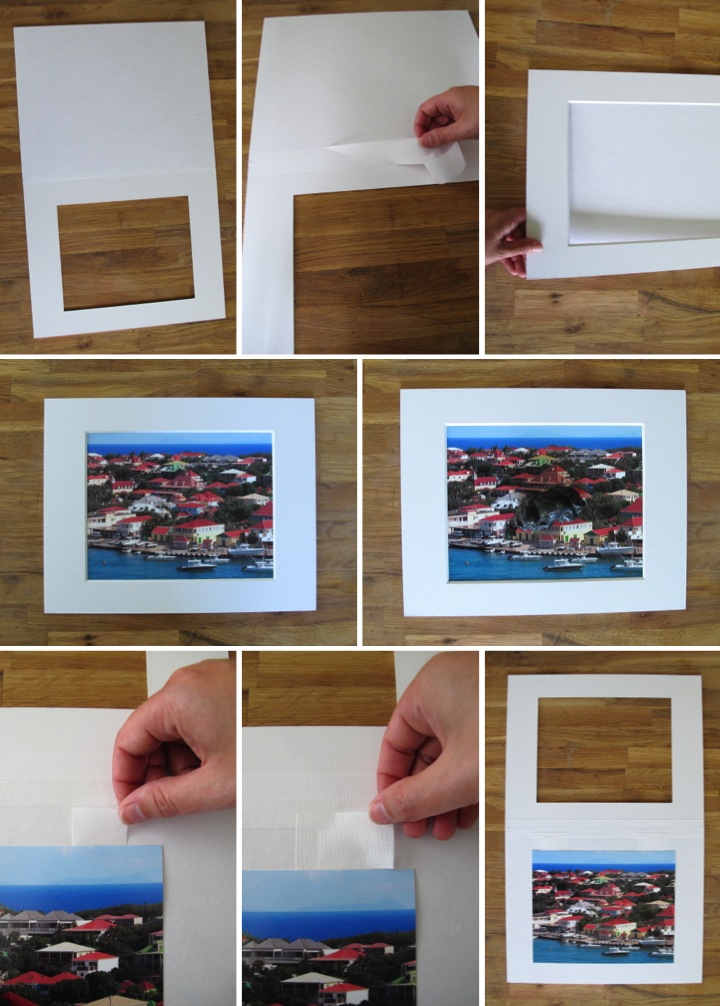
While I was mounting the photos from my giveaway to celebrate my six month anniversary of blogging I thought I would share how to do it. Pictures can buckle when the mount board, mat board and picture expand and contract at different rates when the temperature changes. By hinging the mat board to the mount board and hanging the photo from T-hinges you keep the picture as free to move as possible and minimize the chance of warping.

To mount a photo you need a mat board and mount board that are the same size and some linen tape. Start by laying your mount board face up with the mat board face down and align their edges. If the thicknesses of the mat board and the mount board aren't the same put something underneath the thinner one so that they are level. Cut a piece of linen tape the width of the boards and then lay it along the seam between them to make a hinge. Flip the mat board down and so that it is right side up.

Now that you have hinged the mat and mount board the next step is to mount the photo. Place your photo under the mat board and adjust it to the position you want. Once you have it where you like it, place a paper weight on the photo to hold it in place and then flip the map board back. Cut two short pieces of linen tape. Carefully lift up the top corners and slip the tape halfway under with the sticky side up. Cut two more pieces of linen tape and then place them sticky side down over the previous pieces of tape. The picture will now be hanging from the two tape T-hinges. To complete just remove the paper weight and flip the mat board pack over the picture. Your picture is now ready to frame.

Monday
Jun182012

Scrabble Tile Wall Art


I love playing Scrabble so I've been meaning to make some kind of wall art for a while with Scrabble tiles. After thinking about it for a bit I decided I wanted to write out a quote with the tiles and instantly the following quote by St. Augustine came to mind, "The world is a book and those who do not travel read only a page." To me it is perfect for the project for so many reasons. I love to travel so the quote resonates with me plus the reference to books reflects my love of reading and ties back to the word game of Scrabble.

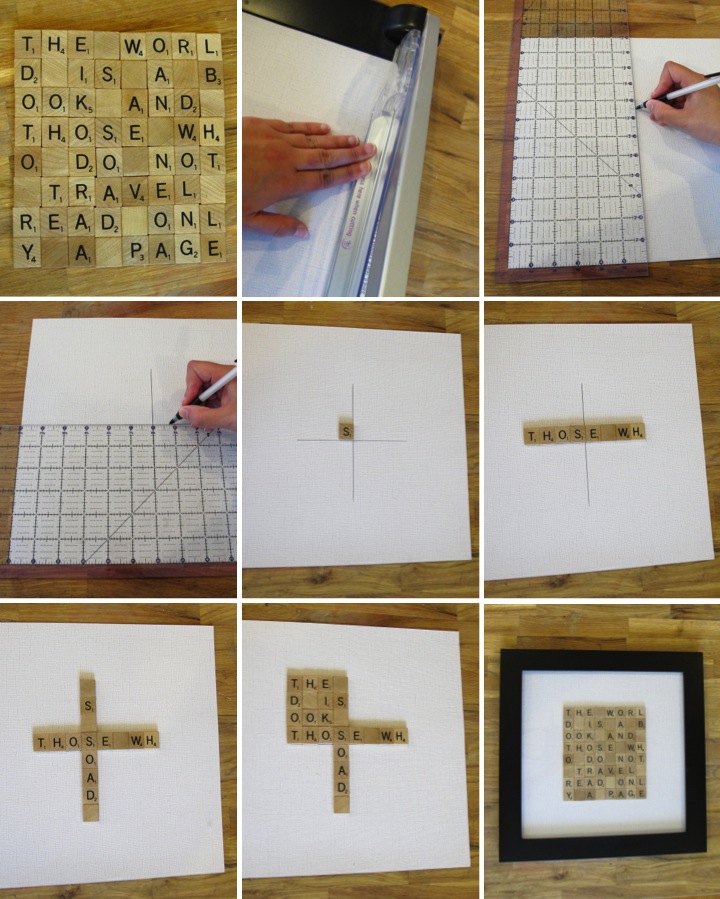
With my idea set I bought some wooden Scrabble tiles on eBay and then laid out my quote design into an 8 tile by 8 tile square. I didn't have enough blanks so I just flipped over some letters that I was unlikely to use later (like Z and Q) for my extra spaces.

I also bought a piece of white textured scrapbook paper and a 12" x 12" picture frame. The frame came with a double mat about the thickness of a Scrabble tile so I knew it would be able to fit my project. I trimmed my paper to fit in the frame  and then measured to the center of the paper, drawing a vertical line just a bit shorter than the height of my tile design. I repeated the same procedure in the horizontal direction. This gave me guidelines to be able to make everything straight and centered.

I started by using a tiny dab of hot glue to adhere the tile that went in the corner of the upper right quadrant, aligning it with my guidelines. Working from the center out I then attached the rest of the tiles in that line. Next, I placed the tiles along the vertical guideline, again working from the center out. To finish up I filled in each quadrant in the same manner.  After that I just popped the paper in my frame and it was ready to hang.

I decided to hang my Scrabble tile quote over a bookcase that I have in my upstairs hallway. I paired it with a carved wooden vase that I picked up in the little mountain village of Batad in the Phillipines. Inside the vase I put my Chuukese love sticks that I bought when I was visiting Micronesia to go scuba diving. I placed my framed butterfly wings from Costa Rica on a small easel to finish off my display. I think that my new Scrabble wall art and display arrangement definitely perks up this little nook of my home.