Welcome

My name is Lisa and I'm a crafty girl with wanderlust working as an engineer by day. My blog chronicles projects in my home as well as pictures and stories from my travels.

Search


Instagram

Blog Index
The journal that this archive was targeting has been deleted. Please update your configuration.
Navigation

Entries in Guest Room (8)

Wednesday
Aug222012

Basket Night Stands for My Guest Bedroom

While working on my guest room I needed a solution for a pair of nightstands. Looking around it was hard to find a matching pair of anything and anything new that looked decent seemed too pricey. 

I wanted something on the small side since the room isn't very big and there isn't a lot of space. Color and finish was also an issue. With the red headboard I wanted something neutral that wouldn't compete too much. On the otherhand I didn't want wood because the wood from my console table and dresser from Japan seemed like enough in the room.

After thinking about it, floating baskets mounted on the wall seemed like a perfect solution. I hunted around looking for something that was large enough and didn't have angled sides. I also needed to find something with a tight weave that would be flat enough to act as a table top. Finally I found a pair of banana fiber baskets that fit the bill and were only $14.99 each. I couldn't put them in my cart and check out fast enough.

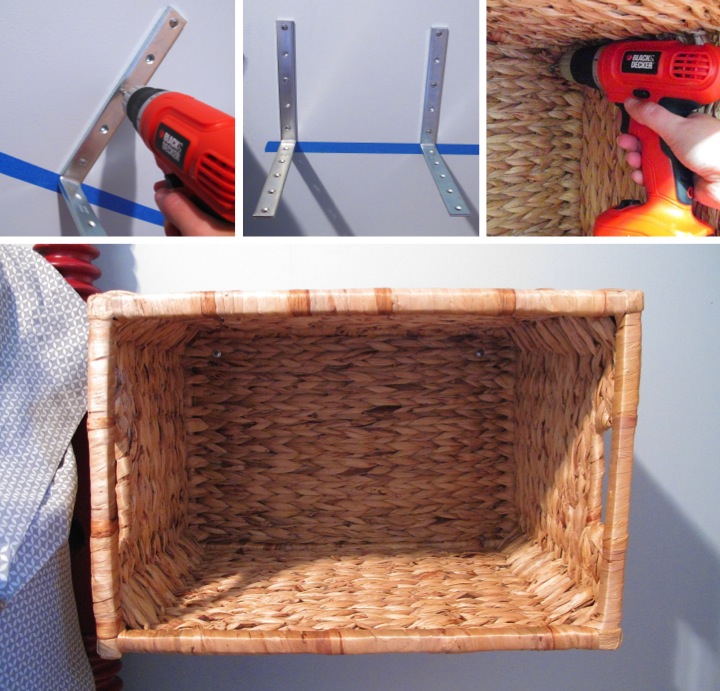
I now needed to figure out a way to secure them to the wall in a sturdy way. I looked around at Lowe's and found some sturdy 10" L brackets. The baskets are 12" deep so it was just the right length to give the baskets enough support without sticking out so far than the brackets would be visible once mounted.

I measured up 16" from the floor and used a level to tape off a level strip of painter's tape. I then used the tape as a guideline to mount the brackets to the wall. For each basket I used two brackets with one screwed into a stud and the other attached to the wall with anchors.

I set the baskets on the brackets and to make sure they didn't tip I secured them by screwing a screw in each of the top inside corners. Unless you look at the basket straight on you can't see the screws or brackets making the baskets look like they are floating on the wall.
With my bedside tables installed I had some fun decorating. On each of the night stands I put a new lamp. I like the apothecary style of the lamps with the adjustable arms and shades. I also like how the oil rubbed bronze finish ties in with the hardware of the console table and dresser from Japan that I have in the room. 

Using the baskets left me some nice open storage space that I wanted to use for some amenities for my guests. On the left side I rolled up some bath towels for guests.

On the right side I found a little red wire basket that I filled up with some wash clothes to match the towels. I also wanted to include some small bath products in case my guests had forgotten something. I took a little white and blue bowl that I made in Seto, Japan and filled with with some fancy hotel samples than I had saved from when Frank and I were in Sicily earlier this year.
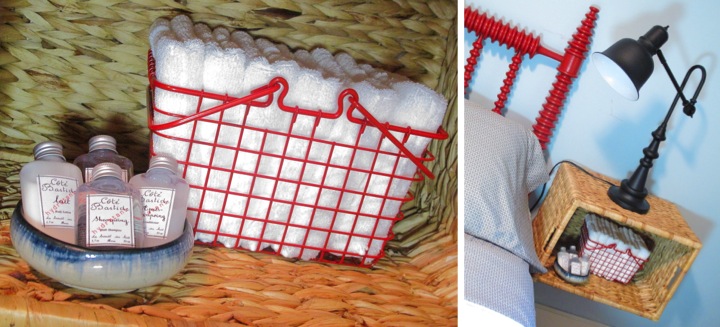
I like how the baskets turned out. The make a great solution that doesn't take up much space. I also like the empty space underneath which keeps the room from looking too cluttered.

The room is starting to come together. I still have more to do, like make some art for above the bed and make some curtains. I can't wait to get it all finished.

Have you been doing any updates on your home? What have you done to make your guest room cozy?

Monday
Aug202012

Simple Pillow Customization

With my headboard painted red in my guest room I have been on the lookout for some throw pillows to add to the bed.

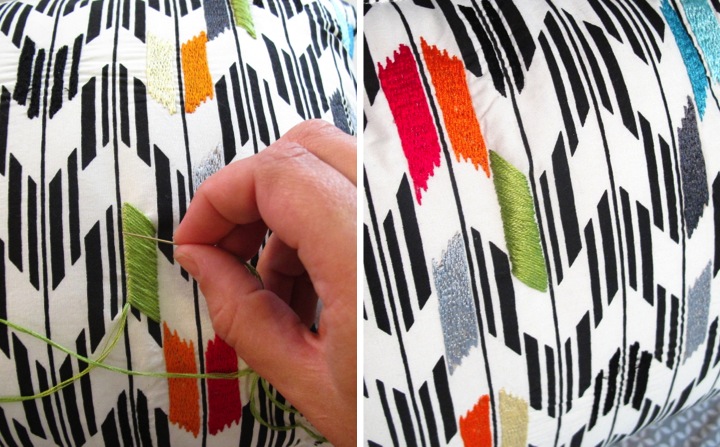
I ran across a cute little rectangular pillow at Target with a black and white design that had some colors embroidered over it. With red, orange, yellow and blue as the accent colors of the pillow it was almost perfect. It only needed a little green to be just right for the room.

I thought about it a bit and decided to buy the pillow. I grabbed some green embroidery thread and used a satin stitch to cover a few of the pattern shapes with green.

The change is a subtle one, but it pulls the pillow together to fit in with the color scheme that I have for the guest room. I'm really happy that I got the pillow and that this simple customization was so easy. Sometimes the little touches are just what is called for.

Have you made any little changes to something store bought recently to customize it for your home?

Wednesday
Jul182012

Headboard Makeover for My Guest Room

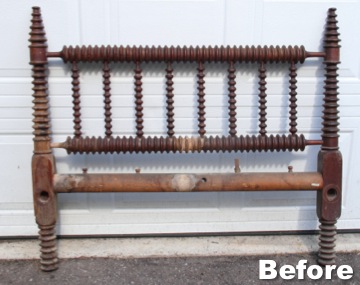
About a week and a half ago, I was at the Ann Arbor ReUse Center wandering around looking for treasures when I stumbled upon this really cool wooden headboard for just $25.

The wood was cracked and in terrible shape, but I knew that with a little bit of work it would be perfect in my guest room. I just loved the rounded spindles that looked like stacks of beads. I loaded it up in the back of my little hatchback and took it home.

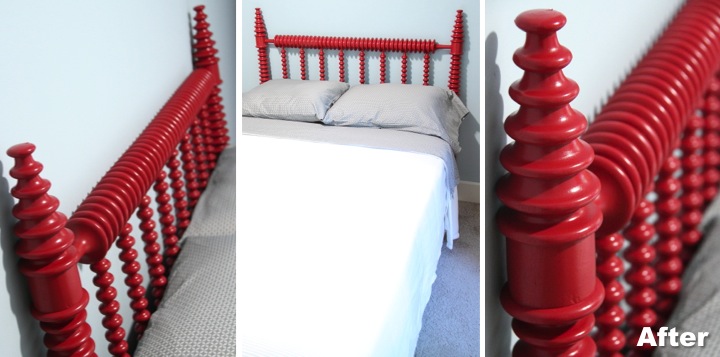
As a first step I gave the headboard a good washing to get rid of all the dust and gunk that had accumulated on it over time. I patched a few large cracks and then used some grey spray paint primer to give it an even base. With a few light coats of red satin spray paint and a few days of drying, my headboard was ready for the guest room.

I chose the red because I thought it would stand out nicely against the pale blue walls and pick up some of the red in the vintage travel posters that I have across the room over the console table that I made from a Japanese chest.

I am so happy to finally have a headboard in the guest room. I think the final result is quite striking. I got some new grey sheets with a tiny, subtle geometric pattern, but now the bed needs some fun throw pillows and some art above it as a next step.

What do you think? Do you like the red or would you have gone with another color?

Monday
May212012

Folding Luggage Stand Makeover for My Guest Room

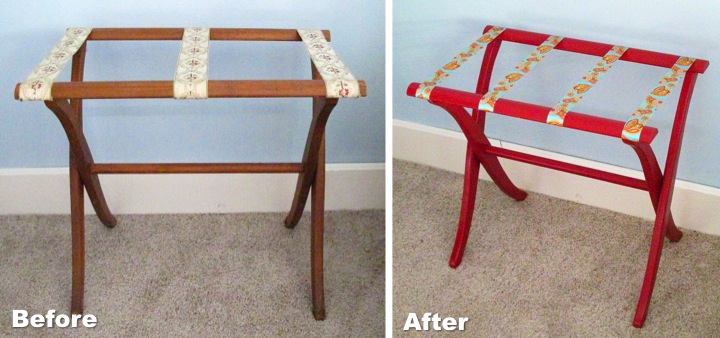
As I was cleaning out my garage on Saturday I rediscovered an old folding luggage stand that I had picked up for a few dollars several years back. It was in nice shape but the color of the wood and the ribbon wouldn't fit in with the style of my guest room so I decided to give it a little makeover.

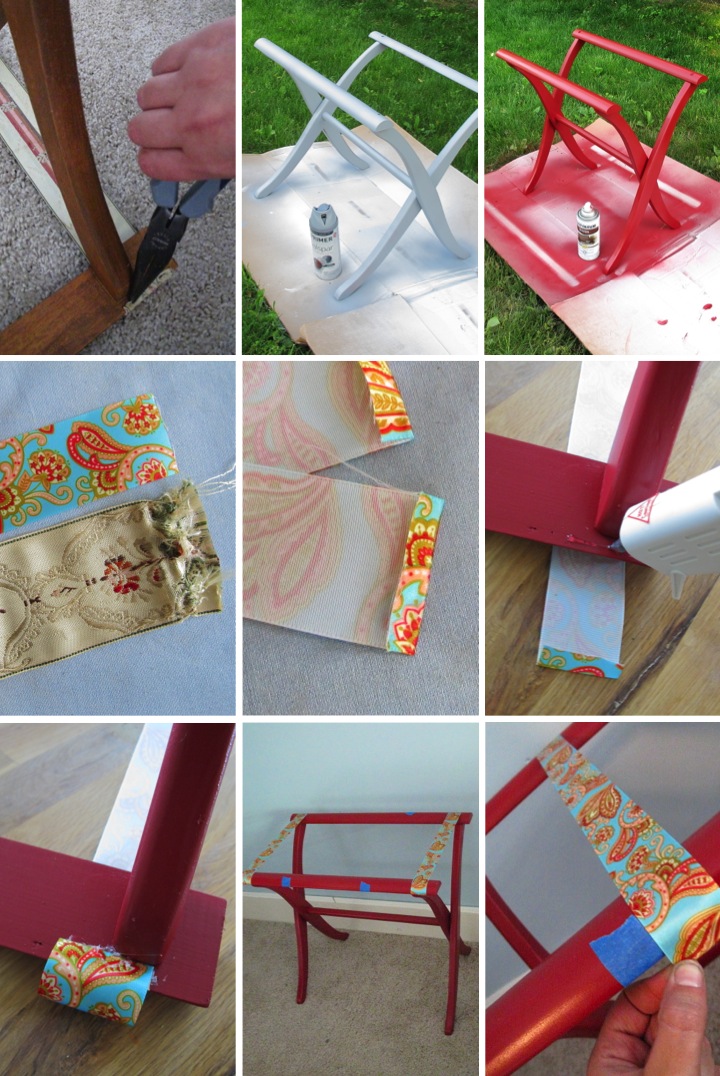
I started by using a needle nose pliers to remove all of the staples that held the ribbon onto the stand. With the ribbons removed I gave the wood stand a good cleaning followed by a light sanding. I then primed it with a grey spray paint primer followed by some light coats of red spray paint. Whenever I am using deeper colors I get better results if I use grey primer instead of white.

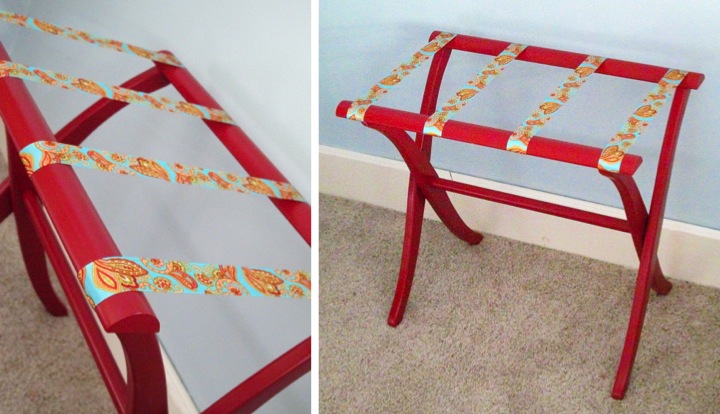
After the stand was dry it was time to add the new ribbons. Using the old ribbon as a pattern I cut new ribbons to length and then ironed under 1/4" on each end. Because my old ribbon was 2" wide and my new ribbon was only 1-1/2" I decided to increase the number of ribbons to four.

I started attaching the ribbons by working on the ends. I flipped the stand upside down on top of the ribbons and used a glue gun to glue them to the underside of the stand. For the middle two ribbons I wanted to make sure everything was taut so I stood the stand right side up to attach them. I measured out where they should be placed and marked the spots with blue painters tape and then glued them in place.

I had picked up the stand a few years back and already had the spray paint and primer so my total cost for the project was $3.50 for the spool of ribbon. Not counting paint drying time it took me about forty-five minutes of hands on time to complete the makeover.

The new version of the stand is very bright and cheery and a nice improvement over the way it used to look. I think it will make a fun and useful addition to my guest room.

Tuesday
May012012

Replacing Outlets

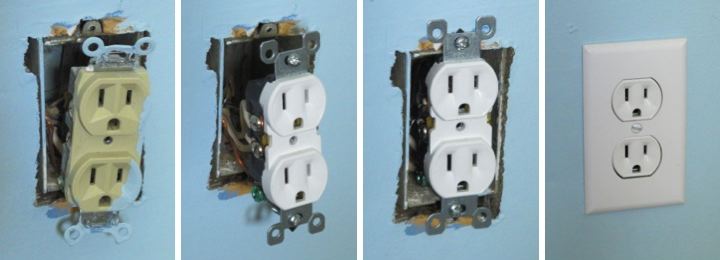
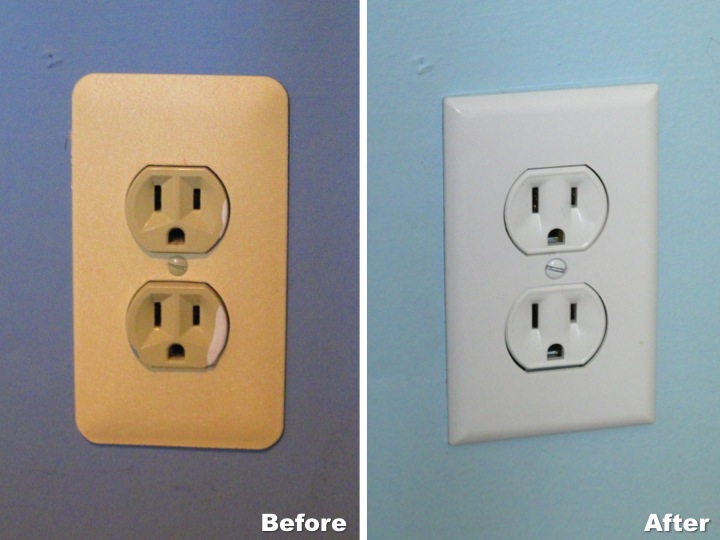
After I repainted my guest room on Saturday I decided that something needed to be done about the old, ugly outlets in the room. They were a yucky tan color with metal cover plates and just looked dirty and old. Since I already had the covers off due to painting I figured it was an opportune time to replace them.

Replacing an outlet is really simple, but due to the fact I don't want anyone to hurt themselves by misunderstanding what I might write, I'll let you look it up from professionals instead of giving the details here. I will say one thing, however. The most important thing is to make sure that you kill the power before you start. I am a little paranoid so I cut the power with my house's main circuit breaker instead of just the circuit I am working on. No shocks for me, thank you very much!

It took me about five minutes to swap out each outlet with a new white outlet and a new white cover plate. It is just a little detail but I think it definitely helps make the room look cleaner and more updated.

Monday
Apr302012

Turning a Chest into a Console Table

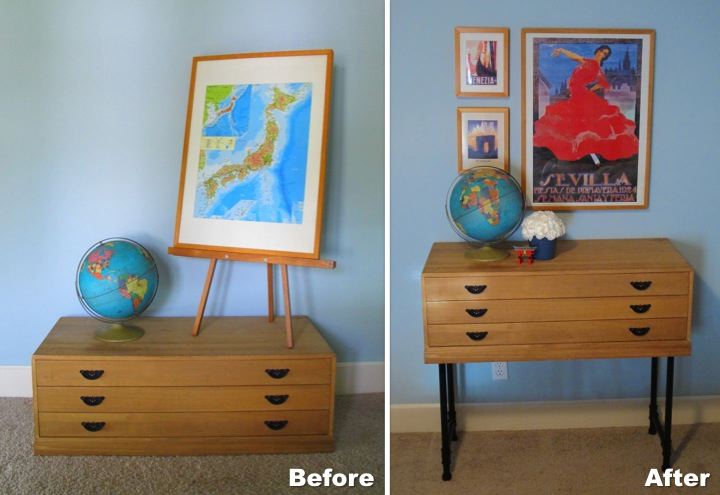
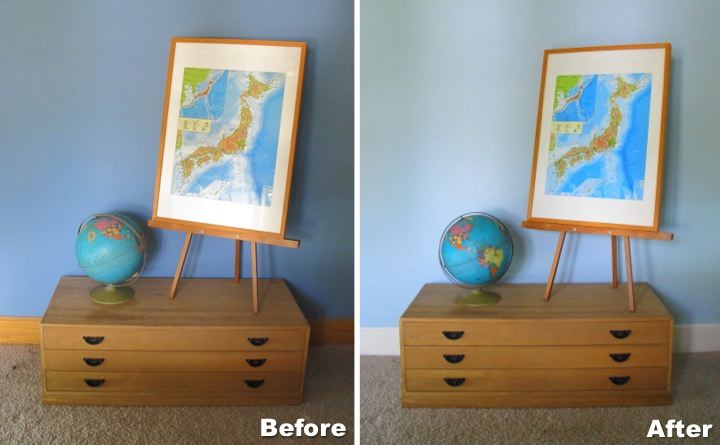
I love the little tansu chest that I bought for my apartment while I was living in Japan, but at only 14" high it has been hard to incorporate into my home in the U.S. without it looking like a piece of doll furniture.

To solve my problem I decided to try to turn it into a console table. I wasn't able to find wood with the fine grain to match the chest for legs so I decided to match the black metal pulls instead.

While I was trying to figure out what to do I remembered seeing a DIY Industrial Cart on Ana White's site that used pipes between the shelves which inspired me to use pipes for the legs. 

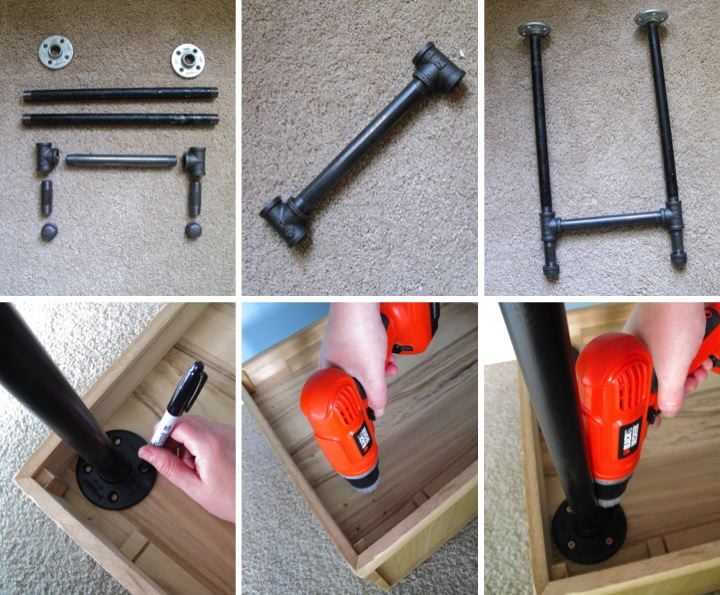
I chose to use 3/4" black pipe which I thought would be sturdy enough to support my light chest. To start I threaded two tees onto each end of a 10" nipple. On the bottom of each tee I threaded a 3" nipple followed by an end cap. On the top of each tee I threaded an 18" pipe topped by a flange. I repeated the same process for the second set of legs.

Once I had the legs assembled I gave them a coat of tinted primer followed by two coats of matte black spray paint. After they were thoroughly dried I flipped my chest upside down and lined up the legs where I wanted them to be on the bottom of the chest. I marked where the flange holes would be and then pre-drilled holes for my screws. I then put the legs back on the chest and screwed them on to complete the transformation into a console table.

Comparing how short and out of place the tansu chest looked before, to how it has now become a piece of featured furniture in my guest room makes me really happy. I think elevating the chest has made a world of difference. The legs are quite sturdy and as an added bonus with the chest raised up I now have easy access to the outlet on the wall which was previously hidden.

After the console table was done I had a bit of fun decorating. I picked up the Sevilla, Venezia and Paris prints and poster during my travels and framed them in Ikea Ribba Frames. I have had the tin globe for several years and actually used for the photo in my banner. The tiny red torii gate is a souvenir that I bought while visiting Miyajima in Japan. I finished my display off by arranging a bouquet of carnations in a little blue pot. 

With this transformation I have one little corner of my guest room feeling cozy and welcoming. Now I need to get on doing something about the ugly bi-fold doors on the closet and making a headboard.

Sunday
Apr292012

Fresh Coat of Paint for My Guest Room

The first thing I decided to do to spruce up my guest room was to give it a fresh coat of paint. I really like the blue on the walls but the saturated color makes the room seem a little small so after looking at about thirty swatches of lighter shades of blue I settled on Valspar Inhale which seemed like a nice, light neutral looking blue.

I also wanted to paint my trim white. To save money I had the trim around the windows and doors made out of the salvaged wood paneling that had previously lined my stairs. Now I am not such a fan of the look since the wood had knots in it and looks a bit too country for me. Painting it white gives the trim a cleaner look which matches my style more.

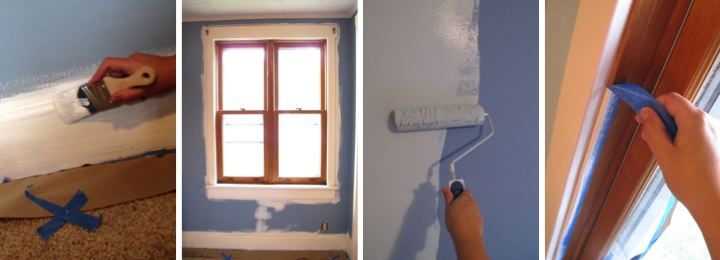
To prep the room I moved my furniture to the middle of the room and removed my switch plates. Since I wasn't doing the ceiling I only taped down paper around the perimeter of the room. I planned to cut in by hand for the trim so I didn't do any taping there, but on the inside of the window I wanted to be extra careful so I taped there. When you remove tape, always do it at an angle to reduce the chance that some of your paint will come up with your tape.

I started by using two coats of a stain blocking primer on the trim followed by a two coats of a warm white, Chamois Cloth, which was part of the discontinued Martha Stewart Colors Valspar line. I like the color and I had some on hand because it is the same paint that I used for the trim in my master bathroom. Because I was going to do the walls afterward I made sure to overlap the white onto the walls so that I would have a nice area to cut in against later.

With all of the coats of primer and paint to make sure that the knots and grain wouldn't show through, the trim took a long time. The walls were a comparative breeze. Because the color I bought was a Valspar Signature color, it could only be mixed up as a paint with primer so the coverage was really good. In fact, I had planned on two coats but when I looked at how the first coat dried I decided a second coat was unnecessary.

I am really happy with the new color of the room. The white trim and lighter blue make it seem bigger and will allow me to add some brightly colored accents without overwhelming the room.  I have a bunch of ideas to try out in the room and with the fresh slate the new wall and trim color gives me I am ready to go. 

What do you think of the new, lighter color? Have you been doing any painting around the house? Do you have any plans to do so in the future?

Monday
Apr232012

Plans for my Guest Room

My friend, Erin, is going to be visiting in a little over two weeks so I thought I would switch gears from working on my study and cozy up the guest room before her arrival.

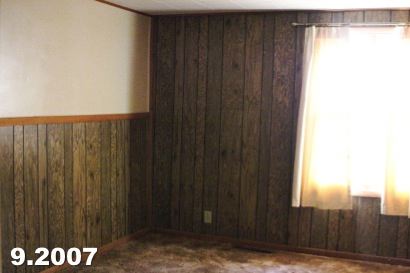
When I first bought my house this room in my side wing was one of the better of rooms in the house. It wasn't great but at least after I pulled down the fake wood paneling there was drywall hung (but not finished) underneath. The ubiquitous ceiling tiles were dingy looking and the carpet was stained and filthy.

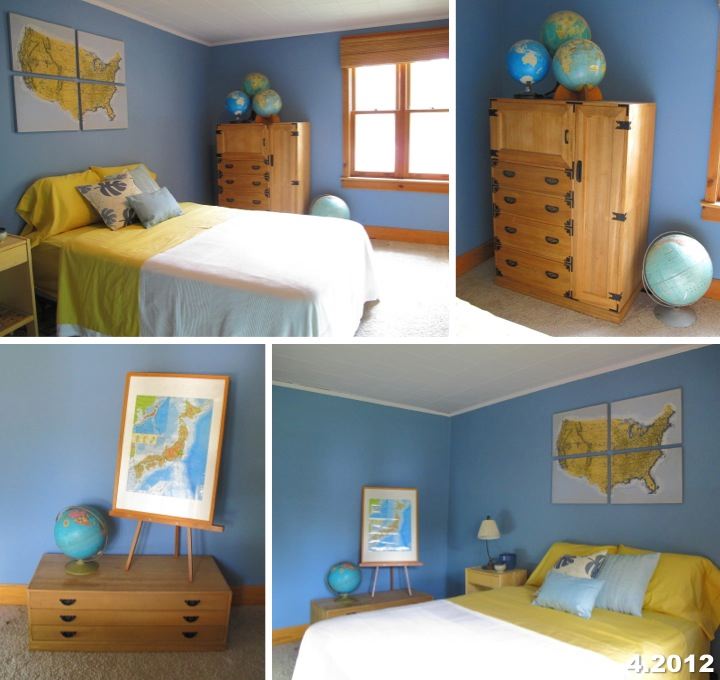
I decided that I would live out of this room while the main part of my house was in full tear down to the studs mode so that meant I had to get it in shape quickly. After tearing down the fake wood paneling and I worked on mudding and sanding all of the drywall seams and screw holes. After that I primed and painted the walls blue and the ceiling white. With new trim work around the window and doors and some new carpeting the room was liveable.

I remember when I had the carpet guy come in to quote the job I asked him how quickly he would be able to schedule me in. He replied, "Why does it matter? It's not like you are living here anyway," referring to the fact that my house was completely torn up and in shambles. I told him that actually I was planning on living there because I had to be out of my apartment by the end of the month. He laughed and told me he wouldn't live there and I must be a tough woman.

Since getting the room habitable, I haven't done much in there other than set it up as a guest room. I have long term plans to replace the pressed cardboard ceiling tiles with bead board or drywall and get rid of my cheap carpeting for hardwood. I also want to replace the old hallow core door and bi-fold closet doors with solid wood doors that match the rest of the house.

I won't be able to get to any of that before Erin comes but I would like to freshen up the room and make it more comfy and welcoming before she arrives. Right now the room seems too blue and yellow and too barren to me. I'd like to get some curtains to add to the bamboo blinds, make a headboard and add some art to the walls. I love my tansu chests that I bought for my apartment in Japan so I'll keep those in the room but the current night stand is doing nothing for me (I bought it from the As-Is section of Ikea when I was in grad school). Back in Japan the short tansu chest was my coffee table and it worked well because my couches were also low to the ground. Now with the scale of U.S. sized furniture it looks a little short and out of place so I am thinking of seeing if I can turn it into a console table.

I have lots of plans and am short on time but hopefully I can knock a few items off the list before Erin comes. Wish me luck!