


Shutter Organizer for My Craft Room
 Ever since I saw the shutter organizer in Martha Stewart Living years ago I thought it was a neat idea. Since then all sorts of variations have popped up in magazines and the internet and I've always wanted to make my own version.

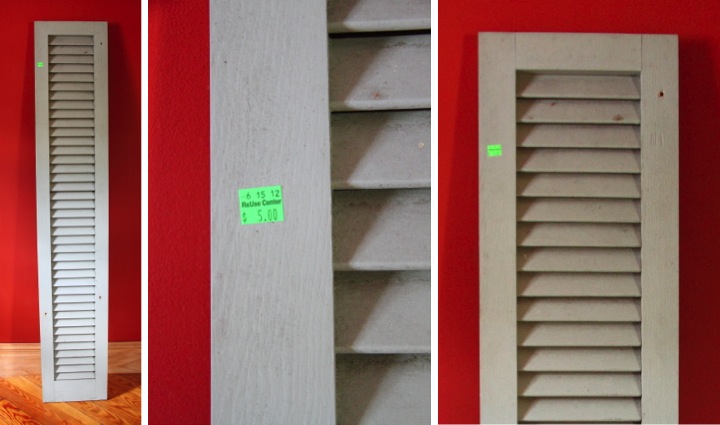
A few weeks ago when I was at the Ann Arbor ReUse Center I found a really tall and narrow wood shutter for $5 and bought it with the intention of making one.
I was drawn to the shutter because it was so tall that it could be free standing and hold a lot of items. Aesthetically I also liked that it didn't have a divider rail and was just uninterrupted louvers the whole height of the shutter. The shutter was solid wood and all of the louvers were solidly attached. It was filthy and a little dinged up, but I knew it had a lot of potential to be fixed up to become an organizer.
Unfortunately after I bought it life has seemed to get in the way and the shutter has just sat in my back room waiting for me to get around to it. The Pinterest Challenge hosted by Sherry, Katie, Michelle and Kate finally motivated to take my project from a pin on my Pinterest board to real life.
To start my shutter needed a little bit of TLC. I used wood filler to patch up some holes and then sanded it down. I wiped it down with a tack cloth and then gave it a few coats of paint with primer in Martha Stewart Living Plumage with an eggshell finish.
The shutters that Martha Stewart used had moveable louvers and the tilt bar kept items tucked in the organizer from falling through the slats. My shutter has fixed louvers and thus no tilt bar so I had to add a backing to hold things in place. I had some leftover pieces of foam board from making bolts to organize my fabric stash which did the trick. Using my glue gun I attached the pieces to the back and I was done.

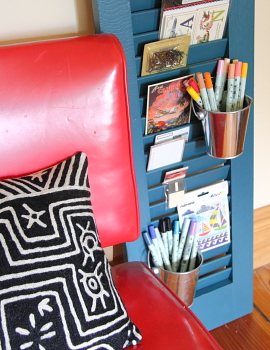
Now that my shutter was complete it was time to put it in place and start organizing. I wanted to add some little pails that I had found for a dollar at the Target One Spot to hold some writing implements and other small things. To hang them I simply attached a bobby pin to each of the pail handles and then tucked the bobby pins in between the slats. This easy method securely held the tin buckets in place and allowed me to fill them with all sorts of things.

With the buckets hung I proceeded to tuck a bunch of my small craft items in the louvers. I like that I can easily see everything in just a glance. Now I am one step closer to getting my craft room in some sort of working organized order.

Did you participate in the Pinterest Challenge? What did you make? Please post a link to your project in my comments so I can check it out.
 Lisa | Post a Comment | Share Article | Email Article | Print Article
Reader Comments