Welcome

My name is Lisa and I'm a crafty girl with wanderlust working as an engineer by day. My blog chronicles projects in my home as well as pictures and stories from my travels.

Search


Instagram

Blog Index
The journal that this archive was targeting has been deleted. Please update your configuration.
Navigation

Entries in Organizing (22)

Monday
Jun032013

Basement Fun

This past week there was a bit of unwanted excitement at the house when part of the basement flooded. Frank and I spent a yucky hour cleaning up with the wet vac and throwing damaged things away.

With things initially under control we had to figure out what happened to fix it. Because it was during a rain storm in Ann Arbor, our first thought was that maybe the city's storm sewers were having an issue but the city confirmed there was no issue. It turned out that our sewer line out to the street had a bit of a blockage due to roots which we paid to get it cleared out. Ah, the joys of owning an old house...

The basement flood brought to the forefront a larger issue, which is that I need to clean up and organize the basement. I have made it no secret on this blog that I have a problem with wanting to keep everything and having trouble letting things go. Living in a five bedroom house with a four car garage as a single woman has enabled me to keep way too much because I have a ridiculous amount of space for one person.

With Frank moving in (I can't believe it is less than two months until we get married!) it is high time that I stop using the basement as a general dumping ground. I need to purge a bunch of stuff and get the remainder organized so that Frank has room for storing his things as well. This past weekend I spent a good chunk of time in the basement doing just that. After spending a ridiculous amount of money on plastic storage tubs and removing 17 contractor bags of things I decided to get rid of (good-bye college electromagnetics class notes and faded red roman shades) the main room in the basement is starting to look presentable. 

Here is where things looked right after we had cleaned up from the flood:

Here is the same corner after my weekend of work:

I started by sorting things that I wanted to keep into plastic bins, labeling them with some painter's tape and a Sharpie. I have a bin for every phase of my life like high school, college, grad school, etc. and am limiting myself to one bin of memorabilia for each.

Below is another corner of the basement before I started purging:

Here is that same shelf as it is right now:

I thought that this would be a good spot to store my paint cans. I have most of my tools stored in the garage, but living in Michigan I can't store my paint out there otherwise it will freeze in the winter.

All in all, it wasn't the most fun weekend (I'd much rather be building or making something) but it was necessary and I made a significant dent into getting the basement in order.

Have you had any basement water issues? Do you have your basement well organized or is it more of a catch all like mine has been?

Thursday
Mar072013

Craft Room Cleanup is Done!

This past weekend I finally finished organizing and cleaning out my craft room. It took me a few months but I am so glad that it is done. I need to do some furniture rearranging and decorating, but having things organized is a good first start.

So far I moved the grey rug that I used to have in the living room up into the room. For a work surface I set up two white Vika Amon table tops from Ikea that I already had on top of some new Lerberg trestles. That's all I was able to do before we headed on vacation but I am ready to get things looking great as well as being clean and organized when I get home.

Wednesday
Nov142012

Ribbon Organization for My Craft Room

So, as I have mentioned before, my craft room is a hot mess and I am trying to do something about it. Unfortunately, it is turning into a bit more of a marathon rather than a sprint, but at least I am slowly making some progress.

One of those organization projects that I have been working on was to figure out a way to store my ribbons. Previously I have stored them in glass Burken jars from Ikea. It looked pretty sitting on a shelf, but practically it didn't really work for me. The ribbons would get tangled and if I wanted to find a particular ribbon I would need to dump the whole jar out to find what I was looking for.

A few months ago I had pinned an idea to organize embroidery floss by wrapping it around clothespins onto my Organization Board on Pinterest. I thought that the idea would work equally well for my ribbons and decided to give it a shot. I picked up a few packs of clothespins (a set of 50 will run under $3) and I was on my way.

Wrapping the ribbons, especially the wide ones, took a little practice to find a good way to make it work, but once I did I was on a roll and got everything wrapped in no time. I would start and the top of the clothespin and wrap the ribbon back around on itself to secure the end. I would then wrap up and down the clothespin, overlapping the ribbon a little bit for each turn around. Once it was completely wrapped I gently pressed the prongs a bit to open the clothespin and secure the tail end between the prongs. 

To store the ribbons I bought some cute wire bins at Target for $2.50 each and then sorted them into warm colors, cool colors and neutral colors. Now it is super easy to find what I am looking for by rummaging through the bins. I also don't have to deal with tangles and as an added bonus it looks cute, too.

Have you been doing any organizing? Do you have any tips for keeping your craft supplies neat?

Saturday
Nov032012

Resolution Recap: October 2012

How can it already be November? Where is this year going? Anyway, I am back with an update on my two 2012 New Year's resolutions of purging and organizing my home and finishing up some of the many projects I have going on around the house after not providing a recap about September. I had a lot going on in September at work and personally so I just didn't get that much done.

October was a little better for me on the resolution front. I did manage to get a little more done this month and while it wasn't my most productive I'm doing my best. In the words of an old boss of mine, "Do the best you can do. That is all you can do." 

Resolution 1: Purge & Organize
My goal of having a volume of at least one trash cart (between my recycling and regular trash) out on the curb on garbage pick-up morning every Monday was up and down in October but if you look at the average it isn't bad. Here's my breakdown:

- October 1: 1/2 full trash + 1/2 full recycle = 1 total
- October 8: 1/4 full trash + 1/4 full recycle = 1/2 total
- October 15: Nothing (In Woodstock)
- October 22: 1/4 full trash + 0 recycle = 1/4 total
- October 29: Overflowing full trash + 1 full recycle = 2+ total 

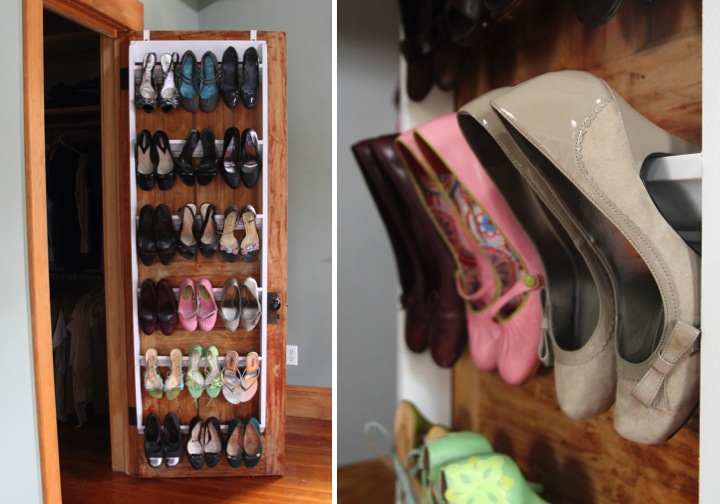
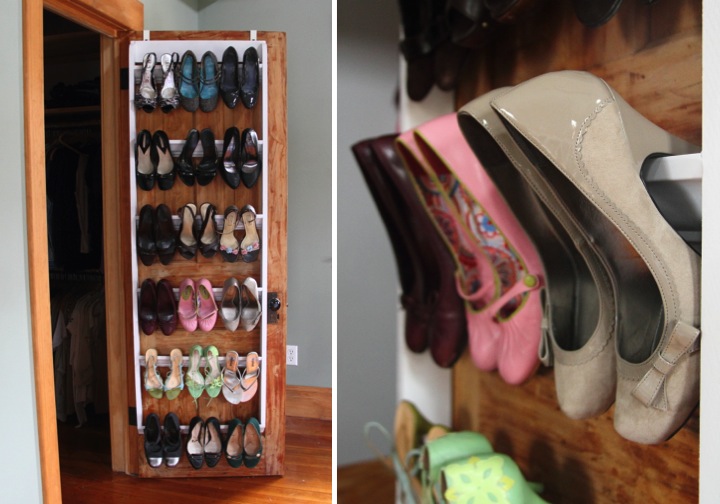
On the organizing front I built a shoe organizer for my closet door and I am trying to purge a bunch of my unused craft items

Resolution 2: Finish Up Projects

In getting some of my rooms updated I got a new dining table and new sectional and moved an old beloved table into the room. I didn't have much time to devote to projects since I was focusing more on cleaning, but I hope that November is a little better.

Did you work on any projects or do any purging at your house this past month? Are you still trying to stick to any New Year's resolutions?

Tuesday
Oct302012

DIY Crown Molding Closet Shoe Organizer for Heels

I am short but I would just love, love, love to be tall. Because of this I have a high heel addiction and wear them everyday. In fact, I am so used to wearing heels that I can run in them as fast as I can in flats. Before you are impressed, I must disclose that I am painfully slow in whatever footwear I choose. I would tell you to think tortoise slow, but that would be slander against the tortoise.

Anyway, I digress. The point of all of this is that I have a lot of heels. I also happen to live in a house that is over hundred years old built in a time when thoughts of master suites with shoe closets were not exactly on the radar. As a result I need to make the best use of the closet space that I have to store my shoe collection. 

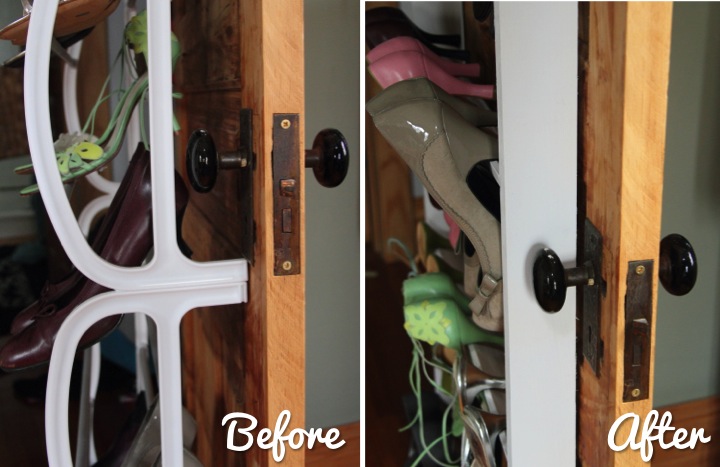
My old solution was terrible. It was a cheap over the door organizer that had all sorts of problems. First, it stuck pretty far out from the door making it a little unwieldy to get in and out of the closet. Second, it was just flat out ugly made from cheap plastic with metal rods. It doesn't look so bad in my pictures, but it real life it was an eyesore. Third, and most importantly it covered over the inside door handle. Normally, no one would care about an inside closet handle but when I remodeled the second floor of my house I reconfigured it to expand the closet as much as I could and to make it a pass through into the master bathroom. If I want to go from the bathroom to my room I have to wrangle the door knob through my shoe organizer. It's really annoying so I tend to just leave the door open which is not the best solution. 
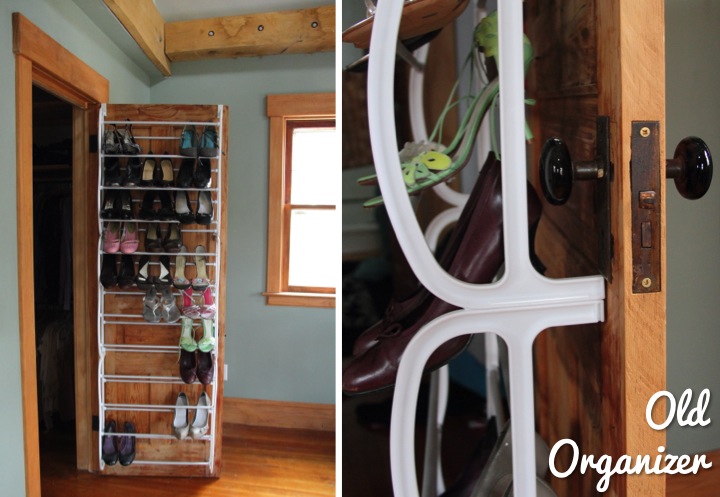
Several months ago on Pinterest I pinned an image of crown molding on a wall for hanging heels from an article on Houzz.com thinking it would make a great solution for me. It has languished among my many pins, but I decided to use The Pinterest Challenge hosted by SherryKatie, Carmel and Sarah to finally get around to doing something with the idea.
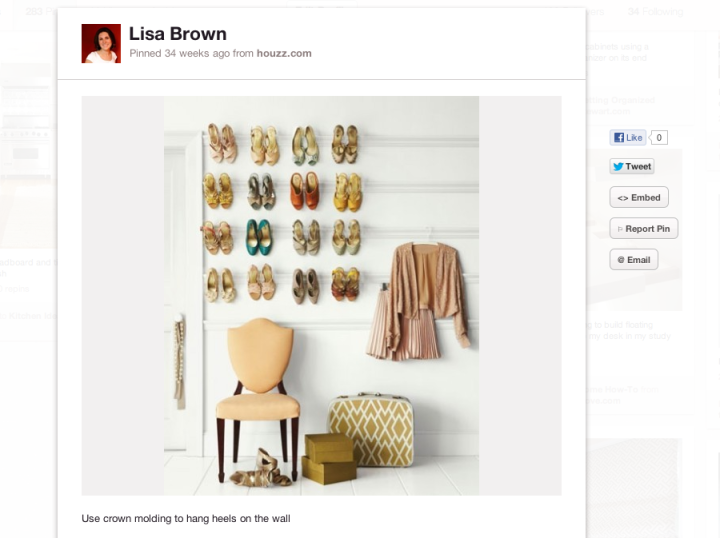
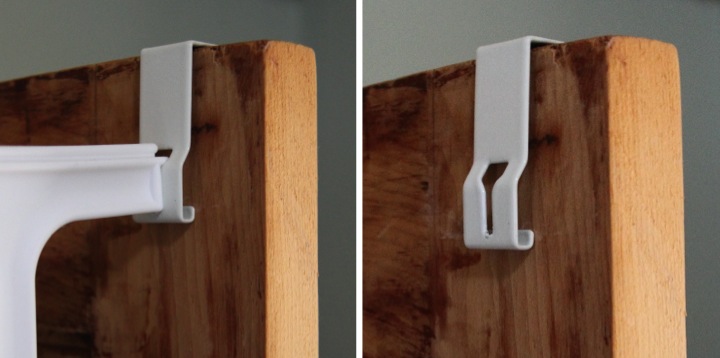
Unlike the pinned image, I wanted to keep my heels inside my closet instead of displaying them on the wall. Also, I didn't want to make any holes in my old solid hardwood door (yes, I know it is bad need of refinishing). On my other closet door I had previously made a laundry sorter system from hanging baskets and had used Command Hooks so that I wouldn't damage the door. Command Hooks wouldn't be an option for this project, however, since any shoe organizer would be too heavy for them. As I was taking down my old shoe organizer, I realized that the metal part that went over the door could be slipped off the rest of the organizer and would make the perfect solution for me.
With how to hang up the shoe organizer figured out I next had to tackle the frame. I needed to make it as light as possible so it wouldn't put excessive stress on the door hinges. After sketching some ideas I decided to use 1x3s for sides with a 1x4 brace at the top. I measured a few pairs of my heels and determined that spacing the crown molding shelves 12" would allow me sufficient space for things not to be too crowded and give me six shelves. I was also careful to determine the width (22-1/2") so I wouldn't have interference with my door knob.

I didn't want to have the top have a square sharp edge so I traced a design on the top of my side supports and cut it out with my jigsaw. Next, I held up the crown molding against the side rotating it until I determined what angle I wanted it to be, which ended up being 40 degrees. I measured down 66" inches from the top (12" x 5 for the spacing between the six shelves plus an extra 6" at the top), clamped the two sides together and cut the bottom at 40 degrees. I then made a mark every 12" starting from the bottom and used the trimmed off piece as a guide to mark the angle for the molding on the sides.
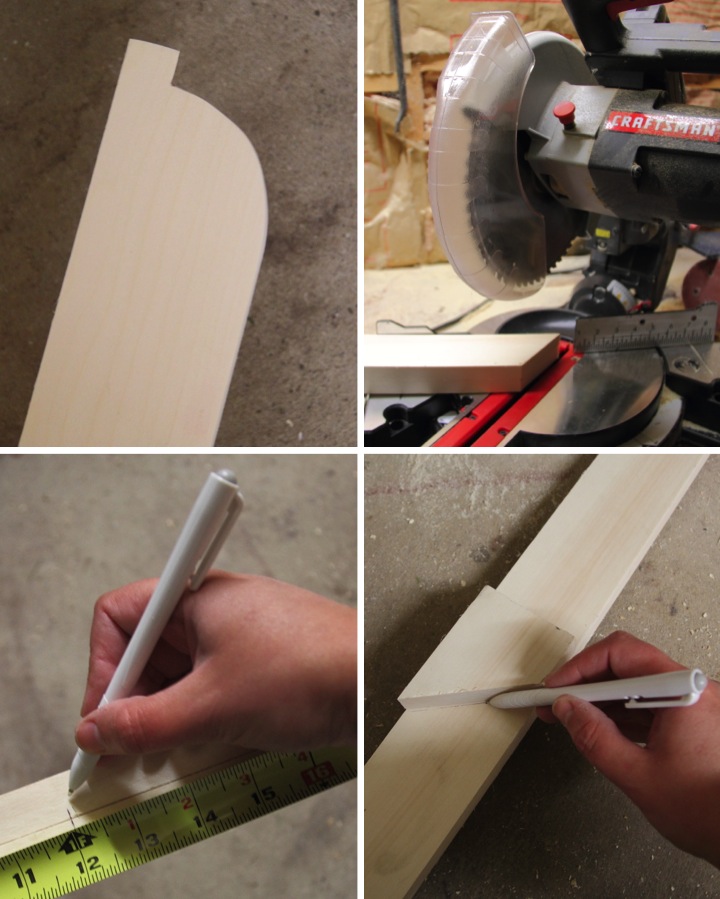
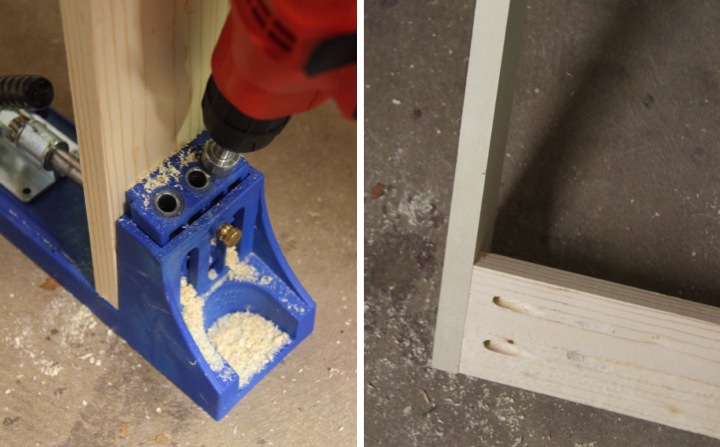
With my sides cut and marked, I cut the 1x4 brace and five of the shelves at 21" and an additional shelf for the bottom at 22-1/2". I made the bottom shelf the full width because I planned it to go over the supports instead of inside like the others. I wanted the brace to be well secured to the shelf so I decided to use my Kreg Jig to make pocket holes to attach it to the sides.
To attach the crown molding shelves I put some wood glue on the ends, aligned them with the marks that I made and used some brad nails to secure them. For the bottom shelf I used glue and brad nails, but placed it on top of the angled bottom. This left a little gap which I filled in with wood putty and sanded flat.

I filled in the rest of the brad nail holes, sanded the whole piece, wiped it down with a tack cloth and I was ready for paint. I kept things simple and just gave the organizer two light coats of white spray paint.
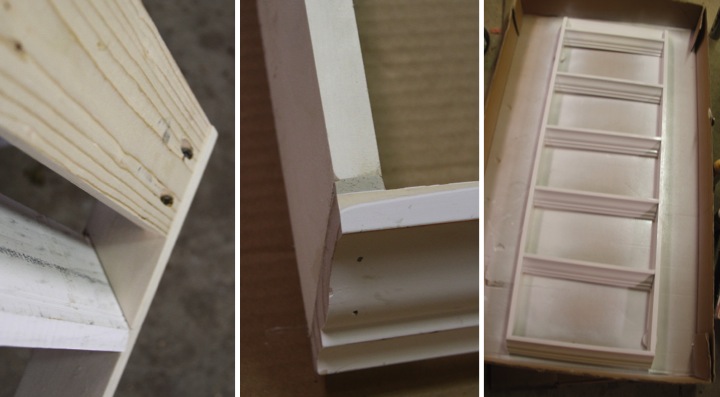
Once the organizer was dry my last step was to attach the old metal over the shelf brackets. I drilled a pilot hole for the screw, attached the brackets with 1/2" screws and my organizer was complete.
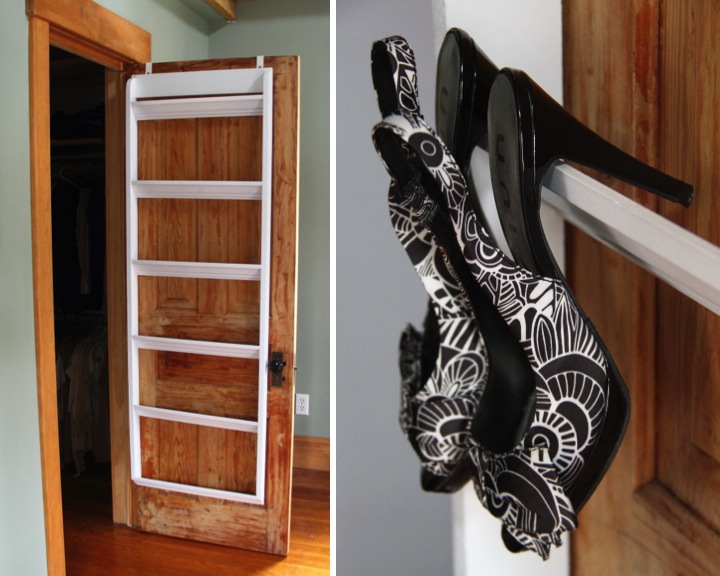
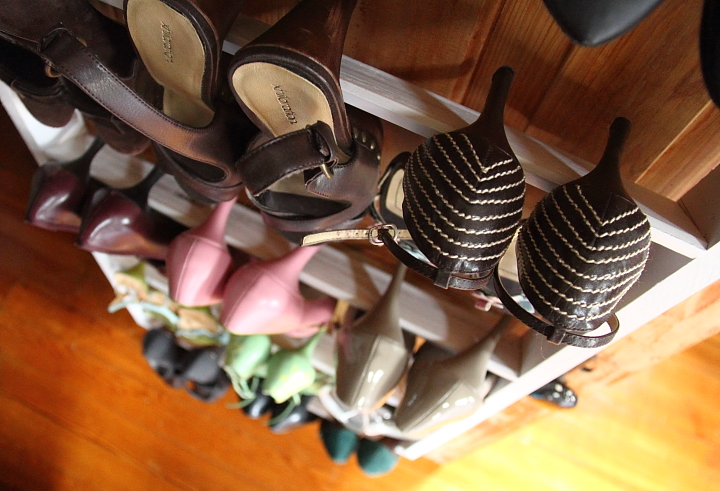
 

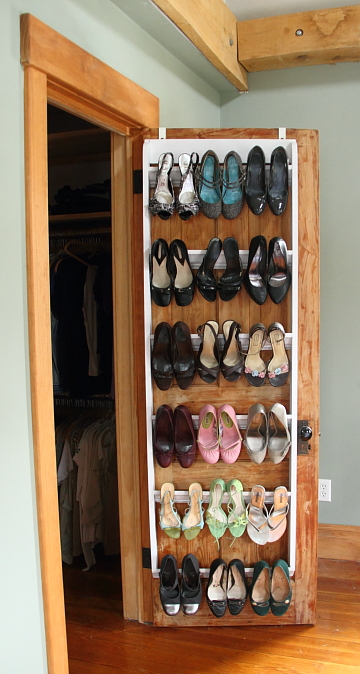
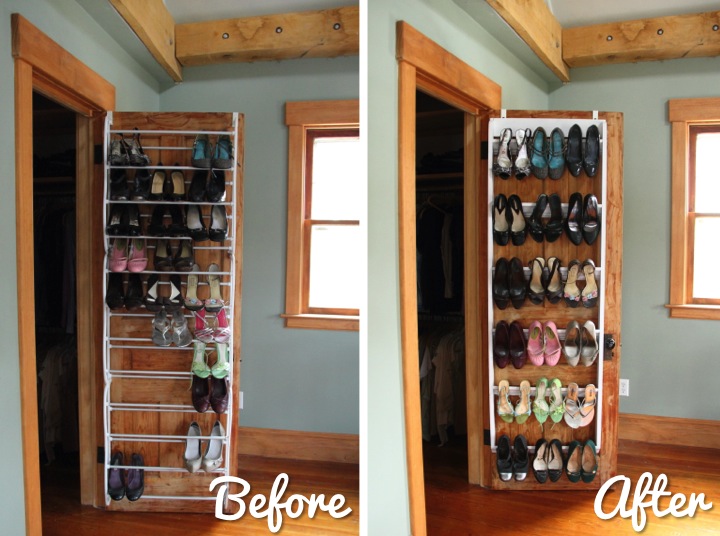
I am thrilled with how my shoe organizer turned out. Not only is it much more functional than my old organizer (I can reach the door handle!) but it is so much prettier. 
Here is a view of the old organizer and new organizer from afar. I think it looks much cleaner to have the shoes spaced out, plus my newly built organizer sticks out less than half the amount from the door as the old one making it much easier to get in about out of the closet. Also, it is needless to say that crown molding looks prettier than cheap metal tubes any day. 
Did you make anything for the Pinterest Challenge? If so, leave a link in my comments because I would love to check it out!

Friday
Sep212012

Kitchen Display Shelves 

One of the things that I love about my kitchen are my display shelves. When I worked out a floor plan for my kitchen the only spot that would work to put the refrigerator positioned it do that the side of it was on full display if you were looking in from the living room. Not so pretty.

I had a few spare inches between the fridge and the door to the laundry room so I decided to box in the refrigerator and add some shallow display shelves. What was a design dilemma turned into one of my favorite parts of my kitchen. I have a tendency to collect tons of things on my travels so this way a great way to showcase some of those items along with some functional kitchen items.

I have been adding things to the shelves to the point where they had just become a messy catch all. Instead of looking pretty, they had become cluttered and ugly. I decided to to a little rearranging and editing of what I had displayed since all of my items were not going to comfortably fit.

I thought I would snap some photos of my rearranging and share a little of the story behind the items I have displayed. It's probably still a bit too cluttered, but being the hoarder that I am I have to take it one step at a time.

Top Shelf
On my top shelf starting from the left I have some wooden pestles that I bought at the market in Chichi, Guatemala. I can't resist picking up local kitchen tools when I travel. Behind that is a sign in Japanese that says "危険注意" which means "Caution Danger" in English. I bought it at a flea market in Kyoto because there are warning signs like these all over Japan everywhere you look. Moving on is a bottle of limoncello from my first trip to Italy back in 2002. The limoncello is long gone, but the bottle is pretty and has good memories associated with it so I filled it up with some water with yellow food coloring and have it on display. The pasta print is from Rome on my most recent trip to Italy, earlier this year. I need to get a frame for it, but it is an odd size. Farthest on the right is an antique nut grinder that I picked up years ago.  

Second Shelf
The leftmost item on my second shelf is the olivewood grater that I bought in Sorrento while Frank and I were in Italy in March. In front of the grater is a vintage red enamel teapot that I bought at a local housewares consignment shop here in town. I collect cookbooks from my travels and the Cocina Peruana cookbook was purchased during a visit to Peru. I like that it has the recipes in both Portuguese and English. In front of the cookbook is a set of egg cups from a trip to Grenada, Spain. I love that you can tell they were handmade by the small variations in size and paint among the four. 

Third Shelf
The left side of my third shelf has an apple tea tin that I saved from a trip to Turkey and a small cast iron teapot from Japan. Continuing with the tea theme on the shelf I have a collection of tea tins from trips in Asia including Taiwan, Hong Kong and Japan with a little ceramic teapot from Taiwan perched on top. The Fresh Bread Daily is a vintage reproduction that I've had for forever.

Fourth Shelf
On my fourth shelf I have a muddler that I bought in Brazil for making their national drink, the Caipirinha. Next to the muddler is a little hand painted bowl that I bought at the Grand Bazaar in Istanbul. Hanging up I have the matching pasta print to the one I have on the top shelf. On the right side of the shelf I have a variety of vinegars that I use plus a tin of Greek Olive Oil that I bought in Athens and saved after I used it.

Bottom Shelf
On my bottom shelf I have saved spice tins from my travels in France, Hungary and New York plus a little spice grinder that I bought in Istanbul. Hanging up are some tiny vintage baking tins and the Pates Baroni sign is from Target over ten years ago. The carved little roosters have a fun story. Over ten years ago a friend of mine visited Japan and bought the little pair on the right as a gift for me. The carving style is known as sasano ittobori and I love how the wings and tails are carved with paper thin curls of the wood. Fast forward several years and while I was traveling around Northern Japan in Yamagata Prefecture I discovered that they were selling these same hand carved birds. Of course I had to buy a rooster to go with the pair I already had and picked a small one with a very long tail.

Do you have any collections on display in your kitchen? What kind of items do you pick up when you travel?

Saturday
Sep012012

Resolution Recap: August 2012

During August I continued work on tackling my two 2012 New Year's resolutions of purging and organizing my home and finishing up some of the many projects I have going on around the house.

Despite being really ill at the beginning of this past month I managed to get a lot of things done. My purging wasn't so great but I made up for it in spades by finishing up a lot of items around the house. I think that all in all it balanced out in the end.

I'm especially excited about what I got done on my back entry during the end of this past month and hope to wrap that up project in September. I'm having a great time in Dallas (I'm here for the Michigan vs. Alabama game) right now but I also can't wait to get home and get cracking on building the bench for my back entry. 

Resolution 1: Purge & Organize
I did not come anywhere near close to my goal of having a volume of at least one trash cart (between my recycling and regular trash) out on the curb on garbage pick-up morning every Monday in August. Hopefully I am a little better in September. Here's my breakdown:

- August 6: 1/4 full trash + 1/4 full recycle = 1/2 total
- August 13: 1/2 full trash + 1/2 full recycle = 1 total
- August 20: 3/4 full trash + 1/2 full recycle = 1-1/4 total
- August 27: 1/4 full trash + 0 recycle = 1/4 total

On the organizing front I came up with a laundry sorting solution from baskets that I hung up on the back of my closet door.

Resolution 2: Finish Up Projects
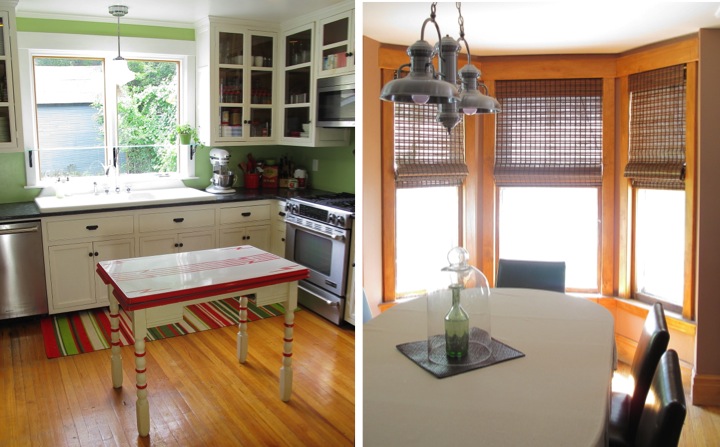
I was super productive on the projects front this month despite being really sick at the beginning of August. For my kitchen I found a vintage table to replace the island that wasn't working for me and finally hung blinds in my dining room.

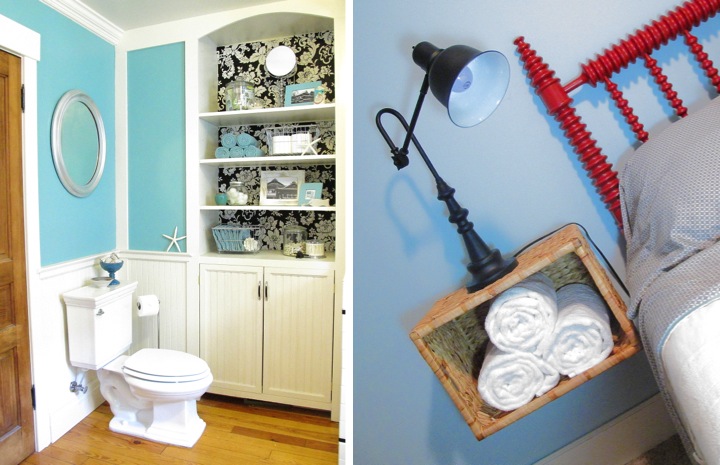
In my bathroom some simple upgrades made a big difference for me. I customized a pillow for my guest room and also came up with a floating basket solution for the night stands. 

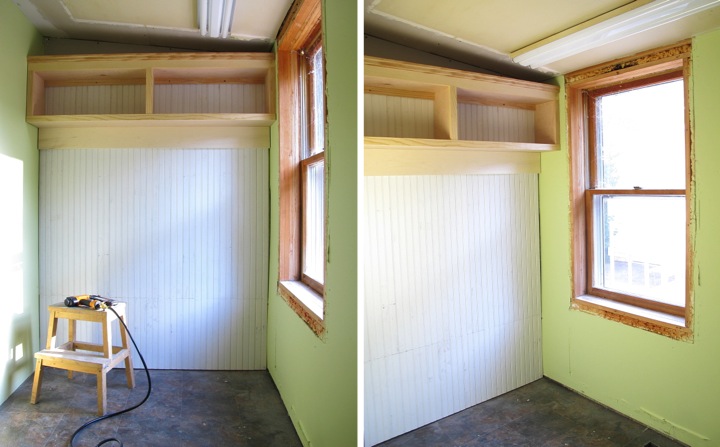
My biggest progress was in my back entry where I taped and mudded the drywall, primed, painted and hung beadboard and then built a storage shelf.

How are you coming along on your New Years Resolutions? Did you work on any home projects in August? 

Sunday
Aug122012

Basket Laundry Sorter

To say that I have a laundry problem is a bit of an understatement. I let it pile up on my bedroom and closet floor and then gather it up and sort it when I have time to do the laundry. It's out of hand and I needed to do something about it.

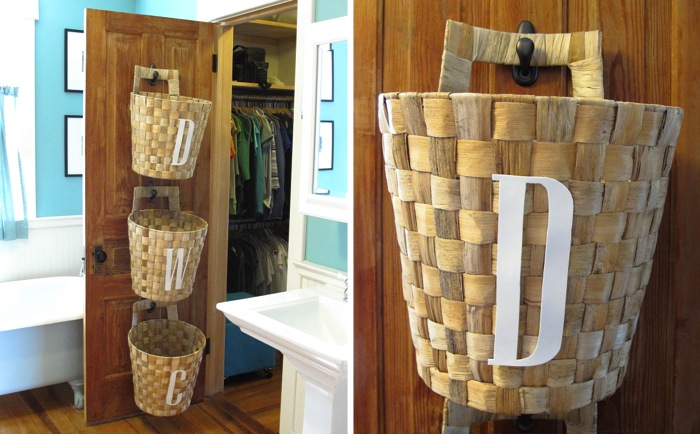
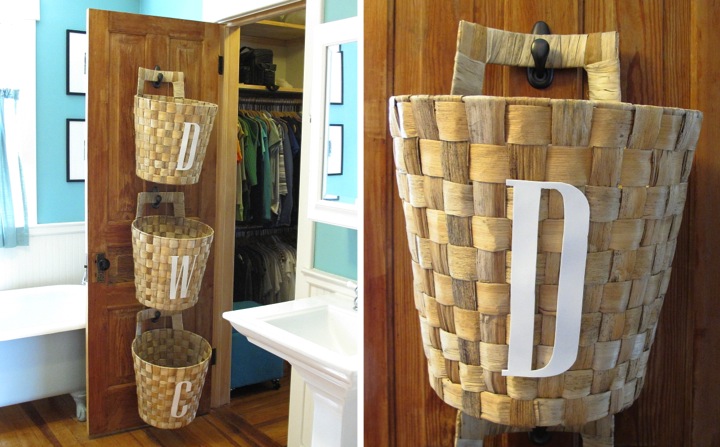
When I was at Ikea yesterday afternoon I spotted the Nasum baskets and a light bulb went off in my head. I thought they would make a perfect laundry sorter solution for me. The single handle is perfect for hanging and when I measured them I determined that I could easily fit three on the inside of my closet door. I also thought the banana fiber texture looked pretty plus each one is about the size of a load of laundry. 

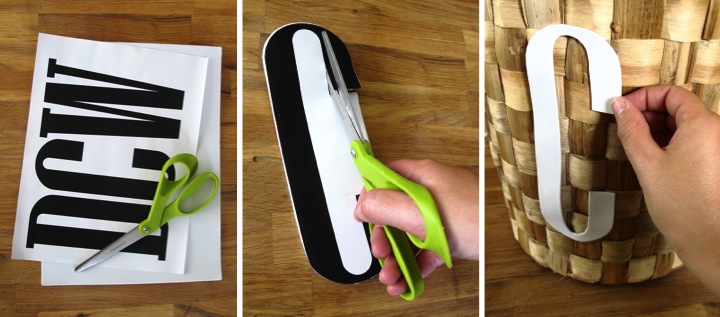
I brought three baskets home and went about making labels for them. I printed out initials for each basket: C for Colors, W for Whites and D for Dry Cleaning. I thought about tracing them and painting them on the baskets, but I wanted something removable in case I wanted to use them for something else later. I cut out the letters out from white adhesive foam and then stuck the letters on the front of the baskets.

Due to the texture of the baskets the letters are a bit bumpy but I still like how they turned out.

With the baskets labeled I turned to hanging them up on my closet door. My closet has a door to my master bath as well as my bedroom. I decided to hang them on the door that opens to the master bath so that I could toss clothes into the baskets before I hop in the shower.

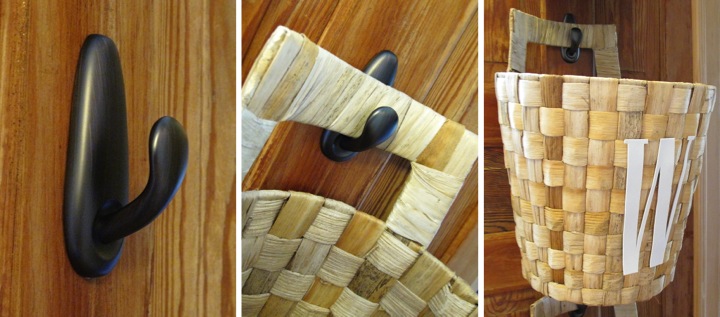
I didn't want to put holes in my antique hardwood doors so I turned to using Command hooks which are removable and won't mark up or damage my door. I got some large ones in oil rubbed bronze finish and attached them to the back of the closet door. Just to make sure that I wouldn't have any issue with the hooks falling off the door I let them sit overnight before hanging the baskets. 

I love how this project turned out and I think that this new system will keep my dirty laundry off of the floor. I'm also hoping this will motivate me to keep on top of my laundry instead of letting it pile up.

How do you sort or organize your dirty laundry? Do you have a system? Do you let your laundry build up or do you keep on top of it and do it regularly?

Wednesday
Aug012012

Resolution Recap: July 2012

During July I made a little bit more progress toward tackling my two 2012 New Year's resolutions of purging and organizing my home and finishing up some of the many projects I have going on around the house.

Just like in June I was out of town a lot this past month, this time to Canada and then to Japan for work. I am happy with what I did manage to accomplish while I was home, though.

I should be home more in August so I have some big plans for next month and hope to make some progress on my back entry that I didn't get around to in July. I'm not always as productive as I wish, but I keep trying to plug away at it each month.

Resolution 1: Purge & Organize
I met my goal of having a volume of at least one trash cart (between my recycling and regular trash) out on the curb on garbage pick-up morning every Monday in July, except when I was in Japan and sick. Here's my breakdown:

- July 2: 3/4 full trash + 1/4 full recycle = 1 total
- July 9: 1/2 full trash + 1/2 full recycle = 1 total
- July 16: 3/4 full trash + 1/2 full recycle = 1-1/4 total
- July 23: Nothing (In Japan)
- July 30: Nothing (In Japan and sick) 

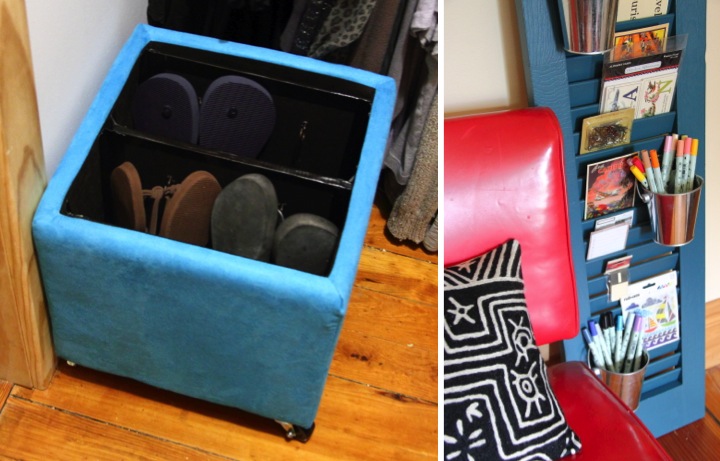
On the organizing front I did two projects. In my craft room I made a free standing organizer from a tall shutter that I found from the Ann Arbor ReUse Center. For my closet I converter an ottoman to store my flip flops. I also put casters on the ottoman to raise it up a bit so I can use it as a step stool to reach the high shelves in my closet.

Resolution 2: Finish Up Projects
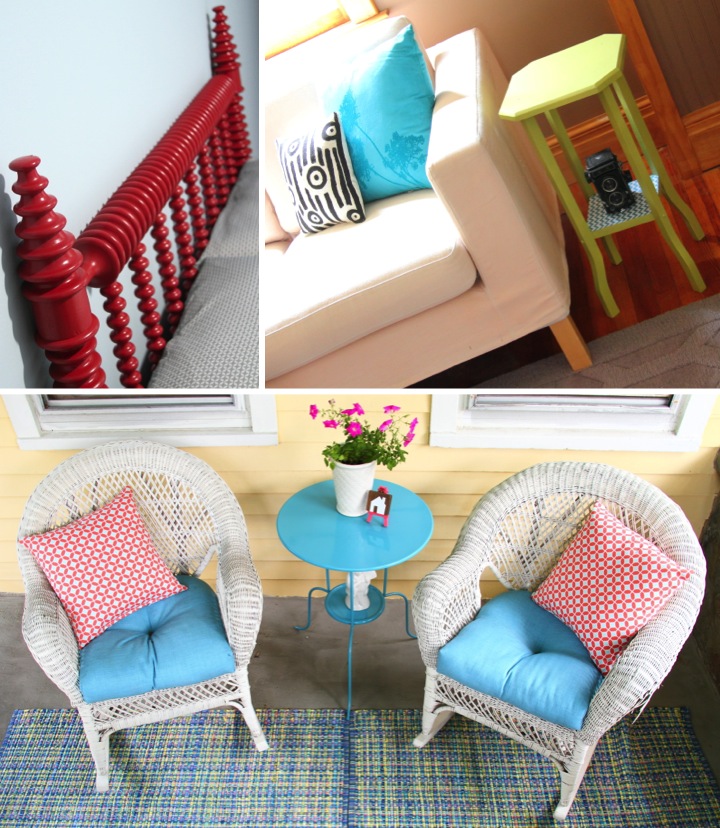
Even with my limited time at home this month I managed to tackle a few little projects at home. I found an old wood headboard for $25 and made it over for my guest room with some red spray paint. In my living room I did a make over on a little side table with some scrapbook paper and sprout spray paint. Out on my front porch I finished the make over that I started last month by adding some pillows and making decor items.

How are you coming along on your New Years Resolutions? Did you finish up any big projects in July? 

Monday
Jul162012

Storage Ottoman Makeover For My Closet

My closet is a complete and total mess. Having enough space isn't the issue. It's a nice size for an old home with about 42" of hanging space on either side of the door. I have access to it from my room and then can walk through it to the master bathroom. Unfortunately, it is completely unorganized and I have all sorts of junk on the floor. I added a second hanging bar on one side, but that is all I have really done recently. The woodwork needs to be painted and I'd also like to paint the walls something other than white. I have a lot of shelving but because I am so short I can't reach it so it is currently wasted space.

As a first step to make my closet more usable and organized  I decided to make it easier to access my shelves. I had this little turquoise suede ottoman that I thought would be perfect to make into a step stool. I wanted to be able to move it around easily so I decided to put it on casters. I didn't want it to slip out from under me when standing on it so I bought two locking casters and two regular swivel casters.

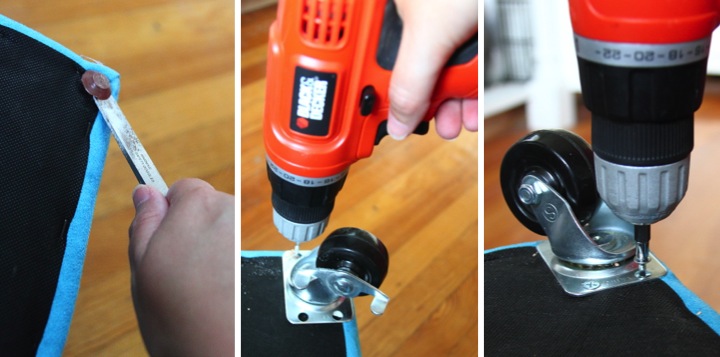
To mount the casters I started by flipping the base of the ottoman upside down and prying off the small feet that were on the ottoman. I then placed the casters in each corner of the ottoman with the two locking ones in opposite corners. I predrilled holes and then screwed them into the base.

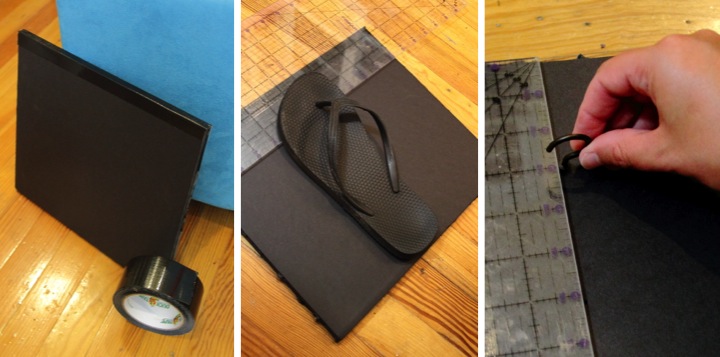
Now that the ottoman was rollable I decided to make the inside more useful as well. I have a lot of flip flops but no good place to store them and I thought this could be just the ticket. I used some black foam core, large cup hooks and black duct tape to make some partitions for my flip flops to hang from. I cut four pieces of foam core the width of the inside of the ottoman and 1/2" shorter than the height.

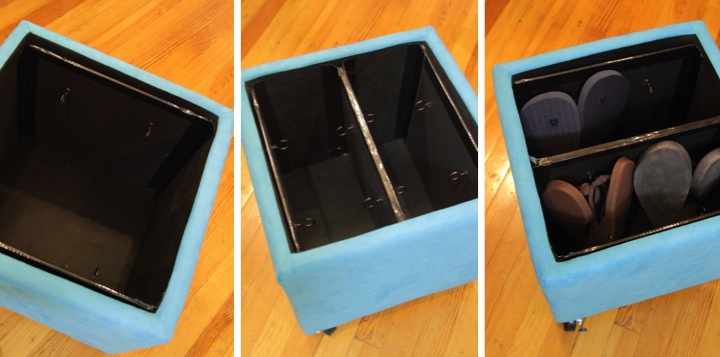
For the center I doubled up two pieces and put a piece of duct tape over the top of them to join them. I used a flip flop for a guide and determined that the hooks needed to be 2-1/2" from the top of the foam core. I then poked a cup hook into the foam core 3" from each side and 2-1/2" from the top. I repeated the same on the back side as well. I found that the hooks had a tendency to spin when I tried to hang the flip flops on them so I pulled them out, added a dab of hot glue and then replaced the cup hooks.

For the two end partitions I did the same process as above, but with a single piece of foam core and with hooks on only one side.

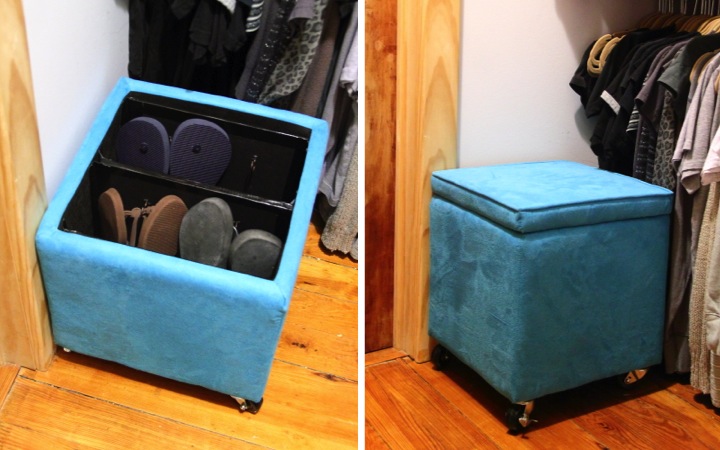
With all of my partitions complete I was ready to assemble everything in the ottoman. I placed the end partitions against the side and used duct tape along each edge to secure them to the ottoman. I then put the middle partition in the ottoman and taped it down as well. I finished by hanging some of my flip flops in the ottoman.

I moved my ottoman into my closet and it fit perfectly. I can also now reach my closet shelves when I stand on it which is really convenient. 

Now I need to find where the rest of my flip flops are hiding around the house and wrangle them in my new and improved ottoman.