Welcome

My name is Lisa and I'm a crafty girl with wanderlust working as an engineer by day. My blog chronicles projects in my home as well as pictures and stories from my travels.

Search


Instagram

Blog Index
The journal that this archive was targeting has been deleted. Please update your configuration.
Navigation

Entries in Organizing (22)

Tuesday
Jul102012

Shutter Organizer for My Craft Room

Ever since I saw the shutter organizer in Martha Stewart Living years ago I thought it was a neat idea. Since then all sorts of variations have popped up in magazines and the internet and I've always wanted to make my own version.

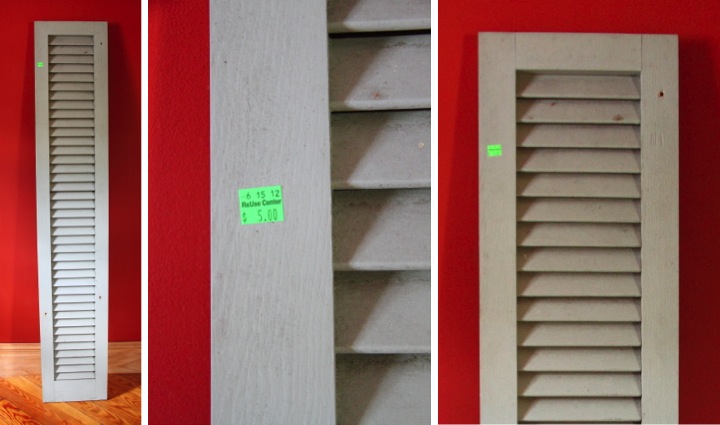
A few weeks ago when I was at the Ann Arbor ReUse Center I found a really tall and narrow wood shutter for $5 and bought it with the intention of making one.

I was drawn to the shutter because it was so tall that it could be free standing and hold a lot of items. Aesthetically I also liked that it didn't have a divider rail and was just uninterrupted louvers the whole height of the shutter. The shutter was solid wood and all of the louvers were solidly attached. It was filthy and a little dinged up, but I knew it had a lot of potential to be fixed up to become an organizer.
Unfortunately after I bought it life has seemed to get in the way and the shutter has just sat in my back room waiting for me to get around to it. The Pinterest Challenge hosted by Sherry, Katie, Michelle and Kate finally motivated to take my project from a pin on my Pinterest board to real life.

To start my shutter needed a little bit of TLC. I used wood filler to patch up some holes and then sanded it down. I wiped it down with a tack cloth and then gave it a few coats of paint with primer in Martha Stewart Living Plumage with an eggshell finish. 

The shutters that Martha Stewart used had moveable louvers and the tilt bar kept items tucked in the organizer from falling through the slats. My shutter has fixed louvers and thus no tilt bar so I had to add a backing to hold things in place. I had some leftover pieces of foam board from making bolts to organize my fabric stash which did the trick. Using my glue gun I attached the pieces to the back and I was done.

Now that my shutter was complete it was time to put it in place and start organizing. I wanted to add some little pails that I had found for a dollar at the Target One Spot to hold some writing implements and other small things. To hang them I simply attached a bobby pin to each of the pail handles and then tucked the bobby pins in between the slats. This easy method securely held the tin buckets in place and allowed me to fill them with all sorts of things.

With the buckets hung I proceeded to tuck a bunch of my small craft items in the louvers. I like that I can easily see everything in just a glance. Now I am one step closer to getting my craft room in some sort of working organized order. 

Did you participate in the Pinterest Challenge? What did you make? Please post a link to your project in my comments so I can check it out.

Thursday
Jun282012

Spice Organization

I am overwhelmed with the unorganized disaster zone that is my home so I am trying to get some sense of accomplishment by attacking some easy items on my list. First up, I present my spice shelf in my kitchen.

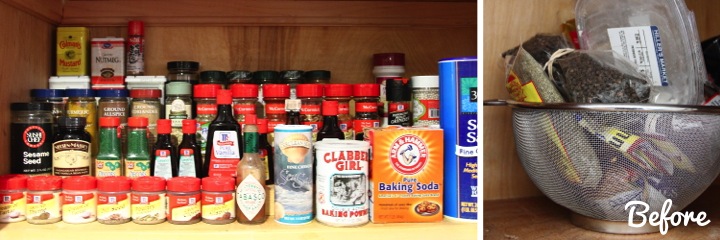
At first glance it isn't so bad but since my kitchen upper cabinets are glass fronted I wanted things to look a little nicer and more uniform. The biggest issue was that I have a lot of bulk spices in bags that I just ended up storing in a heap in a mesh colander which was not so convenient.

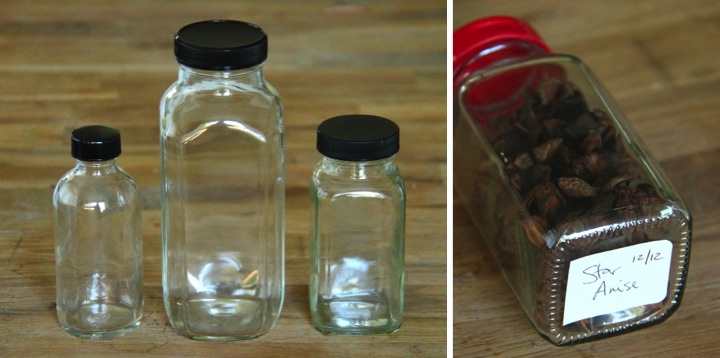
As a solution I ordered a bunch of spice bottles from Specialty Bottle. I got 6 oz French square glass bottles for most of my spices with a few 16 oz French square bottles for my larger quantity bulk spices. For my baking extracts I bought some 4 oz Boston round glass bottles.

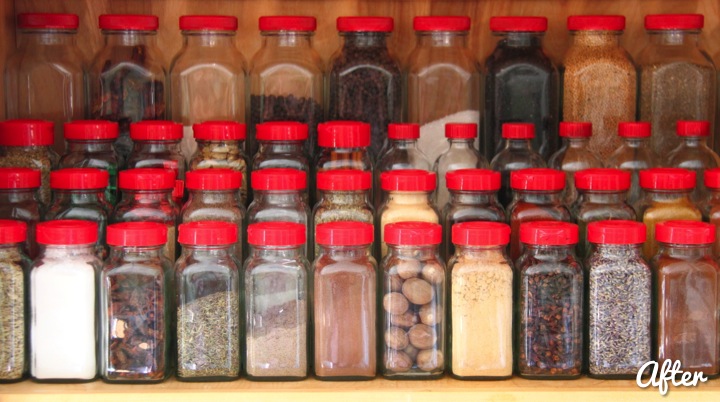
The glass bottles came with black lids which didn't really go with the red lidded glass jars that I use for storing my dry goods. As luck would have it the red lids from my McCormick spices fit perfectly on the 6 oz spice bottles. For the 4 oz and 16 oz bottles I used some red spray paint to transform the lids. I haven't decided if I want to add labels to the front of the jars but in the meantime I cut down some cheap labels and put them on the bottom of the jars with each spice's name and expiration date.

Everything is much neater plus I can find what I am looking for quickly now. There's nothing better than a project that is both pretty and functional.

Have you been tackling any organization projects? How is it going? Are you naturally neat or naturally messy like me?

Friday
Jun012012

Resolution Recap: May 2012

Last month my 2012 New Year's resolutions of purging and organizing my home and finishing up projects around the house went by the wayside a bit but I was back on track in May. I am happy with what I accomplished, especially the garage cleaning.

Resolution 1: Purge & Organize
I met my goal of having a volume of at least one trash cart (between my recycling and regular trash) out on the curb on garbage pick-up morning every Monday in May, even on the Monday following my weekend trip to Florida. Here's my breakdown:

- May 7: 3/4 full trash + 1/2 full recycle = 1-1/4 total
- May 14: 3/4 full trash + 1/4 full recycle = 1 total
- May 21: 1 full trash + 1 full recycle + 3 SUV loads full (from garage cleaning) = tons!
- May 28: 1 full trash + 1/4 full recycle = 1-1/4 total

On the organizing front Frank helped me clean and organize my garage. It definitely needs more work, but it is so nice to have space in there to work on projects now. I also did some blog organizing creating my Projects tab with thumbnails of projects as well as my Away tab with a clickable map of where I have traveled.

Resolution 2: Finish Up Projects
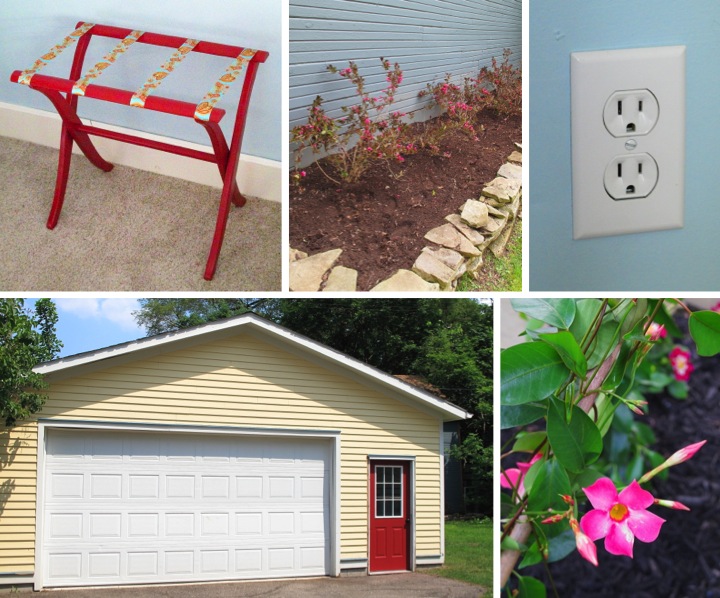
I got a lot of gardening work done outside in May including new plantings in my front beds and clearing out my back bed. In my guest room I got a little more done, replacing the old outlets and making over a luggage stand that I rediscovered during my garage cleaning. I also spruced up my garage door by painting it red and replacing the door knob and worked on my application to the historic district for new shutters and two replacement windows

In June I hope to fix the trim on the garage door and maybe get some things done in my back entry/laundry room.

How are you coming along on your New Years Resolutions? Did you finish up any big projects in May? 

Thursday
May312012

Digital Photo Storage Organization

Back when I used a film camera I used to organize my photos in chronological order in photos boxes and kept my negatives in binders. When I switched over to digital back in 2003 I had to find a good way to sort and deal with all of the digital photo files I now had.

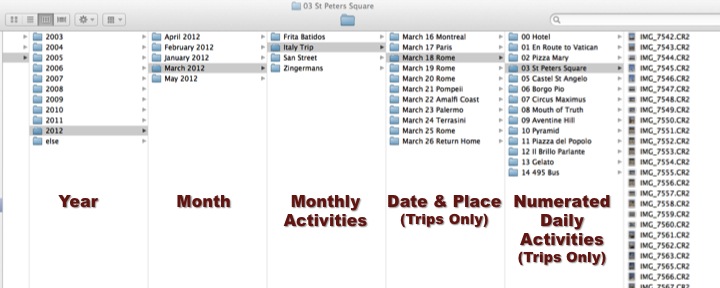
My system has evolved a bit over time, but here it is in a nutshell. On my hard drive I have a folder for every year. Under every year I have a folder for every month and then every activity within that month. I then put my pictures within that activity folder. For the example below I went to Zingermans for dinner in March so those photos are in 2012/March 2012/Zingermans.

That system works well for basic things that happen in a month, but it is insufficient for the photos I take on a trip. On a vacation it is not uncommon for me to snap over a hundred photos in a day and when you multiply that by a week or two it ends up being a lot of photos. To organize trip photos I make a trip folder under the month that the trip occurred and then make sub-folders for each day of the trip with the place that I was on that day. For each day I then make another set of folders about the specific activities/places I saw on that day and then number the folders in order of when I did them on that day. So for the example below, the third thing that I did on March 18 in Rome on my Italy trip was visit St. Peter's Square so those pictures are in 2012/March 2012/Italy Trip/March 18 Rome/03 St Peters Square. Having the sub-folders for each activity on a day is great so that I don't have to try and remember a few years later where a particular photo was taken.

The two exceptions that I have to this system are that I keep the pictures that I take of blog projects in a separate area (but similarly structured) and I keep pictures of my house in folders sorted by room. Overall, I have used my system for a while and it works really well for me to be able to quickly find any photo I am looking for.

How do you organize your digital photo files? What system do you use to easily find photos?

Sunday
May202012

Garage Cleaning

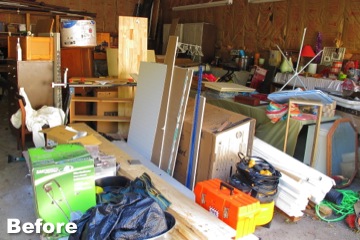
My garage has been an embarrassing mess. Things have just piled up in there and since it has a ton of space it has really gotten out of control. Even with it being about 30' x 30' I had almost no floor space left to easily move around. It was in bad, bad shape.

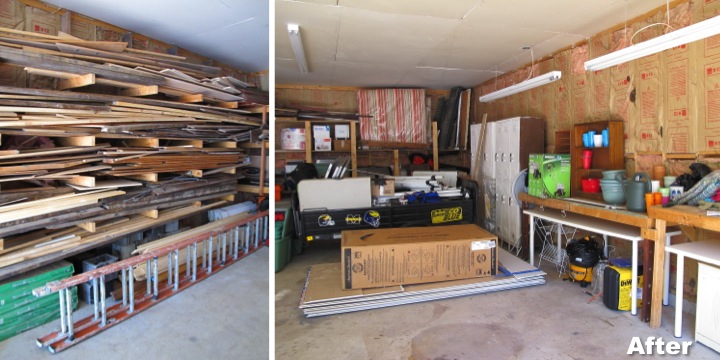
Yesterday Frank came over and helped me to tame it. We filled up my recycling bin and trash bin and then filled up his SUV with three loads of things to get rid off (one load to the Re-Use Center and two to the dumpster). It felt good to get rid of so much stuff that I didn't need and wasn't using.

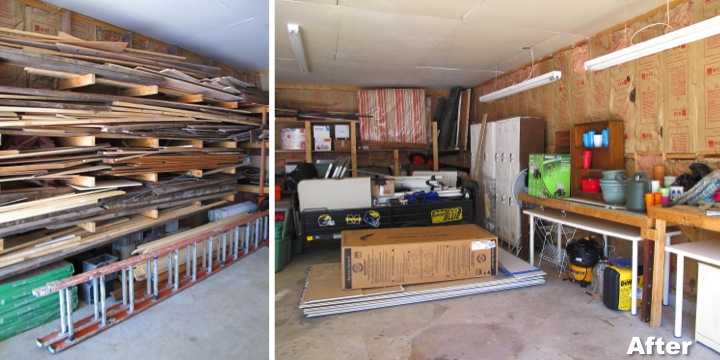
The remaining things were sorted into general areas and put up on the shelving that wraps around my garage. It is not super organized but I now have easy access to everything and know where to find it. Apart from Frank's tailgate trailer and a stack of drywall with a tub on top of it, the rest of the garage floor is finally clear.

I definitely have more work to do in the garage but I think it was a very productive day and I am happy with it. I finally have enough space to work on some of my projects in the garage instead of my house. Yeah!

Are you better than me about keeping your garage tidy? Did you do any organizing or cleaning this weekend?

Friday
Mar302012

Organizing My Tools

To say that my small hand tools were in a bit of a mess would be the understatement of the year. Instead of having anything organized I would accumulate small piles of tools in various rooms depending on what projects I was working on. This system (or lack thereof) clearly wasn't working and I wasted a lot of time looking for things. Something had to be done.

I set off to Lowe's in search of a storage solution. I wanted something inexpensive where I could easily see everything. Using five gallon buckets with an organizer completely fits the bill for me. Because I have a lot of stuff I got two buckets and generally organized painting and dry walling supplies into one and my clamps and other miscellaneous items into the other. I'm thinking that I need to get another one for storing my sanding discs and sanders as well. So far these buckets have worked well for me and the time I used to waste looking for things is now devoted to getting things done more quickly.

What do you do to keep your DIY supplies under control? Do you have creative ideas for storing your tools?

Thursday
Mar012012

Resolution Recap: February 2012

I'm just two months into my 2012 New Year's resolutions of purging and organizing my home and finishing up projects around the house. I have made some good progress in February and am feeling happy about how things are going even though it is still early on.

Having my blog has been a really good motivator for me and done a lot to help keep me on track with things. After I've publicly written that I am going to do something it makes me feel accountable to follow through and actually get it accomplished. Without further ado, here is a recap of how I fared with my resolutions in February.

Resolution 1: Purge & Organize
For three out of four Mondays in February I met my goal of having a volume of at least one trash cart (between my recycling and regular trash) out on the curb on garbage pick-up morning. Here's my breakdown:

- February 6: 3/4 full trash + 1/2 full recycle = 1-1/4 total
- February 13: 1/4 full trash + 1/2 full recycle = 1 total
- February 20: Full trash + 3/4 recycle = 1-3/4 total
- February 27: 1/2 full trash = 1/2 total

Although I faltered this past week I am still happy with what I've been able to get rid of this month. Hopefully I'll do better next month.

On the organization front I front I got my fabric in my craft room organized using things I already had. In my kitchen I found some additional storage jars to get more of my dry goods in order. Also, while I was working on my bathroom I got everything organized in my built-in and new medicine cabinet.

Resolution 2: Finish Up Projects
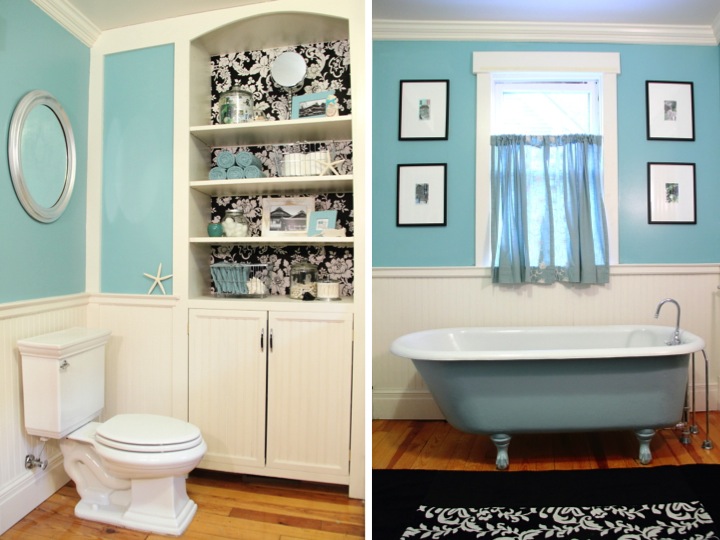
A month after starting work on finishing up my master bathroom I got everything done and it feels wonderful. Here's what I did to complete the room:

- Paint the outside of the tub teal: Done!
- Replace the cheap, temporary mirror with a medicine cabinet: Done!
- Add shelving to the inside of the built-in cabinet: Done!
- Jazz up the built-in with some color: Done! (Plus it is now organized)
- Make a wood vent cover to go over the ceiling fan: Done!
- Make a rug to go in front of the bathtub: Done! 
- Add some wall art and do some paint touch-ups: Done! (wall mirror + framed Japanese bath salts)
- Build a shower stool: Done! 

I'm really excited about having my bathroom completely finished and organized. I have a couple things that I want to do in my kitchen and then I think that the next room that I'll tackle is one of my first floor back bedrooms that I want to make into a study for myself.

Is anyone else trying to keep New Year's Resolutions? What are they and how are you doing on them?  I'd love to hear what you are doing to keep motivated.

Monday
Feb202012

Organizing My Bathroom Built-in Shelves

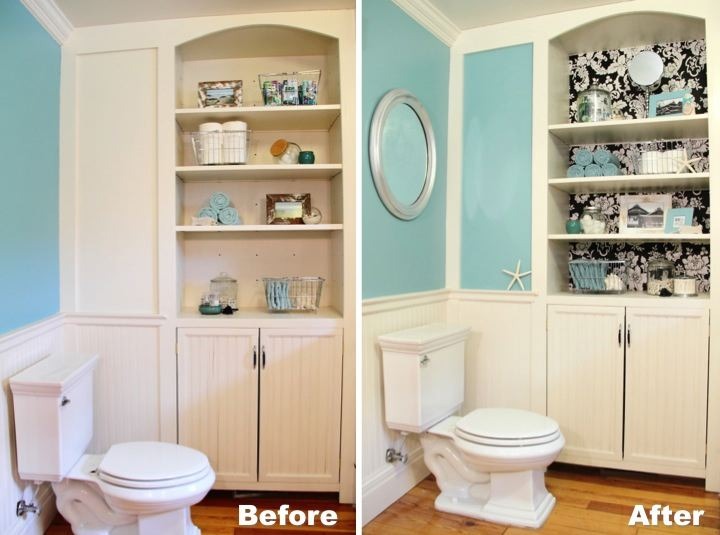
With my many projects (hanging wallpaper and painting the built-in, adding shelves and organizing the built-in cabinet and hanging a mirror on the wall) completed there was only one thing left for me to finish up in this corner of the bathroom; organize the built-in shelves. After all of the more mundane things this was definitely the fun part for me.

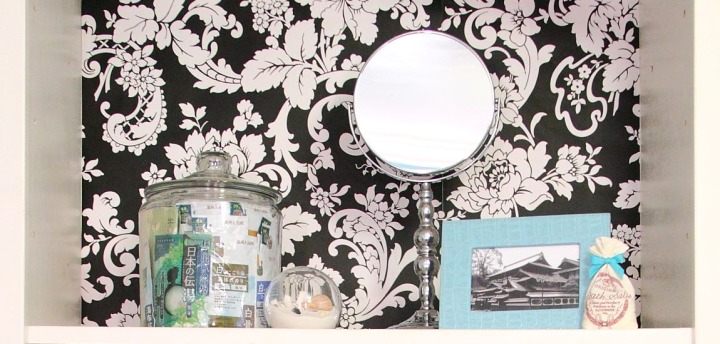
On the left side of my top shelf I have a large glass canister from Target for storing my packets of Japanese bath salts. Previously I had them in a wire basket but they kept slipping out so I got this canister instead and moved the basket to my craft room for storing fabric. Japan has a strong bathing culture and going to hot springs (onsen) for bathing is very popular. When I was living in Japan it was well known among my friends that I loved going to onsen so I got lots of bath salt packets with minerals from different famous onsen for going away presents.

Next to my bath salts I have a glass bubble filled with shells and sand that my sister gave to me for Christmas one year. On the right side I have a photo that I took of Dogo Onsen (one of the oldest hot spring baths in Japan) in a teal faux alligator frame that I picked up on sale at Papyrus years ago. Next to the frame I have a little muslin bag of bath salts that I bought in Bath, England. It originally had a royal blue ribbon on it so I swapped it out for a teal one. My last item on the top shelf is a new standing mirror at I picked up at HomeGoods this past week. I've been wanting to get a mirror like that for a while and decided that as a reward to myself for my bathroom progress I would get it.

On my second from the top shelf I rolled up my extra hand towels and stacked them up on the left side. The right side has a wire basket from Target with extra rolls of toilet paper in it and a little starfish.

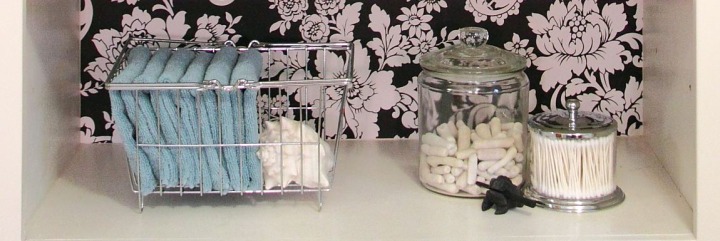
On the left side of my second from the bottom shelf I have an old glass canister whose lid I spray painted silver. I have it filled with cotton balls next to a little teal ceramic jar that was a thrift store find. On the right side I have another photo of Dogo Onsen in a white reclaimed wood frame that I picked up at an art fair on the Mornington Peninsula in Australia. I also printed out an Alicia Keys quote, "If I want to be alone, some place I can write, I can read, I can pray, I can cry, I can do whatever I want - I go to the bathroom,” that I used for a previous blog post and put it in another teal frame that I bought at the same time as the one on the top shelf. Last but not least I have a little fish shaped pumice stone. 

On my bottom shelf I have another wire basket from Target with my extra wash cloths folded up in it. I also tucked in a conch shell that my paternal grandfather gave me years ago when I was a little girl. On the right side I have a glass canister filled with white coral that I picked up on a beach in the USVI when visiting my sister. In a smaller glass and chrome container from HomeGoods I have my cotton swabs and for fun I have a little wooden frog I got on another one of my trips to the Caribbean with my sister. 

It feels so nice to have this part of the bathroom all organized and finished now. Almost all of the items I already had and my only new purchases were the large glass container for my bath salts, the standing mirror and the little container for my cotton swabs. I love that everything on the shelves either has some functional bathroom purpose or has a special memory for me. With just a few small things that I've done, this corner of my bathroom now looks a lot more polished and finished than it did just a month ago. Now if only I could get some motivation to finish up my bathtub...

If you are interested, check out the rest of my bathroom posts here: Bathroom Blog Posts

Sunday
Feb192012

Kitchen Jar Organization 

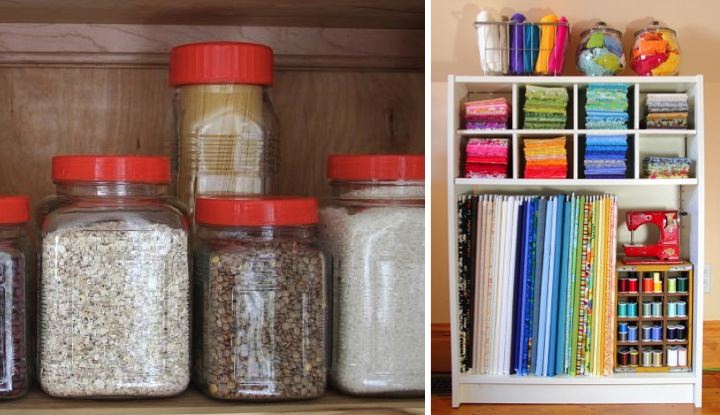
When I lived in Japan I found glass jars with red plastic lids and I thought they would be perfect for storing my dry goods. I didn't have much storage space in my tiny Japanese kitchen so I had bought an inexpensive wire shelving unit to hold the jars and some other kitchen goods. I love that the jars are square which maximizes shelf space and they also look cute with the ribbed design on the glass and the bright, cheery tops. Although I had to spend a few dollars at a home store for the tall ones with the pasta and some bigger ones for flour and sugar, I found the small and medium sized jars for only about dollar at the Seria Hyaku-en Store in Toyota City (Hyaku-en store in Japan ≈ Dollar store in US).

Back home in the US when I redid the kitchen I chose to have glass fronts for all of my upper cabinets. I love it because I always know where to find things, but I have to try to keep things organized and looking nice. My red lidded Japanese jars are perfect for this and they are a perfect combination of practical storage while also looking nice on my shelves. Jars full of delicious ingredients just make me happy and I like being to be able to easily see what's inside. It inspires me to cook.

Unfortunately, the number of things that I would like to store in my Japanese jars has exceeded my supply. What is a girl to do?!? I have searched high and low online and in stores to find something similar but with no luck. When I was back in Japan in December I actually went to the Hyaku-en store and bought three more of the medium sized ones to bring back home with me. In case you were wondering, they made it home safely in my luggage with my socks stuffed inside.

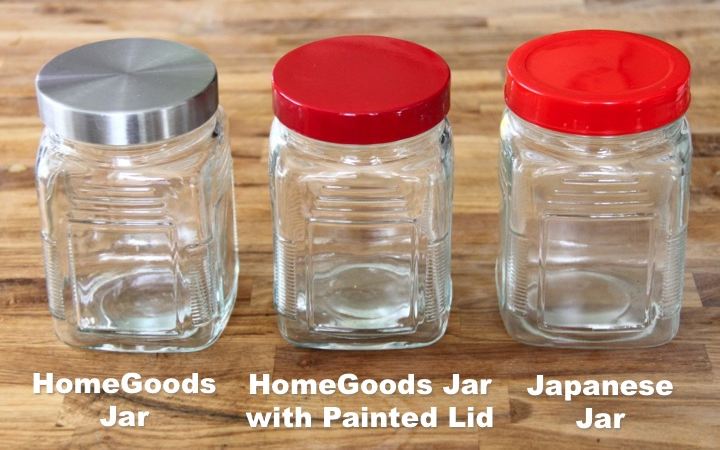
So imagine my surprise when I was at HomeGoods earlier this week and I saw some glass jars that were remarkably close to my Japanese ones. They are the same size as my small Japanese ones and have the same exact ribbed pattern on the glass. The lid is metal instead of plastic and doesn't have the indented design on it but all in all they are a fairly close match. I immediately bought up all five that they had. They were $2.99 each, so triple my Hyaku-en price, but well worth it. When I got home I used some red glossy spray paint that I had to paint the lids.

It's a pretty close match, don't you think? My spray paint is a little dark compared to the Japanese lids so I think that I'll try to find something that matches a little better, but otherwise I am pretty happy. My search is still not over though, because I would like to get some more large ones as well. If anyone happens to see some cute glass storage jars with red plastic lids, please let me know! I would be forever grateful and send you chocolate.

Sunday
Feb122012

Fabric Organization for My Craft Room

My fabric stash in my craft room had gotten completely out of control so I decided that I needed to do something about it. Because my plan is to someday build myself a fabric armoire I didn't want to spend much on this project since it isn't a long term solution for me. I already had this white Billy bookcase with a CD insert from IKEA that I had purchased nearly ten years ago for almost nothing in the As-Is section. By moving the CD insert to the top shelf and removing the bottom shelf I thought I could turn the bookcase into some functional fabric storage.

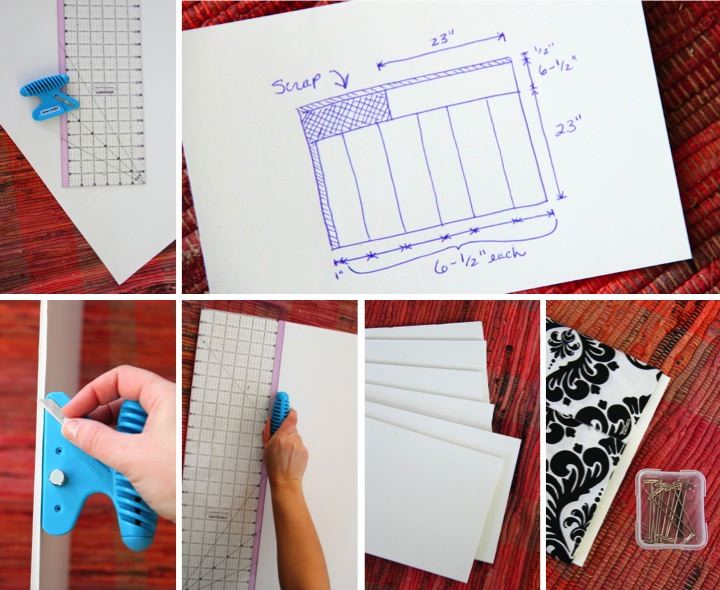
To organize my fabric that is at least 1/2 yard I made my own fabric bolts out of foam board. I decided to make the bolts 6-1/2" x 23" for a few reasons. 23" height allows for easy storage of 45" fabric folded in half plus it was short enough to just fit under the CD insert on the bookshelf. 6-1/2"depth fit nicely on the shelf and worked out well for maximizing the number of bolts (seven) that I would get out of a piece of 30" x 40" foam board. 

To start making the bolts I adjusted my foam board cutter's cutting depth so it was just longer than the depth of my foam board. When I cut foam board I do it in top of an old ratty rug that I don't mind getting torn up a bit from the cutter. I actually keep the rug solely for the purpose of cutting things on it. 

Using my quilting ruler as a guide I cut my bolts out of 30" x 40" foam board per the diagram I drew out. I made a 23" cut across the board lengthwise and then cut the piece into 6-1/2" strips. The leftover top piece was enough to cut one more 6-1/2" x 23" bolt. After cutting my bolts I wrapped my fabric around them and secured the edge with a T pin. 

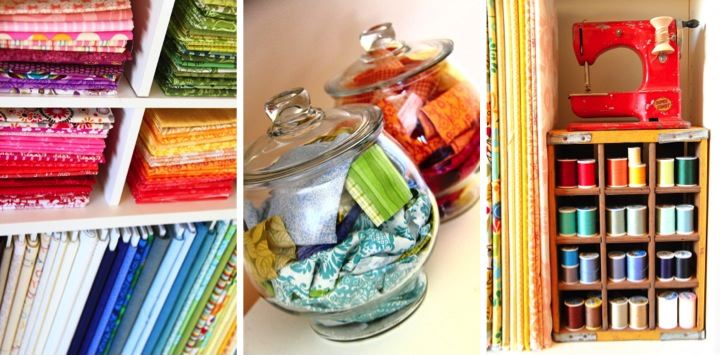
After getting my larger pieces of fabric wrapped onto my foam board bolts it was time to start organizing the rest of my fabric. The CD insert was the perfect place for storing my fat quarters and I put small fabric scraps sorted by warm and cool hues in some glass jars that I already owned. Larger, bulky fabric scraps (like the fleece left over from my DIY laptop sleeve and the fleece monogrammed scarves I made) got organized into a wire basket that I had. I put my bolts of fabric in the bottom of the bookshelf and since I had a little room left over I also squeezed in an old soda Coca-Cola crate that I bought in Japan. The crate was the perfect size for organizing my thread and on top for fun I put an antique children's sewing that I picked up in Notting Hill in London.

I'm really happy that I was able to make some sort of sense out of my fabric stash and now that I can see everything easily I'll be more likely to use what I have on hand. I'm also glad that apart from spending about $25 for foam board I already had everything else making this an inexpensive organization project. 

How do you keep your fabric stash under control? Do you have a good organization method?