Welcome

My name is Lisa and I'm a crafty girl with wanderlust working as an engineer by day. My blog chronicles projects in my home as well as pictures and stories from my travels.

Search


Instagram

Blog Index
The journal that this archive was targeting has been deleted. Please update your configuration.
Navigation

Entries in Food (53)

Wednesday
Dec192012

Comfort Food at the Polish Village Café

Since my little episode on Sunday morning I have being feeling a bit off which is probably to be expected. I was in need of some comfort food, which due to my heritage on my paternal side means Eastern European food to me, so Frank and I headed to the Polish Village Café in Hamtramck on Tuesday night for dinner.

The restaurant dates back to 1976 and is such a cute, cozy place in its cellar location. It totally reminds me of a place that my grandpa would have taken me as a kid. As an added bonus it was all decorated for the holidays with greens, twinkle lights and ornaments dripping from the ceiling. 

To start Frank and I both had dill pickle soup. It was one of the best I have had with nice big chunks of potatoes and shredded carrots making it quite hearty. 

For dinner I had the Polish Plate which was a sampler full of many of my favorites, stuffed cabbage, pierogi, kielbasa, sauerkraut and mashed potatoes. Frank got a combination plate with stuffed beef rolls, pan-fried chicken livers and stuffed cabbage. Everything was spectacular but Frank and I agreed that the stuffed cabbage was the best.


For dessert I couldn't resist ordering sweet cheese filled nalesniki. Nalesniki are Polish crepes which are served with filling inside and then fried in butter until crispy.

When I was really little my dad brought home sweet cheese nalesniki from the Polish Deli to try for the first time. I didn't want to eat it because I thought the name sounded funny, but of course once I tried a bite I loved it. Being a proud little kid I pretended that I didn't like it but that I was continuing to eat the nalesniki because I had to. I don't think my dad was fooled by my charade and ever since it has been a favorite food of mine.

The nalesniki at Polish Village Café was absolutely wonderful and brought me straight back to my childhood. It was a great way to end a delicious meal. Sometimes comfort food is just what the doctor ordered.

Thursday
Dec062012

Pie Crust From Scratch

It is no secret that I love pie. I'll use just about any excuse I can to make (and eat!) one. For me, one of the secrets of a good pie is having a good, homemade crust. Making a crust from scratch may seem difficult but it is actually quite quick and easy. Here is a simple pastry recipe for a two crust pie.

Ingredients List
- 2 cups flour
- 1 tsp. salt
- 3/4 cup butter, chilled and cut into pats
- 5-6 Tbsp. cold water

Pastry Directions
- Stir together flour and salt in a bowl
- Cut in butter with a pastry blender until the mixture becomes coarse crumbs
- Sprinkle in the water a little at a time, mixing the the dough lightly with a fork after each addition
- Form dough into a ball with your hands, wrap in plastic wrap and refrigerate for at least half an hour 

Rolling Out Directions
- Divide dough into half, form into a flat disc and place on a lightly floured surface
- With a rolling pin, roll out the dough in a circle until it is 1/8" thick and about 2" larger than your pie plate
- Roll half of the circle onto your rolling pin to transfer the pastry to the pie plate
- Gently lay the bottom half of the circle on the pie plate and roll the rest over the plate
- Trim excess crust 

Tips and Tricks
- For success both your butter and your water must be very cold
- If you don't know how to use a pastry blender, you just hold the bowl with one hand, and push the blender into the dough with the other, repeating until the mixture has become coarse crumbs
- If you do not have a pastry blender you can cut in the butter by using two knives in a scissor fashion (i.e. blades crossing each other like scissors to cut the butter up)
- Don't use too much water or over mix the dough- you want it to barely hold together
- Make sure to store the dough in the refrigerator until you use it as it is much easier to work with cold dough
- To limit how much flour I need to use to prevent sticking I like to roll my dough out on parchment paper
- If you make a mistake transferring the pastry to the pie plate just roll it out again 

If you are interested, check out how to make a lattice top or use cookie cutters with your pastry to decorate your crust.

Thursday
Nov292012

Graham Cracker Gingerbread Houses

With Thanksgiving behind us and December on its way I am ready to be in the holiday spirit. Nothing is more festive than gingerbread houses so I thought I would share some tips for making your own using graham crackers.

I made graham cracker gingerbread houses as a kid and last year I made a few base houses for Frank's nieces and then let them decorate themselves with candy and icing on Christmas Eve. It is a really fun and easy project and doesn't require baking.

To start you need (you guessed it!) a box or two of graham crackers. I have found that the best way to cut them is to lightly score them with a serrated knife, like a bread knife, and then break it on the scored line. Whenever I tried to cut right through I would have some breakage at the end. You should expect that some of the crackers in the package will be broken or you make accidentally break them so be prepared with extra crackers.

For "glue" you need to mix up a batch or royal icing. You can use your own recipe or try my royal icing recipe. Fill up an icing bag with a round tip with the icing and you are ready to start assembling. As you proceed it is really important for the icing to completely dry at each step otherwise you run the risk of the seams breaking as you put the house together.

To make the ends of the houses I cut angles on two pieces of graham cracker, put and bead of icing down the edge and pressed them together, laying them flat on a cookie sheet face down. To reinforce them I put another bead of icing on the back.

Once the ends were dried I put together the walls of the houses with two graham crackers placed lengthwise for the sides. Again I used royal icing to attach everything. For extra strength I took the trimmed off corners from making the ends and attached them inside of the house where the walls met. This added a lot of stability to the house.

For the roof pieces I used two pieces of graham cracker plus an additional half cut lengthwise. I put them together the same way as the ends but I decided to also press an additional half of a graham cracker on the middle of the back to make sure it was a strong and wouldn't later buckle. Once the roof pieces were dry I carefully attached them to the top of the house and the bases were complete. 

To make a snowy roof, I coated it with royal icing and then used frosted shredded wheat to make the shingles. Overlapping the shredded wheat and varying between starting a row with a full or half piece gives it more of a shingled roof look. Also, it is best to do one side at a time so that your icing doesn't set up while you are still working.

Finally, you can decorate to your hearts content with candies, attaching them with royal icing. Peppermint swirls, licorice sticks, gumdrops and gummy candies are all excellent colorful candies to use, but really the sky is the limit. This is a really fun activity and doing it with Frank's nieces last year was a really wonderful time.

Wednesday
Nov282012

Apple Pie

I just love apple pie. It is such an American classic and one of my favorites to make (and also to eat). You can usually get pretty nice apples almost all year round (unlike some other fruits) so this is a great pie to make from summer through early winter.

I've been making apple pie since my early teens and to me no summer picnic or Thanksgiving meal is complete without out one. Not only does it taste delicious but it also makes my home smell wonderful while it is baking.

Ingredients List
- 2 pounds apples: peeled, cored and cut into 1/4" slices
- 1 tsp. lemon juice
- 2/3 cup sugar
- 1/2 tsp. ground cinnamon
- 1/4 tsp. ground nutmeg
- Double pie crust pastry

Directions
- Prepare the apples (peel, core and cut) and place them in a bowl
- Add the lemon juice, sugar, cinnamon and nutmeg and toss the apples in the mixture
- Roll out half of the pastry and line the bottom of a pie plate with it, trimming off excess
- Roll out remaining half of the pastry
- Add apples to the pie plate and then top with pastry using lattice crust or other vented style top
- Bake for 40-50 minutes at 425° F until the crust is golden and the filling is bubbling 

Tips and Tricks
- Using a variety of apples gives a nice flavor I think. For this particular pie I used Granny Smith and Raeburn but feel free to experiment, just avoid apples with a high water content.  
- I make my own crust (I'll share the recipe in another post) but you can also use store bought
- To make your pastry easier to deal with, keep it in the refrigerator until you are rolling it out
- To prevent your crust from browning too much, wrap it in tin foil for the first 25 minutes of baking

Sunday
Nov252012

How to Make a Lattice Pie Crust Top

For Thanksgiving this year I made a few pies and I took a some pictures so that I could share how to make a traditional lattice pie crust top.

A lattice top is a classic that always looks pretty. It seems like it could be a lot of work but it really isn't. Here are some simple instructions to try it if you've never done it before.

To start, roll out the top crust (it is easier if the dough has been chilled first) and then cut it into strips of an even width. I just use a knife to cut my strips, but you can use a pastry wheel or pizza wheel as well.

Once you have the strips all cut, drape a strip across the middle. Working out from the center, lay out the strips on one side and then the other until the whole pie is covered, spacing them one strip width apart.

Next, fold back every other strip on the top of the pie. Make sure to fold it back a little more than halfway. Lay a strip across the middle of the pie, perpendicular to the other strips.

Now fold the strips back down over the middle strip that you just laid down. Every other strip will be on top or underneath it. This is the start of the lattice.

To make the next lattice piece, fold back every other strip again but this time you want to fold back the ones that were underneath the middle strip. Lay down another strip of pie dough and then fold the strips back down.

Repeat the same process of folding back strips, laying down a perpendicular strip and folding the strips back down, alternating which strips you fold back each time. Once the pie is covered in one direction, perform the same process on the other side of the pie.

To finish simply trim the ends of the strips. If you want you can leave it (just pinch the strips down into the bottom crust to seal it) or you can make a fluted edge.

That's all there is to it. It looks quite fancy but it is simple to do in less than ten minutes. Easy as pie!

Thursday
Nov222012

Happy Thanksgiving!

Happy Thanksgiving!

I am in charge of desserts for the meal this year so I have been having a fun morning in the kitchen baking. I was hoping to do some of the prep work earlier this week but work was crazy (I worked nearly 40 hours in three days) so I had to do everything today.

I'm making pumpkin pie, apple pie and a cranberry upside down cake. I'm actually waiting for the pumpkin pie to finish baking right now so that I can head over to the festivities.

After spending today with Frank I am heading out to St. Thomas to visit my sister for the rest of the holiday weekend. I am so excited to see her and can't wait. My first trip to visit her on her island was actually for Thanksgiving in 2006. It was so hot and her stove wasn't working so we decided to make turkey sandwiches to celebrate Thanksgiving that year. It wasn't very traditional but it was a lot of fun!

What are you doing to celebrate Thanksgiving this year? Are you making anything tasty? What do you usually do to celebrate?

Wednesday
Nov212012

Simple Autumn Appetizer Party

Last fall I hosted a simple appetizer party for my friend's birthday at my home that I thought I would share the recipes. With a vegetarian guest I kept my menu selections vegetarian with autumnal ingredients.

Baked Brie in Puff Pastry
This is a go-to recipe for me when I am entertaining. Simply coat a wheel of brie with apricot preserves and wrap in puff pastry, tucking the ends under the brie. With the scraps of leftover pastry I cut out some vines and leaves and attached them to decorate the top with a bit of water. I brushed the puff pastry with an egg wash (an egg white whisked with 1 Tbsp water) to make it glisten and baked it at 350 degrees for 25-30 minutes. To serve it I topped the brie with some pomegranate seeds to add a little color. 

Frozen Puff Pastry Tips: Make sure that the pastry is fully thawed and at room temperature before you roll it out. Also, to prevent needing to use flour to keep it from sticking when rolling it out, try rolling it on parchment paper.

Fig and Gruyere Palmiers
This is another simple recipe using puff pastry. I rolled out a sheet of puff pastry into a large rectangle and sprinkled it with a cup of shredded gruyere cheese. I rolled up each of the sides toward the middle and then cut the resulting roll into 1/4" slices, placing them on a parchment lined baking sheet. I melted 1/2 cup of fig preserves and then brushed it on top of the palmiers. I baked them for 12 minutes at 400 degrees and served them warm from the oven.

Endive with Caramelized Pears and Blue Cheese
I used this recipe (originally in December 2006 Cooking Light) to make this endive appetizer. In the past I have also substituted pecans for the walnuts which has worked quite well. I really like the recipe and love the sweet and savory aspects that it combines.

Butternut Squash Spread
This spread was slightly adapted from this recipe (originally in September 2007 Cooking Light) with me omitting the pumpkin seeds (just didn't have any) and halving the amount of garlic. I served the spread in a small bowl with a few sage leaves for garnish. This spread has a little kick to it which I really quite enjoy.

To set my table I put out an orange table runner that I have from Ikea and topped it with some red leaf felt placemats that I picked up from HomeGoods. I placed my appetizers on the table along with a bowl of baguette slices to go with the brie and squash spread. For drinks I served hot apple cider with sticks of cinnamon.

It was a fun little celebration and everyone loved the food. These simple recipes meant that I spent minimal time in the kitchen but still had a beautiful spread for my guests to enjoy.

Do you have a favorite fall entertaining recipe? What do you like to serve?

Wednesday
Oct102012

Wandering Through Mercato Trionfale

One of my favorite parts about traveling is stumbling upon things unexpectedly. Often time when things don't go as planned you open yourself up to something different that you might not have otherwise experienced. While Frank and I were in Rome earlier this year wandering through Mercato Trionfale was one of those lucky discoveries.

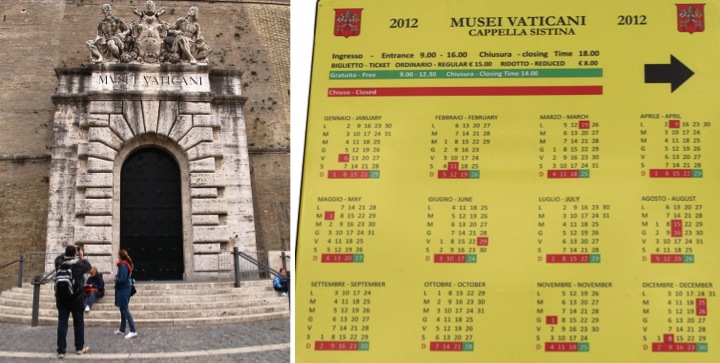
It all started when we tried to visit the Vatican Museum. Our first day in Rome was a Sunday which meant the Vatican Museum was closed. In general it is closed Sundays except for the last one of the month when admission is free. Unfortunately, our Sunday happened to be the third one of the month so we thought we would visit on Monday. 

As we approached the Musuem entrance on Monday, things definitely seemed amiss since there was no one there apart from a couple of stray tourists taking a photo of the beautifully carved entranceway. Further inspection of a sign posted nearby showed that in addition to it being closed the day before, the Museum was also closed that day. There was really nothing that we could do but come back the next day.   

On Tuesday we tried again, heading to the Vatican Museum right after breakfast. Predictibly after being closed for two days the line was enormous, seeming to snake along the wall almost back to St. Peter's Square. While waiting in line doesn't bother me so much (I had previously waited in line about an hour to get into the Vatican Museum on a different trip) it is really not Frank's thing. You can book tickets with online reservations to skip wait but when we had tried the day before nothing was available. 

By the museum entrance some guys were hawking for travel agencies nearby to provide tours of the museum or to simply sell tickets with time reservations. Frank did a bit of haggling and we paid for two tickets with a bit of a markup, of course. The only catch was that our reservation was an hour from then so we had some time to kill.

We had already visited St. Peter's Bascilica the afternoon before after finding out the museum was closed so I pulled out a map of the area to see what might be nearby. A short way north on Via Tunisi I saw Mercato Trionfale marked on the map. Frank and I both love food markets so we decided to head that way. After a five minute walk we popped in through an unimposing side entrance right into the thick of the hustle and bustle.

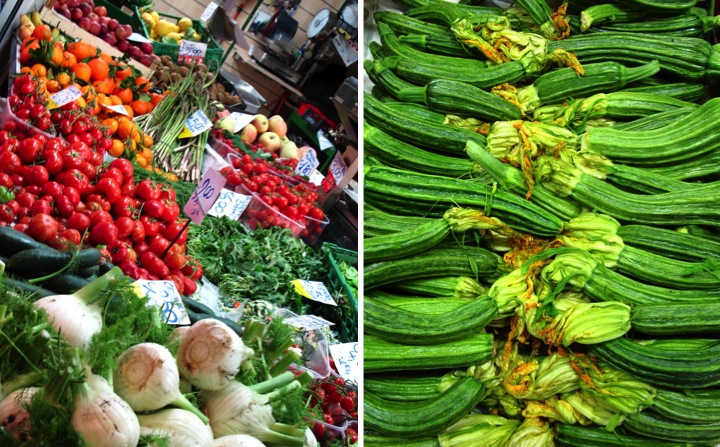
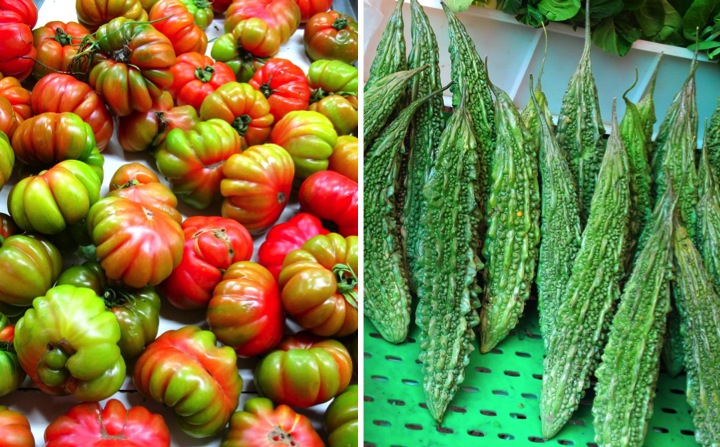
The covered market spans a whole block with over 270 stalls and seems to go on forever. The produce in the market was amazing. Stall after stall was full of fresh fruit and vegetables all of which was perfectly ripe and looked like it was picked that very day. Bushels of heirloom tomatoes, stacks of slender zucchini, baskets of lettuce: everything you could think of was there. If we were going to be heading to the Vatican Musuem directly afterwards I would have loved to pick up a few items.

Apart from the lovely produce, the market was also amazing for people watching with locals out shopping for that evening's dinner. I really wish that I was able to do that kind of daily shopping for fresh ingredients back at home.

I was particularly intrigued with the heads of Romanesco broccoli for sale because of their lovely color and shape. Being a math nerd I couldn't help but admire the approximate fractal pattern, with each bud composed of a series of smaller buds. I thought it was so cool, that I looked it up later and also discovered that the number of spirals on the head of Romanesco broccoli is a Fibonacci number. The world truly is an amazing place.

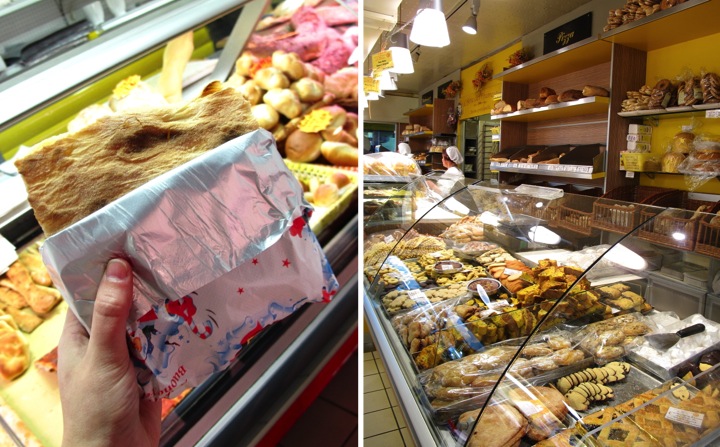
Wandering by all the tempting food was making us hungry even though we had recently had breakfast so we couldn't resist splitting a piece of focaccia from one of the bakery stands.

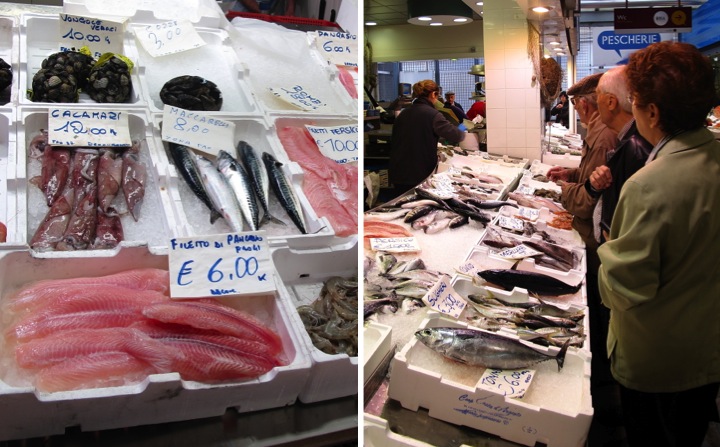
The seafood section of the market was full of freshly caught selections including everything from calamari to swordfish.

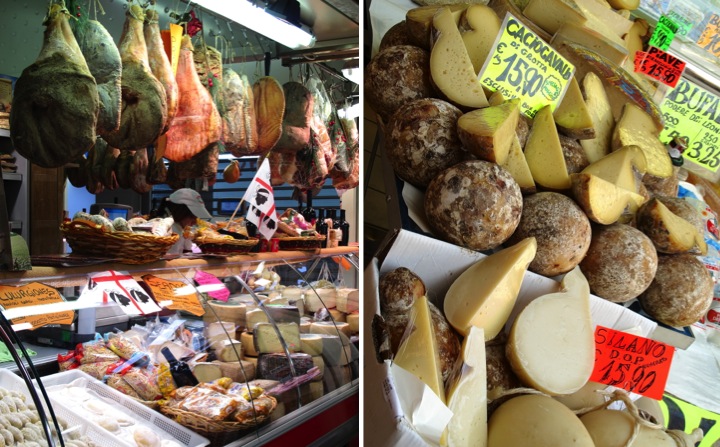
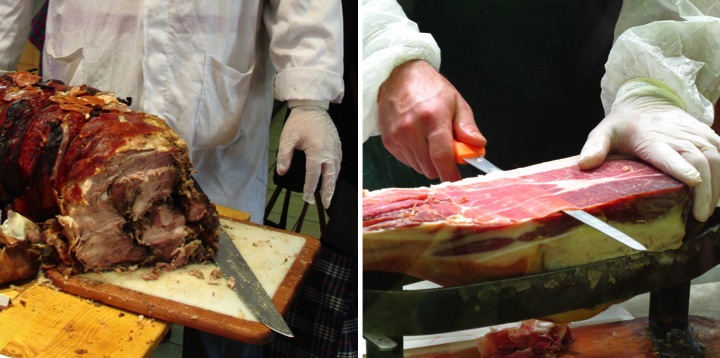
We also wandered past cases of wonderful meats and cheeses. Especially impressive were the rows of hanging dried cured meats. Watching the butchers skillfully cut paper thin slices of prosciutto and bresaola by hand was amazing.

One of butcher cut off a chunk of the porchetta he was slicing, placed it in a square of butcher's paper and pressed it into Frank's hand. Lucky for me, Frank shared some the wonderfully moist pork loin with me. If meat can melt in your mouth, this certainly did.

It was nearing time for us to return back to the Vatican Museum so we threaded our way back through the beautiful vegetable stalls on our way out. Visiting the market was definitely a feast for the senses and it was a lovely accident. I would highly recommend that if you are ever in the Vatican area, you make an intentional stop.

Mercato Trionfale Details
Location: Via Andrea Doria 3, Rome
Hours: Mon, Wed, Thurs, and Sat 7 a.m. – 2 p.m. and Tues & Fri 7 a.m. – 7 p.m. 


Monday
Oct082012

Zucchini Bread Recipe

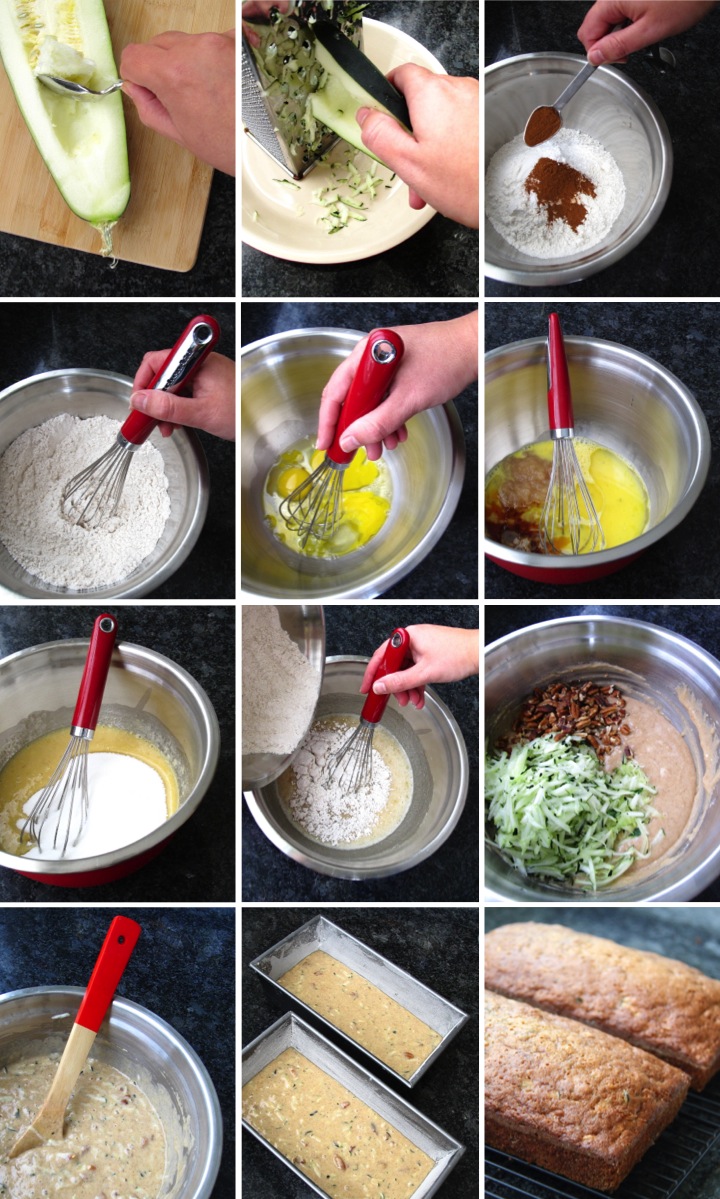
Every year as soon as summer fades and the weather cools down I get bitten by the baking bug. Yesterday was a chilly, rainy day and was perfect for turning on the oven. I decided to make a batch of zucchini bread since I had one last large zucchini from the end of summer harvest from my garden.

I love to make quick breads and in particular zucchini bread has a special place in my heart and stomach. It was something that my family made often when I was a kid and is a childhood favorite. As an adult a slice of zucchini bread with a dab butter and a cup of tea makes the perfect treat for me on a rainy afternoon.

The recipe I use today is essentially the same as my traditional family one but I replaced half of the oil with applesauce to make it a little lighter. It makes the zucchini bread a titch sweeter and moister but retains all the flavors of my youth.

Ingredients List
- 3 cups flour
- 1 tsp. salt
- 1 tsp. baking soda
- 1-1/2 tsp. baking powder
- 3 tsp. cinnamon
- 1/2 cup oil
- 1/2 cup applesauce
- 3 eggs, beaten
- 3 tsp. vanilla
- 2 cups sugar
- 3 cups zucchini, grated
- 1/2 cup nuts, chopped 

Directions
- Preheat oven to 350 and grease and flour two loaf pans
- Slice zucchini in half, remove seeds and grate using a large box grater or the coarsest grater in a food processor
- Stir together flour, salt, baking soda, baking powder and cinnamon
- In a separate bowl beat together eggs, applesauce, oil, and vanilla and then stir in sugar
- Add dry ingredients to the wet ingredients and mix until fully incorporated
- Stir in zucchini and nuts and then pour batter into prepared pans
- Bake for 40-50 minutes until tester inserted in the center comes out clean 
- Let cool for 15 minutes, remove loaves from pans and then let them cool completely on wire racks 

The recipe makes two loaves, so feel free to share one or since it freezes well, wrap one up and freeze it for a later day. I've also baked up the batter in mini loaves and muffins with great success.

Are you doing any fall baking? What is in your oven?

Tuesday
Oct022012

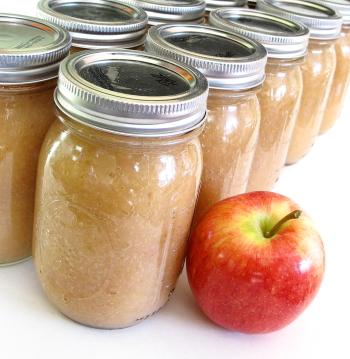
Homemade Applesauce Part 2: Canning

After yesterday's post about how you can prepare your own applesauce it's time to delve into canning it. Successful canning is all about keeping things hot and sterile. If you are new to canning The National Center for Home Food Preservation website is a wonderful resource sponsored by the government for explaining proper and safe methods as well as answering questions about preserving food. I would highly recommend reading their basic canning information.

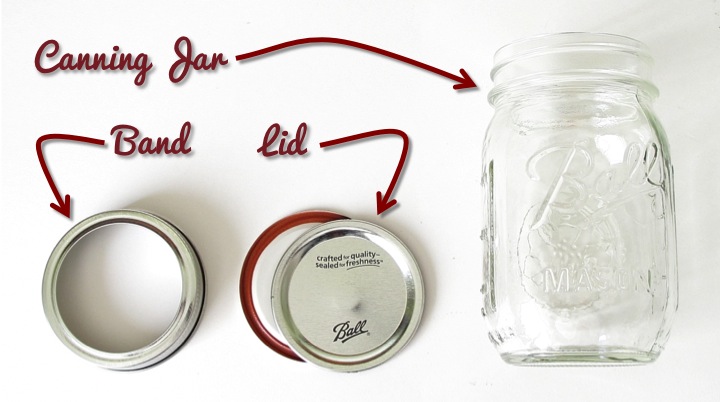
To begin with you need proper canning jars with lids and bands. Mason jars with a single piece lid or bail jars look super cute but are not appropriate for safe canning. You can reuse jars and bands after cleaning them, but you cannot reuse lids because the sealing surface (gasket) will have already been compressed from the first time it was used. If you use a lid again you won't be able to guarantee a proper seal which could lead to the food spoiling.
Some basic tools are also required for canning. For applesauce because it is high in acidity we can use a boiling water canning method which requires a large pot and jar rack. You can buy a water-bath canning pot with a jar rack pretty inexpensively (about $20). I actually have two canning pots, one which I use for preparing whatever food I am going to can and one for the jars. The jar rack comes with the canning pot and sits in the bottom of the canner. It keeps the jars from sitting on the bottom of the pot so that the boiling water can flow underneath them. It also allows you to raise the jars up so that loading and unloading jars is easier.

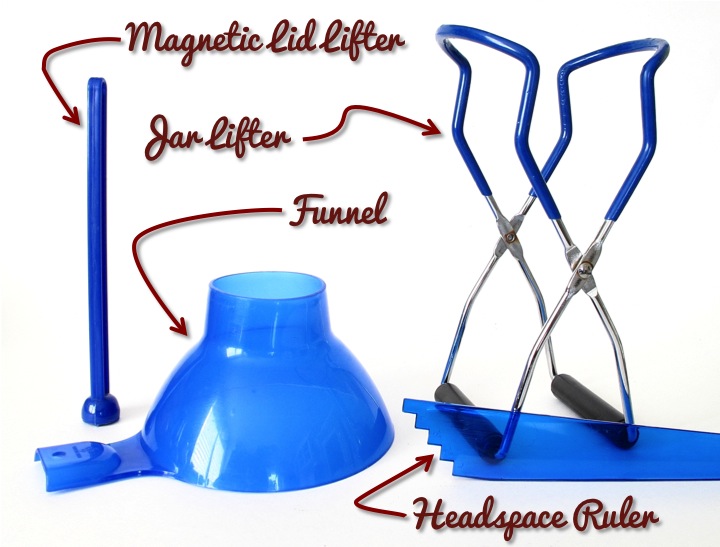
A few more tools are needed to get started. In order to grab the jars out of the boiling water a jar lifter is essential. It clasps around the neck of the jar so that you can pull it out securely and not worry about slipping. A magnetic lid lifter is just a long stick with a strong magnet on the end which allows you to pull the rings and lids out of the water. A funnel helps you pour your applesauce into the jars without making a complete mess. A headspace ruler has notches on in in 1/4" increments so that you can measure the headspace (distance between the top of what you are canning and the rim of the jar). Headspace is specified in each recipe and is important. If you leave too little you may have difficulty getting a seal and if you leave too much you could have some discoloration on the top of your food. These tools are generally sold as a canning utensil set which runs a little over $10.

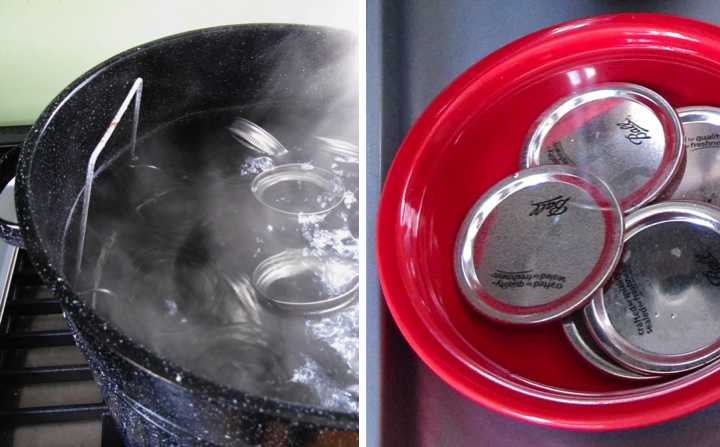
Now that we've covered the background, let's start canning. First you need to thoroughly clean your jars. You can wash them with hot soapy water or run them through the dishwasher. To sterilize the jars place them in the canner, cover them with water and bring it to a boil, boiling for at least ten minutes (longer if you are above sea level). I also boil my bands in the pot. My general process is that after I put whatever I am canning on the stove to cook I start boiling my jars. After the ten minutes has elapsed I turn the heat down to a simmer on the jars, keeping the water and the jars hot. The jars need to stay hot so that when you pour your hot liquid into the jars they won't break.

Lids should not go in the boiling water which could compromise the gasket which makes the seal. Instead after washing them, place them in a bowl of hot, but not boiling, water until you are ready to use them. 
After you have prepared the applesauce it is important to keep it hot while you are in the process of filling the jars. A simple way to do this is to put it in a pot on the stove over medium heat. 

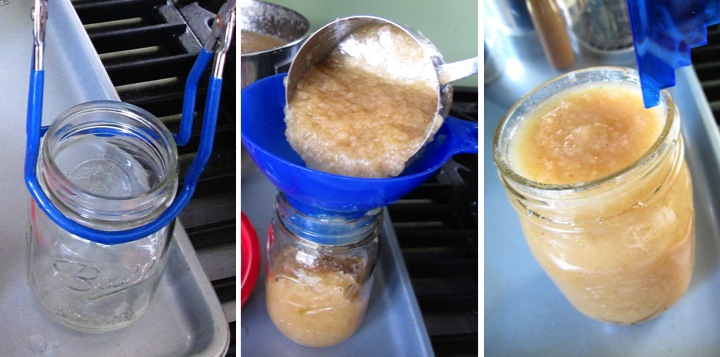
To start filling the jars, pull a hot jar from the water using the canning jar lifter and place it on your work surface. Place your funnel in the jar and ladle in applesauce, leaving 1/4" of headspace (distance between the top of the applesauce and the rim of the jar). Use the headspace ruler to scrape against the inside of the jar to release any air bubbles and then check your headspace. If you spilled any applesauce on the rim, use a cloth to wipe it off so that you have a good surface for your seal.
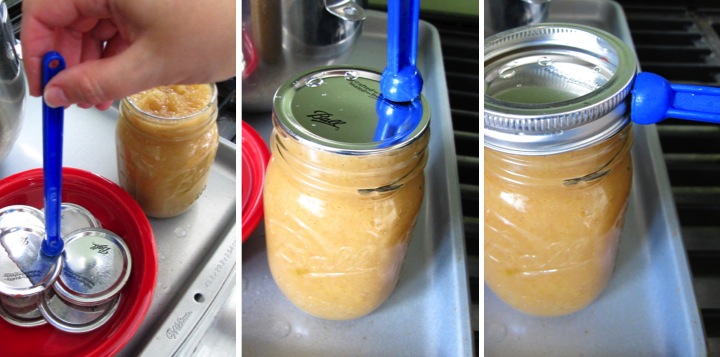
Using the magnetic lifter, pull a lid out of the hot water and place it on top of the jar. Pull a band from the simmering water in the same way and place it on top of the lid. Screw down the band over the jar.
The jar of applesauce is now ready to go back into the canner using the jar lifter. Once you have filled all of your jars, lower the jars into the water with the jar rack. Make sure that you have at least one inch of water covering the top of the jars. Place the lid on the canner and turn the heat on high to boil the water.

Processing time starts from when the water begins vigorously boiling. If you are at sea level (altitudes less than 1000 feet) then you will need to process pint jars for 15 minutes and quart jars for 20 minutes. If you are at a higher altitude check the NCHFP processing times for applesauce. The water must remain boiling for the entire processing time, otherwise you need to bring the water back to boiling and restart the processing time. If the water level appears that it will drop to less than an inch over the jars, add additional boiling water. 
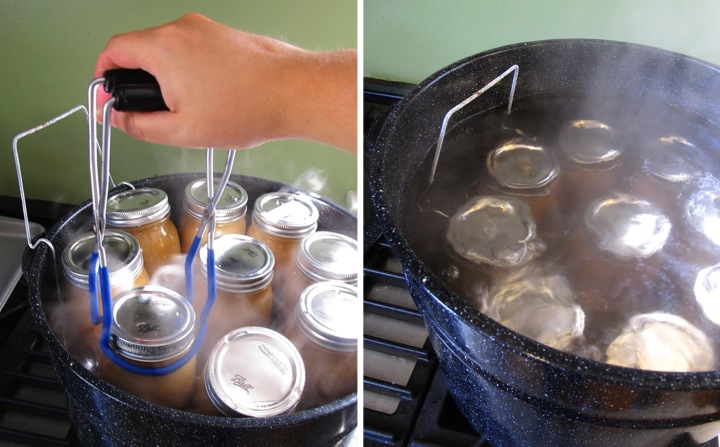
Once processing is complete, turn off the heat and remove the lid of the canner. Let the jars sit in the hot water for five minutes before pulling them out with the jar lifter. Place the jars with an inch between them and allow then to cool undisturbed for at least twelve hours.

As the jars cool and seal you will probably hear them making a little pop sound. After they have completely cooled you should check your seals by pressing on the top of the lids. If the lid springs back after you lift your finger, your jar did not seal. If your jar did not seal, place it in the refrigerator and eat the applesauce within the next few days.

The sealed jars no longer need the bands and can be stored without them. If you do want to keep the bands on it is a good idea to loosen them a bit so they won't get stuck on. Properly sealed applesauce can be safely stored for a year.
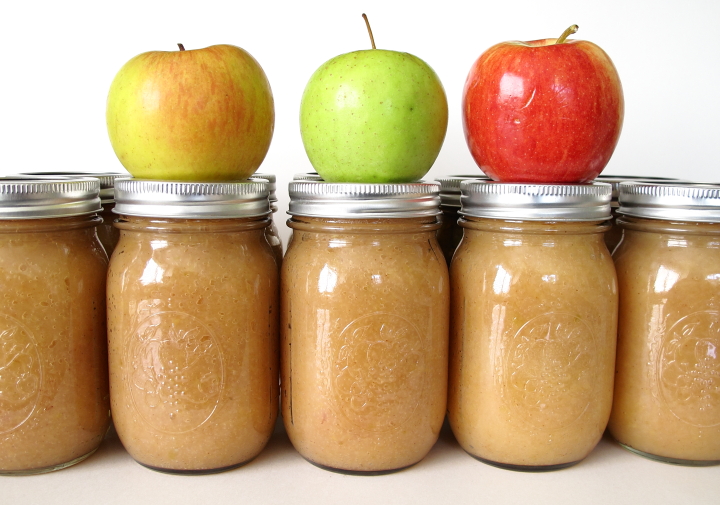
Now you can sit back and enjoy your beautifully canned applesauce and have the taste of fall all throughout your winter. Happy canning!

If you are interested in canning, check out Homemade Applesauce Part 1: Cooking & Sieving