Welcome

My name is Lisa and I'm a crafty girl with wanderlust working as an engineer by day. My blog chronicles projects in my home as well as pictures and stories from my travels.

Search


Instagram

Blog Index
The journal that this archive was targeting has been deleted. Please update your configuration.
Navigation

Entries in Food (53)

Monday
Oct012012

Homemade Applesauce Part 1: Cooking & Sieving

After coming home with several bags of apples yesterday I set about doing one of my favorite fall activities, making and canning homemade applesauce.

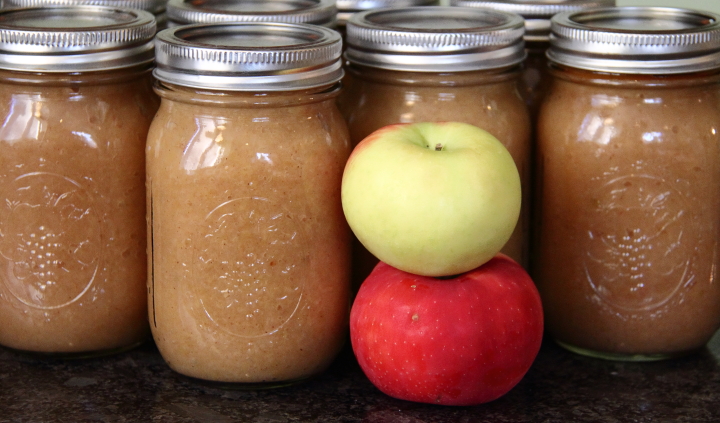
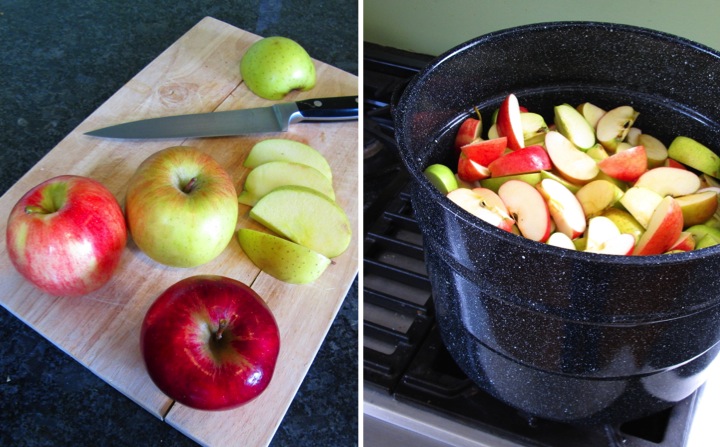
One of the key things in making tasty applesauce is to use a variety of apples instead of just one. Also, it is best to use sweet apples instead of tart ones so that you don't need to add any sugar to your applesauce. From year to year the apples that I use vary based on what is reasonably priced and available. This year my applesauce is a combination of Jonathon, Yellow Delicious, Gala and Honeycrisp apples. Red Delicious, Fuji, McIntosh, Winesap and Pink Lady apples are also wonderful for making applesauce.

With my apples picked out I set about preparing them. After washing them in cold water, I cut them into eighths and tossed them into my large canning pot with an inch or two of water in the bottom. Because I use a strainer with my food grinder, there is no need to peel or core the apples. Super easy!

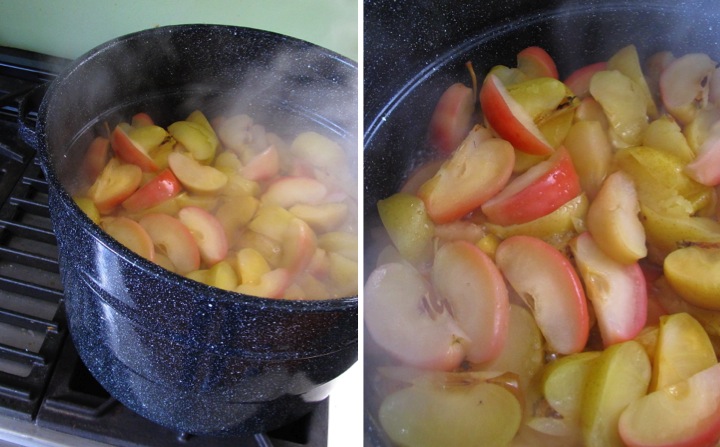
I put the pot on the stove with high heat, turning it down to medium-high once it started bubbling. I just love the smell of the apples cooking on the stove top. When the apples are nice and soft it's time to sieve the apples. If I am planning on canning my applesauce I put the canning jars on to boil at this time (more on canning is coming tomorrow). 

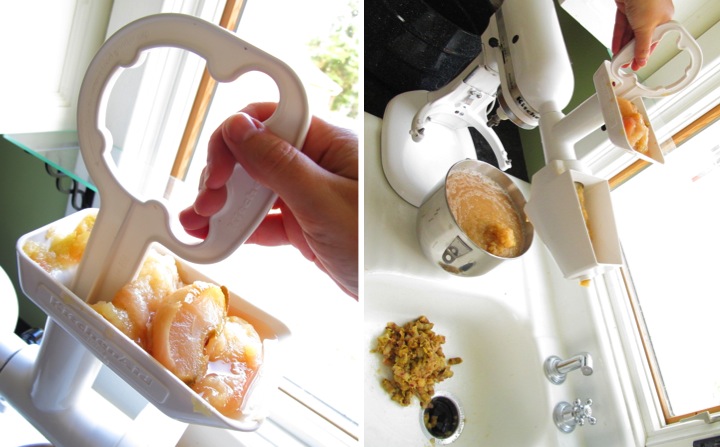
As I mentioned before, my setup combines a food grinder with a strainer so I don't need to peel or core the apples. I use my KitchenAid mixer (a college graduation present from my grandparents) with the KitchenAid Food Grinder Attachment and the KitchenAid Fruit and Vegetable Strainer Attachment. I know that this is pricey, but I use these tools a lot and they are a big time saver for me so over the years I've decided it was worth investing in them. If the expense of the KitchenAid tools is not for you, fear not, you can still make tasty applesauce with a Foley Mill. They are pretty reasonably priced at anywhere between $20-$40 and you can build up some arm muscles with the hand cranking. I am lazy, however, so I will continue on with my powered method.

My setup is pretty simple. I attach my food grinder to the front of my KitchenAid mixer with the fruit and vegetable strainer added in front. I then position my mixer so that the front end of the strainer sticks out over my sink and then place a bowl under the strainer. I ladle the soft apples into the top of the food grinder tray and then use the stomper (yeah, I think it is strange that is what is called, too) to push the apples down into the grinder. The seeds and peels spit out the front of the strainer right into my sink where I can wash it down my garbage disposal. Meanwhile the tasty applesauce spills out underneath and is caught into my bowl.

Once all the apples have been sieved I just stir in some cinnamon to taste and I am ready to start canning. If you like you can also add some sugar, but if you chose sweet apples it probably isn't necessary. Stay tuned and tomorrow I will share how to can the applesauce using a boiling water canner.

Do you make applesauce at home? What apple varieties do you like?

If you are interested in canning, check out Homemade Applesauce Part 2: Canning

Saturday
Sep222012

Herb Compound Butter Three Ways

I love compound butters. They are so easy to make and add a little something extra special to any meal whether you are just having a simple home meal or having a fancy dinner party with company.

With the abundance of herbs in my garden I decided to make a few different compound butters since they freeze so well and I  can use them later. You just need to pull them out of the freezer about fifteen minutes before you want to use them, slice off what you need and you are ready to go.

I went out to my garden and picked a bunch of different herbs and set to work.

When it comes to making combinations, the sky is really the limit and it is fun to experiment with different ingredients. Yesterday I made a lemon parsley butter, garlic chive butter and mixed herb butter using a variety of herbs from my garden.

Lemon Parsley Butter
- 1/2 cup (1 stick) unsalted butter
- 1/4 cup parsley, finely chopped
- 1 Tbsp. freshly squeezed lemon juice
- Salt and pepper to taste

Garlic Chive Butter
- 1/2 cup (1 stick) unsalted butter
- 2 Tbsp., finely chopped
- 2 cloves garlic, minced
- Salt and pepper to taste

Mixed Herb Butter
- 1/2 cup (1 stick) unsalted butter
- 1/4 cup herbs, finely chopped
- Salt and pepper to taste

To make the butters, leave the butter out until it is room temperature. Whip the butter with a mixer or by hand and then stir in the other ingredients until they are evenly dispersed in the butter.

Spread the butter out on a piece of plastic wrap and shape into a cylinder. Twist the ends of the plastic wrap and place in the freezer until needed. You can then easily slice the butter into round pats.

If I am planning to use the butter within the next day, I will usually scoop it into a small ramekin and keep it in the refrigerator.

What herb combinations do you like to try for making compound butter? Do you have any creative ways to use up your herbs from your garden before it gets too cold? 

Sunday
Sep092012

Michigan Tailgate Cake: All American Theme

Yesterday was the home opener for the 2012 Michigan Football season. We played Air Force so the tailgate theme was "All-American".

After a long and stressful work week I decided to make a simple design for the cake, taking an American flag and modifying the white star field on blue to be a maize and blue Michigan logo.

I made a chocolate cake using Beatty's Chocolate Cake recipe from Ina Garten. I baked it in a sheet cake pan and then cut it in half to make a two layer, rectangular shaped cake.

Next, I made up a double batch of buttercream icing. I used a Wilton #789 decorating tip to ice the cake, smoothing it with a large offset spatula.

With my cake iced, I turned to making my flag design on the cake. Although fondant looks prettier and is easier to work with I decided to use rolled buttercream because it tastes yummier. I made up a batch and tinted some of it red and some of it blue. I rolled out the blue first, cut out a rectangle and placed it in the top left of the cake. I then rolled out the red, cut it into strips and layered it onto the cake to make the stripes of the flag.

My final step was to tint some of my leftover buttercream from icing my cake a maize color. I used a flat basketweave tip to make a block M shape on the blue rectangle and then used a small spatula to smooth together the seams.

Although I always notice the imperfections on my cakes, I think it turned out pretty cute and most importantly it tasted delicious. The icing on the cake (if you excuse my terrible pun) was that Michigan beat Air Force. It wasn't a pretty win, but after the loss to Alabama last week we'll take what we can get. Go Blue!

Friday
Sep072012

Strawberry Ricotta Salad with Mint

Back in November 2010 I visited Sydney, Australia with my friends Erin and Andy for a vacation. We were staying in the Potts Point area and on our first morning we discovered a wonderful little cafe down the street from our hostel called Cafe DOV for breakfast. The food was so wonderful that we ended up grabbing breakfast there every day for our whole stay so that we could everything on their awesome menu.

On one of those mornings I tried their bread pudding which was served with a side of strawberries and ricotta. It was absolutely delicious and ever since eating it I have thought about trying to recreate something similar at home.

After seeing some wonderful looking strawberries for sale at the grocery store I decided to buy them, pick a bunch of mint from my garden and have a go at putting a recipe together.

I like how my dish turned out and I think it would make a nice little side for a pancake brunch or a great dessert served with some pound cake.

Ingredients List
- 6 cups strawberries, cut in half and stems removed
- 1 cup ricotta
- 1 Tbsp. cream
- 2 Tbsp. powdered sugar
- Scant 1/4 cup of fresh mint leaves, loosely packed

Directions
- Put ricotta in a small bowl and mix in cream and powdered sugar until smooth
- Place 4 cups of the strawberries in a bowl with ricotta mixture and gently stir to coat
- Add in mint and gently stir again
- Serve salad with remaining strawberries scattered on top plus a garnish of mint


Wednesday
Sep052012

Thoughts On Freezer Meals

Monday night after returning from Texas, Frank and I visited a special person who just recently returned home from a stay in the hospital. I thought that some sunflowers in a mason jar would be cheerful to bring over in addition to a freezer meal. I've found that giving a homemade dish that a person can pop in the oven when they are under the weather is generally a welcomed gesture.

I thought that I would try out making something new so after perusing some recipes I prepared Martha Stewart's Baked Pasta with Chicken Sausage.

When I give away freezer meals I like to write out a little card with the name of the dish and directions for heating it up. I wrap a layer of plastic wrap around the dish, set the directions on top and then add another layer of plastic wrap. Sandwiching the directions between layers of plastic wrap makes sure that they don't get lost even if the recipient doesn't get around to heating up the dish for a month or two. 

The recipe makes two small pans so I cooked up one for Frank and I to try for dinner since I didn't want to give away a dish that I didn't think tasted okay. We both really liked it and it was quite easy to prepare so I think I will definitely make it again sometime. 

This also has me thinking about making some freezer meals for myself. I work a lot of long hours and when I come home late I just want to relax so I tend to eat junk instead of taking time to make a decent meal for myself. Having some premade meals on hand in the freezer would be a easy way for me to eat a little better when I am stressed out and busy and don't feel like making any effort.

Do you have any good freezer meals that you enjoy? I'd love to hear about some new recipes to stock up my freezer.

Wednesday
Aug292012

Week in Pictures: 8.27.2012

I'm two days late in posting my pictures from last week, but better late than never, right? The week was spent at home and was all about eating good food whether it was at a fancy place or from a food cart. Actually, a good portion of my life in general is devoted to eating tasty things.

Collage One, First Row
- On Tuesday night Frank and I grabbed a quick dinner at Seoul Street, which is a tiny laid back Korean restaurant in town. I am addicted to their kimchi fries. This time we got them topped with bacon.
- During lunch on Wednesday I stopped by Lowe's for a little blinds shopping for my dining room. I always laugh when people stare at me dressed up in my office clothes while I am at a home improvement store.
- Thursday night Frank and I headed to Logan for one of their wine dinners. They are an amazing local restaurant and about every two months they pick a wine region and prepare a set five course menu around wines from the region. The dinners are a huge splurge (like my whole grocery budget for a month back when I was in grad school huge) but so worth it to go a few times a year. Thursday night's theme was California wines and the first course was calamari stuffed with shrimp mousseline in a Szechuan sauce. Amazing!

Collage One, Second Row
- Possibly my favorite course of the wine dinner at Logan was the lamb kefta over a fennel pollen scented funnel cake with pickled blueberries. It was so inventive and delicious.
- Friday evening we went in the opposite direction and headed to Mark's Carts (our local food truck area) to grab dinner with some friends. I tried the banh mi sandwich from San Street and while it wasn't as tasty as the banh mi I got from street vendors in Vietnam last summer (what? no liver pâté?!?) it was still pretty good. I really liked the crisp that the daikon leant the sandwich.
- The big surprise on Friday night was that while we were hanging out at the picnic tables eating at Mark's Carts a woman sat down at the table next to me with a huge stack of hand drawn maps of Michigan. She caught me looking at them and gave me and the other girl at my table one for free. Awesome, don't you think? She said that she adapted the map from a children's book from the 1930s, updating some of the items associated with each part of the state. I can't wait to figure out a way to incorporate it into my house.

Collage Two, First Row
- Saturday night was the last Saturday in August which means only one thing in Ann Arbor: it's the last German Park of the summer. German Park is located on the outskirts of Ann Arbor and is a rec area out in the woods with a large pavilion, a bunch of picnic tables and some other small buildings. Three times a year (the last Saturday of June, July and August) they host a public picnic. Attendance is usually about 2500 people and there is always a long line to get in.
- The best thing about German Park is the food and beer. I got a bratwurst, German potato salad, spätzle and of course a pretzel. Several German beers are also on tap and sold in buckets to share with your table.
- People usually stake out their spot among the picnic tables by laying out a tablecloth. Since German Park starts at 4 pm it isn't uncommon for people to bring cards or games while hanging out. 

Collage Two, Second Row
- Another fun aspect of German Park is the dancing. There is a polka band that plays the whole time. Some choreographed dances are also performed by dancers is lederhosen and dirndl which is fun to watch, too. 
- On Sunday night Frank and I went to dinner at Frita Batidos for an eve Commemorative Dinner. Frita Batidos is a Cuban inspired restaurant run by Eve Aronoff. She also used to run a lovely restaurant in town called eve which closed a little while back. For the evening the regular fare at Frita Batidos was replaced with a seven course meal inspired by the menu from eve. I loved eating at eve so it was really fun and tasty. The first course was a duo of delicious cold soups. I especially liked the ceviche topping the avocado soup.
- My favorite course from the dinner was a seafood lasagna. It was amazing and a nice cap to a wonderful week of awesome food.  

What were you up to this past week? Do you have any fun summer festivals in your home town?

Sunday
Jul292012

Pie & Tea

I am still really under the weather so I haven't been working on any projects around the house since I came back from Japan on Thursday. I've been camped out on my couch eating pie and drinking tea over the last few days. Pie and tea is a well known cure for the flu, didn't you know? Anyway, I'll be back and posting as soon as I can kick this bug.

Monday
Jul092012

Smoking in the Backyard (Pulled Pork That Is...)

Frank just got a smoker this past weekend and decided to break it in by making pulled pork yesterday. I luckily got to be the beneficiary of the tasty food and also documented everything in pictures.

The night before Frank applied a dry rub on two pork butts and then let them marinate in the refrigerator overnight.

Yesterday morning Frank started by setting up the smoker and placing a layer of hardwood lump charcoal along the bottom of the smoker. He then filled a chimney with paper in the bottom and hardwood lump charcoal in the top.

After lighting the paper he waited until the fire burnt down and then poured the hot charcoal from the chimney onto the bottom of the smoker. Frank then filled up the water pan placed inside of the smoker.

Frank added some apple wood on top of the charcoal, closed up the smoker and then waited until it heated up to 250 degrees. Frank placed the pork butts on the top rack of the smoker, put the probe of a digital thermometer in the center of one of the cuts of meat and then placed the lid on top of the smoker. After a few hours the meat had a wonderful crust on it.

Frank flipped the pork butts, basted the top of them and then placed the lid back on the smoker to let it cook some more. He then placed them in foil tents before putting them back in the smoker for a final time. Once the pork butts reached an internal temperature of 190 degrees, Frank took them out, placed them in covered metal pans and poured a pre-finishing sauce over them to soak up while the meat rested.

After the meat rested, Frank shredded the pork with tongs and then added his finishing sauce to the meat. He toasted some buns on the smoker and then started assembling the sandwiches. He put a generous layer of pulled pork on the bun topped by a deliciously spicy coleslaw than he made. 

Having gone to undergrad in North Carolina I absolutely love pulled pork and was really excited about Frank making these amazing sandwiches. They turned out fabulously and I hope he makes them again soon.

Have you been doing any grilling or smoking this summer? What have you been making? 

Linked To: Centsational Girl's BBQ Link Party

Saturday
Jul072012

Happy Birthday Song Cake

This past week was Frank's birthday so I thought that I would share the cake I made for him last year.

I made a chocolate cake using the recipe for Beatty's Chocolate Cake and then made a chocolate ganache filling between the layers. To cover the cake I made rolled buttercream icing in chocolate and vanilla. I rolled out the vanilla, cut a strip of it and placed it across the middle of the cake. I then did the same for the chocolate and used it to cover the top and bottom.

With a base of icing on the cake I set about decorating it. Using icing that I tinted black, I piped five parallel lines across the cake to make a music staff. I looked up the sheet music for the happy birthday song online and then piped the notes for the song onto the music staff, writing the words "Happy B-Day Dear Frank" under the corresponding notes.

To finish off the cake I added a little color by tinting some icing blue and using it to add a border above and below the music and then piped blue stars along the base.

Trying to use rolled buttercream to cover the cake instead of fondant was quite a challenge, and it wasn't as smooth as fondant, but it tasted really wonderful. The rolled buttercream is so soft that it really wasn't feasible to deal with very large sections and the only way I was able to manage it was doing in the three sections that I did. The taste made it worthwhile though, and it is definitely something that I'll have to try again.

Thursday
Jul052012

Easy Blueberry Topped Mini Cupcakes

Frank and I are headed to his friend's family cottage for a few days on the lake so I wanted to bring a fun treat with me to share. Everyone loves cupcakes so I decided to make some chocolate mini-sized ones with buttercream icing.

I didn't have a lot of time to make them, but wanted them to be cute. Things taste better if they are cute, wouldn't you agree?

I had some blue mini cupcake liners on hand plus some leftover blueberries from the pie I made yesterday that did the trick.

I baked the cupcakes in the blue mini liners and then made the frosting while they cooled. Using a large start tip I piped the icing on each cupcake and topped it with a juicy blueberry. The cupcakes were quick, easy and delicious: just how I like things!