Welcome

My name is Lisa and I'm a crafty girl with wanderlust working as an engineer by day. My blog chronicles projects in my home as well as pictures and stories from my travels.

Search


Instagram

Blog Index
The journal that this archive was targeting has been deleted. Please update your configuration.
Navigation

Entries in Food (53)

Wednesday
Jul042012

Mixed Berry Pie for Fourth of July

Happy Fourth of July! Although it is blisteringly hot and humid here in Michigan I felt compelled to make a pie this morning to bring to the Independence Day get-together that I am going to this afternoon. The first reason is that so many wonderful berries are in season and just begging me to bake with them. The second reason is that pie is delicious.

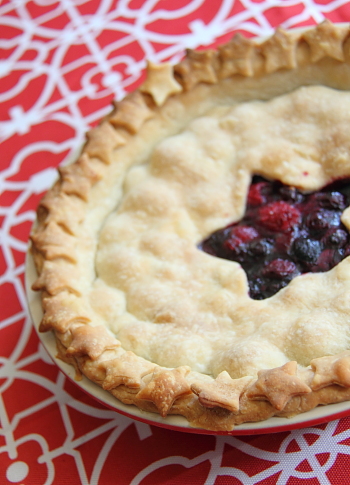
I love making mixed berry pies with all sorts of fruit combinations: strawberries, black raspberries, blueberries, rasperries, blackberries... you get the picture. It is a great and delicious way to use up whatever fruit you have on hand. Today I paired some blueberries and raspberries since it makes a festive color combination. The pie smells delicious and I am having some serious will power issues not cutting into it before I head to the party. 

Ingredients List
- 4-5 cups berries (depending on the size of your pie pan)
- 2/3 cup sugar
- 3 tablespoons cornstarch
- Double pie crust pastry

Directions
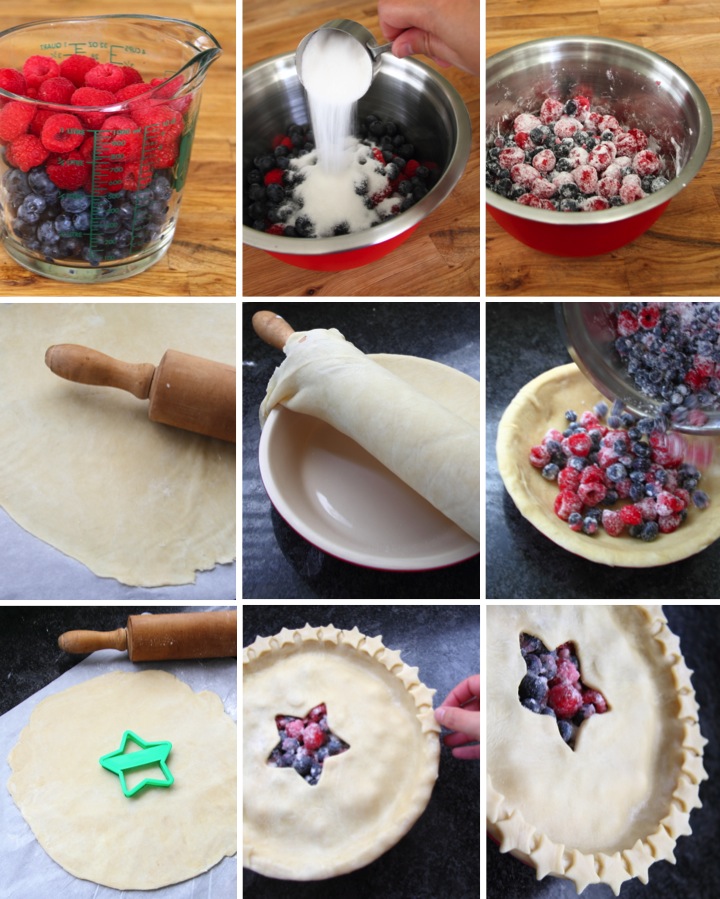
- Toss the berries with the sugar and cornstarch to coat and let sit for at least fifteen minutes
- Roll out half of the pastry and line the bottom of a pie plate with it, trimming off excess
- Roll out remaining half of the pastry
- Add berries to the pie plate and then top with pastry
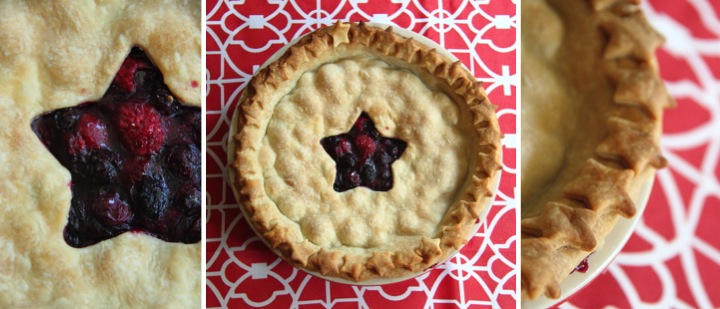
- Trim excess pastry, crimp the edges and cut vents in top crust for steam to escape
- Bake for 45-55 minutes at 375° F until the crust is golden and the filling is bubbling 

Tips and Tricks
- I make my own crust (I'll share the recipe in another post) but you can also use store bought
- To make your pastry easier to deal with, keep it in the refrigerator until you are rolling it out
- To prevent your crust from browning too much, wrap it in tin foil for the first 25 minutes of baking
- Part of the fun of making pie is being creative with the vents on your top crust. I love making a woven top, but since today is Fourth of July I used star shaped cookie cutters to make my vent. Any large vents should be made before you place your top crust on your pie 

Thursday
Jun282012

Spice Organization

I am overwhelmed with the unorganized disaster zone that is my home so I am trying to get some sense of accomplishment by attacking some easy items on my list. First up, I present my spice shelf in my kitchen.

At first glance it isn't so bad but since my kitchen upper cabinets are glass fronted I wanted things to look a little nicer and more uniform. The biggest issue was that I have a lot of bulk spices in bags that I just ended up storing in a heap in a mesh colander which was not so convenient.

As a solution I ordered a bunch of spice bottles from Specialty Bottle. I got 6 oz French square glass bottles for most of my spices with a few 16 oz French square bottles for my larger quantity bulk spices. For my baking extracts I bought some 4 oz Boston round glass bottles.

The glass bottles came with black lids which didn't really go with the red lidded glass jars that I use for storing my dry goods. As luck would have it the red lids from my McCormick spices fit perfectly on the 6 oz spice bottles. For the 4 oz and 16 oz bottles I used some red spray paint to transform the lids. I haven't decided if I want to add labels to the front of the jars but in the meantime I cut down some cheap labels and put them on the bottom of the jars with each spice's name and expiration date.

Everything is much neater plus I can find what I am looking for quickly now. There's nothing better than a project that is both pretty and functional.

Have you been tackling any organization projects? How is it going? Are you naturally neat or naturally messy like me?

Saturday
Jun232012

Going Away Party For Trisha

My friend, Trisha, is moving out of state for a new and exciting job so last night I had a little dinner party for her and some friends over at my house.

To set the table I started off by laying out a kraft colored linen tablecloth and then laid out a pink table runner and pink napkins at each place setting. I also laid out two glasses at each place setting. The short, wide glass was for sangria decorated with a sugared rim and a lime slice with a short pink polka dot straw and the tall, skinny glass was for water with a tall pink bendy straw. 

For flowers my grocery store had bunches of alstroemeria on sale for $3 each so I bought four bunches in two shades of pink and placed them on the table in little white flower pots.


For drinks I made two different flavored waters, strawberry-mint and watermelon-sage, and set them out in glass carafes. For those who wanted alcohol, I sliced up some oranges and put them with some sangria in a pitcher. I placed my drinks in a pink metal tray at the center of the table.

For food I had to be careful of my menu to make it gluten-free. I used a quinoa-corn pasta to make a pasta salad with cherry tomatoes, feta cheese, kalamata olives and parsley. I also made a spinach salad with goat cheese, raspberries and sugared pecans and tilapia wrapped in sage and prosciutto. 

We had a fun time and it was so nice to have everyone over and celebrate our friendship with Trisha. Good luck with your move, Trisha! We love you!

Thursday
Jun212012

Cincinnati Eats

I had to make a quick trip down to Northern Kentucky for work earlier this week and had the chance on the drive down and on the way back to try a few new restaurants in the Cincinnati area.

On Monday evening we pulled into Blue Ash Chili at eight p.m., just in time to eat before they closed at 8:30. I really enjoy Cincinnati style chili and Blue Ash Chili had a lot of rave reviews so I thought it would be fun to try it. I got a 3-Way which is spaghetti topped with chili and cheese. For reference, a 4-Way is a 3-Way with the addition of beans or onions and a 5-Way is a 3-Way with both beans and onions. Blue Ash Chili also featured a topping unique to their restaurant: fried jalapeño caps. Of course I had to have them added to my 3-Way. I really loved it. The spicy jalapeños gave an excellent kick to my 3-Way. The service was also really quick and we ordered, got our food, ate and left in under thirty minutes which was nice since we still had an hour and a half drive remaining that night. Overall it was delicious chili and I would go there again if I had the chance.

On Tuesday as we drove back we arrived for an early dinner at Terry's Turf Club at four o'clock, right when it opened. I had read that it was a popular place and fills up fast but we had no problems getting a seat since it was early on a weekday. I will say that almost all the tables had people seated at them by 4:30, though. The decor is really charming full of vintage neon signs and posters. The vibrant colors and neon continued outside as well, and I also spotted some old brightly colored stadium seats for waiting in line to get in, I presume. Besides the fun decor, another thing that I liked about Terry's was that every table has a bowl of peanuts and you can just toss your shells on the floor as you snack on them.

The menu looked awesome. I had never seen foie gras on the menu at a diner before so I decided to try it. It was served with toast points, grilled apple slices and a pomegranate pear sauce. It wasn't the best foie gras that I had ever had but it was pretty darn good. The burger, on the other hand, was probably the best burger I have ever eaten. Terry's offers all sorts of sauces and toppings for your burger and I couldn't resist getting Stilton cheese and the Burgundy wine with wild mushrooms and truffle sauce. The burger was perfectly cooked and both the sauce and the cheese were to die for. Absolutely delicious! Terry's is definitely worth a detour if you are anywhere in the area. 

Wednesday
Jun062012

Peanut Butter Balls

When I was a little kid I absolutely loved peanut butter balls. Since the recipe is no bake I could make them myself with no adult help needed for the oven. Shaping the balls was also a lot of fun for me and I would make all sorts of variations like hearts and cubes. As much fun as making them was, eating peanut butter balls was even better. In my world peanut butter + chocolate + sugar = delicious any day of the week.

As I've grown older the amount of sugar in the original recipe became a little too much for me so I have reduced it to accomodate my tastes. Don't worry, though, they are still plenty sweet!

The recipe is fast and easy to make. Using the mini chocolate chips is nice because it is super quick unlike some other recipes that call for dipping peanut butter balls in melted chocolate.

The recipe also freezes well so I like to keep some unformed dough in ziplock bag in my freezer. After a little bit of thawing I form as many as I need and then pop the rest back in the freezer. As a word of caution, these can be terribly addictive so be careful!

Ingredients List
- 1 cup butter (softened)
- 2 cups creamy peanut butter 
- 4 cups powdered sugar (about 1 lb.)
- 2 cups miniature chocolate chips

Directions
- Cream softened butter and peanut butter in a bowl until smooth
- Mix in powdered sugar one cup at a time and stir until thoroughly mixed
- Stir in chocolate chips
- Place in refrigerator for at least 30 minutes to chill
- Roll teaspoon sized amounts of the dough into balls and place onto cookie sheet lined with wax paper or parchment paper
- Place in refridgerator to chill
- After balls have firmed up stack in a container and store in refrigerator until ready to eat 

Tips and Tricks
- If you would like the peanut butter balls sweeter, feel free to add more powdered sugar. I wouldn't recommend using less, however, since the dough might not be stiff enough to form into balls anymore.
- When you are forming the balls if the dough starts getting sticky you can either dust your hands with powdered sugar or pop it back in the refrigerator for a bit
- The balls are fine at room temperature but they can get a little sticky if it is hot out so I like to store them in the refrigerator until they are ready to be eaten
- This recipe makes a fairly large quantity so I like to put about half in the freezer. You can either put the unformed dough in the freezer or put already formed balls in the freezer. 

Tuesday
Jun052012

Reason I ♥ A2 # 48: Taste of Ann Arbor

Summertime is closing in which means it is the start of the festival season in Ann Arbor. This past Sunday was the annual Taste of Ann Arbor event which I love. Main Street is closed to traffic and restaurants from around town set up stands with two or three small samplings of dishes to showcase. You purchase blocks of tickets for $0.50 each and then items are usually between three to eight tickets.

The event is fun because you can sample a lot of different food for a great price. There is also a stage in the middle with local acts performing music for entertainment. It is a great time and the street is always packed every year.

Since I live just a few minute walk from Main Street Frank and I walked over and had fun trying a bunch of things. I enjoyed fried polenta with mushrooms from Silvio's Organic Pizza, a raspberry macaroon from Cafe Japon, an asparagus and parmesan crostini from Arbor Brewing Company and a shrimp skewer from Real Seafood. All of those were delicious but my very favorite was the fish taco I got from Black Pearl. The tortilla was perfect, the fish was wonderful and I loved the sauce. Delicious! I always head home wishing that I had more room in my stomach to try more things.

Do you have any favorite local festivals or fairs that you go to in the summer? What are your summertime favorites?

Saturday
May122012

Making Banana Boats

When I was a little girl my absolute favorite thing about Girl Scout campfires was making and then eating banana boats.  They were a wonderful special treat and absolutely delicious.

As an adult camping still means banana boats to me and I never head out on a camping trip without bringing banana boat ingredients along. What could be better than melted chocolate and marshmallows with bananas? Only eating it around a campfire.

Ingredients List
- Bananas
- Miniature marshmallows
- Chocolate chips
- Aluminum foil

Directions
- With a paring knife, make a score down the center of the banana peel and across the top and bottom 
- Peel back the banana peel and stuff the banana full of marshmallows and chocolate chips
- Carefully wrap the banana with aluminum foil and place in campfire coals
- After five to ten minutes, use tongs to pull the banana from the fire
- Once the banana has cooled enough to eat, peel back the foil and use a spoon to scoop out the softened banana 

Tips and Tricks
- While amazing delicious, banana boats are very messy so beware!
- If you aren't going camping any time soon and you are craving banana boats, you can try baking the bananas in the oven

Have you ever made banana boats while camping? What is your favorite camping food? 

Sunday
Mar252012

Reason I ♥ A2 # 18: The Ravens Club Brunch

Frank and I love to go out for brunch on the weekend and Ann Arbor is not lacking in wonderful options. One of the places that I really love is The Ravens Club. They have a fabulous brunch menu that never disappoints. They have awesome omelettes and if you are in the mood, the best Bloody Mary in town.

The Ravens Club also has a wonderful beef hash with heirloom potatoes topped with a poached duck egg. My very favorite brunch option there has to be the lamb and pork belly cabbage rolls with basmati rice. It is a wonderful combination of comfort food with a fun twist. Yum!

If you ever find yourself in good old Ann Arbor town on a Sunday morning, try visiting The Ravens Club. You won't be disappointed!

If you are interested, check out the other reasons I love Ann Arbor here: I ♥ A2 Blog Posts

Saturday
Mar172012

St. Patrick's Day Sugar Cookies

Happy St. Patrick's Day from Paris! Frank usually observes St. Patrick's Day back home by celebrating at our local Irish Pub, Conor O'Neills, starting with a traditional Irish breakfast. This year since we are out of town I knew Frank would be a little bummed about not being at Conor's so I thought that I would make him some shamrock cookies before we left and surprise him with them on St. Patrick's Day.

To make the cookies I made up a batch of sugar cookie dough, rolled it out and then cut out shapes with a shamrock cookie cutter. For best results, I find it is important to let your dough sit in the fridge for a few hours before rolling it out. To make sure I have evenly baked cookies I make sure to have the dough rolled out an even thickness because any thinner part will brown too quickly. I also keep a close eye when I am baking and pull the cookies out of the oven as soon as I see a little browning on the edge.

After the cookies cooled I decorated them with royal icing. I tinted the icing with green coloring and then piped an outline around the shamrock's edge. I let the outline icing set and then used water to thin the royal icing for filling in the design. To thin the icing I add the water in small amounts until a drip of icing will disappear back into the bowl. It's important not to thin the icing too much otherwise the icing will be hard to control. Once the icing is sufficiently thinned I put it in a piping bag, trace just inside my outline and then fill in the rest of the design. To finish off the cookies I sprinkled green sugar on top of them and then tapped off the excess when the icing was dried. Simple, easy and tasty! I hope Frank likes them!

Saturday
Mar172012

Royal Icing Recipe

My grandma passed on this royal icing recipe to me. It is a pretty standard recipe and she used it to make roses for wedding cakes that she made and sold out of her home kitchen. When I was little I was absolutely mesmerized by the way she would turn out the roses so quickly and methodically.

With my baking I don't have much need for royal icing roses, so instead I typically use this recipe for icing sugar cookies. I pipe an outline onto my cookie with stiff icing and then flood the design with thinned icing. It is a really easy way to make pretty designs on your cookies.

Another fun thing you can do is pipe royal icing into lacy designs on wax paper and then attach the designs to your baked goods once they are dry. The decorations are quite fragile, though, so it is always wise to make spares in case you break a few.

Ingredients List
- 1 lb. powdered sugar
- 3 egg whites
- 1/2 tsp. cream of tartar
- Food coloring (optional)

Directions
- Put powdered sugar, egg whites and cream of tartar in a mixing bowl
- Beat for 10 minutes for icing to achieve desired consistency
- Tint icing with food coloring if desired

Tips and Tricks
- Royal icing can dry out quickly start crusting over so using plastic wrap to cover the top of the icing with the plastic completely covering the surface of the icing
- If the icing is too thin, add more sugar; if it is too thick, add a bit of water or more egg whites
- If you are leery of using egg whites, there are recipes that use meringue power instead