Welcome

My name is Lisa and I'm a crafty girl with wanderlust working as an engineer by day. My blog chronicles projects in my home as well as pictures and stories from my travels.

Search


Instagram

Blog Index
The journal that this archive was targeting has been deleted. Please update your configuration.
Navigation

Entries in Parties (14)

Monday
Sep162013

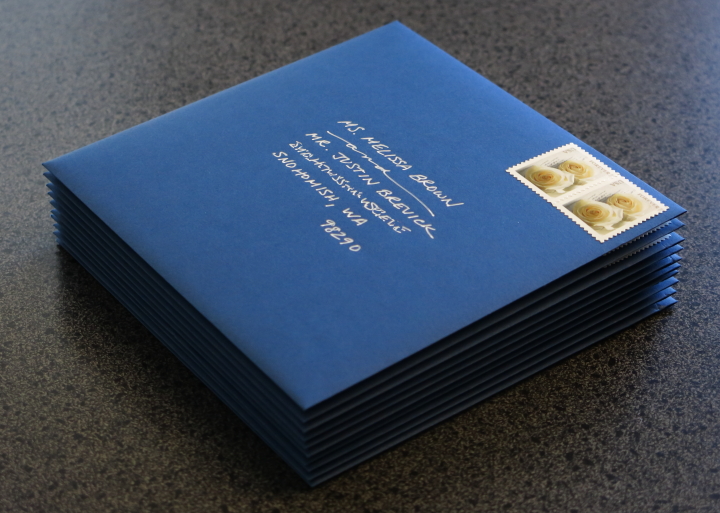
Backyard Celebration Party

Since Frank and I had a tiny wedding this summer with only sixteen people we decided that it would be fun for us to have a casual barbecue in our backyard to celebrate our marriage with some of our local friends. We hosted the party this past Saturday after the Michigan vs. Akron football game.

Since Frank was busy with preparing for the tailgate before the game (he made a bunch of delicious pizzas with his Pizza Kettle) I worked on doing some party set up on game day before heading to the tailgate later and then left the game at half time to finish getting things ready. The game was pretty ugly with Michigan barely pulling out a win so I was actually glad to have an excuse to head home.

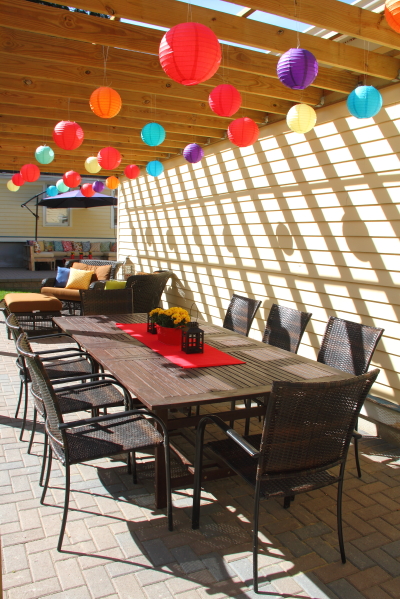
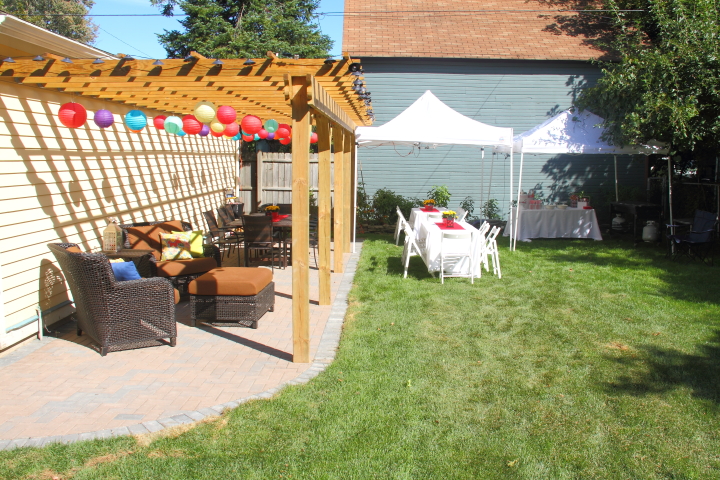
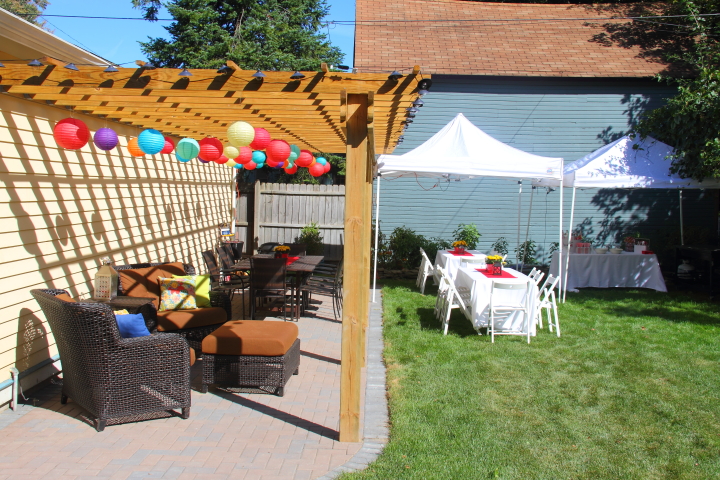
Last time I shared about our backyard on the blog we only had the cuddle set under our new pergola. Since then we added a dining table that I found on Amazon as well as a set of eight outdoor wicker chairs that I got at an end of season sale at Meijer. This provides us with a nice permanent outdoor dining area that we made use of for the party.

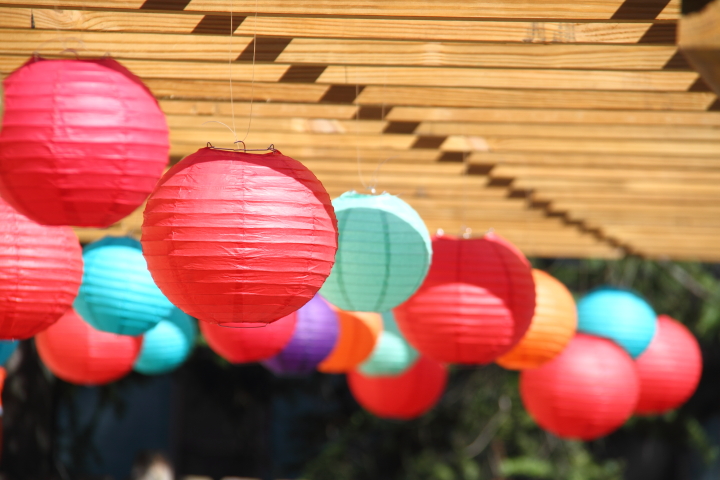
For some decoration I dressed up the pergola by hanging a bunch of paper lanterns in different sizes and colors. I used fishing line to tie the lanterns to the pergola in random spots and slightly different heights. I thought it added a festive touch to the yard.

We were expecting a lot of guests so we set up two pop up tents and some additional seating in addition to our permanent backyard furniture. 

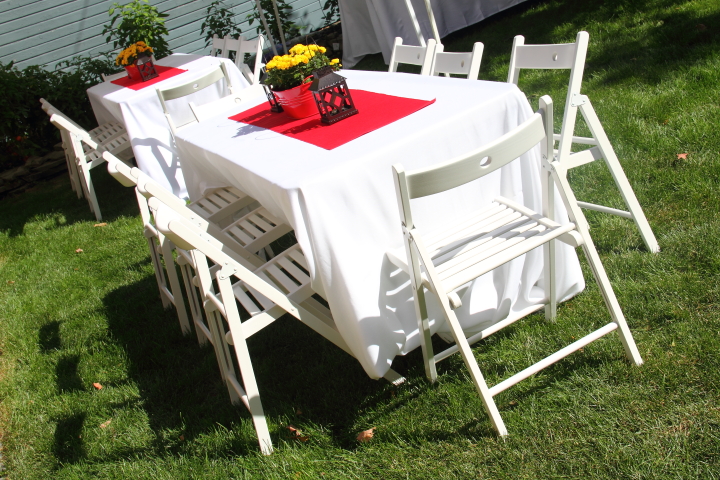
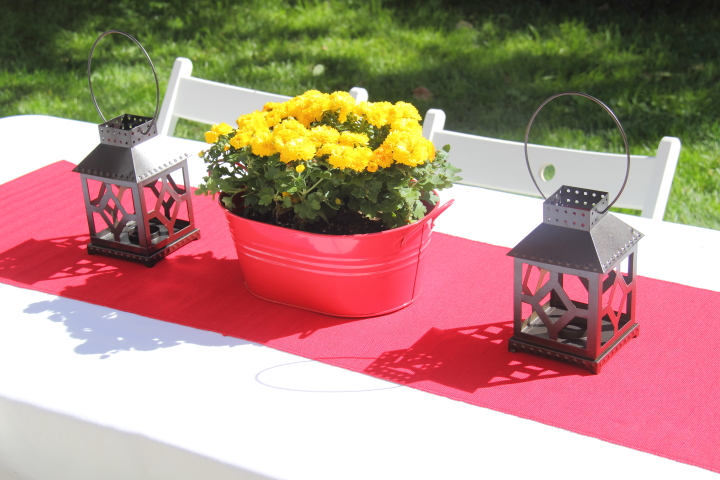
I used two white table cloths to cover a few of Frank's tailgating tables and set out white Terje folding chairs from Ikea. In the center of each table I laid out red Marit table runners. For center pieces I put out red metal bins with yellow mums flanked by lanterns. Both the red bins and lanterns were from the Target One Spot purchased last year. The lanterns were a light brown but I spray painted them oil rubbed bronze. Now that the party is over I plan to plant the mums in my front garden beds.

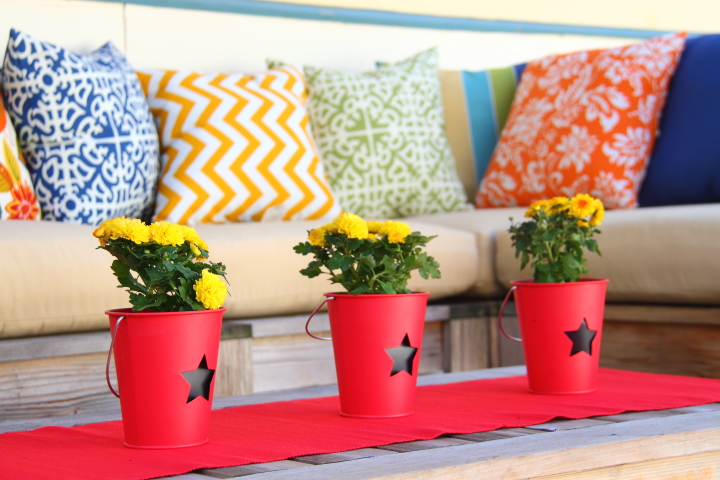
I also did a little decorating with the seating area on the patio behind the house setting out another table runner and more mums.

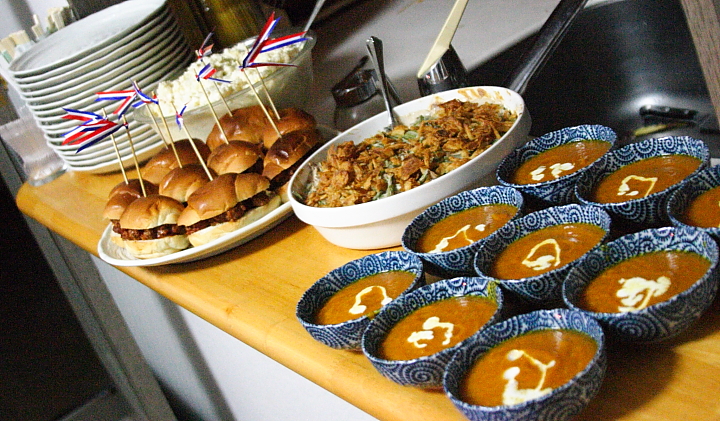
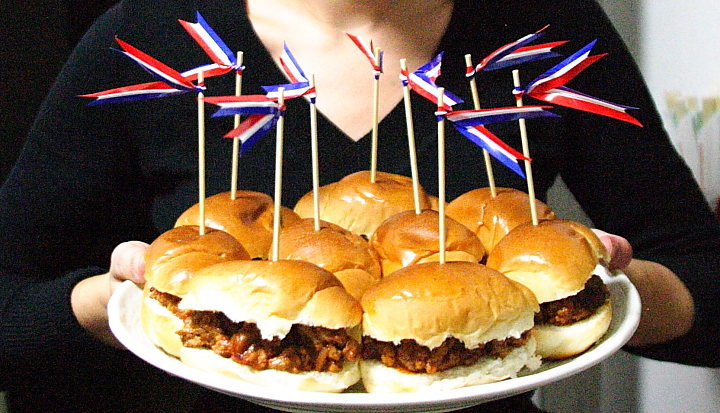
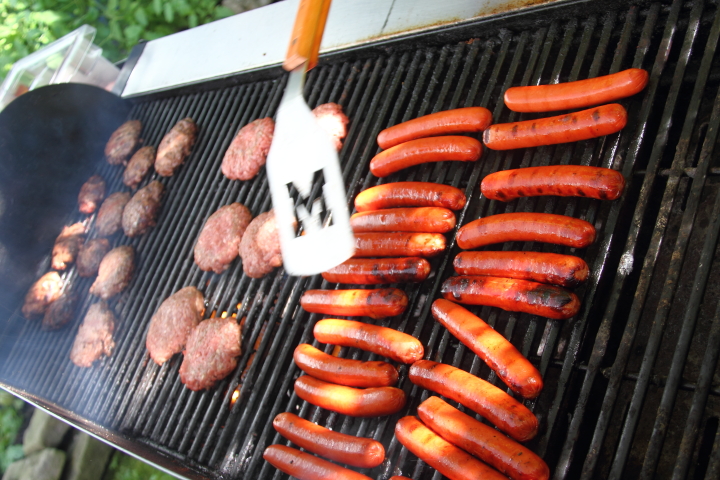
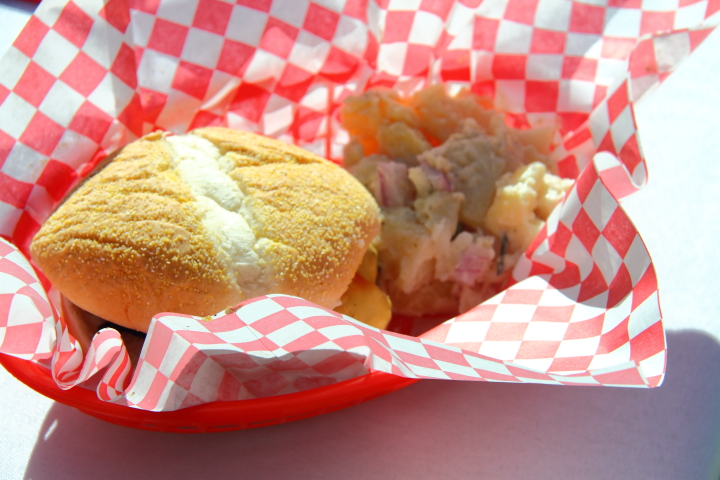
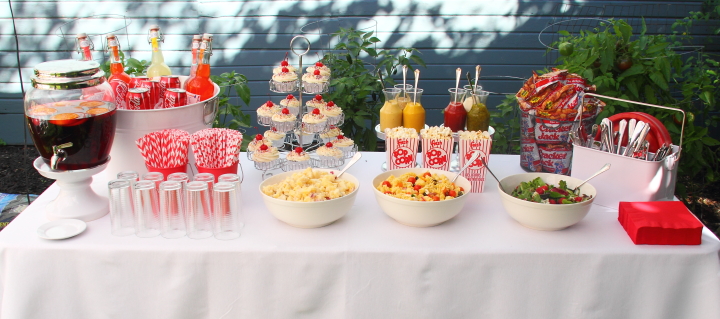
When Frank got back from the game he fired up the grill and made hot dogs and hamburgers. I had found red fast food baskets which I lined with red checked wax paper to serve them up.

In addition to the burgers and hot dogs I set up a table next to the grill with other food and some drinks.

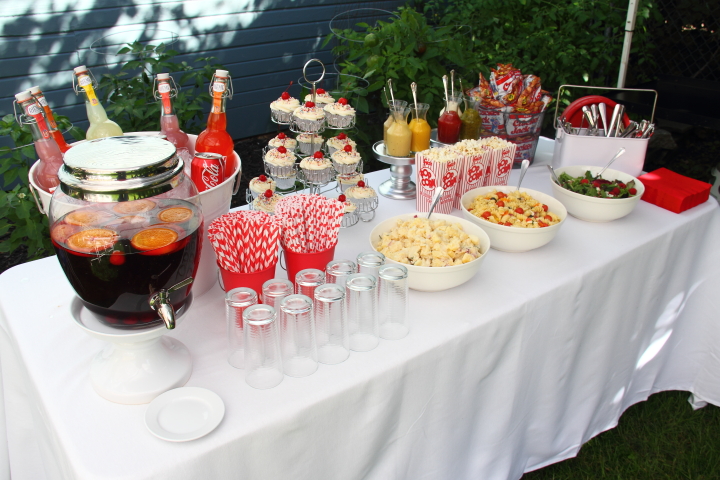
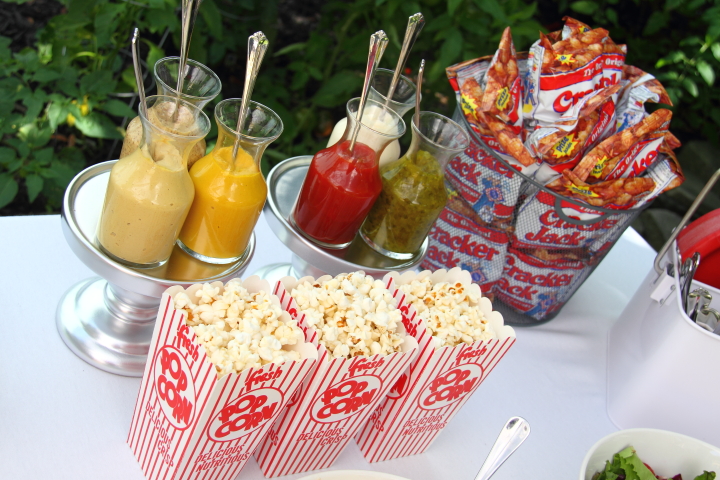
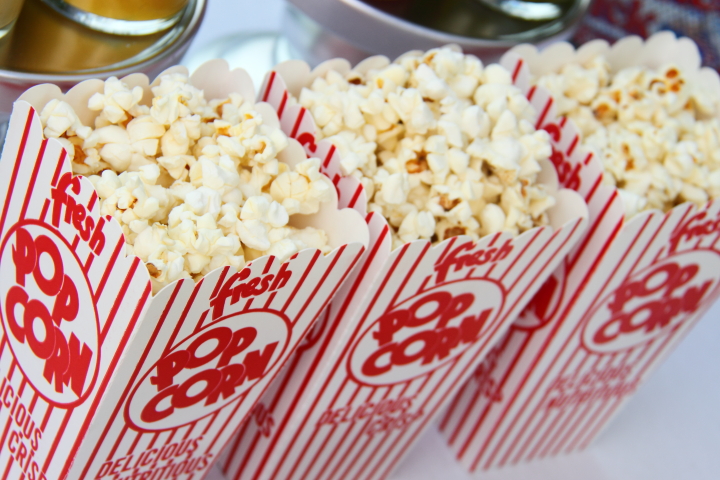
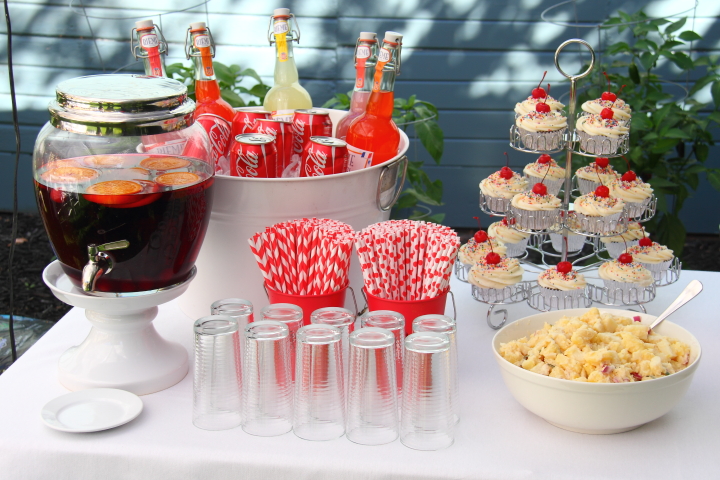
I put out condiments in small carafes which I placed atop pillar candle holders that I found on sale at Target and spray painted silver. I also had small bags of Cracker Jacks that I set out in a silver mesh bin. I popped some pop corn and put it out on the table in red and white stripped popcorn boxes.

The night before I made a few salads for the party including rosemary potato salad, pasta salad with feta, oregano, bell peppers, tomatoes and olives and a salad of spring greens with pecans, bleu cheese, dried cranberries and raspberries.

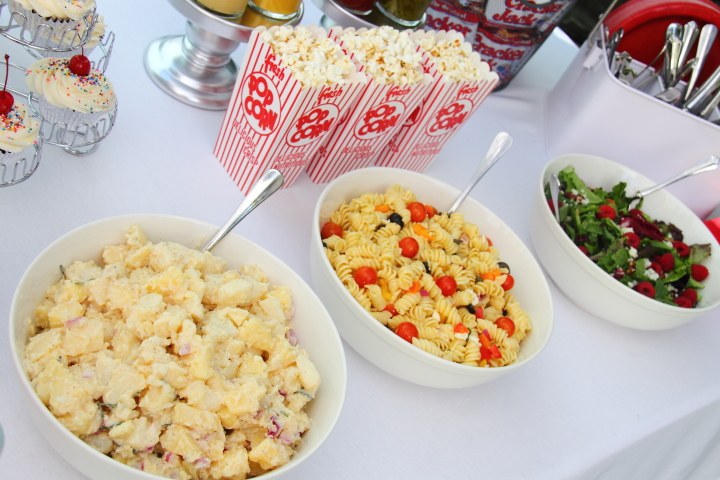
I also made buttermilk chocolate cupcakes that I iced with buttercream frosting and topped with sprinkles and maraschino cherries.

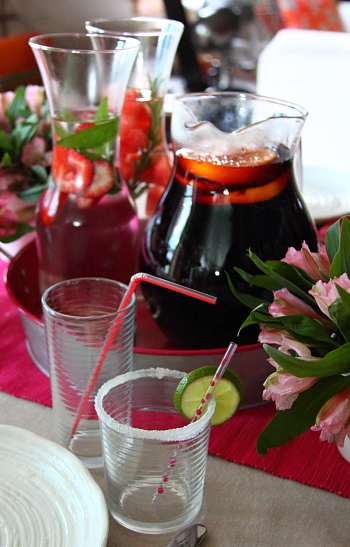
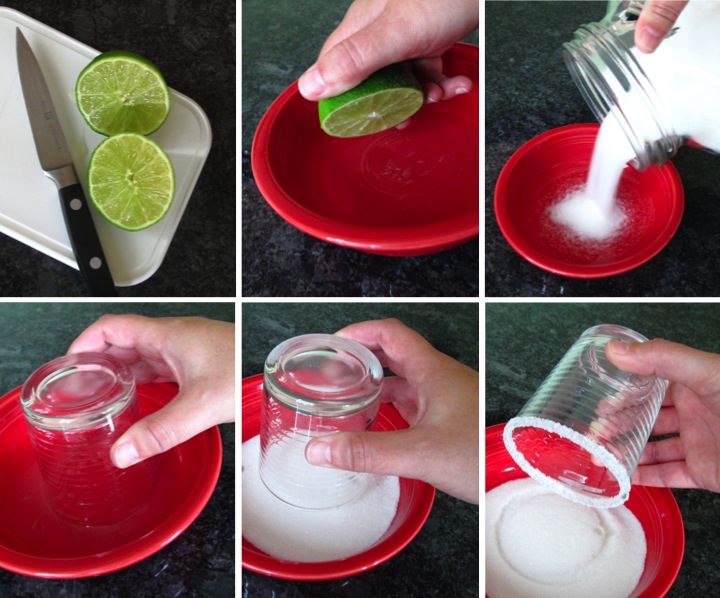
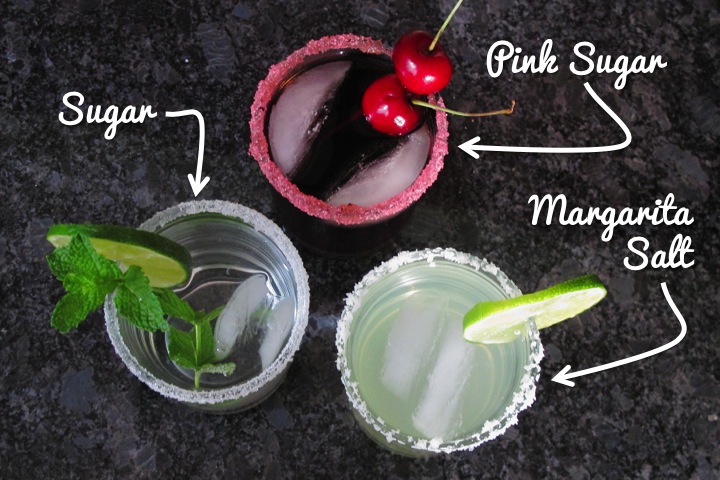
For drinks I had sangria in a pretty drink dispenser that Frank and I got as a wedding gift as well as some flavored sparkling lemonades and cokes on ice. To keep the sangria cold I cut up orange slices that I had frozen the night before. For fun I set out red polka dots and red striped straws with the glasses.

The barbecue was a lot of fun and we ended up having over sixty guests. It was so nice to hang out with everyone and finally break in our new side patio and pergola with a party.

Thursday
Jul112013

DIY Letterpress Wedding Invitations 

I love how letterpress looks so I really wanted to try making my own letterpress wedding invitations. I looked at my local paper/bookbinding shop to try to do a traditional class where you set your own type, but nothing was available in the time frame I needed. I did a little searching around on the internet and came across an at home option with the Lifestyle Crafts Letterpress Combo Kit. At first I was a little discouraged since the reviews weren't so great, but I found that some people had success using modifications with a tutorial from Boxcar Press.

With renewed enthusiasm, I decided to go for it and ordered a custom letterpress plate from Boxcar Press. My first step was to create a design for my invitation and reply card on Adobe Illustrator. For fonts I used Bickham Script Pro for our names, Times New Roman in italic for "and" and "reception to follow" and Copperplate for the rest of the wording. 

Since you pay for the total area of the design and there is a minimum size I decided to fill up the blank spaces with other words like "Happy Birthday" and "Thank you" as well as some cute icons for later use in card making. Honestly, I realized after getting my plate I could have packed things together a little more tightly than I did. Ordering the plate was super easy. I simply created a log-in and uploaded my Adobe Illustrator file. They also take PDF and EPS files as well. Below is a portion of the plate that I received with my invitation on the top right and the reply card on the bottom right.

I used a regular scissors to cut apart the elements from each other. The reply card is on the left and my invite is on the right.

Next, I pulled the blue film off the plate to expose the sticky backing on my invitation plate. I saved the blue film to reapply after I was done. The letterpress kit is basically two hinged acrylic boards that you crank through a die cut machine. I aligned my plate on the top board using the grid lines.

Next I inked my plate. This was a bit tricky. I choose to order deep navy blue rubber ink from Boxcar Press.  Honestly, it was expensive but now I have a lifetime of navy ink since it comes in a two pound can. I also liked the fact that rubber ink was slow drying to make clean up and printing easier.

When printing you need to use a very, very small amount of ink so you should have two acrylic pieces, one to work some ink until it is soft with an ink knife and the other to roll out with your brayer. I had the one that came with my kit and then I used the back of one of my quilting templates for the other one. Honestly, the piece of acrylic that came with my kit was ridiculously small and I would have saved myself some headaches if I had used something larger since I barely had any room to hold it. The brayer that comes with the kit is also so small that is it absurd. I got a 6in soft rubber brayer and was very glad that I did. 

I took a small amount of ink from my can, mixed it until it was smooth on my first acrylic piece with my ink knife and then transferred a very small amount onto the second acrylic piece. I then rolled it out with my brayer until I had a very, very light coating of ink on the brayer.

With my brayer loaded with ink, I very lightly rolled it over my letterpress plate. I used some of the polymer plate strips that came with my plate for roller bearers as the Boxcar Press tutorial suggested, but honestly I found that I got better results by hand inking it.

It definitely took some time to get the hang of exactly how much ink I needed to get a nice impression. The picture below is with my plate inked with a bit too much ink, but unfortunately I didn't take a picture with it inked the right amount. To make sure that I got good impressions, after each print I wiped the plate clean with a dry cotton rag before reinking.

After the plate was inked I put my paper on the bottom board of the letterpress bed.  I splurged and bought Crane's Lettra Pearl White 220lb Cover. It is hard to show in pictures but it is amazingly thick and beautiful and I felt it was definitely worth it. Instead of using gage pins to align my paper on the letterpress bed I just aligned it with the sides (since the paper was the full width of the bed) and the trimmed down the top and bottom afterward. I was only making ten invitations so that method seemed easier for me, but if you were making a large quantity you may want to do something different.

With the paper in place I carefully flipped the top of the letterpress over the bed.

I then put the letterpress bed into the Epic Six and turned the crank which pushed the letterpress bed through the machine.

After trimming it down to size my invitation was complete. I then used the same process to print my reply cards.

To finish things up I bought 6" x 6" Navy Square Invitation Envelopes for the invitations and 3-5/8" x 5-1/8" Navy Invitation Envelopes for the reply cards. I kept things simple and used a white gel pen to address the envelopes before popping them in the mail.

I really love how my invitations turned out and to me it was worth the time and effort. Honestly speaking, figuring out how much ink gave a good print was a bit fussy and time consuming but once I had that down it was fairly quick to crank them out. It is definitely something that I would try again for a special occasion.

Tuesday
Dec112012

Beautiful Details from Cindy's Wedding

This past weekend I went to Amelia Island in Florida to join Frank in going to the wedding of one of his college friend's, Cindy. The whole wedding weekend was full of beautiful special touches and I thought that I would share a few of them here.

On Friday night Mike and Cindy hosted an amazing rehearsal dinner. The food was wonderful but the highlight for me was the s'mores. They had wrapped up graham crackers, chocolate and marshmallows in little cellophane bags and tied them closed with baker's twine and a cute little tag that read "S'mores, Y'all." There were Adirondack chairs set out around fire pits outside and you could relax, toast your marshmallows and make some s'mores. It was really a wonderful and fun idea.

On the morning of the wedding Cindy had arranged a trolley tour for the guests. The trolleys were really cute and decorated for the holiday season. We went to historic Fernandina Beach and the trolley driver explained all sorts of interesting facts about the town and its history. We then had two hours to walk around the town and grab some lunch before heading back to the hotel.

The wedding location was beautiful, set on the lawn in front of the Ritz Carlton Amelia Island overlooking the sand dunes and the ocean. It was a foggy day which made for a romantic ambience. As an added touch Cindy thoughtfully provided pashmina wraps with the programs for the ladies since it was a little chilly outside. Cindy's dress was amazing and she looked like a princess. The ceremony was truly lovely, with adorable flower girls and ring bearers and touching readings. Cindy and Mike looked truly gorgeous and happy together.

After the ceremony was a wonderful cocktail hour. At the tables around the outside bar Cindy had set out these really neat butterfly jars which tied into the ceremony. They looked real and the butterflies inside would flit around every once in a while making it really believable, but they were actually battery operated with super thin wires and a battery under the lid of the mason jar. They looked lovely and definitely had us fooled for a while into thinking they were real.

Inside at the cocktail hour they had a lady who was hand rolling cigars for the wedding guests. It was really cool to watch her process as she worked.

There was also a fun photo booth set up with a variety of silly props like big glasses, colorful bowties and fake mustaches. It would take four pictures and print out for the guests with the wedding information along the bottom.

At the reception the table settings were lovely. I especially liked the purple jewel toned water glasses which were a unique touch.

For dessert, there were the most amazing cupcakes. I thought it was neat that they were offered in both full and mini sized in case you wanted just a bite. The red velvet with cream cheese frosting one was really quite amazing.

At the end of the evening we all went outside and were given long sparklers. We lit them and made a tunnel of light for Cindy and Mike to run through as they left the reception. It was really beautiful and a fun way to send them off.

Frank and I had such a wonderful time at Cindy and Mike's wedding. It was fun to catch up with several of Frank's college friends and be a part of Cindy and Mike's special day. I'm sure that the two of them will be blessed with a long and happy life together. Congratulations, Cindy and Mike!

Tuesday
Nov062012

Election Day 2012 (& 2004)

Happy Election Day to the Americans out there! Today is such a special day as we get to make our voice heard and participate in our democracy. I feel so lucky that I live in one of the places in the world where we can change the direction of our country by peacefully voting instead of resorting to a coup d'etat or civil war.

My polling location is at a little brick elementary school a few blocks from my house. Seeing the people in my neighborhood walking over and waiting in line together epitomizes the special feeling of community I have on Election Day. The US, like all countries, has its problems, but I love the fact that I have the freedom to say what I want, openly agree or disagree with the government and vote as I believe. I am proud to be an American everyday, but especially so on Election Day.

I went to vote this morning but the line was an hour and a half long so I headed into work and then came back during lunchtime. This ended up having a special perk since when I went back a lady had baked a huge tray of chocolate chip cookies and had her daughters passing them out to the other voters waiting in line. I really love my little neighborhood.


This year I won't be able to have a party to watch the returns come in since I have a TV conference for work this evening. I'm a little disappointed, especially since it looks like it will be a tight race.

I thought for fun I would share my election party details from 2004 since I had already shared about my election experience in 2008 while I was living in Japan. Back then I was living in a little apartment in Oakland, California. For fun I hung up red, white and blue streamers draped from my living room ceiling and passed out red, white and blue bead necklaces to my guests.

For food I kept with the patriotic theme and had all red and blue snacks including blue corn tortilla chips with red salsa and candy bars with red and blue wrappers. I also made star shaped sugar cookies icing half in red and half in blue. For drinks there was red and blue punch.

My favorite part of the party was the felt electoral collage map that I made. I made two enlarged photocopies of an outline map of the US states that I found on the Internet and used them as a template to cut out all of the states in red felt and then blue felt. I mounted a large piece of white felt on a piece of foam core as a background for the map. As each state was called for either John Kerry or George Bush I put up either the blue or red version of the felt state on the board. It was a great way to keep track of electoral college standing throughout the night with my guests.

It was fun to get together with friends to spend time enjoying watching our political process in action. Hopefully in 2016 I'll be able to do it again!

Thursday
Oct042012

American Presidential Election as an Expat in Japan

The 2012 American Presidential campaign is in full swing with the first of the debates between Mitt Romney and Barack Obama last night. Election time is such a wonderful chance to see our democracy in action and I enjoy learning more about the candidates and their ideas.

I like following politics and can be pretty opinionated sometimes so I always vote in every election. A typical presidential Election Day will find me heading to the polls and then dorkily, but proudly wearing my "I Voted Today" sticker to work. In the evening I eagerly watch the election returns come in, often times inviting people over to watch for an election party.

During the last presidential election, however, I had quite a different experience since I was living in Japan in 2008. One of the biggest differences was my exposure to campaign ads. Back in the US it is common to be continuously bombarded with election information and advertising. In Japan I had the luxury of choosing how much I wanted to be exposed to since I was seeking information out myself on the internet. I found it quite refreshing actually and had a lot of fun following how the campaigns unfolded from afar.

Having the chance to talk to other expats from different countries and my Japanese colleagues about what they thought of the election was interesting. Hearing an outside perspective was thought provoking and I had a number of fun discussions learning about how elections are run in other countries and how it contrasts with the United States.

A little town in Fukui Prefecture in Japan is named Obama (小浜) so during the election it received a lot of publicity in Japan for sharing a name with one of the American Presidential candidates. The town capitalized on its newfound fame by making all sorts of memorabilia with the candidate's image on it. They even made sweets emblazoned with Barack Obama's face. 

Actual voting was quite different for me while I was in Japan. I wasn't going to let being overseas keep me from voting so I applied for an absentee ballot which I had never done before. It seemed really strange to vote by mail in October a few weeks before the election instead of going to my local polling station on Election Day but I was still happy to be have my chance to exercise my right to vote.

The weirdest thing for me was watching the returns come in. Instead of watching at home they were coming in while I was at work due to the 13 hour time difference from Eastern Standard Time and Japan Standard Time. All morning as I was working at my desk I kept peeking at the Internet to check the electoral college standings. By lunchtime I knew that Barack Obama had won over John McCain. This was a far cry from the election eight years prior to that where I stayed up until the wee hours of the morning during the 2000 election only to learn that the decision between George Bush and Al Gore would not be decided that night.

Despite already knowing the outcome of the election, I wasn't deterred from having an election party at my apartment that night. I decided to make American comfort food. With my Japanese kitchen only equipped with a stove top and a small convection microwave and my grocery access limited to Japanese offerings I had to be creative with my menu. I wanted to make burgers but since that wasn't feasible in my kitchen I made sloppy joes served on some rolls that I found instead. For sides I made potato salad and green bean casserole. I also decided to make curried apple pumpkin soup since I had some canned pumpkin that I had brought from the US to Japan with me for something special. 

To add a little patriotic flare I added some skewers to the sloppy joes. I had found a package of red, white and blue twist ties at a Hyaku-En Store and attached them to the top of the skewers making little pennants. 

We had a fun night and for the Americans in attendance it was nice to eat some food we hadn't had in a long time. I never knew before that I could crave potato salad...

What do you normally do on Election Day?

Wednesday
Aug082012

How to Rim a Glass with Sugar or Salt

After sharing about Trisha's going away dinner party I thought I would provide the details about how to do one of the party elements, namely how to rim a glass with sugar. Although I used sugar for the party since I was serving a sweet Sangria and flavored waters, this technique works equally well with salt.

The process is really simple and easy. You just need limes, sugar or salt and two flat dishes with a lip that are larger in diameter than the cups or glasses that you intend to decorate.

Squeeze the limes over the first dish until it has a shallow covering of lime juice at least an eighth of an inch deep. Pour some sugar or salt in the second dish and tap it to level it out flat.

Dip the rim of your glass in the lime juice followed by dipping it into the dish of sugar or salt. Keep the glass upside down between dipping into the juice and the sugar or salt otherwise the juice will drip back into the glass. Also, only lightly dip the glass into the sugar or salt because if you hit the bottom of the dish you may rub off the sugar or salt on the very top of the glass. Very lightly tap the glass to gently shake off any excess granules. Turn the glass right side up and then fill it with your favorite party beverage.

You can also try this technique with colored or flavored sugars for something different. It is a super easy and fun way to dress up your drinks.

Wednesday
Jul042012

Mixed Berry Pie for Fourth of July

Happy Fourth of July! Although it is blisteringly hot and humid here in Michigan I felt compelled to make a pie this morning to bring to the Independence Day get-together that I am going to this afternoon. The first reason is that so many wonderful berries are in season and just begging me to bake with them. The second reason is that pie is delicious.

I love making mixed berry pies with all sorts of fruit combinations: strawberries, black raspberries, blueberries, rasperries, blackberries... you get the picture. It is a great and delicious way to use up whatever fruit you have on hand. Today I paired some blueberries and raspberries since it makes a festive color combination. The pie smells delicious and I am having some serious will power issues not cutting into it before I head to the party. 

Ingredients List
- 4-5 cups berries (depending on the size of your pie pan)
- 2/3 cup sugar
- 3 tablespoons cornstarch
- Double pie crust pastry

Directions
- Toss the berries with the sugar and cornstarch to coat and let sit for at least fifteen minutes
- Roll out half of the pastry and line the bottom of a pie plate with it, trimming off excess
- Roll out remaining half of the pastry
- Add berries to the pie plate and then top with pastry
- Trim excess pastry, crimp the edges and cut vents in top crust for steam to escape
- Bake for 45-55 minutes at 375° F until the crust is golden and the filling is bubbling 

Tips and Tricks
- I make my own crust (I'll share the recipe in another post) but you can also use store bought
- To make your pastry easier to deal with, keep it in the refrigerator until you are rolling it out
- To prevent your crust from browning too much, wrap it in tin foil for the first 25 minutes of baking
- Part of the fun of making pie is being creative with the vents on your top crust. I love making a woven top, but since today is Fourth of July I used star shaped cookie cutters to make my vent. Any large vents should be made before you place your top crust on your pie 

Saturday
Jun232012

Going Away Party For Trisha

My friend, Trisha, is moving out of state for a new and exciting job so last night I had a little dinner party for her and some friends over at my house.

To set the table I started off by laying out a kraft colored linen tablecloth and then laid out a pink table runner and pink napkins at each place setting. I also laid out two glasses at each place setting. The short, wide glass was for sangria decorated with a sugared rim and a lime slice with a short pink polka dot straw and the tall, skinny glass was for water with a tall pink bendy straw. 

For flowers my grocery store had bunches of alstroemeria on sale for $3 each so I bought four bunches in two shades of pink and placed them on the table in little white flower pots.


For drinks I made two different flavored waters, strawberry-mint and watermelon-sage, and set them out in glass carafes. For those who wanted alcohol, I sliced up some oranges and put them with some sangria in a pitcher. I placed my drinks in a pink metal tray at the center of the table.

For food I had to be careful of my menu to make it gluten-free. I used a quinoa-corn pasta to make a pasta salad with cherry tomatoes, feta cheese, kalamata olives and parsley. I also made a spinach salad with goat cheese, raspberries and sugared pecans and tilapia wrapped in sage and prosciutto. 

We had a fun time and it was so nice to have everyone over and celebrate our friendship with Trisha. Good luck with your move, Trisha! We love you!

Thursday
May242012

Pink Bachelorette Dinner

In May several years back I hosted a bachelorette sleepover at my house for a friend. It was a lot of fun and I had a great time setting the table for our dinner.

I decided to go with a pink theme and put out my white china with a white tablecloth and pink napkins. For placecards I made up tent cards on the computer that had all the ladies' names in white script against a pink background.  Right before everyone arrived I clipped some dogwood blossoms from my tree to decorate the placecards.  I made a little slit in the upper right corner and then just tucked the stem in. The blossoms held up surprisingly well and luckily didn't wilt until the next day.  

I also made a pink and white candy buffet for us to snack on over the evening. I put the various candies, like Good & Plenty, white malted milk balls, chocolate truffles dusted in pink, in ice cream sundae glasses along my buffet. I was a little desperate to find pink and white candies so I resorted to buying a large bag of Ice Cream Treat Skittles and sorting out the strawberry flavor (pink) and vanilla flavor (cream). It was a bit tedious, but it looked really cute.

As I was in Target shopping for the pink and white candies I couldn't resist stopping by the Target One Spot where I spotted some cute pink bookmarks. They were sold in two packs for a dollar so I grabbed a bunch. They had a photo opening at the top and I printed out hot pink script monongram initials for each lady and slipped them in the photo opening.  I thought they made an easy and inexpensive little favor.

Friday
May042012

Spice Jar Wedding Favors

After sharing the wedding flowers I made for the small wedding reception for my friends, Pam and Pete, that I hosted at my house a few years back I thought I would also share the wedding favors.

We had Indian food catered and so I thought little jars of curry powder would make a nice favor. I got little spice jars from Cost Plus World Market and filled them with curry powder that I had bought in bulk.

To decorate the jars I made little P&P tags on my word processor, printed them out and trimmed them into squares. I punched a hole in the corner and then tied on the tags with a pumpkin colored ribbon. 

The favors were super easy to make and inexpensive, too. Everyone thought they were cute and the curry powder was a useful gift as well.