Welcome

My name is Lisa and I'm a crafty girl with wanderlust working as an engineer by day. My blog chronicles projects in my home as well as pictures and stories from my travels.

Search


Instagram

Blog Index
The journal that this archive was targeting has been deleted. Please update your configuration.
Navigation

Entries in Parties (14)

Wednesday
May022012

Simple Carnation Flower Arrangement

When I want to brighten up my home with flowers I love buying grocery store carnations to make a simple arrangement. I just made one to display on the console table in my guest room and I thought I would share how easy it is to do it.

Depending on the size of arrangement I want to make I use two to three bunches of carnations. I like to try to find bunches that have slightly different shades of flowers to give the arrangement a little more depth.
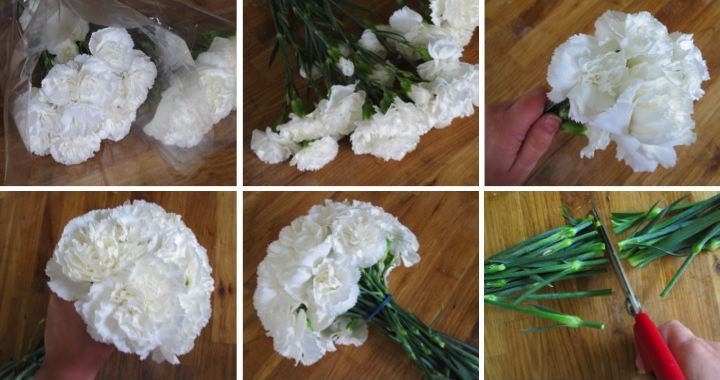
After opening up the bunches, I start to gather up stems in my hand, arranging them as I go to form a tight puff of flowers. Once I have built up the bouquet to the size that I would like I secure them close to the flowers with a rubber band and then trim the stems to fit in my vase. I always use an opaque pot or vase, but if you wanted to use a clear vase you could disguise the rubber band by tying a pretty ribbon over it.

I like this arrangement for two reasons. First, I can make it in about five minutes and I don't need any special flower arranging items, like frogs. Second, the carnations can last several weeks if taken care of which means pretty flowers in my house for a long time with little effort and little money. You can't beat that!
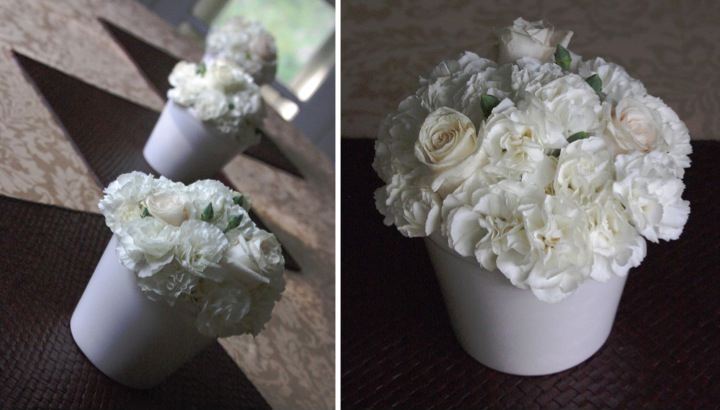
A few years ago when my friends, Pam and Pete, got married I hosted a small reception for them at my house. For the flowers I did a variation on this arrangement, just adding in a couple of white roses and the carnation buds into the mix. It made for a pretty table without breaking the bank.
Sunday
Jan082012

Music Note Candy Party Favors

Yesterday was Earnee's Motown themed baby shower that I was a co-host for. Everything came together really well and turned out cute. Chavella did a great job with the decorations, Tiffany planned fun party games, Yuko took care of picking up the cake and the catered soul food and I made punch and cornbread as well as party favors.

Since Earnee's favorite color is yellow we decided to use a yellow color scheme with some silver for added glamour.  To keep with the theme I thought it would be neat to mold yellow candy music notes for the favors.

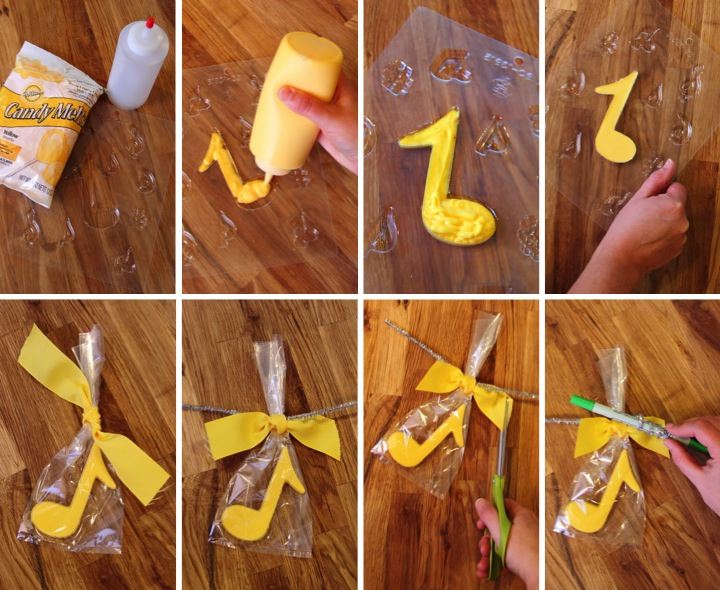
Molding candy is pretty easy. Personally, I like to use squeeze bottles to keep things simple. You can put the candy melts right into the bottle and pop it into the microwave on low heat to melt. It's important to use a bottle that is meant for this purpose so the plastic won't melt. Once the candy was melted I squeezed it into cavity of the mold. After filling it up the back looks a little uneven but a few light taps of the mold on the counter makes the candy distribute evenly in the mold and smoothes everything out. To speed up the candy hardening I put it in the fridge on a level surface. Once the candy cools it is simple to gently pop the candy out of the mold.

To package the candy I slipped them into a clear favor bags. Using a yellow ribbon I tied one knot around the top of the bag, placed a silver pipe cleaner on top of the knot and then tied a second knot with the yellow ribbon. I trimmed the ends of the ribbon on a slant and created curls with the pipe cleaner by twisting it around a marker.

The favors were simple and inexpensive to make and reflected the glitzy Motown theme. I like how they turned out and was happy that they were a hit with all the ladies at the party.

Sunday
Dec182011

Motown Baby Shower Invites

My girlfriend, Earnee, is expecting her first son this February and I am co-hosting a Motown themed baby shower for her in January. I was in charge of the invitations for the shower and had fun coming up with something cute to fit the Motown theme.

Because she is having a boy I decided to use a blue color scheme.  Since I was going to be making a lot of invitations I kept the design simple and thought that embellishing the front of the card with tiny records would fit the theme and be easy to make.

I started with blue cardstock that had a woven texture, cut it into 8-1/2" x 5-1/2" strips and then folded in half to make the base of the cards. I printed the shower detail information on white cardstock, trimmed it to 4" x 5-1/4", and attached it to the inside of the card.

For the front of the card I cut 1-3/4" x 5-1/2" strips of white cardstock and then attached it with two mini records on top. To make the mini records I punched out 1-1/2" circles from black metallic cardstock and 3/4" circles from different shades of blue cardstock. I layered the blue circles on top of the black ones and then used a 1/8" hole punch to make the record hole.

Everything came together well and by making the invitation assembly line style I was able to get them finished pretty quickly. With the invitations in the mail I'm ready to start working on other fun items for the shower.

Monday
Dec122011

Holiday Party

With being out of town to Japan, New York and New Orleans this month I'm not going to be able to host a holiday party this year but I thought I'd share my Christmas decorations and food from my party last year.

For decorations I made table runners out of teal and white fabric. I also made pillows out of coordinating fabric and used white felt to add a snowflake motif on one of the pillows.

I kept things simple for my tree decorations with white lights, teal and silver ornament balls, pinecones that I spray painted silver and teal, and silver pipe cleaners that I twisted into spirals.

For the tables I filled vases with extra ornaments and some extra branches I trimmed from my tree. I also put some of the painted pinecones and ornaments in a wooden bowl on my serving table. 

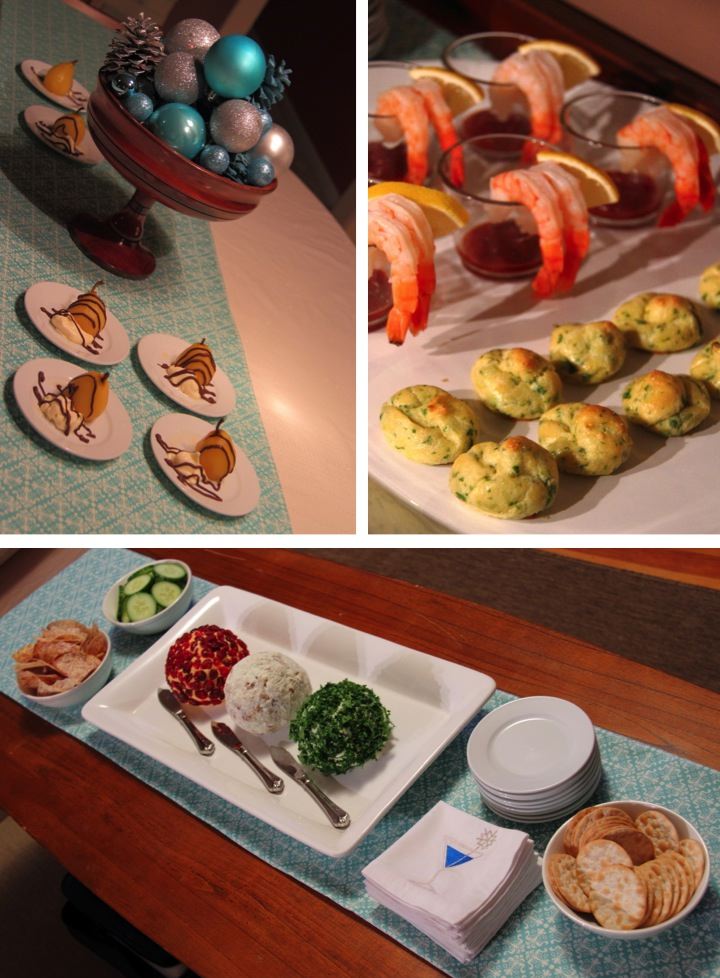
I like to try to make some food ahead for my parties so I made three different cheese balls a few days before that just required garnishing before serving.  The lemon-parsley gougeres can be made ahead and then baked right before the guests come. I also made individual shrimp cocktails by putting a little bit of cocktail sauce in the bottom of a small glass with shrimp and a slice of lemon.  For something sweet I made honey-poached pears with marscapone drizzled with chocolate. I used whole small pears and cored them from underneath to keep the pear intact for presentation. I was happy that with so much I could make ahead everything was stress free for me at the party and I could spend my time enjoying the food with my guests instead of in the kitchen cooking.

Page 1 2