Welcome

My name is Lisa and I'm a crafty girl with wanderlust working as an engineer by day. My blog chronicles projects in my home as well as pictures and stories from my travels.

Search


Instagram

Blog Index
The journal that this archive was targeting has been deleted. Please update your configuration.
Navigation

Entries in Cardmaking (7)

Monday
Dec252017

DIY Letterpress Holiday Cards with Foil Accents

Happy holidays! This year we got snow on Christmas Eve and Christmas Day so we are enjoying a cozy white Christmas here in Michigan. It's been a busy month but I managed to finish making our holiday cards and mail them out a few days ago.

For the design this year I wanted to do letterpress again since I have enough navy ink left over from making our letterpress wedding invitations to last a lifetime. I created a simple greeting "Happy Holidays from the DiMaggios" using Adobe Illustrator and then ordered a letterpress plate through Boxcar Press.

To make the invitations I used the tools that I previously used for my past letterpress projects, Lifestyle Crafts Letterpress Combo Kit, letterpress plate, two pieces of acrylic plexiglass, a palette knife and a rubber brayer. For these cards I also used Crane's Lettra Pearl White 220lb Cover which is my favorite because due its thickness you can make a really lovely impression with it. I buy it in 8-1/2 x 11 sheets which I cut in half to print the cards and then later cut down.

I've explained my letterpress process in this previous post which has all the details but the number one tip is that you need way less ink than you think. Practice makes perfect and over time I am becoming happier with the quality of the impressions when I print and at the same time I am managing to get less ink stains on my hands. It now takes me less than a minute to ink the plate and print each card.

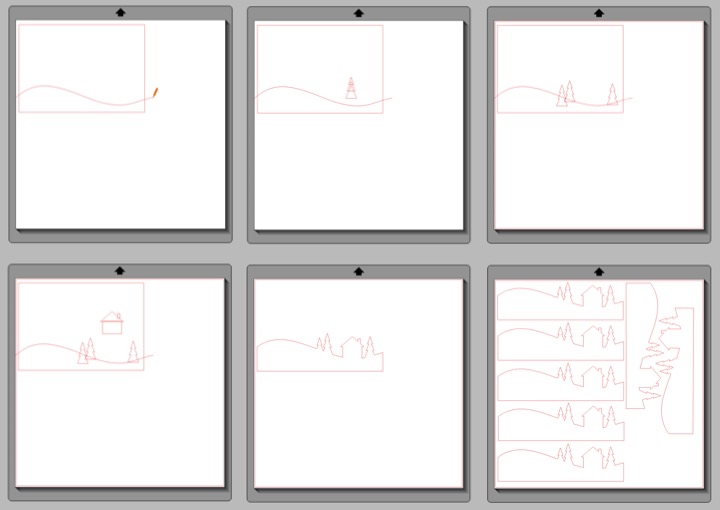
After printing the cards I wanted to add a foil detail along the bottom so I drew a little snowscape design on my computer using Silhouette Studio. Since I knew that my final card was going to be 7" wide I made sure to make my design a quarter inch wider. Once I was happy with the design I copied it across the workspace so I could cut 7 at a time and then used my Silhouette to cut the design out of blue adhesive foil. If you don't have a Silhouette you can make a pattern from cardboard and then trace and cut out the design by hand.
I applied the foil designs along the bottom of the cards and then trimmed the cards down to 7" x 5" to fit into A7 sized envelopes. Because of the thickness of the 220 lb. stock I used to bring my cards to Kinko's and use their paper cutter to trim down cards. However, a few months ago I picked up a huge 24" x 24" paper cutter at a second hand shop for $20 which is perfect for handling the thick stock. Despite being a little worn from a previous life in an elementary school art department, the paper cutter was super sharp and I was able to quickly trim all of the cards. Making the cards oversized and then cutting them down ensures that the edges of the foil design line up with card perfectly.

With the cards finished I mailed them off to our friends and family. It was fun to add the blue foil to the design this year and I'll have to come up with a different unique touch for next year. Wishing everyone a wonderful holiday season and a happy 2018!

If you are interested you can check out some more of my handmade holiday cards here and here.

Saturday
Dec242016

DIY Letterpress Holiday Cards

I love to make our annual holiday cards and this year I decided to do a simple letterpress card. I previously had made our letterpress wedding invitations a few years ago so I had the benefit of some lessons learned this time around. I already had plenty of navy ink that I had previously custom ordered for the wedding invitations and my Lifestyle Crafts Letterpress Combo Kit so all I needed was to order some more paper and create a design. I'm just going to share some basics in this post so for a thorough rundown about the process, check out my wedding invitation post as well as the information from Boxcar Press..

I started by creating my design using Adobe Illustrator with a simple greeting and a few snowflakes. I then ordered my plate through Boxcar Press. They have a minimum size so I like to add on a bunch of other fun things that I may use later, like small designs, greetings or initials. Also, when ordering they will send you extra plate strips for free that you can use as bearings when inking so definitely ask for it in the comments of your order. After receiving the plate I cut out the design using a scissors and removed the blue backing so that I could stick it to the top board of my letterpress bed. 

The big thing that I learned from last time was to start with a very, very small amount of ink and use a large acrylic piece to work with as your base. Instead of using the small piece that came with the kit, I ordered a nice large 12"x12" acrylic piece. I used my ink knife to only spread out a pea sized amount of ink and then worked it with my knife back and forth until it was smooth.

I then transferred only a small amount from my blade onto a second large piece of acrylic and used my rubber brayer to roll it back and forth until I had a very, very light coat of ink on the brayer.

I used some of the polymer plate strips that came with my plate for roller bearers. I didn't do this when I did my wedding invitations (it didn't work well for me then) but this time it resulted in a much better impression. With my brayer loaded with ink, I very lightly rolled it over my letterpress plate. It is very important to only roll once otherwise you will have way too much ink on the plate and you will get a messy impression.

After the plate was inked removed the polymer plate strips and put my paper on the bottom board of the letterpress bed.  I splurged and used the Crane's Lettra Pearl White 220lb Cover again. It is hard to show in pictures but it is amazingly thick and beautiful and I felt it was definitely worth it. Instead of using gage pins to align my paper on the letterpress bed I just aligned it with the markings on the letterpress and then trimmed down the card afterward. 

With the paper in place I carefully flipped the top of the letterpress over the bed. I then put the letterpress bed into the Epic Six and turned the crank which pushed the letterpress bed through the machine. After trimming it down to size my card was complete.

To make sure that I got good impressions, after each print I wiped the sentiment part of the plate clean with a dry cotton rag before reinking. I found that not wiping the snowflakes worked best to make sure that they filled in well. I also found that after trimming the cards down, if it was a little rough on the edges using a very fine sandpaper (600 grit) made it nice and smooth for a professional look.

I am very happy with how the cards came out and hope that our friends and family have enjoyed receiving them this year. It was definitely worth some blue ink stained fingers.

If you are interested you can check out some more of my handmade holiday cards here and here.

Monday
Dec212015

Gold Foil Holiday Cards with Hand Drawn Evergreens

Nothing says holiday like a little sparkle so this year I decided to design my holiday cards using black cardstock and gold foil. For an extra touch I also added some evergreen branches that I drew with colored pencils.

To apply the foil design I used my Heidi Swapp Minc Foil Applicator. I started by making designing my card with scattered small dots across the left and my holiday greeting in the lower right corner. I made my cards 5"x7" and fit two on a page. I then printed my card using my laser printer onto black cardstock. The Minc reacts to the toner of laser printing so it won't work with an ink jet printer but you can always bring your print to a copy store to make laser printed copies.

Next I drew my evergreen branches using colored pencils. I started by using brown to draw some branches along the side of the card. I then used light colored green to add pine needles and then added a little shading with a slightly darker colored green.

When I was experimenting with making the cards I tried drawing the evergreens first and then laser printing the design but I found I had much better results when I did the laser printing first.

With the evergreens drawn I placed my cardstock into my Minc transfer folder, layered some gold reactive foil on top, and fed it into my Minc using a setting of 3.

About a minute later it was done and I could peel back the foil to see the gold design where I the laser print had been.

 After I trimmed down my cards to size they were complete.

To send off my cards I used black A7 envelopes I purchased at my local stationary shop, Rock Paper Scissors. As an aside, if you are ever in Ann Arbor you should definitely stop to visit it as well as its sister store, Bed & Butter, which is an amazing shop to pick up things for your home. To match the gold foil on the cards I addressed the envelopes with a gold metallic Sharpie.

I really like how the cards turned out. The gold foil is festive and the hand drawn evergreens are a personal touch and make each card unique. Now I'm off to the post office to drop them in the mail...

Thursday
Dec192013

2013 Holiday Cards

I am finally starting to get some of my holiday cards in the mail today. This is the first holiday for Frank and me to send a card together since it is our first Christmas married and I had a lot of fun making these cards for our friends and family.

To make the card I started with some blank cards that I had found a while back that had two folds with a cut out at the top. Since I have friends from a variety of religions I decided to make the card saying "Wishing you joy this season."

I thought it would be cute to have the "joy" pop out from the back of the card through the opening so I used my Silhouette Cameo to cut out circles with the word "joy" from red textured cardstock . I attached the circles to the center of the opening with some foam tape so they stood off from the card 1/8".

I added the rest of the words using my Silhouette Cameo to cut "wishing you" and "this season" from black vinyl and used transfer paper to add them just above and below the circle on the innermost part of the card. To make it all stand out I used some white polka dotted black washi tape to frame around the opening on second page of the card. 

I like how the card turned out. It was simple enough that I could make a bunch of them in a day (thank goodness I am on vacation this week!) but they are unique for Frank and I to send to the special people in our life.

Happy Holidays!

Thursday
Jul112013

DIY Letterpress Wedding Invitations 

I love how letterpress looks so I really wanted to try making my own letterpress wedding invitations. I looked at my local paper/bookbinding shop to try to do a traditional class where you set your own type, but nothing was available in the time frame I needed. I did a little searching around on the internet and came across an at home option with the Lifestyle Crafts Letterpress Combo Kit. At first I was a little discouraged since the reviews weren't so great, but I found that some people had success using modifications with a tutorial from Boxcar Press.

With renewed enthusiasm, I decided to go for it and ordered a custom letterpress plate from Boxcar Press. My first step was to create a design for my invitation and reply card on Adobe Illustrator. For fonts I used Bickham Script Pro for our names, Times New Roman in italic for "and" and "reception to follow" and Copperplate for the rest of the wording. 

Since you pay for the total area of the design and there is a minimum size I decided to fill up the blank spaces with other words like "Happy Birthday" and "Thank you" as well as some cute icons for later use in card making. Honestly, I realized after getting my plate I could have packed things together a little more tightly than I did. Ordering the plate was super easy. I simply created a log-in and uploaded my Adobe Illustrator file. They also take PDF and EPS files as well. Below is a portion of the plate that I received with my invitation on the top right and the reply card on the bottom right.

I used a regular scissors to cut apart the elements from each other. The reply card is on the left and my invite is on the right.

Next, I pulled the blue film off the plate to expose the sticky backing on my invitation plate. I saved the blue film to reapply after I was done. The letterpress kit is basically two hinged acrylic boards that you crank through a die cut machine. I aligned my plate on the top board using the grid lines.

Next I inked my plate. This was a bit tricky. I choose to order deep navy blue rubber ink from Boxcar Press.  Honestly, it was expensive but now I have a lifetime of navy ink since it comes in a two pound can. I also liked the fact that rubber ink was slow drying to make clean up and printing easier.

When printing you need to use a very, very small amount of ink so you should have two acrylic pieces, one to work some ink until it is soft with an ink knife and the other to roll out with your brayer. I had the one that came with my kit and then I used the back of one of my quilting templates for the other one. Honestly, the piece of acrylic that came with my kit was ridiculously small and I would have saved myself some headaches if I had used something larger since I barely had any room to hold it. The brayer that comes with the kit is also so small that is it absurd. I got a 6in soft rubber brayer and was very glad that I did. 

I took a small amount of ink from my can, mixed it until it was smooth on my first acrylic piece with my ink knife and then transferred a very small amount onto the second acrylic piece. I then rolled it out with my brayer until I had a very, very light coating of ink on the brayer.

With my brayer loaded with ink, I very lightly rolled it over my letterpress plate. I used some of the polymer plate strips that came with my plate for roller bearers as the Boxcar Press tutorial suggested, but honestly I found that I got better results by hand inking it.

It definitely took some time to get the hang of exactly how much ink I needed to get a nice impression. The picture below is with my plate inked with a bit too much ink, but unfortunately I didn't take a picture with it inked the right amount. To make sure that I got good impressions, after each print I wiped the plate clean with a dry cotton rag before reinking.

After the plate was inked I put my paper on the bottom board of the letterpress bed.  I splurged and bought Crane's Lettra Pearl White 220lb Cover. It is hard to show in pictures but it is amazingly thick and beautiful and I felt it was definitely worth it. Instead of using gage pins to align my paper on the letterpress bed I just aligned it with the sides (since the paper was the full width of the bed) and the trimmed down the top and bottom afterward. I was only making ten invitations so that method seemed easier for me, but if you were making a large quantity you may want to do something different.

With the paper in place I carefully flipped the top of the letterpress over the bed.

I then put the letterpress bed into the Epic Six and turned the crank which pushed the letterpress bed through the machine.

After trimming it down to size my invitation was complete. I then used the same process to print my reply cards.

To finish things up I bought 6" x 6" Navy Square Invitation Envelopes for the invitations and 3-5/8" x 5-1/8" Navy Invitation Envelopes for the reply cards. I kept things simple and used a white gel pen to address the envelopes before popping them in the mail.

I really love how my invitations turned out and to me it was worth the time and effort. Honestly speaking, figuring out how much ink gave a good print was a bit fussy and time consuming but once I had that down it was fairly quick to crank them out. It is definitely something that I would try again for a special occasion.

Tuesday
Mar132012

Bunting Happy Birthday Card

I made this card for a dear family friend whose birthday is this month. Of course, me being me, I am behind on everything and I sent out her present a week late, but I hope she will forgive me. Since spring is in the air I wanted to make something bright and cheery so I thought a simple card decorated with bunting would be fun.

For the base of the card I used white cardstock with a faded lined paper design on it. To make the bunting I made a little template out of chipboard and then cut out the flags from some brightly colored origami paper I bought at a hyaku-en shop (Japanese version of a dollar store). I folded the tabs on the flags over some black and white string and taped them to secure them. Once I had all the flags attached to the string, I mounted them on the card with foam tape to give the flags a little dimension. I coated the back of the remaining string with craft glue, arranged the string in loops and then trimmed the excess off once the glue had dried. To finish off the card I wrote "Happy Birthday" on the flags.

Happy Birthday, Georgene! You are such a special part of my life and I am so lucky that you adopted me as part of your family.

Sunday
Dec182011

Motown Baby Shower Invites

My girlfriend, Earnee, is expecting her first son this February and I am co-hosting a Motown themed baby shower for her in January. I was in charge of the invitations for the shower and had fun coming up with something cute to fit the Motown theme.

Because she is having a boy I decided to use a blue color scheme.  Since I was going to be making a lot of invitations I kept the design simple and thought that embellishing the front of the card with tiny records would fit the theme and be easy to make.

I started with blue cardstock that had a woven texture, cut it into 8-1/2" x 5-1/2" strips and then folded in half to make the base of the cards. I printed the shower detail information on white cardstock, trimmed it to 4" x 5-1/4", and attached it to the inside of the card.

For the front of the card I cut 1-3/4" x 5-1/2" strips of white cardstock and then attached it with two mini records on top. To make the mini records I punched out 1-1/2" circles from black metallic cardstock and 3/4" circles from different shades of blue cardstock. I layered the blue circles on top of the black ones and then used a 1/8" hole punch to make the record hole.

Everything came together well and by making the invitation assembly line style I was able to get them finished pretty quickly. With the invitations in the mail I'm ready to start working on other fun items for the shower.