Welcome

My name is Lisa and I'm a crafty girl with wanderlust working as an engineer by day. My blog chronicles projects in my home as well as pictures and stories from my travels.

Search


Instagram

Blog Index
The journal that this archive was targeting has been deleted. Please update your configuration.
Navigation

Entries in Kitchen (9)

Friday
Jul252014

A Few Kitchen Updates

It has been a long time since I posted anything about my kitchen and since over the past few months I've made several changes I thought I would share.

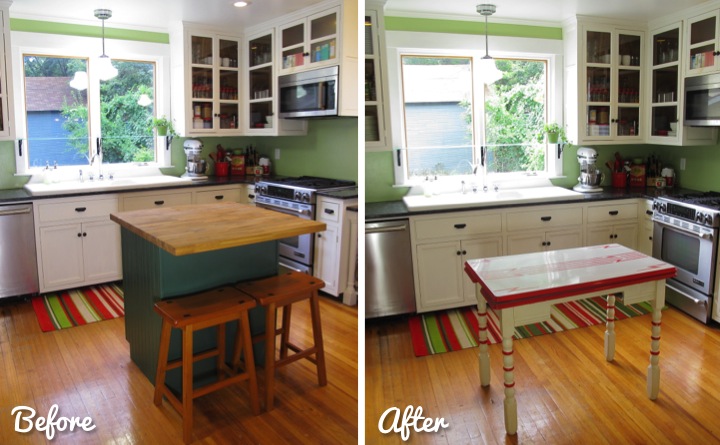
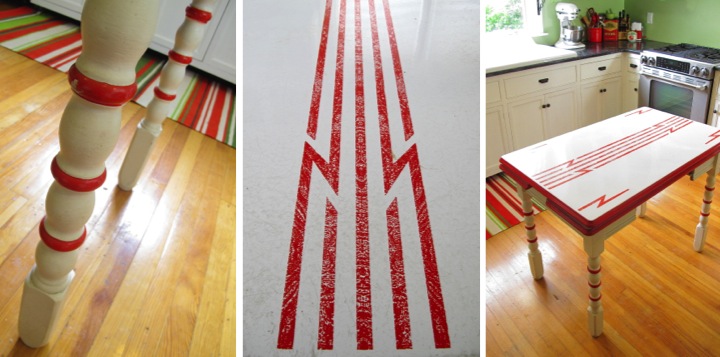
First up was swapping out the vintage red and white enamel topped table that I had been using as a kitchen island. Let me just say that I love that table. I think it is fantastic. Since I stand at a towering 5'2" it is perfect for me as a work space plus it is super cute. My husband, however, had some differing opinions. He's a foot taller than me and it was way too low for him to comfortably use as a prep area in the kitchen, or as he would say the table was designed for munchkins.

Marriage is all about compromise (plus for selfish reasons I love having him make me dinner and thought removing any impediments to that would be in my best interest) so I had planned on building an island after we got married. Unfortunately, I have way more plans than time, so although I still intend to build a fantastic island that Frank will love the reality is that is likely a few years down the road. With that in mind I set about searching for something that would work better for us, but not break the bank.

I had no idea that kitchen islands were so dang expensive. Everything I seemed to like was about $1500 which was way more than I wanted to pay. Eventually I found a black kitchen cart with a stainless steel top on Overstock. At $368.99, it was still more than I would have liked to spend but it was the best option and by far the least expensive of anything I had found and I ended up ordering it in March.

When it arrived while Frank was out of town on a business trip I was excited to put it together and surprise him when he came home. Of course as I started putting it together I discovered that the two locking casters were missing and both side panels were broken. After some frustration I was able to get the replacement parts for the island a week later.  At this point I had become pretty annoyed with the kitchen cart so Frank, who had since returned home, kindly assembled it. 

In the end it has been pretty awesome. It is a great height for Frank to use as a prep space and I still have my lowered baking center to use when I am working on making something. I also like that the black color ties in with the black granite and the stainless top matches the appliances. The only thing I am not a fan of is the weird handles on the drawers. They have a strange cross hatch pattern on them, which is hard to see in the picture. Someday I will swap them out, but that is a minor thing to do down the road.

After we got back from our Scandinavia trip in May, Frank was off to Japan for work. I decided while he was gone that I should paint the kitchen. This is what happens when I am left to my own devices. The color has been a pretty green since I remodeled it when I first bought the house, but I was growing a little tired of the color. Additionally, the green was a little jarring with the macchiato color of the living/dining room that you could see through the pass through.

I wanted something lighter as well as a neutral and settled on Benjamin Moore's Pale Oak. Two coats of paint later and my kitchen was transformed.

With the fresh paint color on the walls there were a few more changes as well. While Frank and I were on our Scandinavian vacation most of the hotels we stayed at had a muesli bar as part of the buffet breakfast. We loved it and decided that we should make our own small version at home. Frank found the jars and filled them up with goodies and I found the wood tray at HomeGoods to stack them on.

The old red, white and green rug that I had been using in front of the sink had seen better days, plus with the new wall color I wanted something different so I replaced it with a hounds tooth check runner that I found at Target.

On the wall next to the window above the baking center I hung another HomeGoods find. I loved the mix of the white wire with the wood slats and rope hanger. On the top shelf I have a little bowl that I picked up at the Grand Bazaar in Istanbul paired with some sake I bought in Japan. The second row has two pestles that I bought at the Chichicastenango Market in Guatemala, my great-grandmother's coffee can, an antique milk bottle that I bought at the Osu Kannon Flea Market my last day living in Japan and a tiny brass spice mill I bought in Turkey. On the bottom sits a hand painted bowl that I bought with Frank when we were in Positano, Italy two years ago. 

Overall I am really happy with the kitchen updates. They aren't the biggest changes but to me it really freshens up the space and makes everything seem so much brighter.

Still on my to do list in here is to sew some cafe curtains for the windows and add a subway tile backsplash, but I really need to finish tiling the downstairs bathroom before I even begin to think about that...

Monday
Jan212013

Pantry + Pictures for My Kitchen

In my kitchen I have a little nook in the corner between the doorway to the living room and the doorway to the laundry room. Ever since I have owned my house and remodeled the kitchen it has just sat there empty. Long term I have plans to build myself a hutch in that space with an outlet and a place to store my counter top appliances out of the way.

If I am being realistic, however, there is no way that I am going to have time to build the hutch anytime in the next few years with other projects taking precedence. I finally decided to get myself in gear and give my little nook some love to make it useful for myself in the meantime.

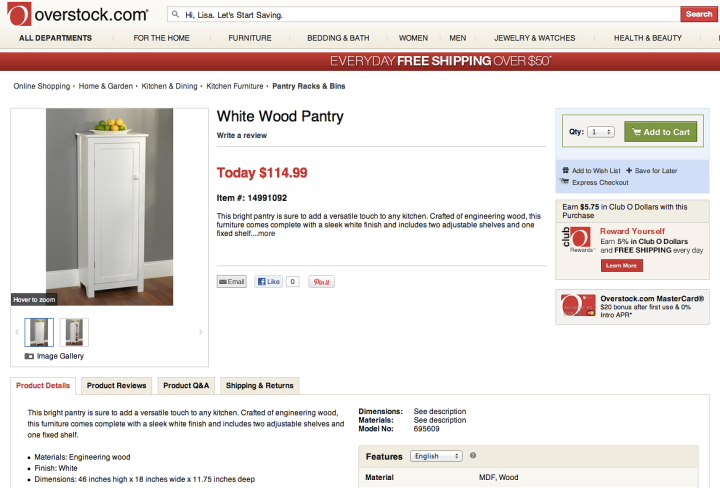
Since this is only a temporary solution I wanted something inexpensive but that would also match the style of the white cabinets in my kitchen. I searched around a bit and found a small pantry on Overstock for $115. The style was pretty close and the price was right so I bought it.

When the pantry arrived I opened the boxes and set out the pieces to start to put it together. It was at this point that I noticed that the back was actually two pieces hinged together with a piece of tape. It looked a little cheap so I decided to cover the back with some cute paper that I bought at a local stationary store.

I've had luck with hanging wallpaper on the back of my bathroom built in with double sided tape so I decided to use the same method again. I put tape along the edges of the board and down the middle. The board needed two pieces of paper so I lined one up along the left side edge and the middle of the board and the second piece above that but aligned to the right edge. This made it so that my seam would be hidden behind the middle shelf and so that the repeat of the design would be staggered. Also, the tape is super sticky so to attach it I rolled it up, aligned it and then rolled it out over the tape, smoothing it as I went. To finish I just trimmed the excess paper from around the board.

With the back decorated I set about putting the pantry together which took about half an hour. In addition to adding the paper to the back of the pantry I also decided to swap out the knob. The knob that came with the pantry was a plain square wood knob painted white, which didn't really go with my other cabinets. I had already purchased extra knobs and pulls (Season from Restoration Hardware) for when I build my hutch someday since I was worried that maybe they would be no longer available by the time I got around to it. Using the knob that matches my other cabinets is a small detail, but I think it really helps to tie the pantry in with the rest of the kitchen.

Assembled, I think the pantry is pretty cute and I quickly filled it up with food. You can't see much of the paper once the pantry is full, but I still like the added touch. 

The pantry looked a little bare on the wall by itself so I decided to hang my French fruit prints over it. I bought the prints on my first trip to Paris back in 2002 from one of the little book stalls along the Seine. As an aside, when Frank and I were in Paris this spring I spotted the same exact prints for sale as we were walking along the Seine so I bought another set, just in case my old set fades over time from sunlight. They were only 50 Euro cents each so I couldn't resist.


Years ago I had put the fruit prints in Ribba frames from Ikea (the ones I have are no longer available) and have hung them in the kitchen of my previous homes, but I've never gotten around to hanging them up in my current home. This seemed like just the perfect spot.

I have ten prints but a three by three grid seemed to fit the space best. To make sure to have even spacing I used some painters tape and my level to create a level line where I wanted my bottom row to hang. I then measured up 8-3/4" (giving a 5/8" gap between frames) and put up another line of tape, again making sure it was level. I repeated one more time to have three rows.

Next, I measured to the middle point of the wall on the middle piece of tape and made a mark. I then lined my level up to the mark, made sure it was plumb and then used my level to mark the top and bottom piece of tape. I measured to the right of the mark 6-3/4" (giving a 5/8" gap between frames) on the middle piece of tape and then marked the top and bottom piece using my level again. I repeated the same steps to the left to finish my marking.

I sunk a picture nail at each mark and then pulled the tape off the wall, leaving me nine nails in a perfect grid to hang my pictures.

I really love these prints and seeing them up reminds me of walking along the Seine and all the wonderful memories of that very first trip abroad for me. I can't believe it has been nearly eleven years. I also can't believe that it has taken me so long to get these hung...

As a last step the pantry needed a few items on top to balance things out. My coffee grinder that I bought in Sicily has a wood tone that is a great match to the wood frames of my prints so I started with that. I then placed an antique tea tin that I found at a shop in Ontario in the back with a tiny tea pot I picked up in Taiwan in front. Cute, simple and full of memories: just the way I like things.

I am really happy with how my nook turned out and very glad to have the extra food storage space. For me it is a great temporary solution until I build my hutch someday. Someday...

Have you given an unloved space in your home an update recently? What did you do?

Friday
Sep212012

Kitchen Display Shelves 

One of the things that I love about my kitchen are my display shelves. When I worked out a floor plan for my kitchen the only spot that would work to put the refrigerator positioned it do that the side of it was on full display if you were looking in from the living room. Not so pretty.

I had a few spare inches between the fridge and the door to the laundry room so I decided to box in the refrigerator and add some shallow display shelves. What was a design dilemma turned into one of my favorite parts of my kitchen. I have a tendency to collect tons of things on my travels so this way a great way to showcase some of those items along with some functional kitchen items.

I have been adding things to the shelves to the point where they had just become a messy catch all. Instead of looking pretty, they had become cluttered and ugly. I decided to to a little rearranging and editing of what I had displayed since all of my items were not going to comfortably fit.

I thought I would snap some photos of my rearranging and share a little of the story behind the items I have displayed. It's probably still a bit too cluttered, but being the hoarder that I am I have to take it one step at a time.

Top Shelf
On my top shelf starting from the left I have some wooden pestles that I bought at the market in Chichi, Guatemala. I can't resist picking up local kitchen tools when I travel. Behind that is a sign in Japanese that says "危険注意" which means "Caution Danger" in English. I bought it at a flea market in Kyoto because there are warning signs like these all over Japan everywhere you look. Moving on is a bottle of limoncello from my first trip to Italy back in 2002. The limoncello is long gone, but the bottle is pretty and has good memories associated with it so I filled it up with some water with yellow food coloring and have it on display. The pasta print is from Rome on my most recent trip to Italy, earlier this year. I need to get a frame for it, but it is an odd size. Farthest on the right is an antique nut grinder that I picked up years ago.  

Second Shelf
The leftmost item on my second shelf is the olivewood grater that I bought in Sorrento while Frank and I were in Italy in March. In front of the grater is a vintage red enamel teapot that I bought at a local housewares consignment shop here in town. I collect cookbooks from my travels and the Cocina Peruana cookbook was purchased during a visit to Peru. I like that it has the recipes in both Portuguese and English. In front of the cookbook is a set of egg cups from a trip to Grenada, Spain. I love that you can tell they were handmade by the small variations in size and paint among the four. 

Third Shelf
The left side of my third shelf has an apple tea tin that I saved from a trip to Turkey and a small cast iron teapot from Japan. Continuing with the tea theme on the shelf I have a collection of tea tins from trips in Asia including Taiwan, Hong Kong and Japan with a little ceramic teapot from Taiwan perched on top. The Fresh Bread Daily is a vintage reproduction that I've had for forever.

Fourth Shelf
On my fourth shelf I have a muddler that I bought in Brazil for making their national drink, the Caipirinha. Next to the muddler is a little hand painted bowl that I bought at the Grand Bazaar in Istanbul. Hanging up I have the matching pasta print to the one I have on the top shelf. On the right side of the shelf I have a variety of vinegars that I use plus a tin of Greek Olive Oil that I bought in Athens and saved after I used it.

Bottom Shelf
On my bottom shelf I have saved spice tins from my travels in France, Hungary and New York plus a little spice grinder that I bought in Istanbul. Hanging up are some tiny vintage baking tins and the Pates Baroni sign is from Target over ten years ago. The carved little roosters have a fun story. Over ten years ago a friend of mine visited Japan and bought the little pair on the right as a gift for me. The carving style is known as sasano ittobori and I love how the wings and tails are carved with paper thin curls of the wood. Fast forward several years and while I was traveling around Northern Japan in Yamagata Prefecture I discovered that they were selling these same hand carved birds. Of course I had to buy a rooster to go with the pair I already had and picked a small one with a very long tail.

Do you have any collections on display in your kitchen? What kind of items do you pick up when you travel?

Tuesday
Aug142012

New (To Me) Vintage Kitchen Table

I love my kitchen. It's a nice size at 13-1/2 feet by 13-1/2 feet which gives me lots of space. Last year I decided to make use of some of the open floor space and have some seating by making an island out of salvaged cabinets like I did for my mom previously. I've never really been happy with it because it it blocks the view of my sink, which is my favorite part of my kitchen.

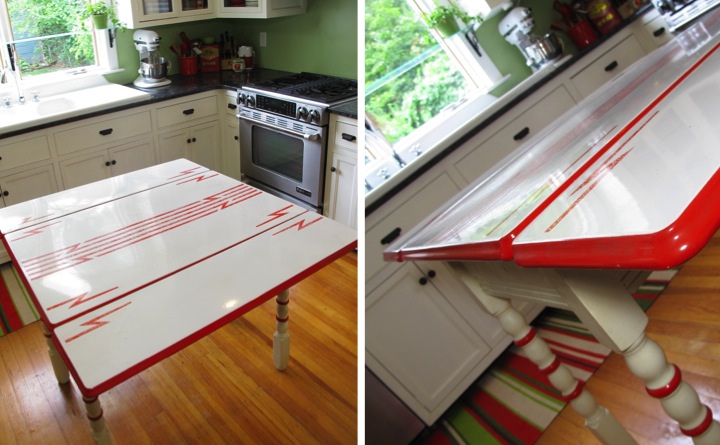
On Saturday I went to one of my favorite places to find things, The Treasure Mart. It's a consignment shop in town selling housewares and furniture ranging from antiques to mid-Century with a few more modern pieces scattered in. On this trip, buried under a bunch of toys and hiding behind a Betty Boop poster and a framed picture of a statue of Buddha I spotted an awesome vintage table. The table had a white and red enamel table top with leaves that pulled out at either side. I knew it would be just perfect in my kitchen.

The cherry on top was the price. The table was originally marked $100 but I got it for $60. The Treasure Mart marks the date that items come in and every month that it sits in the store the price gets reduced by 10%. Since the table had come in back at the end of March I got a 40% discount. What a great deal! In no time I purchased the table, squeezed it into the back of my little hatchback and had it home.

I think the table looks great in my kitchen and it makes everything more open. The red and white is so cheerful and lightens things up a lot more than the heavy cabinet island.

The table has some light scratches so I need to figure out how to spruce that up.  Also, the legs are cream so I plan to paint them the same color white as my cabinets. I also want to find some new stools to go with the table.

The pull out leaves are wonderful and nearly double the workspace when necessary. Being an engineer I love the old wood glide and and spring mechanism that makes the leaves work. I like the flexibility of being able to have them open or close them up.

Do you think that the table looks better than the island? Do you have any tips for sprucing up enamel? Have you scored any great deals lately?

Wednesday
May302012

Treasures From My Travels: Nisshin Flour Milling Sign

I love bringing home things from my travels to decorate my home and each souvenir is special, but my Nisshin Flour Milling sign has a particularly dear spot in my heart.

I bought the sign at the wonderful To-ji Flea Market. To-ji is a beautiful Buddhist temple in Kyoto and on the first Sunday of every month there is an antiques oriented flea market on the grounds. After my friend, Trisha, and I had our debacle of visiting the market with no access to our money (the ATMs were closed) we went back two months later.  

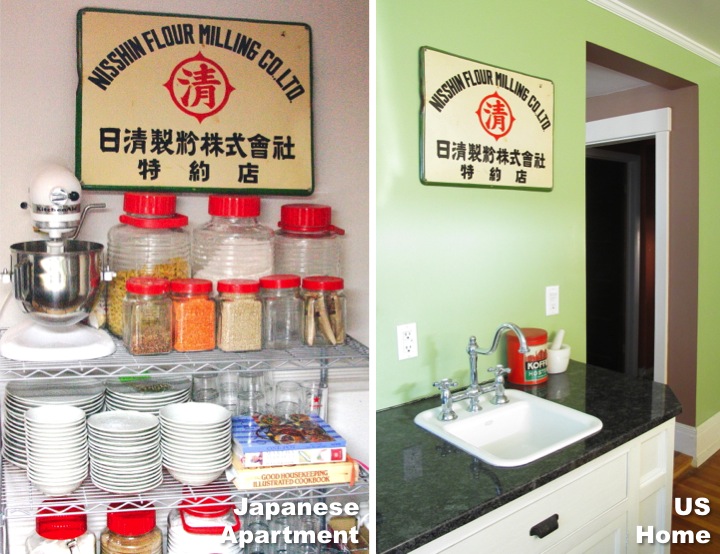
On that second trip to To-ji Flea Market I found my vintage metal Nisshin Flour Milling sign. My kitchen in the US was red and green so as soon as I saw it I knew it would be perfect to hang there when I moved back. I also love to bake so being a flour milling sign gave it extra meaning. I love the worn patina it has with some small rust spots dotting the cream background and green border.

I did a bit of haggling and got the sign for ¥2000 (about $20 at the time) and happily lugged it home. I was not allowed to put holes in the walls of my Japanese apartment and the metal sign was too heavy for Command Strips so I propped it on top of my dry goods storage shelf.

When I moved back to the US I didn't want to pack the sign in my sea shipment (just in case it got lost and also because I didn't want to wait two months for it to arrive) so I put it in the bottom of one of my checked bags on my flight home. It was so heavy to lug that bag around but so worth it. My Nisshin Flour Milling sign was the very first thing I hung on my walls when I moved back into my house. When I was struggling with readjusting to life back in the US, seeing it in my kitchen gave me a sense of continuity and brought back good memories of Japan.


Of course I had to do a little digging into the history of the sign. The first line of Japanese Kanji reads 日清製粉株式會社  and means (yes, you guessed it!) Nisshin (日清) Flour Milling (製粉) Company Limited (株式會社) and the bottom three characters mean Distributor (特約店) so the Japanese didn't really give me any additional information. I did some internet searching and found that the company was founded in 1900 as Tatebayashi Four Milling Company. Later in 1908 when Tatebayashi merged with Nisshin Flour Milling Company, the company incorporated under the Nisshin Flour Milling Company name. The company is still in existence today and Nisshin Flour Milling Inc. is one of the subsidiaries of the holding company, Nisshin Seifun Group Inc. Isn't it amazing what you can dig up online?

It has been nearly four years since I bought my Nisshin Flour Milling sign and it is as special as ever to me. It has graced my kitchen wall on two continents and traveled in my suitcase with me. It also represents different sides of me, loving to travel (Japan) and loving to do things at home (flour) and will always be a treasure to me.   

Linked To: Centsational Girl's Favorite Souvenirs Link Party

Thursday
Apr052012

Treasures From My Travels: Italian Coffee Grinder

When I travel I love to bring back things for my home. It makes me so happy to be surrounded my mementos from my trips and the memories each item brings back. I've been meaning for a long time to start writing down the stories behind all the treasures from my travels and I thought it would be fun to share them on my blog.

Picked up in Sicily on my Italy trip last month, this little coffee grinder is a recent addition.

Frank and I were wandering through one of Palermo's many colorful street markets (where we also got a spleen sandwich) when I spied it sitting amongst a pile of other random used items for sale. I had been meaning to get myself a coffee grinder so it was a perfect item to bring home. The seller wanted 20 Euros for it, but after a few rounds of bargaining back and forth (20-10-15-11-13-12-sold!) and approval from his wife the coffee grinder was mine for 12 Euros.

I love the worn patina that the wood has acquired and the red metal on top is a great match for my kitchen. It is not very big which is fine since I only plan to use it for grinding small amounts. As an added plus the small size made it easy to bring home and it doesn't take up much storage space. Cute and functional: that's what I call a perfect souvenir. Off to make some coffee... 

Sunday
Feb192012

Kitchen Jar Organization 

When I lived in Japan I found glass jars with red plastic lids and I thought they would be perfect for storing my dry goods. I didn't have much storage space in my tiny Japanese kitchen so I had bought an inexpensive wire shelving unit to hold the jars and some other kitchen goods. I love that the jars are square which maximizes shelf space and they also look cute with the ribbed design on the glass and the bright, cheery tops. Although I had to spend a few dollars at a home store for the tall ones with the pasta and some bigger ones for flour and sugar, I found the small and medium sized jars for only about dollar at the Seria Hyaku-en Store in Toyota City (Hyaku-en store in Japan ≈ Dollar store in US).

Back home in the US when I redid the kitchen I chose to have glass fronts for all of my upper cabinets. I love it because I always know where to find things, but I have to try to keep things organized and looking nice. My red lidded Japanese jars are perfect for this and they are a perfect combination of practical storage while also looking nice on my shelves. Jars full of delicious ingredients just make me happy and I like being to be able to easily see what's inside. It inspires me to cook.

Unfortunately, the number of things that I would like to store in my Japanese jars has exceeded my supply. What is a girl to do?!? I have searched high and low online and in stores to find something similar but with no luck. When I was back in Japan in December I actually went to the Hyaku-en store and bought three more of the medium sized ones to bring back home with me. In case you were wondering, they made it home safely in my luggage with my socks stuffed inside.

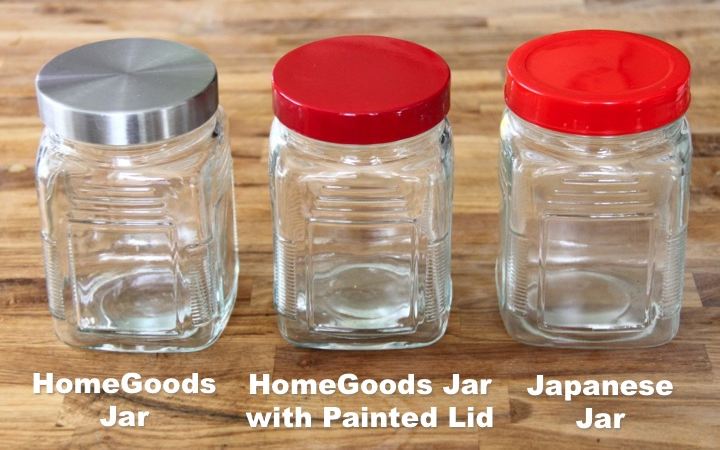
So imagine my surprise when I was at HomeGoods earlier this week and I saw some glass jars that were remarkably close to my Japanese ones. They are the same size as my small Japanese ones and have the same exact ribbed pattern on the glass. The lid is metal instead of plastic and doesn't have the indented design on it but all in all they are a fairly close match. I immediately bought up all five that they had. They were $2.99 each, so triple my Hyaku-en price, but well worth it. When I got home I used some red glossy spray paint that I had to paint the lids.

It's a pretty close match, don't you think? My spray paint is a little dark compared to the Japanese lids so I think that I'll try to find something that matches a little better, but otherwise I am pretty happy. My search is still not over though, because I would like to get some more large ones as well. If anyone happens to see some cute glass storage jars with red plastic lids, please let me know! I would be forever grateful and send you chocolate.

Monday
Jan302012

The Story of My Kitchen Sink

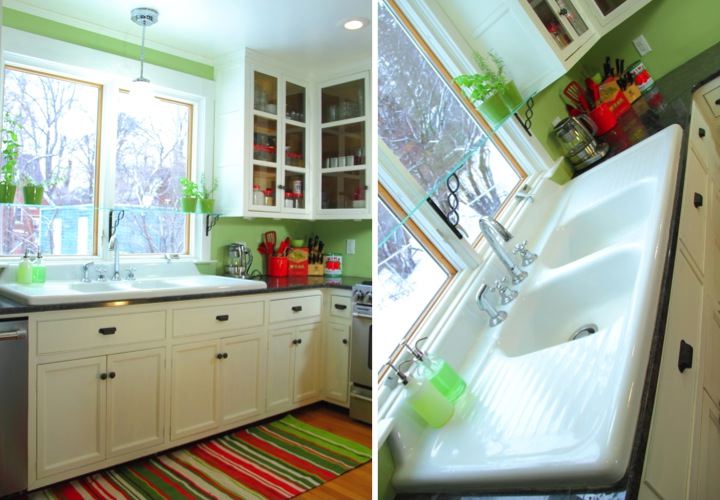
My kitchen sink is one of my favorite parts about my kitchen. When I was remodeling my kitchen I wanted a big, old fashioned cast iron sink with side drainboards to sit under my new large back window. The closest new sink that I could find to what I wanted was the Clarion Farmhouse Drainboard Sink but at more than $1500 it was over ten times my budget.

With the Clarion sink completely out of the question I set about hunting for my dream sink. I made weekly stops at the Ann Arbor ReUse Center and the ReStore searching through all the old sinks. I constantly checked eBay and Craigslist in the Southeast Michigan area. After looking for months I finally found a promising listing on Craigslist for $100 and made arrangements to see it.

One look at the sink and I knew it was perfect. It was 60" wide with a double bowl and drainboards on both sides. The porcelain had some minor discolorations but was free of any chips or scratches. I was in love. Despite the fact that I was deliriously happy at having finally found a sink, I hid my excitement and calmly offered $75 for the sink. The guy who was selling it just wanted to get rid of it (he had just ripped it out of his kitchen as part of a remodel) and gladly took it.

The sink was a beast and weighed a ton. When the countertop guys tried installing it the first time they cracked the thin piece of granite in front of the sink opening and had to fabricate it again. Once installed the sink was exactly perfect for the space. It's the focal point of my kitchen and it is wonderful to have so much bowl space. I absolutely love my kitchen sink and it was definitely worth the long search.

Wednesday
Jan252012

Kitchen Window Herb Garden

I love to cook and for me one of the joys of summer is being able to go out to my large herb garden and pick fresh herbs to use in whatever I am making.

Since I live in Michigan, winter, however, is a completely different matter. It can be bleak and the view that I love from my huge kitchen window over my sink can often become dreary. To liven things up and to also give me some limited access to having fresh herbs throughout the year I decided last year to make a little window herb garden.

I ordered a long 6" wide piece of glass from a local glass company and using some simple shelf brackets mounted it across my window flush with the bottom of my adjoining cabinets. With a few herb plants and some $1 pots from Ikea my window garden was complete.

Having the plants sitting in my window always cheers me up and it so nice to have a few fresh herbs on hand for cooking during winter. Right now I have basil, oregano, thyme and mint on my little glass shelf and I am thinking about whether I want anything else.

I would love to say that my window garden has always flourished, but truthfully I can't. Potted herbs are not as forgiving as those planted in the ground. With being out of town a lot and sometimes working long hours and forgetting to water them I have had some casualties, but luckily I can always plant more seeds when I screw up.