Welcome

My name is Lisa and I'm a crafty girl with wanderlust working as an engineer by day. My blog chronicles projects in my home as well as pictures and stories from my travels.

Search


Instagram

Blog Index
The journal that this archive was targeting has been deleted. Please update your configuration.
Navigation

Entries in Crafts (42)

Sunday
Jun172012

How to Wrap Gifts Like A Japanese Department Store

One of the things that I always thought was cool while living in Japan was the method that the department stores would use to wrap gifts. They wrap the gift with the paper on an angle, tucking the excess paper in as they go and the final result requires only a single piece of tape at the end. It always looks quite elegant and I would watch amazed as the department store clerks would beautifully wrap up something I bought so quickly and efficiently.

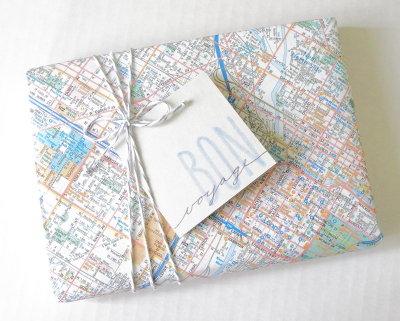
With one of my friends moving to Chicago I bought her a little book about the town as a going away gift and thought it would be fun to wrap in a Chicago map. I've been meaning to try to wrap something Japanese Department Store style and this seemed like a good opportunity.

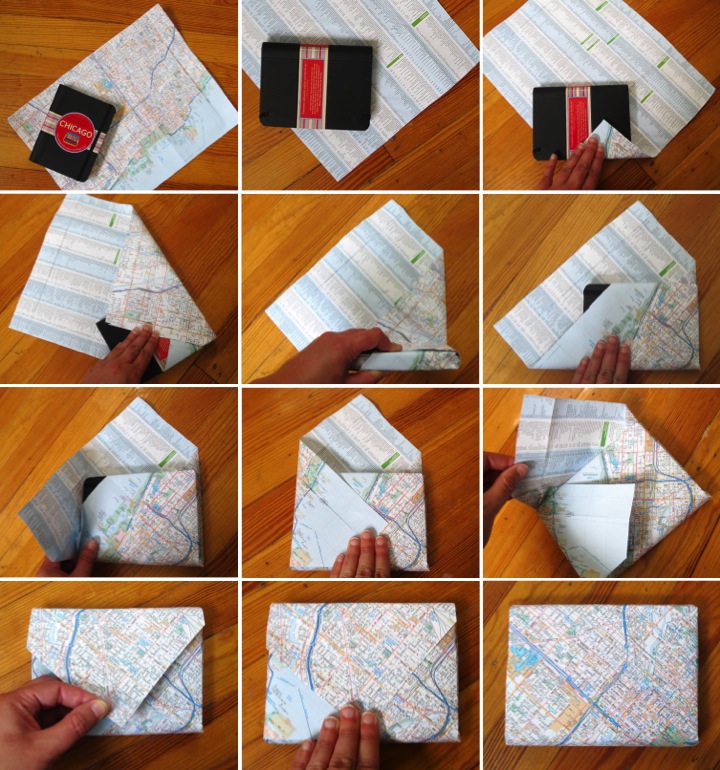
I had seen it done a ton of times so I thought it wouldn't be hard but it is definitely a little more difficult than it looks. I tried it out with a scrap piece of paper before I wrapped it for real with the map and I am glad that I did. Getting the right angle and making sure the paper is big enough to cover your gift, but not so big that you have too much excess paper to tuck in is a little tricky. I think with a little practice it would be fairly simple to get the hang of though.

To wrap the gift place it in the bottom right corner of your paper at an angle so that you can fold a small amount of the corner of the paper over the bottom of the gift. Next, fold the paper over the right side of the gift, tucking in the excess paper at the corner so the paper lays flat.

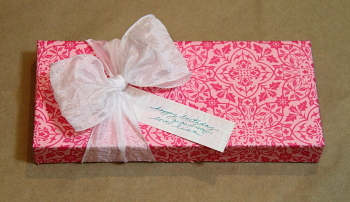
Once you have the bottom and right side folded over, you flip the gift over itself on the table, tucking in excess paper on the right as you go. Now the gift is mostly covered with paper flaps still remaining on the left and top. Fold the left side over the gift, tucking in the excess paper and the finish by folding down the top over the gift. The wrapping paper can now be secured with a single piece of tape on the top flap. I finished my gift off by adding a handmade Bon Voyage card and some baker's twine with a bow.

I am happy at how my first try at Japanese Department Store gift wrapping came out and I'll have to try it again. If you are curious how the experts do it, here is a video of a lady slowly explaining how to wrap a gift (it's in Japanese but you can see how it is done) and here is a video of an Isetan Department Store Clerk in action wrapping a gift. Pretty neat, don't you think?

Saturday
Jun162012

Treasures From My Travels: Sea Glass Souvenir Display

When I posted about the souvenirs that I bought during my recent trip to Panama I forgot to mention a free souvenir that I literally picked up. On the day that Missy and I spent on Isla Taboga, an island off the coast near Panama City, we lounged at the beach for a good part of the day and cooling off in the water in an attempt to escape the ninety degree heat.

There was a lot of sea glass washed up on shore so we decided to collect some, rinsing the sand off in the ocean. I gathered a handful of pieces but Missy lives in the Caribbean and is a sea glass finding expert so she found a bunch and shared with me. That is sisterly love!

Now that I am home I wanted to do something cool with my sea glass. I found a tall slender glass apothecary jar on sale and thought it would be perfect to use. To make my display I started by printing out a little tag with the location and date and cut it out. I then put a little tape on the top back edge of the label and adhered it to the inside of my glass jar. I used some craft sand and filled up the bottom of the jar until the label was secure but not so much that the tape was covered. I then gently peeled off the tape and added more sand until I reached the level that I wanted. You have to be careful to slowly add the sand so that grains don't sneak in front of the label. Pouring the sand in the jar left a dusty residue on the upper part of the jar so I wiped it clean and then finished my display by layering the sea glass on top of the sand.

I think it turned out cute and it pairs well with the Japanese glass fishing floats that I picked up at the Toji Flea Market in Kyoto in December.

Do you like to collect sea glass? Do you have a fun way to display it in your home?

Saturday
May262012

DIY Monogrammed Cocktail Picks

Tomorrow I am attending a wedding and me being me, I just finished up making the gift today. Nothing like waiting until the last minute!

For the bride's wedding shower gift I had purchased some bar related items from the couple's wedding registry and then made white and navy drink coasters to go along. I thought it would be fun to coordinate the shower gift with the wedding gift so I bought a set of martini glasses that they had registered for and then made these navy monogrammed cocktail picks for them.

To make the cocktail picks I started by purchasing some plain, inexpensive stainless steel cocktail picks to use as my base. I cut eight small equal size pieces from some navy clay and then rolled each piece into a ball between my palms. I pushed a cocktail pick into each ball and then reshaped them to make them into flat discs. I finished them off by stamping an initial into them and then baking them in the oven per the clay manufacturer's instructions.

The cocktail picks were easy to make, but it did take me awhile to be able to stamp the clay in the center evenly. I had several at the beginning that were off kilter and that I had to reform and restamp. If you are going to try this at home, make sure to use a clay that is safe around food.

I think the picks turned out cute and I hope that the soon to be Mr. & Mrs. H enjoy them!

Tuesday
Apr242012

DIY Stuffed Duck

I made this little stuffed duck for a sweet young lady's sixth birthday. She loves ducks and has a stuffed duck collection so I thought that I would make her one to add to her growing flock. 

To make the little duck I started with the pattern from Martha Stewart's washcloth duckies and modified it to fit my needs. I enlarged the pattern by 400% on a photo copier, pinned the pattern to some cream colored fake fur and cut out the pieces. Later when I was piecing the duck together I found that with the pattern enlarged the oval bottom piece was way too big and I had to cut it down to a circle to make it all still work.


Duck Body Assembly

I pinned the right sides of the two duck body pieces together and sewed around the edges, leaving the bottom open. I then pinned the bottom circle to the opening of the body and sewed around the edge leaving an opening for turning. I pulled the body right side out through the opening, stuffed it using polyfill and hand stitched the opening shut. Wherever I had joined two pieces the fur was caught in the seam, so using the eye side of a needle I teased the trapped fur out which made the seam invisible.

Wing Assembly
For the wings I followed the same basic process as the body: pinned right sides together, stitched around the edge leaving a small opening, turned right side out, stuffed with filling and then hand sewed the opening shut. After finishing the wings I hand sewed them to either side of the body and then tweezed out the fur trapped in the wing seams just like I had on the body.

Final Touches
To make the duck bill I cut out an elongated oval from gold felt and then ironed it in half. I then pinned it open onto the front of the duck's head and attached it by backstitching along the iron line. I finished up the duck by sewing on black buttons for eyes.

Have you ever made any stuffed animals? How did they turn out?

Sunday
Apr222012

DIY Hunger Games Charm Bracelet

As I was trying to figure out what to get a special young lady for her thirteenth birthday I was really stumped. It's been over twenty years since I was thirteen and I have no idea what is cool for that age. I did know that she has read the The Hunger Games trilogy multiple times and had a Hunger Games themed party with her friends so I came up with the idea of making her a Hunger Games charm bracelet.

To start I bought some rectangle picture frame charms, chain and a clasp. I also found some cute little birds that looking like mockingjays but they were brass and wouldn't match the rest of the silver toned pieces I bought. I quickly fixed that with some coats of spray paint on the front and the back to turn the birds black.

To make the Hunger Games charms I downloaded pictures of the book covers from the internet and printed them out small enough to fit inside the picture frame charms. I cut them out and adhered the clear plastic that came with the charms over the little print outs. I then secured the book covers to the picture frame charms using a little dab of hot glue.

I started assembling the bracelet by putting five links in between each bird and two on the ends. The links were easy to open up using a small needle nose pliers. I added a clasp on the end of the chain and then added the book cover charms with an additional link.

I think that the bracelet is cute and I hope it is cool enough for a newly minted teenager. It would be easy to adapt to another theme and I just may have to make one of a different style for myself. 

Friday
Apr202012

DIY Mother's Day Fruit Soaps

I just booked a flight to head down to my grandparent's place in Florida for Mother's Day which has prompted me to start brainstorming about what to make this year for gifts.

Last year for Mother's Day I decided to make some fruit soaps for the special ladies in my life. I bought some square molds and tried the soap instructions from the April 2011 Martha Stewart Living. I decided to make lemon, orange, strawberry and raspberry. The instructions were clear and the soaps were easy to make but I found that they darkened up a lot as the fruit purees sat in the warm soap. If you try this, less is better when you add the fruit purees. You can see in my picture that the raspberry soap on the bottom turned out a really deep burgundy color.

After the soaps cooled I popped them out of the molds and stacked them with squares of vellum between each soap. To package the soaps I wrapped a strip of vellum around each stack, trimming the ends with scalloped scissors. I threaded white paper flowers on small yellow brads and used them to secure the vellum. To finish I wrote "Happy Mother's Day" with a white gel pen on strips of cranberry cardstock and tucked them behind the flowers. 

The soaps were a big hit with everyone and something I may make again for myself sometime.

Are you making any gifts for Mother's Day this year? What are you going to do to celebrate?

Thursday
Apr192012

DIY Etched Glass Bottles for Limoncello

After making my limoncello I couldn't just store it in any old bottles so I decided to gussy up some bottles that I bought at Ikea with some glass etching.

To start I sketched out a lemon slice design on a piece of cardstock. I traced around the bottom of two different sized bottles to make the inner and outer circles. I then drew three lines through the circles to mark where I wanted to draw the segments and then sketched them in. Once I was satisfied I colored in the areas to discard and then cut it out to make a template. I then traced the pattern onto pieces of shelf liner vinyl, cut it out and then adhered it to my glass bottles.

Following the instructions, I applied a thick layer of etching cream to the bottle over the design area not masked by the vinyl. The etching cream is corrosive so it is important to take safety precautions by using gloves and protecting your work surface. Also with the round bottle I had problems with the cream sliding down the side so I had to keep an eye on it and wipe drips before they went past the vinyl and onto the glass.

After the cream set on the bottle for 10 minutes, I rinsed it off and removed the vinyl from the bottle. By being careful when I was removing the vinyl I was able to reuse it on another bottle. The etching is light so it is a subtle look, but I like it. Also, since this could be any citrus slice I can easily reuse the bottles later for lemonade at a party or orange juice at a brunch.

To finish off my bottles I added a little tag with "limoncello" written on them and tied them to the bottles with some string. Now my bottles look cute enough to match the deliciously sweet limoncello inside.

Have you ever done any glass etching? Did it work well for you? Did you try a different method?

Wednesday
Apr112012

Baby Quilt for Audry's Little Lady

Like the baby quilt I made for my friend, Susan, I also made this quilt for Audry while I was living in Japan back in the Spring of 2009. Since Audry's style is a little more modern I was inspired by some quilts I saw online at West Elm to make this baby quilt for her little girl.

To make the quilt I chose five fat quarters in different patterns of pink fabric and sewed a strip of 24" wide cream fabric on either side of the fat quarters. I then cut 3-1/2" strips from the resulting pieces I had made. 

To make the quilt top I then arranged 18 of the strips, staggering the way they lined up to make a fun pattern. Once I had everything the way I liked I sewed the strips together and then trimmed the excess cream fabric off so that the quilt top was a nice rectangle. It came together fast and was probably the simplest design I've ever used for making a quilt.

I finished the quilt with a pink backing fabric and cream binding. I think that the end result was a cute quilt that works with Audry's style. Now I need to get finishing the quilt that I have started for her little boy...

If you are interested, check out some of my other quilts: Baby Quilt for Vanessa's Little ManBaby Quilt for Susan's Little LadyBaby Quilt for Carla's Little Man

Monday
Apr022012

DIY Drink Coasters

As a part of a wedding shower gift for my friend, Kristen, I decided to make drink coasters. I had purchased some bar related items from her wedding registry and thought this would be a nice compliment to the gift.

To make the coasters I used white twill fabric, 3/8" navy grosgrain ribbon and white thread. I wanted the coasters to be 4" square so I started by cutting two 5" squares from my twill (4" plus 1/2" seam allowance) for each coaster.

I cut four 5" lengths of ribbon for each coaster and pinned them to the top of a twill square 1" from the edge. To tack the ribbons in place I sewed around the twill 1/4" from the edge and removed the pins. I then pinned a second twill square to the beribboned square with right sides together. I sewed around the edges with a 1/2" seam allowance leaving a 2" gap for turning the coaster right side out. After I finished sewing I clipped the corners and ironed the seams flat before turning it right side out. I ironed the coaster again and then finished it by using a blind stitch to close up the gap.

The fun thing about the coasters is that if you are using them for wine glasses you can slide the ribbons around the base of the glass and the coaster will stay attached to the glass. For wine glasses with a smaller sized base my pattern would need to be tweaked to place the ribbons closer to each other and for larger ones the ribbon should be a little farther apart. Cheers!

Thursday
Mar222012

DIY Covered Papered Box

After making the puzzle for my grandma's birthday I decided to cover the puzzle box lid to finish off the gift.

I started by placing the box lid on top of a piece of face down scrapbook paper. Using a marker I traced the outline of the box and then extended the top and bottom lines to the edge of the paper. I cut along the extension lines to the edge of the box outline and then coated the whole back of the paper with a glue stick.

To wrap the lid I placed it back over the lid outline making sure that the paper was well adhered. Next I folded up the top and bottom, wrapping the excess paper around the sides of the box. I then folded up the sides and added a little extra glue in any areas that needed it. Once I was finished wrapping the box I used my scissors to trim off the paper that extended beyond the box lid edge.

To complete the project I put the puzzle pieces back into the box, placed the covered lid on top and tied it all up with a bow and a tag.