


How to Wrap Gifts Like A Japanese Department Store
 One of the things that I always thought was cool while living in Japan was the method that the department stores would use to wrap gifts. They wrap the gift with the paper on an angle, tucking the excess paper in as they go and the final result requires only a single piece of tape at the end. It always looks quite elegant and I would watch amazed as the department store clerks would beautifully wrap up something I bought so quickly and efficiently.
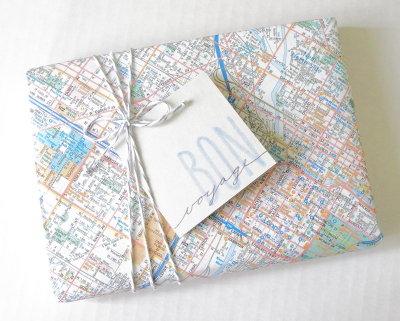
With one of my friends moving to Chicago I bought her a little book about the town as a going away gift and thought it would be fun to wrap in a Chicago map. I've been meaning to try to wrap something Japanese Department Store style and this seemed like a good opportunity.
I had seen it done a ton of times so I thought it wouldn't be hard but it is definitely a little more difficult than it looks. I tried it out with a scrap piece of paper before I wrapped it for real with the map and I am glad that I did. Getting the right angle and making sure the paper is big enough to cover your gift, but not so big that you have too much excess paper to tuck in is a little tricky. I think with a little practice it would be fairly simple to get the hang of though. 
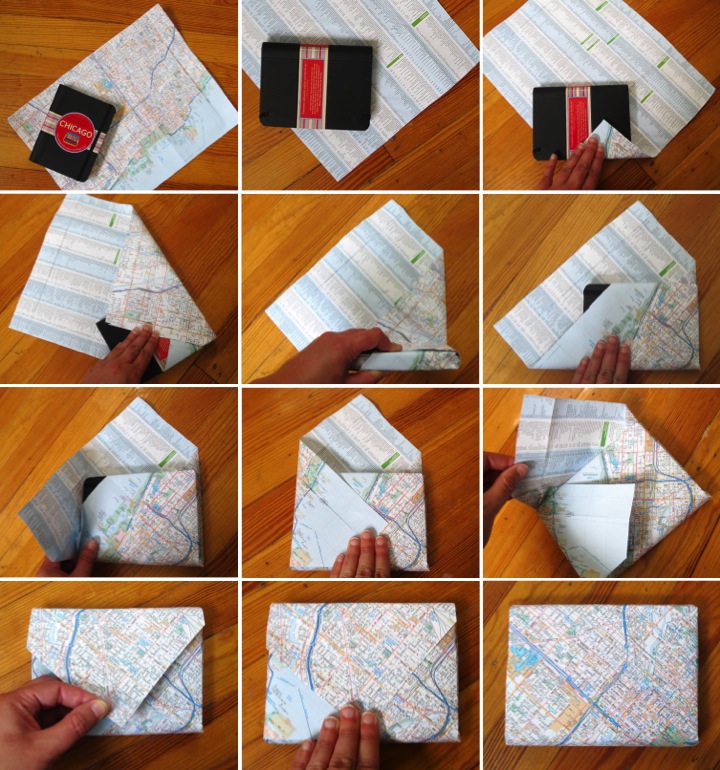
To wrap the gift place it in the bottom right corner of your paper at an angle so that you can fold a small amount of the corner of the paper over the bottom of the gift. Next, fold the paper over the right side of the gift, tucking in the excess paper at the corner so the paper lays flat.
Once you have the bottom and right side folded over, you flip the gift over itself on the table, tucking in excess paper on the right as you go. Now the gift is mostly covered with paper flaps still remaining on the left and top. Fold the left side over the gift, tucking in the excess paper and the finish by folding down the top over the gift. The wrapping paper can now be secured with a single piece of tape on the top flap. I finished my gift off by adding a handmade Bon Voyage card and some baker's twine with a bow.
I am happy at how my first try at Japanese Department Store gift wrapping came out and I'll have to try it again. If you are curious how the experts do it, here is a video of a lady slowly explaining how to wrap a gift (it's in Japanese but you can see how it is done) and here is a video of an Isetan Department Store Clerk in action wrapping a gift. Pretty neat, don't you think?
 Lisa | 20 Comments | Share Article | Email Article | Print Article
Reader Comments (20)
Thanks so much for this post!! Super helpful n has satiated my curiosity. Hopefully, my gift will look as neat as yours!! :)
Alex- I'm glad that you liked the post. Good luck with your wrapping!
This is by far the clearest picture-based step-by-step guide I've seen. Thanks a million!
A.P.- I'm glad that it was helpful!
I've always wanted to learn how those Japanese department stores did it. It's so efficient and elegant at the same time. Thank you! This is fabulous!
I can't wait to try your method this holiday season!
Really helpful! Just wrapped a few gifts the other day using this. Searched on the internet as I'd seen it done before, stumbled here and it worked like a charm. Thanks a million!
Perfect guide! Thank you
To measure the size, the width of the paper should be twice the height plus twice the width, and the length should be three times the height plus twice the length.
Also, practice folding those corners a few times, I really didn't find it easy to get perfectly folded corners at first, but the final result was amazing.
I appreciated what we did here. I enjoyed every little bit some of it. I am always trying to find informative information this way. Thanks for sharing around.
nice post
Dynamic Responsive Website Designing
We are one of the top rated Dynamic website designing company in delhi, India delievered more then 450 ++ projects since 2002.
We have a team of professionals.
This was really helpful to me because it was so easy to do. I hope my warped gift looks great just like yours. Thank you !!!!!
iuanaidabe e3d3fd1842 https://www.sosyalcoin.net/tiadenhioli
Website Designing Company in Kota
You did great.
Just want to point out that the gift is upside down.
In Japan this would be taboo.
But other than that, it looks really professional.
Great articles and great layout. Your blog post deserves all of the positive feedback it’s been getting. https://krogerfeedback.click/
Customers at Kroger are able to express their thoughts and ideas through the Kroger Feedback survey. You may add 50 Fuel Points to your loyalty card account after completing this poll.
Participate in this Kroger survey at Kroger feedback official site with Validation code. After taking the customer satisfaction survey on www.kroger.com/feedback ( español or english) Survey portal. Log on to Official site www.kroger.com/feedback, avail 50 fuel points within 7 days.
Great Post. Are you new to the world of clash royal and want to dominate clash royale like pro? If so, The key to success in this game lies in building powerful decks in clash royale that can handle various situations. clash royale deck builder is a tool for gamers to help them build their Decks. It provides 8 decks and different cards with their capabilities and costs. For in-depth information, visit the website provided.
www.kroger.com/feedback. Kroger uses Krogarfeedback.org to promote KrogerFeedback & Qualtrics XM to designs www.kroger.com/feedback to know feedback about their grocery products quality & store services. Customers can report their satisfaction to Heardquarters : 1014 Vine St. Cincinnati, OH 45202-1141 or contact us through email : admin@kroger.com or call us on Phone Number : 1-800-KRO-GERS (1-800-576-4377)