DIY Etched Glass Bottles for Limoncello
After making my limoncello I couldn't just store it in any old bottles so I decided to gussy up some bottles that I bought at Ikea with some glass etching.

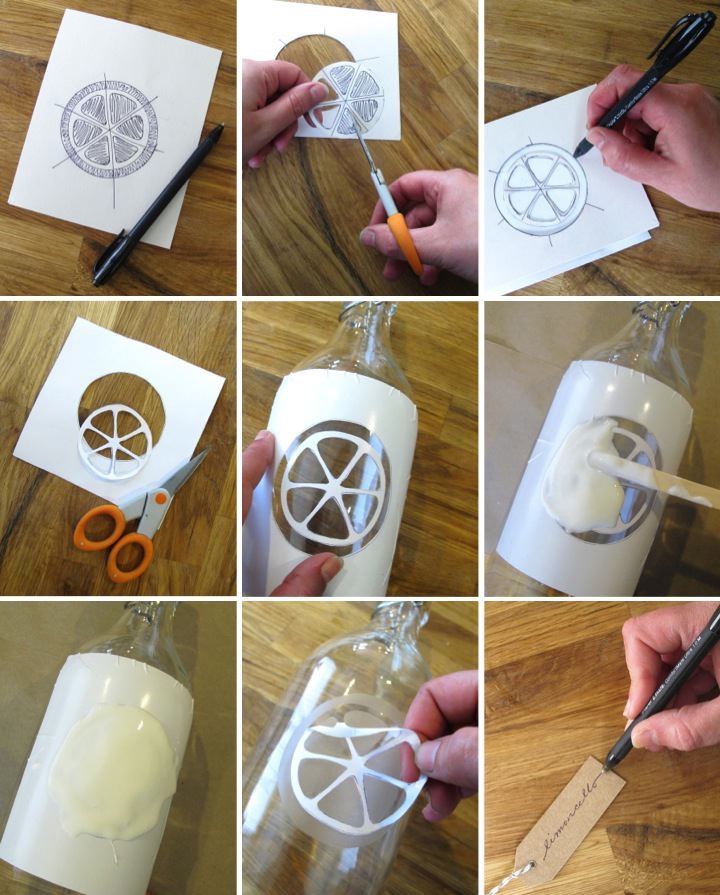
To start I sketched out a lemon slice design on a piece of cardstock. I traced around the bottom of two different sized bottles to make the inner and outer circles. I then drew three lines through the circles to mark where I wanted to draw the segments and then sketched them in. Once I was satisfied I colored in the areas to discard and then cut it out to make a template. I then traced the pattern onto pieces of shelf liner vinyl, cut it out and then adhered it to my glass bottles.
Following the instructions, I applied a thick layer of etching cream to the bottle over the design area not masked by the vinyl. The etching cream is corrosive so it is important to take safety precautions by using gloves and protecting your work surface. Also with the round bottle I had problems with the cream sliding down the side so I had to keep an eye on it and wipe drips before they went past the vinyl and onto the glass.
After the cream set on the bottle for 10 minutes, I rinsed it off and removed the vinyl from the bottle. By being careful when I was removing the vinyl I was able to reuse it on another bottle. The etching is light so it is a subtle look, but I like it. Also, since this could be any citrus slice I can easily reuse the bottles later for lemonade at a party or orange juice at a brunch.
To finish off my bottles I added a little tag with "limoncello" written on them and tied them to the bottles with some string. Now my bottles look cute enough to match the deliciously sweet limoncello inside.

Have you ever done any glass etching? Did it work well for you? Did you try a different method?

 Thursday, April 19, 2012 at 12:58PM
Reader Comments (3)
I wondered where you found such adorable bottles. I should have known you created them yourself!
I have done glass etching a couple of times for teacher gifts. I did the teachers' last names in the bottom of baking dishes one year (no more lost glassware!) and on glass candle holders another year. Both were easy, fun, and turned out great. To make things easier, I used my Silhouette cutting machine to cut my designs. I don't think I'd have the talent or patience to do them by hand.
Thanks for the post. I'm totally going to try that!
Sandy- Those sound like really fun and cute projects! I bet that the teachers really appreciated the baking dishes and candle holders. I'm also jealous that you have a Silhouette.
Jen- Thank you!