Welcome

My name is Lisa and I'm a crafty girl with wanderlust working as an engineer by day. My blog chronicles projects in my home as well as pictures and stories from my travels.

Search


Instagram

Blog Index
The journal that this archive was targeting has been deleted. Please update your configuration.
Navigation

Entries in Quilting (6)

Wednesday
Mar052014

Baby Quilt for Kristen's Little Lady

My friend Kristen just had her first little one last month. She and her husband kept the gender of the baby a surprise so she decorated her nursery to be gender neutral and I drew upon the colors she was using for the baby quilt I made for her. Frank and I got to meet the baby (they had a girl!) a week and a half ago and she was so sweet and beautiful.

I made the quilt using a modified version of a disappearing nine patch. A disappearing nine patch involves making a nine patch block and then cutting it into four smaller blocks. I like to oversize things and then cut it down for a little more accuracy so I adjusted my piecing accordingly.

To make the quilt I used eight different colored fabrics, a patterned white fabric and two different dark turquoise patterns.

Using 44" wide cotton I cut one 5-1/2" wide strip from each of the eight colors, one 5" wide strip from each of the two turquoise fabrics and four 5-1/2" wide and four 5" wide strips from the white fabric.

Next, I started assembling the strips, making four pieced strips by sewing one of the color strips on either side of a 5" wide white strip. I then cut eighteen 5-1/2" tall strips from the pieced color strips.

I then made two turquoise center pieced strips by sewing 5-1/2" wide strips of white on either side of the 5" wide strips of turquoise. I then cut nine 5" tall strips from the pieced turquoise center strips.

To make the nine patches I joined a color strip on either side of a turquoise center strip.

After making nine of the nine patches for the quilt I then cut them apart to make the blocks. I lined up my quilting ruler 2" from each of the seams and cut both vertically and horizontally.

When I was done cutting the nine patch apart the white was 2" wide and the turquoise was a 2" x 2" square.

I then trimmed down the outside edges down to make the disappearing nine patch blocks 7" x 7".

Next I made twelve edge blocks by cutting down the leftover pieced color strips. I cut the blocks 7" tall (5" of color fabric and 2" of white) and 5-1/4" wide.

I started assembling the rows by sewing together five disappearing nine patch blocks (turquoise square to the bottom right) with an edge block on the end (white strip down).

After making seven rows I made the bottom row by sewing together five edge blocks (white strip to the right) with a 5-1/4" x 5-1/4" square from one of the color fabrics on the end.

To finish the quilt top I sewed all of the rows together.

I finished the quilt with a light blue fabric for the backing and bound it with one of the turquoise fabrics that I used. For the quilting I sewed diagonal lines at a random spacing across the quilt.

I am really happy with how the quilt came out. I think it is bright and fun and I hope that Kristen's little girl will enjoy snuggling with it.


Monday
May202013

Owl Baby Quilt for Haneen's Little Man

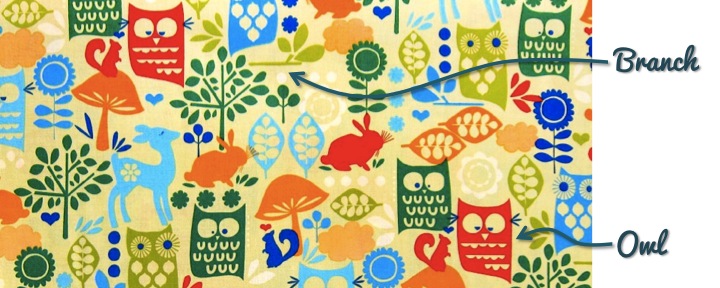
On Saturday night I went to a baby shower for my friend, Haneen, who is expecting a little boy. I decided to make her a baby quilt and wanted to create something bright and fun. When I stumbled across Forest Life in Retro by Michael Miller I knew it would be perfect to use in the quilt with its vibrant colors and whimsical animals.

With the Forest Life fabric as my inspiration I quickly sketched out a quilt design of a simple patchwork of squares broken up by a strip across the top. For an extra touch I decided I wanted to add an applique patterned after the owls in the fabric. 

I started by digging through my fabric scraps and fat quarters picking out some reds, oranges, yellows, greens and one aqua pattern. Along with some of the Forest Life print, I cut 49 5"x5" squares from my scraps that I had chosen. I arranged them into rows of 7 squares and then joined 2 rows for the top and 5 rows for the bottom of the quilt.

I then cut 2 strips of a coordinating striped fabric at 2" plus a white strip at 5-1/2". I completed joining the quilt together with the two rows of squares on top followed by one of the striped strips, the white strip, the second striped strip and finally the seven rows of squares on the bottom.

With the base of the quilt complete I was ready to make the owl applique. I picked out an owl and branch that I liked from the fabric and then photo copied them, enlarging by 200% to make a pattern.

I used the freezer paper method to make the applique. Using my photo copies as a pattern, I cut out the owl, branch and three leaves from freezer paper with shiny side of the paper face down. I then laid the freezer paper, shiny side face up on the wrong side of the fabric I was using and trimmed the fabric to 1/4" around the freezer paper. Folding the edges of the fabric around the pattern I ironed the fabric to the freezer paper, cutting slits in the fabric when necessary to ease around the edges. 

I placed my applique pieces on the quilt and used my iron again to temporarily tack the pieces in place and then used a blind stitch to permanently attach them. Once the appliques were sewn onto the quilt I turned the quilt over, carefully cut away the center of the area behind the applique and then pulled the freezer paper out.

I basted the quilt top to the batting with the Forest Life print for the quilt back and then quilted it with a straight pattern on either side of the seams.  I completed the quilt by adding brown binding around the edges.

Haneen really liked the quilt and I hope that her little man enjoys snuggling in it. 

This was my first time doing a freezer paper applique and it was really easy and fun, plus I think it turned out cute. I will definitely have to try it again sometime.

If you are interested, check out some of my other baby quilts: Alphabet Quilt, Pastel Patchwork Quilt, Neutral Diamond Quilt, Pink Stack Quilt and Doll Bed with Bedding and Patchwork Quilt

Wednesday
Apr112012

Baby Quilt for Audry's Little Lady

Like the baby quilt I made for my friend, Susan, I also made this quilt for Audry while I was living in Japan back in the Spring of 2009. Since Audry's style is a little more modern I was inspired by some quilts I saw online at West Elm to make this baby quilt for her little girl.

To make the quilt I chose five fat quarters in different patterns of pink fabric and sewed a strip of 24" wide cream fabric on either side of the fat quarters. I then cut 3-1/2" strips from the resulting pieces I had made. 

To make the quilt top I then arranged 18 of the strips, staggering the way they lined up to make a fun pattern. Once I had everything the way I liked I sewed the strips together and then trimmed the excess cream fabric off so that the quilt top was a nice rectangle. It came together fast and was probably the simplest design I've ever used for making a quilt.

I finished the quilt with a pink backing fabric and cream binding. I think that the end result was a cute quilt that works with Audry's style. Now I need to get finishing the quilt that I have started for her little boy...

If you are interested, check out some of my other quilts: Baby Quilt for Vanessa's Little ManBaby Quilt for Susan's Little LadyBaby Quilt for Carla's Little Man

Thursday
Jan192012

Baby Quilt for Carla's Little Man

I caught a bad bug this past weekend while I was working in Pasadena so since I came home on Monday evening I haven't really been feeling up to working on projects. While I am under the weather I thought I would share a baby quilt I made last year for my friend, Carla, who was my roommate my senior year in undergrad.

Carla's son's nursery was decorated with a Classic Winnie the Pooh theme complete with a mural on the wall. I used the soft yellows and browns to match for the color pallette for the quilt.

To start I cut 1-1/2" wide pieces of yellow and brown scrap fabric in lengths from 1-1/2" to 3". I then joined the pieces together to make a very long 1-1/2" wide strip. As a foundation for the blocks I cut 24 squares that were 10-1/2" x 10-1/2".

To make the quilt I needed 16 of what I'll call Block A to go around the outside of the quilt and 8 of Block B for the center of the quilt. To make Block A I lined up a ruler on the diagonal of the square and measured up 3" from one corner and marked it with a disappearing ink quilting marker. I then cut off a triangle that went through that point, saving the cut-off triangle. I reassembled the block by sewing a section of the brown and yellow strip to the block, adding the cut-off triangle back on, and them trimming the resulting block back down to 10-1/2" x 10-1/2". To make Block B I did the same thing as Block A but instead of just adding the yellow and brown stripe in across one corner I did it for two opposite corners on the block.

Once I had made all the blocks I joined them in the following rows: Row 1: A, A, A, A, A, A; Row 2: A, B, B, B, B, A; Row 3: A, B, B, B, B, A; Row 4: A, A, A, A, A, A.  In order to make the blocks form the squares you need to flip the orientation of every other block but if you lay it out it is easy to see how it works. I then joined the rows together, used some tan fabric for the back, quilted it with a straight, diagonal pattern between the squares and finally bound the edges with dark brown fabric.

Carla and her husband loved the quilt and even sent me some cute pictures of their son with the quilt in front of his Winnie the Pooh mural.

Thursday
Jan122012

Baby Quilt for Susan's Little Lady

As I am in the midst of making baby quilts for several friends (it seems I am at the age where all my girlfriends are having little ones) I started reminiscing about the first baby quilt I made which was for my friend, Susan, and I thought I would share it.

I was living in Japan at the time and was heart broken that I wouldn't be able to go to Susan's baby shower. Missing things like that was one of the toughest parts about living in Japan. 

Even though I couldn't be there she was in my thoughts and I wanted to make something special for her so I decided to try to make a quilt. I had made baby blankets before but piecing a quilt top was something new for me.

In the craft area of Jusco (Japanese store sort of like K-mart in the US) there wasn't the huge selection of fabrics like Jo-Ann's back at home but I did find a bundle of pre-cut 4" squares in pastel yellow, blue, pink, and green. Susan's daughter's room was going to be lavender so I hunted around to find a few other lavender fabrics that I could cut into additional squares to throw in the mix. 

To make the top I simple joined the 4" squares into strips and then joined the strips together. I used some of my lavender for the back, quilted it with a straight, diagonal pattern and finally bound the edges with cream fabric.

Susan's daughter is now three years old and I love that she still has the quilt in her room. Since they live in Washington DC I only get to see them about once a year or so, but it means a lot to me that she has this gift from me with her still. 


Tuesday
Nov292011

Baby Quilt for Vanessa's Little Man

When my roommate from grad school, Vanessa, had her little man I wanted to make a baby quilt for him.  Her nursery items were full of bright, vibrant colors and when I found the Punctuation Alpha Card fabric by Moda I knew it would be perfect.  

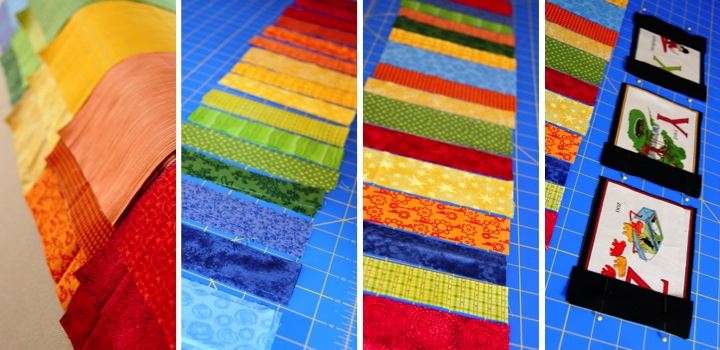
For the center of the quilt I cut out each alpha block and then pieced the blocks together with black sashing. I assembled 'D' - 'W' into a rectangle, made a strip of 'A' - 'C' and 'X' - 'Z' and then set the three pieces aside.

For the outside border of the quilt I went through my fabric stash and pulled out a bunch of bright scraps in rainbow colors. I cut each scrap to 6-1/2" and then cut strips in random widths from 1" to 2-1/2".  I arranged the strips in a random order and sewed them together. I then added a section of the border to the top of the 'A' - 'C' strip, the bottom of the 'X' - 'Z' strip, and both sides of the 'D' - 'W' rectangle.

To make the corners I made four rectangles of the colored strips 11" x 13", two with the strips going vertically and two with the strips going horizontally.  I then made a diagonal cut across each of the blocks and then reassembled the vertical strip and horizonal strip triangles to make the mitered corners.

To finish the quilt top I sewed a mitered corner block to each side of the 'A' - 'C' and 'X' - 'Z' strips and assembed the 'A' - 'C' strip,  'D' - 'W' rectangle and 'X' - 'Z' to each other.  I basted the quilt top to the batting with an alphabet print for the quilt back and then quilted it with a straight pattern.  I completed the quilt by adding black binding around the edges.

Vanessa loved the quilt and it really warmed my heart to see it in her son's nursery when I visited her in DC this past summer.  It is far from a perfect quilt with some uneven seams and stiches but it was made with love for a very special little man and his wonderful mom.