DIY Stuffed Duck
I made this little stuffed duck for a sweet young lady's sixth birthday. She loves ducks and has a stuffed duck collection so I thought that I would make her one to add to her growing flock.

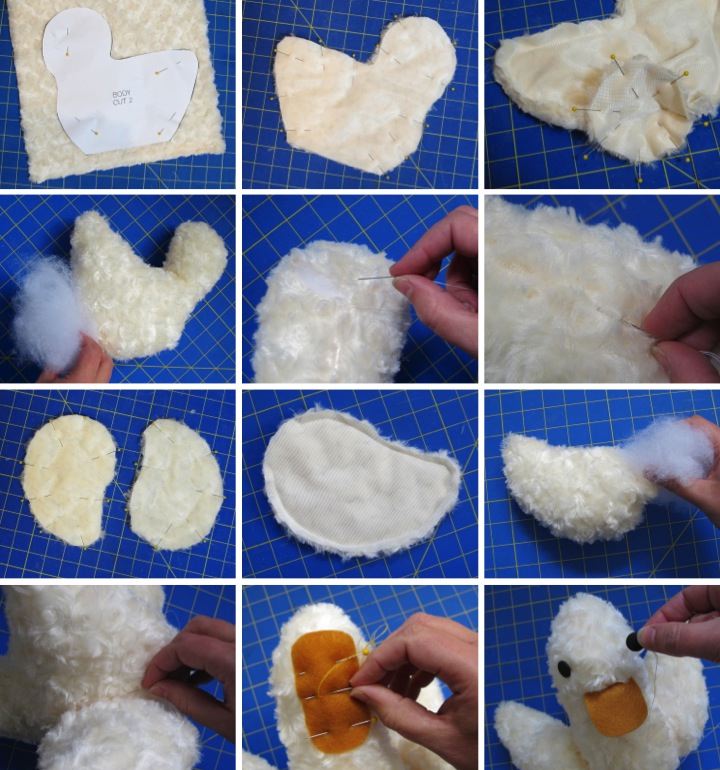
To make the little duck I started with the pattern from Martha Stewart's washcloth duckies and modified it to fit my needs. I enlarged the pattern by 400% on a photo copier, pinned the pattern to some cream colored fake fur and cut out the pieces. Later when I was piecing the duck together I found that with the pattern enlarged the oval bottom piece was way too big and I had to cut it down to a circle to make it all still work.
Duck Body Assembly
I pinned the right sides of the two duck body pieces together and sewed around the edges, leaving the bottom open. I then pinned the bottom circle to the opening of the body and sewed around the edge leaving an opening for turning. I pulled the body right side out through the opening, stuffed it using polyfill and hand stitched the opening shut. Wherever I had joined two pieces the fur was caught in the seam, so using the eye side of a needle I teased the trapped fur out which made the seam invisible.
Wing Assembly
For the wings I followed the same basic process as the body: pinned right sides together, stitched around the edge leaving a small opening, turned right side out, stuffed with filling and then hand sewed the opening shut. After finishing the wings I hand sewed them to either side of the body and then tweezed out the fur trapped in the wing seams just like I had on the body.
Final Touches
To make the duck bill I cut out an elongated oval from gold felt and then ironed it in half. I then pinned it open onto the front of the duck's head and attached it by backstitching along the iron line. I finished up the duck by sewing on black buttons for eyes.

Have you ever made any stuffed animals? How did they turn out?
 Tuesday, April 24, 2012 at 6:42AM | Posted by
  Lisa |
  Post a Comment | |
  Email Article |
  Print Article

Reader Comments