


Project Life: Early January
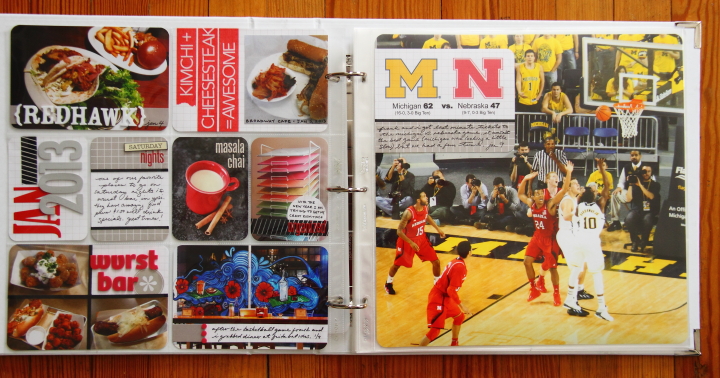
This weekend I finally had a chance to get working on my Project Life album. Instead of doing a spread for every week I am doing a spread every time I have enough pictures to fill up the pockets. This particular layout covers January 2-9. Living alone and not having kids, I am afraid that my daily life spreads (i.e. when I am not traveling) are mostly going to be about food and this layout is no exception.
I purchased the Seafoam Core Kit of Project Life insert cards and while I love the color scheme, it didn't quite go with my photos for this spread. I think what I am going to do to give my album a cohesive look is to use the black, white and grey from the Seafoam Kit and then add in one other accent color for each spread based on my photos. For this particular spread, red seemed an obvious choice to add in.
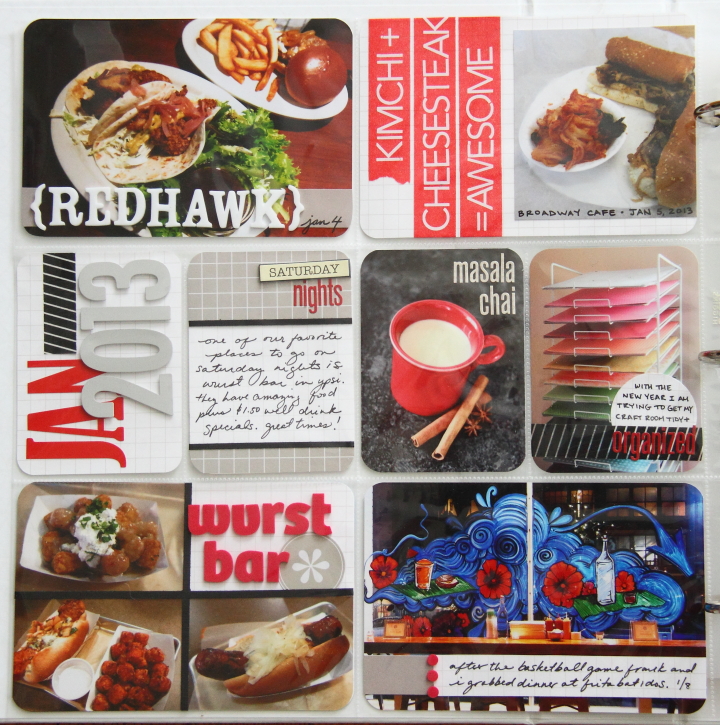
Starting from the top left corner, I took a photo from a restaurant Frank and I visited and added the name with some foam letter stickers with a band of grey cardstock.
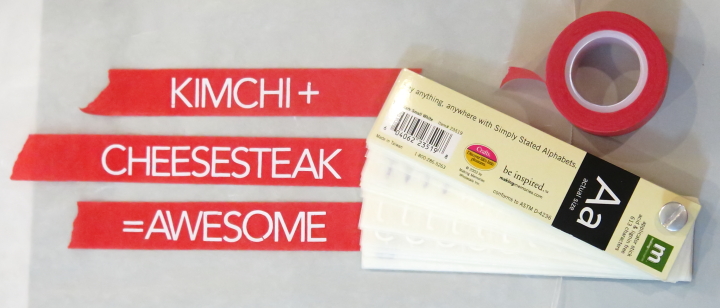
In the top right corner I used a grid 4x6 card for the background and added a title with washi tape and rub-on letters. Since the rub-on letters are not repositionable, I tore off long pieces of the red washi tape and placed them on a piece of waxed paper. Waxed paper works great as a temporary surface because the washi tape will easily peel right off. I added the words to the washi tape with the rub-ons and then was able to adjust the title exactly how I wanted on the card before trimming the excess tape.
Working across the middle row from the left, I made a title block with some letters sticker, metal letters and some black and white washi tape. Next, I wrote some journaling about a favorite place to go on Saturday nights followed by some masala chai teat that I made and my attempts to get my craft room organized.
In the bottom left corner I divided a grid card into quadrants with lines of black cardstock and used red foam stickers to add a title. The little grey icon is from one of the 3x4 Seafoam Kit cards that I cut out to use as an accent.
The bottom right corner has a simple strip of journaling with grey cardstock and a slice of one of the grid cards. The little red dots are periods from the red foam letter stickers I used on the previous pocket card.
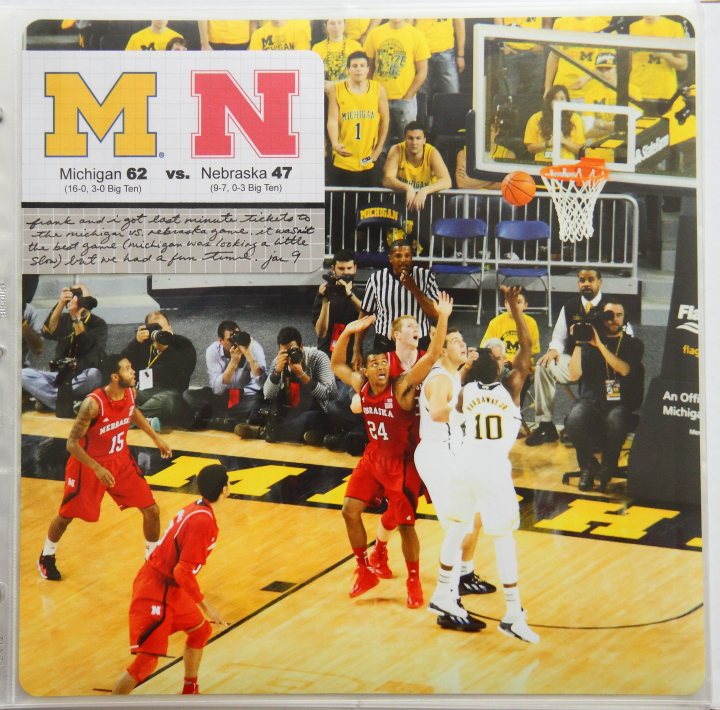
On the right page of the layout, I made an enlargement of one of the photos that I took at the Michigan vs. Nebraska basketball game. We got the tickets last minute and they were pretty far away so the picture isn't the greatest but I still like it.
I downloaded pictures of the Michigan and Nebraska logos and made a design with them and the score in Power Point. I then printed it out on one of the grid cards. Along the bottom I added some grey patterned paper and a strip of black cardstock to make a journaling space under the title block.
This is only my second Project Life spread but I am having fun so far. Hopefully I can keep up for the year!
Supply List
Project Life Core Kit - Seafoam Edition
Project Life 4" x 6" Grid Cards
Project Life 3" x 4" Grid Cards
Project Life Photo Pocket Pages - Design A
Project Life 12" x 12" Page Protectors
Large red letter stickers: Unknown
Small red and grey letter stickers: lily bee design, Picket Fence Collection ABC Stickers
Red foam letter stickers: American Crafts
White foam letter stickers: American Crafts
White rub-on letters: Making Memories
Red washi tape: Target
Black and white washi tape: Love My Tapes, White Diagonal Line On Black Washi Tape
Saturday cardstock sticker: Little Yellow Bicycle
Black cardstock: Bazzill
Have you been doing any scrapbooking lately? What have you been working on?
 Lisa | 9 Comments | Share Article | Email Article | Print Article
Reader Comments (9)
Lisa your P/L is looking good. You have lots of creative embellishments on the stock items. I usually pick a colour theme for the P/L month and then embellish my journal cards accordingly.
My scrapping time has been occupied by the completion of my first December Daily. I went with my tradition of 12X12 and oh my it has been quite the project. I like the December Daily/ Journal Your Christmas concepts and I have learned lots from doing this project - next year I think I will do quite a bit differently - not the 12X12 pages. Although my first "rule" (not that there really is any) was that I had to use what was already in my Christmas stash, so from the perspective I accomplished that goal. I am ready to move on to a new scrapping project - getting my 2013 garden album ready :-)
Beautiful photos + great embellishments = fun, interesting PL pages. Great job, Lisa! I really like what you're doing with your supplies to supplement your photos. The cohesiveness of your embellishments really meshes all of your varied pictures together nicely.
I really like seeing how you use washi tape. Just this weekend, I used some for the first time ever, and I love it! It's so simple to use, yet it makes such an impact. I think I'm hooked!
Thank you for the double inspiration Lisa! I'm to clean off my scrapping desk AND do some work on my Project Life. ;-)
I've never thought of using rub-on letters on washi tape. Brilliant!! Will be trying this later this week.
I love the huge pic on the right. Awesome!
Thanks for the tip about the wax paper and washi tape. :)
Thanks for sharing! Is the enlargement 12x12? Where did you have it printed?
Mary-Lou- Thank you! Your December Daily album sounds lovely and I bet it was worth all of the effort. I hope you have fun creating your garden album!
Sandy- Thank you! I love washi tape. It is so versatile and fun. I tend to buy up a lot of it when I am in Japan at a Hyaku-en Store (Japanese version of a dollar store) because it is so cheap.
Laura- Thank you! Good luck with the cleaning and scrapping!
Rene- Thank you! I love using the rub-ons on washi tape.
Jen- Thank you! I'm glad that you liked the tip!
Hilary- Thank you! The enlargement is 12"x18" that I trimmed down to 12"x12". I had it printed at my local Meijer's (kind of like a Michigan version of Target). It is super convenient because I can order the photo online through Snapfish and then they can print it out in just a few minutes at the store.
Thanks for the info! I actually know Meijer very well, we have them here in the Chicago suburbs too! I actually was just there after work today, we have one nice and close to home. I forgot they have photo printing there, I may have to try them sometime.
Hilary- I didn't know there were Meijer stores outside of Michigan. I had never heard of them before I moved to Ann Arbor. I like their photo printing and being able to do the poster enlargements in an hour is nice.