Welcome

My name is Lisa and I'm a crafty girl with wanderlust working as an engineer by day. My blog chronicles projects in my home as well as pictures and stories from my travels.

Search


Instagram

Blog Index
The journal that this archive was targeting has been deleted. Please update your configuration.
Navigation

Entries in Living Room (10)

Friday
May312013

TV Electronics Cubby

When I last shared my living room I had put up curtains behind the TV on my old sideboard, but needed a solution to store all of Frank's electronics since stacking them on a stool wasn't doing it for me. I decided to build a cubby that would sit on top of the sideboard to house all of the electronics.

I made this project using one 1x12 and one 1x2 boards. I started by cutting a top piece and two side pieces from the 1x12. I cut 45 degree mitered ends on the top board and also on one end of each of the side boards.

Because I like to do things quick and easy I cut the side boards a bit long, clamped them together and cut the square ends at the same time so they would be the exact same height. 

I started to assemble the cubby by spreading some wood glue on all of the mitered ends.

I laid the top upside down, put the sides in place and used my speed square to make sure it was all square. I then attached the sides using my brad nailer.

In order to make sure that the cubby stayed square I attached a back brace from the 1x2. I cut it to fit and attached it with wood glue and my brad nailer. I didn't want a solid back beacuse I wanted the electronic cords to be easy tucked down behind the sideboard.

I used some wood filler to cover the holes from the brad nailer and then sanded the whole piece down smooth.

To complete the cubby I wiped it down with a tack cloth and stained it using a mixture of cherry and walnut stains that I custom mixed together to match the sideboard. After it was complete I put it in place under the TV and tucked all of the electronics inside the cubby.

Unfortunately, while the stain is a good color match to the sideboard it is a little lighter in shade. I'm debating about whether I want to darken it up a bit more or just leave it as is.

I still need something to place on the left side of the wall to balance having the TV off center, but the room is starting to come together.

Friday
May172013

New Curtains for the Living Room

With Frank and I getting married in two months we have been working through combining his things with mine at my house. One of the big items under consideration is what to do with the TV.

I have only ever owned one TV, a TV/VCR combo that I bought used over ten years ago that is up in my bedroom. Frank, however, is a man of electronics and felt that I should join the rest of humanity that has a TV built in this century in their living room. Compromise won the day and Frank's enormous TV (by my standards, he thinks an 80" TV would look much better) moved into the living room but I got to put it on a cute sideboard that I had instead of Frank's glass and metal TV stand. 

The only problem is that with super couch taking up a large area of the living room there is only one wall to put the TV on, which happens to have two windows on it. I tried a bunch of things like centering the TV between the windows and centering it on the window to the right but everything looked awkward.

I decided that the best solution would be to hang curtains all along the wall. I looked around a bit and found three great options from the Target Threshold line that I brought home. Since Frank is going to be living here, too, I decided to start getting his opinion on decorating matters around the house and asked him about the curtains.

I ruled out the navy curtain with cream embroidery on the left right away since it was a more purple hue than the rug and really clashed. I was partial to the middle one but Frank hated it. He said that it looked like a really bad shower curtain and that he wouldn't wish that curtain on his worst enemy and then proceeded to make jokes about the curtain for the next few days.

That meant the curtain on the right was the clear winner. It is navy blue with some thin stripes of shades of blue and white running across it. The fabric is a nice heavy weight and the curtain is fully lined with white light blocking fabric. Curtains can be pricey and these seemed to be a great quality for the price.

The store only sells the curtains in 84" lengths, but I was able to order them online in 95". I used a brushed silver drapery rod and four panels to create my wall of curtains.

I really like how it turned out and it is a good step in the right direction, I think. I still have a lot to do, like some wire management, finding a solution other than a kitchen stool for the cable box and figuring out how to balance out the TV being off center on the wall.

I also got another set of curtains for the window that is over the couch. Having done this is giving me the itch to paint the walls (I want to go with a lighter color to balance out the dark curtains) but there are other larger projects that need to come first. My house is a never ending project but I love it.

Just for fun, and to look back at how far things have come, here is a photo of this same spot in demo mode about a month after I bought my house. Plaster and lathe removal, I do not miss you...

Thursday
Feb212013

Switching Up Some Switches

Since I am still not feeling the best I've been tackling some small projects around the house. I am missing my power tools but it's still good to be making a bit of progress, albeit slowly.

Last weekend one of the little projects was swapping out some of the switches in the living room. With the new living room light being so bright now it seemed like a good idea to put it on a dimmer for times when it was a little overwhelming. 

When I work on the electrical in my house instead of just shutting off the circuit breaker for what I am working on I like to shut off the main breaker on my panel just to be on the safe side. I took off the switch panel and then removed the screws that hold the switch into the electrical box.

The switch I was replacing was a three way switch. I am not going to go into great lengths about three way switch wiring, but if you are replacing one it is really important to take note of which wire is connected to the common screw and which ones are connected to the travellers before you disconnect the wires. The common screw is easy to identify because it is a different color from the others, usually black of copper. Here is my new three way switch with the screws labeled.

There are different ways to wire up a three way switch, depending on how many lights are involved and the order in which you wire everything up, but here is a simple way to think about it to understand why you want to keep the wires straight.  The power is coming into (or out of) the switch at the common screw and the travelers are two lines between them. When you toggle one of the three way switches you are either connecting the power by having the switches toggled to the same traveler wire or disconnecting the power by having them connected to opposite travelers. 

After I removed the wires from my old three way switch, I reattached them to my new switch, making sure to attach the wire that was attached to the old common screw to the new common screw. Super easy!

The dimmer I got has a slider next to the toggle switch so I can set a brightness level that I like and switch it on and off. It is really nice to have this convenience and now I am thinking I need to add a dimmer for the dining room light...

Next up was adding a wireless motion detector to my front porch light. Living alone, I like to come home with my front porch light on. Since I work a lot of late nights that meant that I was leaving my light on all day which really wasn't the best plan. I saw this wireless motion detector and thought it would be just the thing for me.

The kit consists of two parts, a detector and a switch with an antenna and receiver. The installation was fairly simple. Frank mounted the detector in the corner of my front porch for me while I swapped out the old switch with the new receiver switch. 

The system works great. It has a setting where it will come on half power at dusk and stay on like that for three hours. If it detects any motion it comes on full power. At first we thought it wasn't working because it seemed to be on a lot, but then we realized that we needed to reduce the range since it was picking up cars that were driving down the street. I really like it and wish I had installed it sooner.

The last item to cover is the switch cover. I've never seen a four gang switch plate with a single decora opening on the left and three toggle switch openings so I wasn't exactly sure what to do. I found these snap together switch plates so I decided to use them to make the switch plate I needed.

I have to say that although it meets my needs right now I am not crazy about it, since the seams are super obvious. At some point down the line I'll make something that looks nicer, but for now it is okay. It's a small price to pay for having a dimmable living room light and a motion sensor for my porch light.

Monday
Feb112013

New Living Room Light

Living in an old house I have spent a lot of time while remodeling scouring around for antique items or reproduction items that I can use in my home. I want to give it back the feeling of an old home that the previous owners had stripped away in their 1960s remodeling.

One of the things I love are the fixtures at Rejuvenation. They have gorgeous reproductions based on antique lights. In particular I would love to hang their Orville Chandelier in my living room.

Unfortunately, since it is a chandelier the minimum height you can order it is 24" which is way too tall for the low ceilings in my old home. The bigger problem for me, however is that it comes with a $580 price tag which is out of my price range.

Using the Orville as my inspiration I searched around for something similar that was a semi-flush fixture in my price range. I came across a light fixture from Minka Lavery's 1730 Series on Lighting Direct.

The light was a semi-flush and hung down only 13-1/2" from the ceiling which was workable. The fixture had a classic style with three arms that I loved, but the glass shades looked pretty modern in the photos. The price was great at $139.90 plus Lighting Direct had an additional 10% off on Minka Lavery fixtures at the time making the light only $125.91. I decided to get it with the idea that if the shades did look too modern I could always switch them out.

After the fixture arrived Frank helped me hang it. I've hung several lights by myself, but holding the fixture with one hand while you are twisting on wire nuts with the other can be a tricky proposition so it is always easier to do with two people. The fixture looked great and I love how bright it made the living room with the three bulbs. My initial hunch that the shades were way too modern looking was correct, however. Here is the fixture hung in my living room.

I set about looking for some white bell shades with 2-1/4" fitters that looked similar to the Orville shades. I found some for $5.00 a piece with another 10% discount running at the time and decided to get them.

The shades arrived on Friday and I was excited to put them up on Saturday. They really make a difference and I love how the new light fixture looks now.

It's not too far off from my inspiration and I really love how it looks in the living room. Now if only I could figure out what to do with the entryway light...

Monday
Nov192012

New Living Room Rug

After getting my new living room sectional (AKA Super Couch) a month ago I have been on the look out for a rug. Previously I had a light grey rug in the room but the oatmeal color of the sectional clashed with it so something new was in order. 

Finding a rug that would fit the bill was a little tricky. My sectional is square so I wanted an 8' x 8' rug which limited my options. Additionally I wanted something with color since the walls and couch were already neutral, but at the same time I wanted a rug that would go with a variety of color schemes if I decided to chance things up. On top of that I didn't want to spend a ton of money.

Luckily, I was checking out One Kings Lane and found something perfect: a Safavieh 8' x 8' Mulberry Rug in Navy Blue and Ivory. It seemed just right. The navy would add a little color but would be versatile in a number of color schemes. It was also hand-tufted wool and the pile was 1/2" so a nice compromise between being comfy and being dense for a high traffic area.

The rug was listed at $379.00 but there was a special running that day for 30% off Safavieh rugs so I got it for $265.30. It wasn't cheap but that is a really great price for a hand tufted wool rug so I decided to order it.

According to the website, the rug wasn't supposed to arrive until sometime between November 29 and December 4, so I was pleasantly surprised to have it arrive on Friday. Needless to say I was pretty excited and had to open it up and roll it out in the living room right away.

The color is a little more royal blue than navy but I love it. I really think it pulls the space together. I just need some fabric with some lime, teal and royal blue to make a few pillows to tie it into the color scheme.

The rug is really comfortable and a fun surprise that I couldn't tell when ordering online is that the pile of the ivory is just a smidge taller than the blue which gives it a little dimension. 

I am really happy with the rug and looking forward to getting some of the other things done in the room like window treatments, painting the trim and countless other little things. Slowly but surely I will get there...

What do you think of the rug? Have you been doing any decorating or purchased anything new for your home lately?

Sunday
Oct282012

Mini Pumpkin Wall Art for Fall

After making my sweater vase I thought I would create some wall art to continue with my Autumn decorating in my living room. I wanted something that would work for both Halloween and Thanksgiving and figured that mini pumpkins would be a perfect fit.

I came up with the idea of mounting the pumpkins in a little three by three grid and headed to Lowes to figure out a good idea of something to serve as a mounting board. I toyed with the idea of planking together some boards, but when I saw that I could get a 1/2" thick 2' x 2' oak plywood panel for $8.50 I was sold on that solution. I picked out the panel with the prettiest grain and picked up some white mini pumpkins on my way home.

With supplies in hand I started by staining the plywood with Watco Danish Oil in Dark Walnut. I like using it because it is really easy and you can't really screw it up. That's my kind of staining! After you prep your surface by sanding and wiping it down, you simply flood it with the Danish Oil and use a rag to spread it around until the whole surface is covered. After letting it penetrate for half an hour you apply the Danish Oil in the same way again. Fifteen minutes later you wipe off the excess and your piece is ready to use eight hours later. Here is my plywood before and after I stained it:

Since I was using plywood I had to figure out a way to cover the rough edges. I decided using some white iron-on melamine banding would be fun and help set it off from the wall. The edging I had was 3/4" thick and I thought it would look neat if the board seemed thicker so I took some scraps that were 1/4" thick and used wood glue to attach them around the perimeter on the back. After that I simply cut the lengths of the banding that I needed and ironed it onto the edge.

Next up I tackled the mini pumpkins. I had purchased white ones, but they are really cream colored and I thought a true white look would be better for my project, especially since I had used the white band for the plywood. That was an easy fix with a can of white spray paint. With two light coats of matte white I think the pumpkins almost look like little ceramic sculptures.

Once everything was dry I was ready to start assembling. On the back of the board I marked the center and then marked the remaining eight locations for pumpkins in a grid with 5" spacing. I drilled pilot holes at each of the locations and then started 2" screws in each hole. To mount the pumpkins I held them over the pilot hole in the front and the drilled the screw from behind the plywood into the pumpkin.

With the pumpkins mounted I thought it looked really cute but needed a little finishing touch. I took some scraps of white vinyl contact paper cut it into 1/4" wide strips and made a border around the pumpkins.

I think my mini pumpkin wall art turned out really cute. It is festive, but the neutral color scheme doesn't clash with the colors in my living room.

Are you doing any decorating for fall? Have you ever spray painted pumpkins?

P.S. If you are interested, I've gathered together a gallery of my autumn related posts: Gallery of Fall Posts & Projects

Friday
Oct262012

DIY Sweater Vase

I've been wanting to do a little fall decorating in my living room but since it is neutral color scheme with light green and teal accents I was a little stumped about what to do until I thought of making this little sweater vase. Since it is definitely sweater weather around here in Michigan it has a fall vibe even though I used a turquoise sweater to match the room.

Making the vase is super simple and doesn't require much time or energy. All you need for supplies is a round vase and a sweater you don't mind cutting up. My vase is a dollar store find and I picked up the sweater at a thrift store. The only thing that you need to be careful about is to make sure that the sleeves of the sweater will slip over the vase snugly and not be too loose.

To make the vase I trimmed one of the sweater sleeves about an inch longer than the glass vase. I then slipped it over the vase aligning the cuff with the top of the vase. To finish it off I tucked the extra edges under along the bottom. Super easy-peasy!

I decided to place some solidago in the vase since it has a lime green color and seemed to evoke fall to me. I paired the sweater vase with a small ornamental kale in a white Ikea pot and a tiny cream colored pumpkin. I think it looks really cute together and is quite seasonal without using traditional autumn colors.

The other thing that I really like about this little sweater vase is that I can easily use this in the winter, perhaps by putting some holly branches or evergreens in the vase and swapping out the pumpkin for a glass ornament.

Are you doing any fall decorating? What seasonal items do you have in your home?

P.S. If you are interested, I've gathered together a gallery of my autumn related posts: Gallery of Fall Posts & Projects

Thursday
Oct182012

My Coffee Table Indirect From Japan

With Super Couch (oh, how I love it!) happily ensconced in my living room I needed to find a solution for a coffee table. Previously I had been using a Pottery Barn Chloe Coffee Table that I had picked up six years ago at a Pottery Barn Outlet for $60. Regular price it was $350 so it was quite a steal. Although it was a great coffee table the long narrow shape looked awkward with Super Couch. I needed something square or at least a very wide in order to fill up the space properly and look proportional to the sectional.

As I was contemplating what to do it dawned on me that the low table that I brought back from Japan might just work. I bought the table at a Recycle Center (a Japanese second hand shop for home goods) for ¥1000 (about $10 US at the time). The table is low because it is meant to be sat at with cushions on the floor. I loved how spacious the table top was and decided to set it up in my Japanese apartment as a work table for crafts. It worked out really well and I spent a lot of time working on projects sprawled out over the table.

I shipped the table back to the U.S. when I returned home but since then the table has languished in one of the back rooms of my house that I never really use. I rescued it from oblivion and placed it in front of the sectional. It was just the right size and fills the space nicely.

I love the curvy shape of the table legs and the grain pattern of the wood on the top. It really is a beautiful piece, especially for the great deal I got it for, and I am glad that I finally have a place for it in my home that showcases it better.

Temporarily on top I put a beige Marit table runner from Ikea that I already had. The tray is a hand carved wooden batea meant for tossing corn and rice that I picked up at a market in Panama this past summer. The two vases on the outside I bought in Seto, Japan and the one in the middle I made when I was a kid. I love how it is a little wonky, but not so bad for being in sixth grade, I think.

I plan to replace the items with something a little more colorful in the future, but for now it will do.

I'm really happy that the table works so well in the living room. Seeing it there when I walk in the front door brings back a lot of great memories from Japan and brightens my day. Now I just need to find a new rug and things will really be starting to come together...

Have you recently "shopped your home" and moved a piece of furniture or decor item to another room? What kind of coffee table do you have?

Monday
Oct152012

The Saga of Super Couch

I bought my first new couch (as in not free from someone or from a garage sale) when I was in grad school twelve years ago back in 2000. It was a Karlanda loveseat from Ikea that I found in the As-Is section for only $200 since it had previously been a floor model.

I was pretty excited about my awesome deal and managed to haul it home by tying it to the top of my Dodge Stratus with a bunch of the Ikea twine. Doing this is not advised (I think only a 23 year old is capable of thinking that it was a good plan) and I am really not sure how I got home in one piece and didn't hurt anyone.

My little blue couch happily lived in two different apartments in Northern California with me. I tried to find a picture of it, but the best I could find was the one to the left as all the others had people sitting on it.

Fast forwarding five years to 2005, I bought my second couch soon after moving to Ann Arbor. My living room was a little lonely with just the loveseat and my futon was in another room so a second couch was in order. A friend from work mentioned that a local store, Newton's Furniture, was going out of business and had a huge sale going on. They did indeed have some awesome deals and I ended getting a lovely tailored cream colored sofa for $999 which was half off the original price.

I loved the new sofa, but the royal blue loveseat looked a little strange next to it. Ikea sold beige slipcovers for the loveseat but even on eBay they were running about $200 which seemed ludicrous to spend since that is how much I bought the whole thing for. I did see that the light blue slipcovers on eBay were not hot sellers and was able to get one for $30. I bought a few packages of Rit fabric dye remover and washed the light blue slipcover with it. It definitely removed the color, but it had a bit of a blue tinge still so I washed it again with a single package of light tan Rit fabric dye which made it the perfect shade of beige to match my new sofa. Below is a picture of the sofas in my old house soon after I bought the second one and DIYed the color of the slipcover on the loveseat.

Now my couches are 12 and 7 years old and while I have loved them, they are definitely showing their age. They also have some practical problems. Neither one is very deep, especially the big sofa, so while they are awesome for me (I'm 5'-2") for most other people they are not very comfortable. I decided to save up some cash and buy myself a comfy sectional for my living room.

I wanted something like the Pottery Barn Comfort Square Sectional which is deep and comfy, but still has a clean look to it. Unfortunately, with the configuration I wanted it would have cost over $4000. That wasn't going to happen, so I hit up some other furniture stores in town.

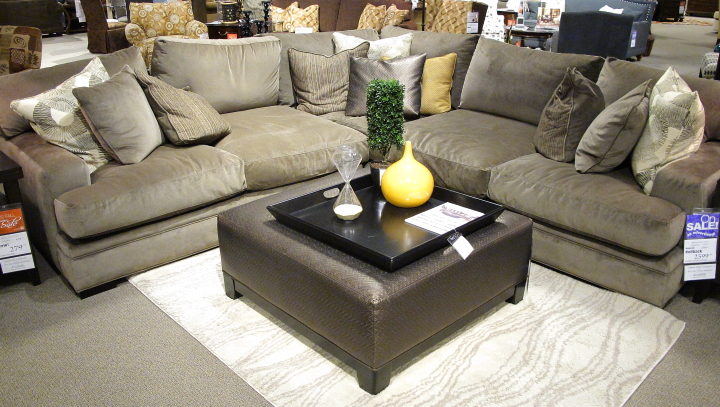
At Art Van I found an amazingly deep sectional (5" deeper than the Pottery Barn Comfort Square!) that was super comfortable (in the picture below). It was Fontaine Sectional in the Cindy Crawford Home collection and while I loved the shape and style, I was not crazy about the brown color that had an olive greenish tinge to it. I asked the salesman what other colors it came in and he told me that it only came in the one color. I was disappointed and looked around the rest of the showroom, but couldn't find anything else that I liked as much.

I couldn't stop thinking about the Fontaine sectional, which I had dubbed "Super Couch" due to the fact that it was so ridiculously deep. I did a little online searching and I discovered that the exact same sectional came in beige under the name Brighton Park. Even better, the website I found it on had the sectional on sale for under $2000. I thought about it for a while (outside of vehicles and homes it is the largest purchase I've made) and then decided to order it. Super Couch was going to be mine!

After waiting a few weeks, Super Couch was scheduled to arrive this Wednesday and I was excited. Saturday afternoon after the Michigan game (Go Blue!) I got a call from the delivery service letting me know that they were running ahead of schedule and would deliver the sectional on Sunday morning. I was thrilled to get it early, but had to kick it into overdrive to clear out the space for it. Frank came over early on Sunday morning to help me move my old couches. I snapped the picture below right as we were about to move them (after I had already moved the little side table that went between them). I was a little sorry to see them go...

We got everything moved just in the nick of time and at 11 o'clock the delivery truck pulled up in front of my house and started unloading the sectional. As an aside, doesn't my little street look pretty with all of the fall leaves? Also note that as a wiser 35 year old I had the sectional delivered instead of trying some crazy things with a small car and twine (see above couch #1).

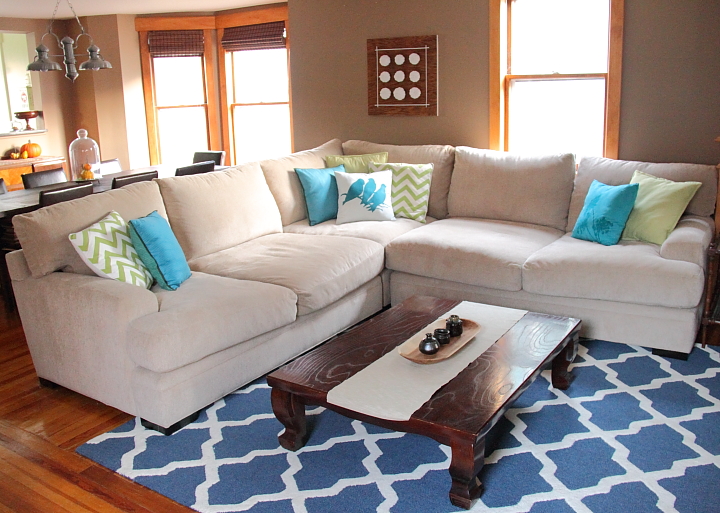
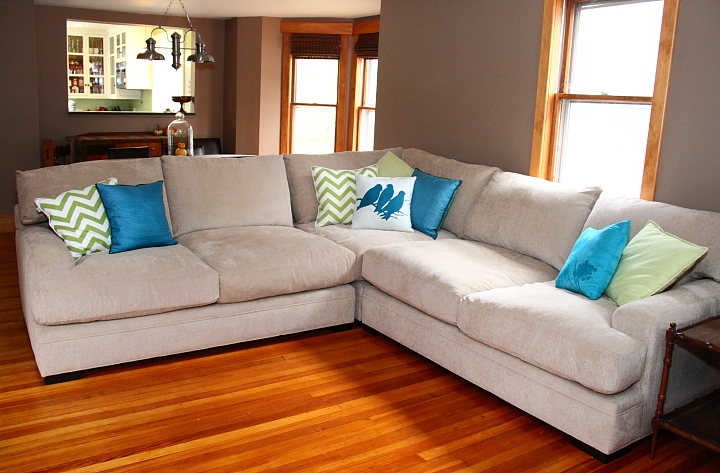
In half an hour the delivery men had my sectional all set up and were on their way to another delivery. I was a little surprised by the color. It's more of an oatmeal color than beige, but I like it and think the slightly darker color will probably hide stains a little better than my old beige couches did.

Super Couch is so comfortable that I don't know how I am going to get work done anymore. It is really hard to tell from the pictures how huge it is, but it is massive. For some perspective, if I sit with my back against the cushions my feet just barely stick off the edge of the seat cushions. I know I am short, but that is crazy deep!

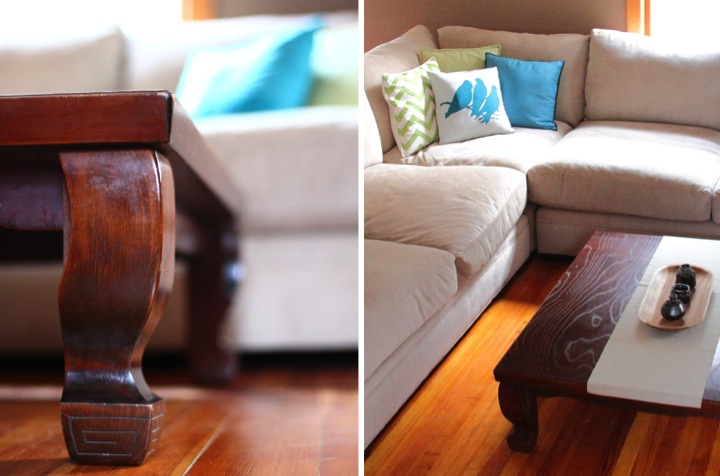
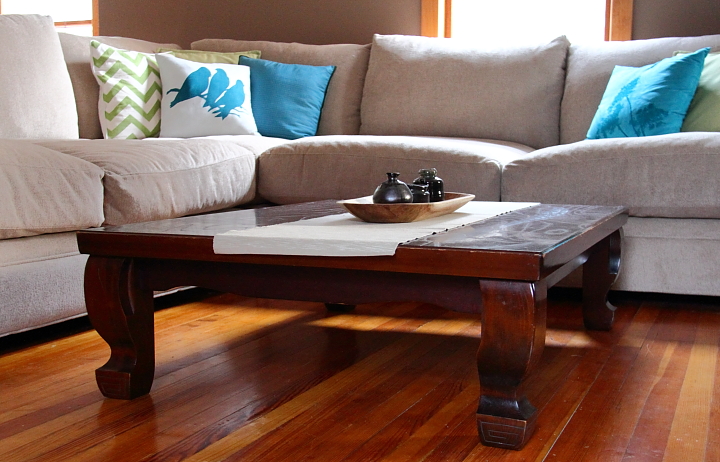
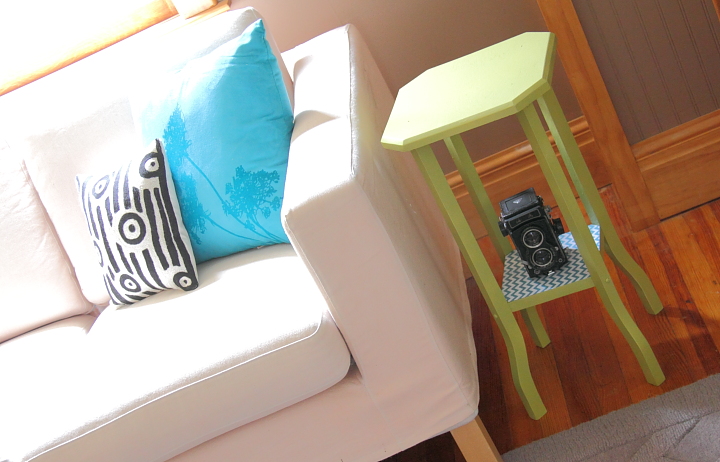
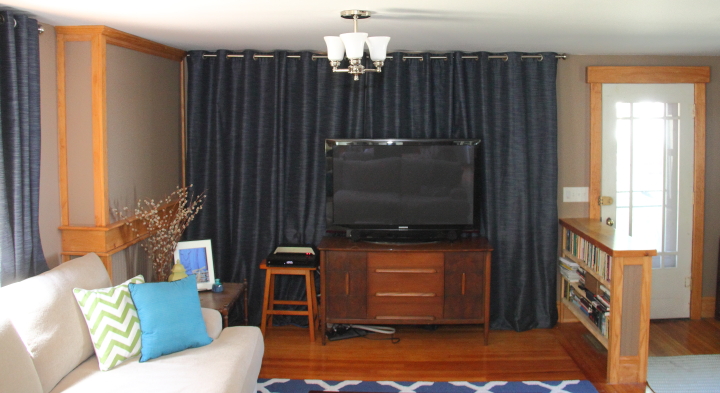
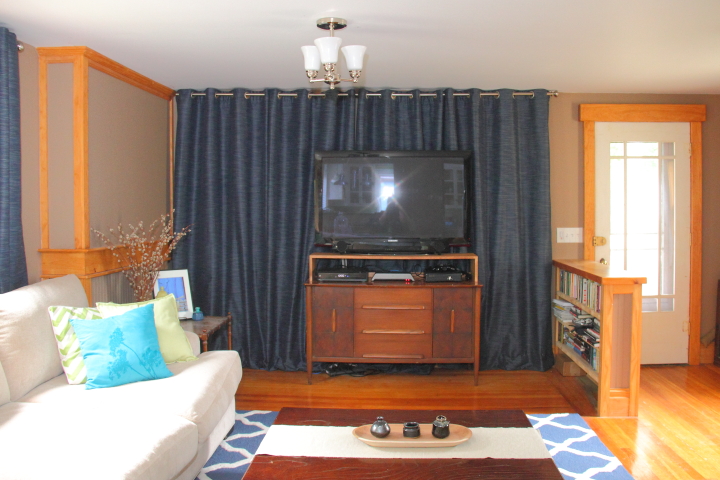
I think Super Couch looks great in my living room although now I have all sorts of things I want to do to spruce up the area. The oatmeal color clashed with my grey rug so I need to find a different rug to go in the room. Also my old coffee table is long and narrow which looks strange in the space so I need to find a replacement for that, too. I'd also like to change the wall color, paint the trim white and a few other little things.

One thing about Super Couch that is not super is that it came with a bunch (eleven!) of ugly throw pillows. The striped ones don't look too bad from afar but when you get close they are actually purple, magenta and lime green. I simply have no words for the red, purple and grey brush stroke pillows. Frank said that they looked like they belonged to a pimp from the nineties which is not exactly the look I am going for. Luckily, the covers are removable so I plan to save the pillow forms and make some new covers. It will give me a good excuse to break out my sewing machine.

So there's my long winded saga of Super Couch and its illustrious predecessors. Have you bought any furniture recently? Have you ever used fabric dyes on a slip cover? What is your favorite furniture purchase? Have you ever been the beneficiary of unwanted ugly throw pillows?

Monday
Jul022012

Living Room Side Table Makeover

On Saturday I dropped off two donation boxes at the Ann Arbor ReUse Center full of household goods that I had purged from my home. While I was there I couldn't resist looking around a bit and I picked up a cute but very battered little end table for $5.

I have wanted a table to go on the end of my love seat in my living room for a while, but I needed something with a small footprint since I don't have much space. I think the little table I found was meant to be a plant stand but it is just the right size for my purposes. The height is great and now I have a spot for guests to place a drink when I am entertaining at my home.

The table was sturdy and the wood was in good shape, but the cream paint finish was grungy and quite poorly applied. I cleaned up the table and gave it a coat of spray primer followed by two light coats of spray paint in Spring Sprout.

Once I let the table dry for a day I decided to add some paper to the bottom shelf for fun. I measured the shelf and then cut a piece of teal chevron scrapbook paper down to a square of the right size. The shelf attaches to the legs at an angle so I needed to trim off the corners to make the paper fit. I placed the paper on the shelf and then folded the paper up where it hit the leg. This gave me a guideline for trimming the corners and ensured a perfect fit.

I think that the table turned out really cute and I can't beat the price of less than $11 ($5 table + $4.98 spray paint + $0.89 paper). It looks really bright and cheerful now.

The table fits wonderfully next to my love seat. I thought that the little shelf would be the perfect place to display the vintage camera that I picked up at a little flea market in Shanghai, China. It isn't in working order but when I saw it I couldn't resist buying it, loving taking photos as much as I do. My favorite part about it is that it actually has markings on it indicating that it was manufactured in Shanghai. 

Have you made over anything recently? Are you up to any spray painting? I think I must spray paint something once a week. It's a compulsion I tell you!

This post is linked to the "Thrift It Challenge" on Our Fifth House.