Welcome

My name is Lisa and I'm a crafty girl with wanderlust working as an engineer by day. My blog chronicles projects in my home as well as pictures and stories from my travels.

Search


Instagram

Blog Index
The journal that this archive was targeting has been deleted. Please update your configuration.
Navigation

Entries in Sewing (19)

Sunday
Feb122012

Fabric Organization for My Craft Room

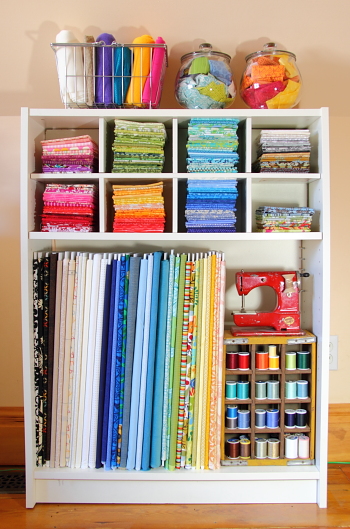
My fabric stash in my craft room had gotten completely out of control so I decided that I needed to do something about it. Because my plan is to someday build myself a fabric armoire I didn't want to spend much on this project since it isn't a long term solution for me. I already had this white Billy bookcase with a CD insert from IKEA that I had purchased nearly ten years ago for almost nothing in the As-Is section. By moving the CD insert to the top shelf and removing the bottom shelf I thought I could turn the bookcase into some functional fabric storage.

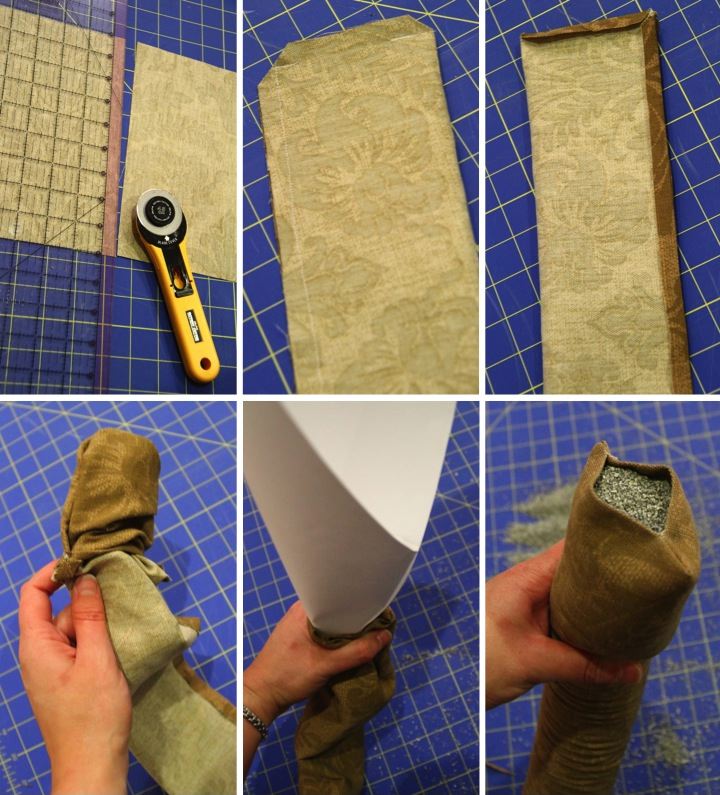
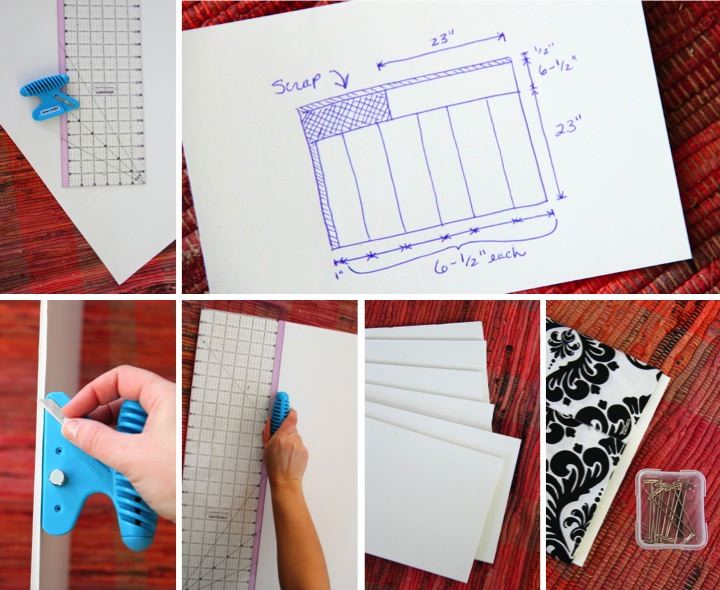
To organize my fabric that is at least 1/2 yard I made my own fabric bolts out of foam board. I decided to make the bolts 6-1/2" x 23" for a few reasons. 23" height allows for easy storage of 45" fabric folded in half plus it was short enough to just fit under the CD insert on the bookshelf. 6-1/2"depth fit nicely on the shelf and worked out well for maximizing the number of bolts (seven) that I would get out of a piece of 30" x 40" foam board. 

To start making the bolts I adjusted my foam board cutter's cutting depth so it was just longer than the depth of my foam board. When I cut foam board I do it in top of an old ratty rug that I don't mind getting torn up a bit from the cutter. I actually keep the rug solely for the purpose of cutting things on it. 

Using my quilting ruler as a guide I cut my bolts out of 30" x 40" foam board per the diagram I drew out. I made a 23" cut across the board lengthwise and then cut the piece into 6-1/2" strips. The leftover top piece was enough to cut one more 6-1/2" x 23" bolt. After cutting my bolts I wrapped my fabric around them and secured the edge with a T pin. 

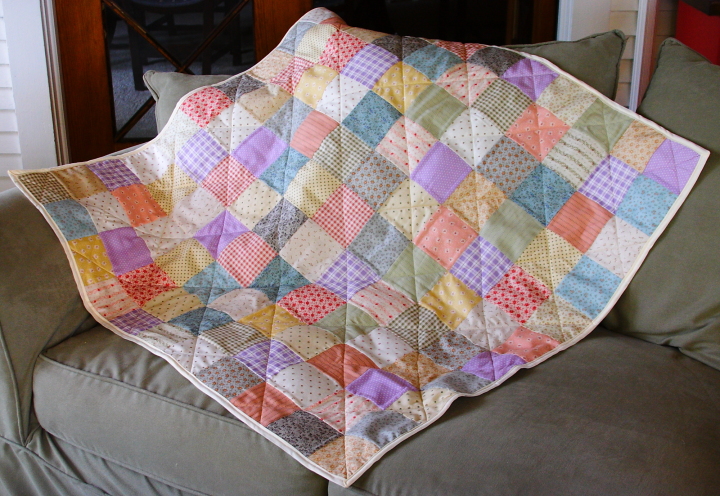
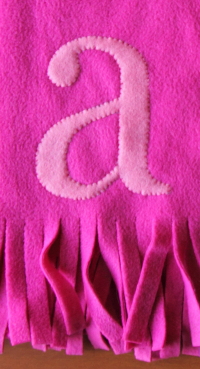
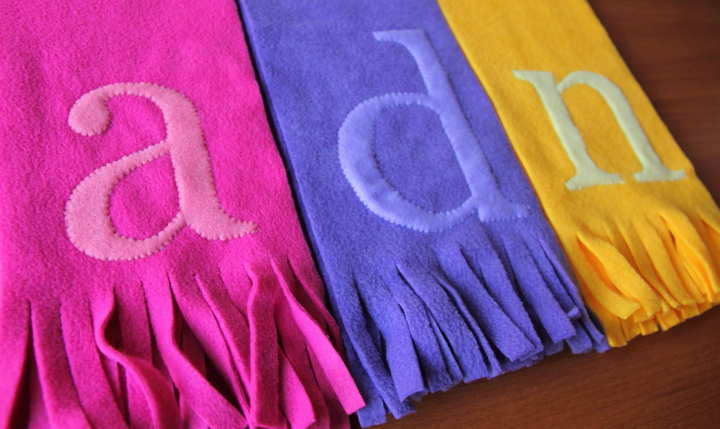
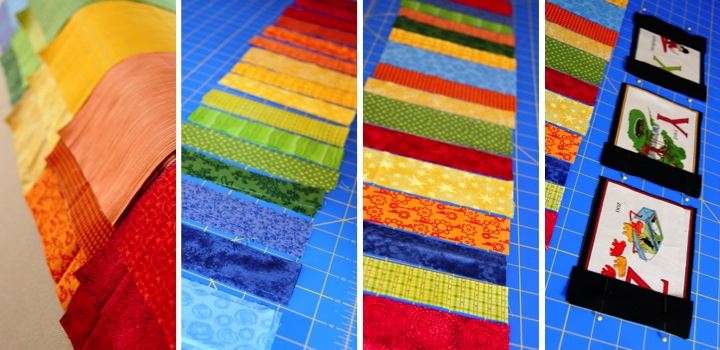
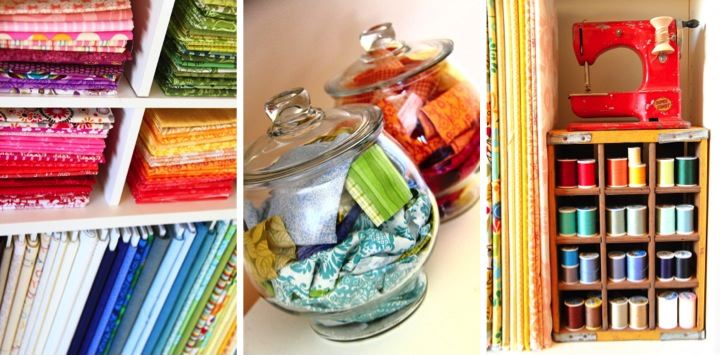
After getting my larger pieces of fabric wrapped onto my foam board bolts it was time to start organizing the rest of my fabric. The CD insert was the perfect place for storing my fat quarters and I put small fabric scraps sorted by warm and cool hues in some glass jars that I already owned. Larger, bulky fabric scraps (like the fleece left over from my DIY laptop sleeve and the fleece monogrammed scarves I made) got organized into a wire basket that I had. I put my bolts of fabric in the bottom of the bookshelf and since I had a little room left over I also squeezed in an old soda Coca-Cola crate that I bought in Japan. The crate was the perfect size for organizing my thread and on top for fun I put an antique children's sewing that I picked up in Notting Hill in London.

I'm really happy that I was able to make some sort of sense out of my fabric stash and now that I can see everything easily I'll be more likely to use what I have on hand. I'm also glad that apart from spending about $25 for foam board I already had everything else making this an inexpensive organization project. 

How do you keep your fabric stash under control? Do you have a good organization method?

Friday
Feb032012

Soo Line Fleece Blanket for Grandpa

My grandpa grew up near a railway line in North Dakota and ever since he has loved trains and especially anything to do with the Soo Line. As a boy he would love watching the trains barrel by and the highlight of every summer was his annual trip to his grandmother's house when he would get to actually ride the train himself.

He is always tough to find presents for so for his birthday a few years back I decided to make him a fleece blanket with the Soo Line logo on it. I cut out the logo out of white fleece and then sewed it onto a large rectangle of red fleece. I then layered the red fleece on top of a rectangle of white fleece of the same size. Using my rotary cutter I cut 4" slits through both layers of fabric at 1" intervals all around the perimeter of the blanket. After knotting the red and white strips together the blanket was complete.

The blanket was super easy to make and my grandpa loved it. To this day he enjoys using it for his afternoon naps which makes me happy. It's my favorite gift that I've given him.

Tuesday
Jan242012

DIY Laptop Sleeve

This past fall my little netbook starting acting up and having troubles so I decided to splurge and buy myself a MacBook Air. I absolutely love how light and fast it is and although I was worried about spending the money it was the right decision in the end.

Since I drag it around with me everywhere and I wanted to keep its case shiny and new looking I decided to make a sleeve for it. In order to give it a little padding for protection I decided to use fleece for the lining and then just used a patterned cotton for the outside. 

To start I cut a piece of the fleece and of the cotton. The width of the pieces was equal to the width of my laptop plus the height of my laptop plus 1" for the seam allowance.  The length of the pieces was equal to the twice the length of my laptop plus the height of my laptop plus 3" for the overlapping flap and seam allowance. My laptop is 9" x 13" x 1/2" so that meant my pieces were 10-1/2" wide (9" + 1/2" + 1") and 29-1/2" long (26" + 1/2" + 3").

Before assembling the sleeve I decided that I wanted to put a pocket on the front of the sleeve to hold a few small items like my iPhone connector and my USB to LAN connector. To make the pocket I cut a piece of the fleece that was 7" x 8". I wanted the pattern on my pocket to line up with the pattern on the sleeve so I found a section of the fabric remnant that matched up, cut it out, and lined it up on top of the sleeve so that the patterns matched. I then put the 7" x 8" piece of fleece (right side down) on the spot where I wanted the pocket to be and then pinned the top of it so it went through the pocket cotton but not the sleeve cotton. Unfortunately it is hard to see what I did in the pictures I took since the patterns are lined up.

I carefully removed the pocket cotton and fleece and then (while it was still pinned) trimmed the pocket cotton so that along the top of the pocket it was flush with the fleece and around the other three edges it was 3/8" wider than the fleece. I sewed a 1/2" seam across the top of the pocket and then flipped it right side out. Next I clipped the bottom corners of the cotton and then ironed them over the edge of the fleece. 

Now that the pocket was made it was time to attach it to the sleeve. I lined it up so the patterns matched and then sewed along the side and bottom at 1/2" and then 1/8" from the edge. I did this for two reasons. First, having double stitching would make the pocket sturdier. Second, the raw edge of the cotton that I had ironed over would be between the two rows of stitching so I would have clean look inside the pocket.

With the pocket attached I started working on assembling the sleeve. With right sides together I folded up the bottom 12" (length of my laptop minus 1") of the cotton, pinned it along the sides, sewed it with a 1/2" seam and then clipped the corners. I repeated the same thing with the fleece but because it was so bulky I also clipped down the seam allowance. I then did a dry fit to see how things were working out by turning the cotton right side out, placing the fleece lining inside and checking the fit with my laptop.

I wanted to make the overlapping flap rounded so while I had everything together I cut a curve through both layers of the flap and a scallop across the top of the opening. I then pulled apart the fleece from the cotton, pinned the right sides of the flap together and sewed it with a 1/2" seam. I then continued pinning the right sides of the top opening together (leaving a 3" gap in the middle so I could turn everything right side out) and then sewed it with a 1/2" seam. You could pin and sew the opening and flap at the same time, but it was easier for me to do it in two steps.

With everything all sewn up I turned the sleeve right side out through the gap I had left and positioned the fleece lining inside the cotton. I then used a blind stitch to sew up the gap and I was done. 

I am happy with the results but think I need to get a button or some velcro to secure the flap. I also think that if I did it again I would make the flap a little longer. At least my laptop will be safe from scratches and dents now.

Sunday
Jan222012

DIY Draft Stopper

There are many things that I love about living in a house that is over a hundred years old, but drafts aren't one of them. With winter here I thought that making a draft stopper for my front door would help keep a bit of the chill out of the house.

To start I used my rotary cutter to trim some fabric to 9" wide and a few inches wider than my door frame. I used outdoor fabric because I wanted something durable and I chose a subtle pattern that I thought would be fun but not too distracting in my entryway.

I folded the fabric lengthwise with right sides together and then sewed it shut, leaving a small opening at the top. I clipped the salvage at the corners, pressed open the seams and, pulling the stopper through the opening, turned it right side out. 

I chose a fine grain kitty litter to fill my draft stopper since it is heavy, compact, and inexpensive. To fill it I made a funnel with a piece of cardstock and poured the kitty litter into the stopper. I made a bit of a mess and I think if I did this again I would decant the kitty litter into something smaller, like a pitcher, to pour it into the stopper.

After filling up the draft stopper as much as I could I used a blind stitch to close up the opening and then placed it under my front door. Now my entryway is a little bit cozier.

P.S. If you are curious, the item hanging from my door knob is a wooden cow bell that I bought in Cambodia this past summer. I love the sound it makes when I open and close my front door.

Thursday
Jan192012

Baby Quilt for Carla's Little Man

I caught a bad bug this past weekend while I was working in Pasadena so since I came home on Monday evening I haven't really been feeling up to working on projects. While I am under the weather I thought I would share a baby quilt I made last year for my friend, Carla, who was my roommate my senior year in undergrad.

Carla's son's nursery was decorated with a Classic Winnie the Pooh theme complete with a mural on the wall. I used the soft yellows and browns to match for the color pallette for the quilt.

To start I cut 1-1/2" wide pieces of yellow and brown scrap fabric in lengths from 1-1/2" to 3". I then joined the pieces together to make a very long 1-1/2" wide strip. As a foundation for the blocks I cut 24 squares that were 10-1/2" x 10-1/2".

To make the quilt I needed 16 of what I'll call Block A to go around the outside of the quilt and 8 of Block B for the center of the quilt. To make Block A I lined up a ruler on the diagonal of the square and measured up 3" from one corner and marked it with a disappearing ink quilting marker. I then cut off a triangle that went through that point, saving the cut-off triangle. I reassembled the block by sewing a section of the brown and yellow strip to the block, adding the cut-off triangle back on, and them trimming the resulting block back down to 10-1/2" x 10-1/2". To make Block B I did the same thing as Block A but instead of just adding the yellow and brown stripe in across one corner I did it for two opposite corners on the block.

Once I had made all the blocks I joined them in the following rows: Row 1: A, A, A, A, A, A; Row 2: A, B, B, B, B, A; Row 3: A, B, B, B, B, A; Row 4: A, A, A, A, A, A.  In order to make the blocks form the squares you need to flip the orientation of every other block but if you lay it out it is easy to see how it works. I then joined the rows together, used some tan fabric for the back, quilted it with a straight, diagonal pattern between the squares and finally bound the edges with dark brown fabric.

Carla and her husband loved the quilt and even sent me some cute pictures of their son with the quilt in front of his Winnie the Pooh mural.

Thursday
Jan122012

Baby Quilt for Susan's Little Lady

As I am in the midst of making baby quilts for several friends (it seems I am at the age where all my girlfriends are having little ones) I started reminiscing about the first baby quilt I made which was for my friend, Susan, and I thought I would share it.

I was living in Japan at the time and was heart broken that I wouldn't be able to go to Susan's baby shower. Missing things like that was one of the toughest parts about living in Japan. 

Even though I couldn't be there she was in my thoughts and I wanted to make something special for her so I decided to try to make a quilt. I had made baby blankets before but piecing a quilt top was something new for me.

In the craft area of Jusco (Japanese store sort of like K-mart in the US) there wasn't the huge selection of fabrics like Jo-Ann's back at home but I did find a bundle of pre-cut 4" squares in pastel yellow, blue, pink, and green. Susan's daughter's room was going to be lavender so I hunted around to find a few other lavender fabrics that I could cut into additional squares to throw in the mix. 

To make the top I simple joined the 4" squares into strips and then joined the strips together. I used some of my lavender for the back, quilted it with a straight, diagonal pattern and finally bound the edges with cream fabric.

Susan's daughter is now three years old and I love that she still has the quilt in her room. Since they live in Washington DC I only get to see them about once a year or so, but it means a lot to me that she has this gift from me with her still. 


Monday
Dec192011

Monogrammed Fleece Scarves

I wanted to make something fun and personal for Frank's nieces for Christmas and I thought that fleece scarves would be cute. I made the scarves in each girl's favorite color and then appliqued each girl's first initial on the scarf.

To make the scarves I started off with a piece of fleece and used my rotary cutter and quilting ruler to cut it 6" wide and then cut 1/2" wide fringe on the ends.

For the monogram applique I printed out each girl's initial in the font Georgia and cut it out. I placed the letters right side down on a coordinating piece of felt, traced them and then cut them out.

Frank and I are heading to New York for a pre-Christmas vacation so I had plenty of time on my hands during our drive yesterday. After I had done all the cutting at home I brought the scarves with me to do the hand stitching in the car. I pinned the felt letters to the scarves and used a small stitch to applique them, hiding the tails of my thread under the letters. 

I bought the fleece when it was on sale half off and got the felt at a ¥100 shop (Japanese version of a dollar store) when I was in Japan. With the fleece, thread and felt each scarf cost under three dollars and took less than an hour to make. I am really happy with how they turned out and hope that the girls like them on Christmas.

Saturday
Dec172011

Kitschy Christmas Sweater 

Last Saturday, my friend hosted a house warming party for his new condo with an ugly Christmas sweater themed party. I was incredibly jet lagged from just returning from Japan and was not up for going out to hunt for a Christmas sweater at the local thrift stores. I knew that I couldn't show up without wearing something festive so I decided to quickly decorate a green sweater that I already had.

I wanted my sweater mod to be temporary so I decided to use some white craft felt that had a low-tack sticky backing that was easy to attach to the sweater but also easy to remove. I drew a reindeer onto the back of the felt, cut out the design, peeled off the backing and then applied it to the sweater.

The reindeer needed a little gussying up so I attached a googly eye and then safety pinned on a red pom-pom nose and white pom-pom tail. The final touch was tying a red ribbon and small bell around the reindeer's neck.

The whole effect was pretty kitschy and it fit right in with the other crazy Christmas sweaters at the party. It only took me 15 minutes to decorate the sweater for the party and then the next day I returned my sweater to normal by just peeling off the felt and unpinning the pom-poms. 

Tuesday
Nov292011

Baby Quilt for Vanessa's Little Man

When my roommate from grad school, Vanessa, had her little man I wanted to make a baby quilt for him.  Her nursery items were full of bright, vibrant colors and when I found the Punctuation Alpha Card fabric by Moda I knew it would be perfect.  

For the center of the quilt I cut out each alpha block and then pieced the blocks together with black sashing. I assembled 'D' - 'W' into a rectangle, made a strip of 'A' - 'C' and 'X' - 'Z' and then set the three pieces aside.

For the outside border of the quilt I went through my fabric stash and pulled out a bunch of bright scraps in rainbow colors. I cut each scrap to 6-1/2" and then cut strips in random widths from 1" to 2-1/2".  I arranged the strips in a random order and sewed them together. I then added a section of the border to the top of the 'A' - 'C' strip, the bottom of the 'X' - 'Z' strip, and both sides of the 'D' - 'W' rectangle.

To make the corners I made four rectangles of the colored strips 11" x 13", two with the strips going vertically and two with the strips going horizontally.  I then made a diagonal cut across each of the blocks and then reassembled the vertical strip and horizonal strip triangles to make the mitered corners.

To finish the quilt top I sewed a mitered corner block to each side of the 'A' - 'C' and 'X' - 'Z' strips and assembed the 'A' - 'C' strip,  'D' - 'W' rectangle and 'X' - 'Z' to each other.  I basted the quilt top to the batting with an alphabet print for the quilt back and then quilted it with a straight pattern.  I completed the quilt by adding black binding around the edges.

Vanessa loved the quilt and it really warmed my heart to see it in her son's nursery when I visited her in DC this past summer.  It is far from a perfect quilt with some uneven seams and stiches but it was made with love for a very special little man and his wonderful mom. 

Page 1 2