DIY Laptop Sleeve
This past fall my little netbook starting acting up and having troubles so I decided to splurge and buy myself a MacBook Air. I absolutely love how light and fast it is and although I was worried about spending the money it was the right decision in the end.

Since I drag it around with me everywhere and I wanted to keep its case shiny and new looking I decided to make a sleeve for it. In order to give it a little padding for protection I decided to use fleece for the lining and then just used a patterned cotton for the outside.
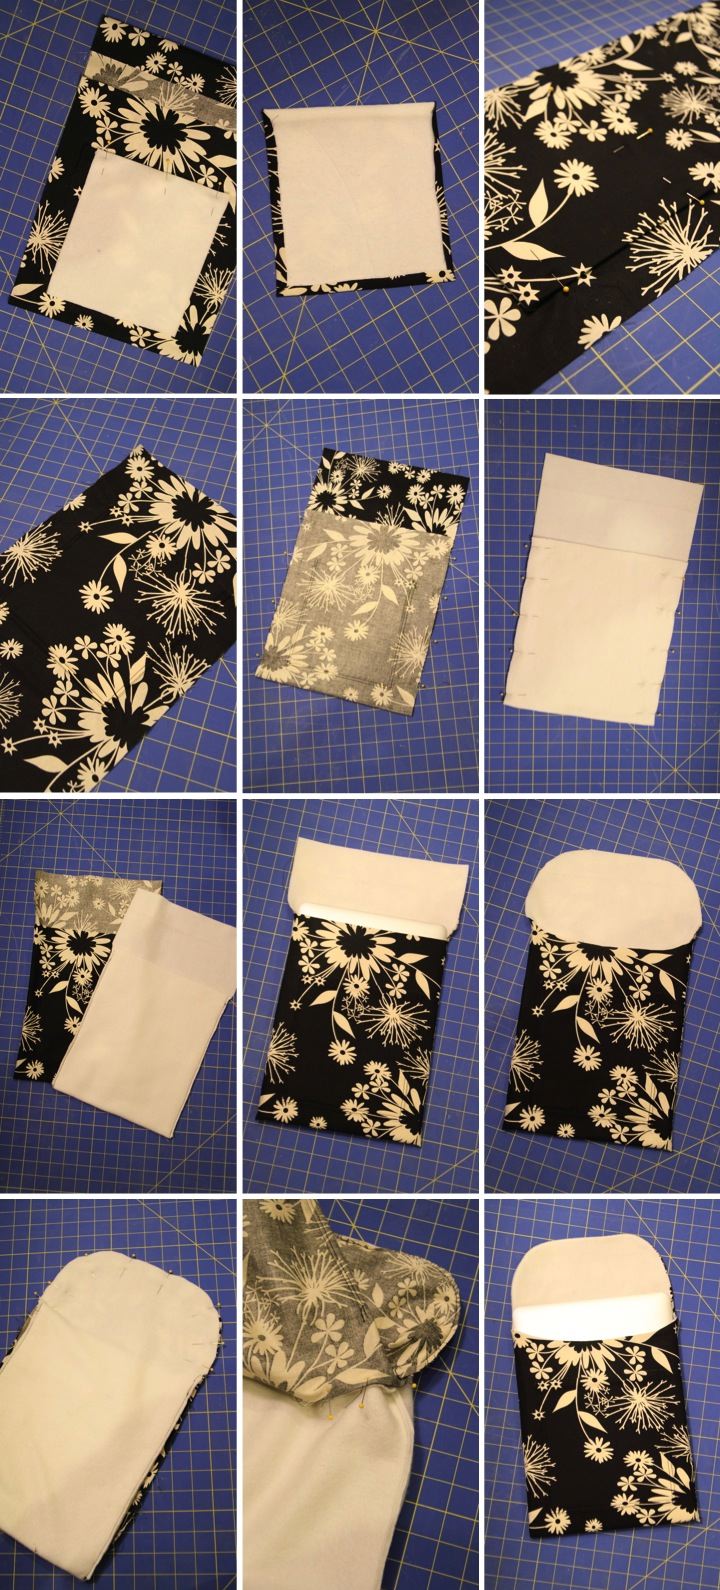
To start I cut a piece of the fleece and of the cotton. The width of the pieces was equal to the width of my laptop plus the height of my laptop plus 1" for the seam allowance. The length of the pieces was equal to the twice the length of my laptop plus the height of my laptop plus 3" for the overlapping flap and seam allowance. My laptop is 9" x 13" x 1/2" so that meant my pieces were 10-1/2" wide (9" + 1/2" + 1") and 29-1/2" long (26" + 1/2" + 3").
Before assembling the sleeve I decided that I wanted to put a pocket on the front of the sleeve to hold a few small items like my iPhone connector and my USB to LAN connector. To make the pocket I cut a piece of the fleece that was 7" x 8". I wanted the pattern on my pocket to line up with the pattern on the sleeve so I found a section of the fabric remnant that matched up, cut it out, and lined it up on top of the sleeve so that the patterns matched. I then put the 7" x 8" piece of fleece (right side down) on the spot where I wanted the pocket to be and then pinned the top of it so it went through the pocket cotton but not the sleeve cotton. Unfortunately it is hard to see what I did in the pictures I took since the patterns are lined up.
I carefully removed the pocket cotton and fleece and then (while it was still pinned) trimmed the pocket cotton so that along the top of the pocket it was flush with the fleece and around the other three edges it was 3/8" wider than the fleece. I sewed a 1/2" seam across the top of the pocket and then flipped it right side out. Next I clipped the bottom corners of the cotton and then ironed them over the edge of the fleece.
Now that the pocket was made it was time to attach it to the sleeve. I lined it up so the patterns matched and then sewed along the side and bottom at 1/2" and then 1/8" from the edge. I did this for two reasons. First, having double stitching would make the pocket sturdier. Second, the raw edge of the cotton that I had ironed over would be between the two rows of stitching so I would have clean look inside the pocket.
With the pocket attached I started working on assembling the sleeve. With right sides together I folded up the bottom 12" (length of my laptop minus 1") of the cotton, pinned it along the sides, sewed it with a 1/2" seam and then clipped the corners. I repeated the same thing with the fleece but because it was so bulky I also clipped down the seam allowance. I then did a dry fit to see how things were working out by turning the cotton right side out, placing the fleece lining inside and checking the fit with my laptop.
I wanted to make the overlapping flap rounded so while I had everything together I cut a curve through both layers of the flap and a scallop across the top of the opening. I then pulled apart the fleece from the cotton, pinned the right sides of the flap together and sewed it with a 1/2" seam. I then continued pinning the right sides of the top opening together (leaving a 3" gap in the middle so I could turn everything right side out) and then sewed it with a 1/2" seam. You could pin and sew the opening and flap at the same time, but it was easier for me to do it in two steps.
With everything all sewn up I turned the sleeve right side out through the gap I had left and positioned the fleece lining inside the cotton. I then used a blind stitch to sew up the gap and I was done.
I am happy with the results but think I need to get a button or some velcro to secure the flap. I also think that if I did it again I would make the flap a little longer. At least my laptop will be safe from scratches and dents now.


 Tuesday, January 24, 2012 at 9:03AM
Reader Comments (3)
This is a brilliant design for a laptop carry case. How padded is it. as we would need one that is padded quite well. I am keeping dropping stuff.
Thank you! The fleece lining gives it a nice cushion.
Nice thing that a laptop sleeve can be made using hands. It is good for those who doesn't have enough budget to buy a commercially produced. Also it is good for those who wants to customize the sleeve for their laptop. They can show here their creativity. Good thing that there are laptop sleeves in the market for those who doesn't have enough time to make one.