Welcome

My name is Lisa and I'm a crafty girl with wanderlust working as an engineer by day. My blog chronicles projects in my home as well as pictures and stories from my travels.

Search


Instagram

Blog Index
The journal that this archive was targeting has been deleted. Please update your configuration.
Navigation

Entries in Gifts (36)

Friday
Dec142012

Small Gift Crate

With Christmas fast approaching I am busy finishing making my holiday gifts.  As a personal touch for some of the purchased items I decided to make little crates to hold the gifts. I used 1/4" poplar craft boards and made them in about half an hour. My dimensions are to fit these spices that I bought for gifts in the Caribbean when I was visiting my sister last month, but the design is so simple that you can easily modify it to fit whatever gift you are giving. 
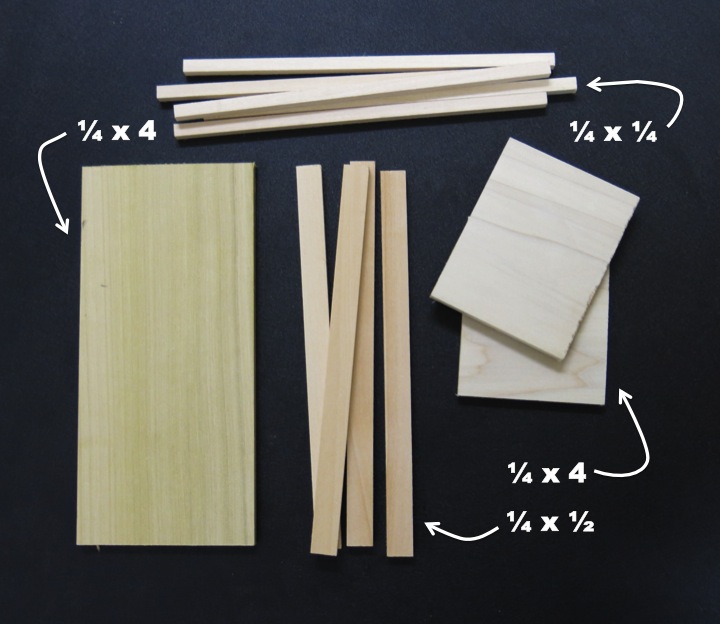
Cut List:
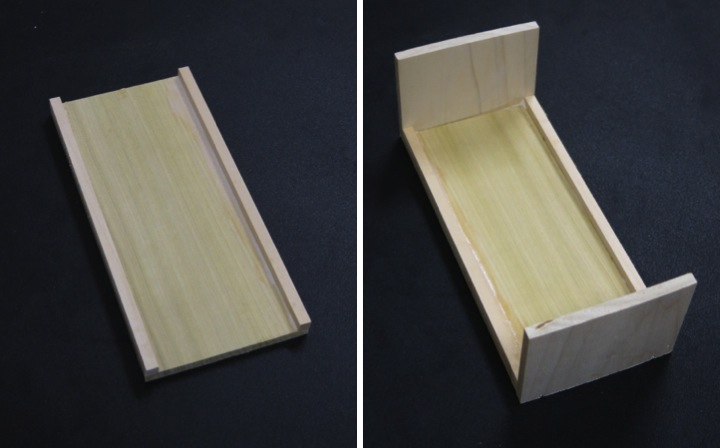
1 - 1/4x4 @ 7-1/2" for bottom
2 - 1/4x4 @ 2-3/4" for ends 
4 - 1/4x1/2 @ 7-1/2" for side slats 
6 - 1/4x1/4 @ 7-1/2" for side slats  

To start use wood glue to attach a 1/4 x 1/4 slat to each edge of the bottom piece. Next, use more glue to add both ends to the crate. 

Attach a 1/4 x 1/2 slat on each side, aligning them with the top of the ends. Fill in bothe sides with the remaining slats, putting another 1/4 x 1/2 slat centered in the middle with two more 1/4 x 1/4 slats in between.

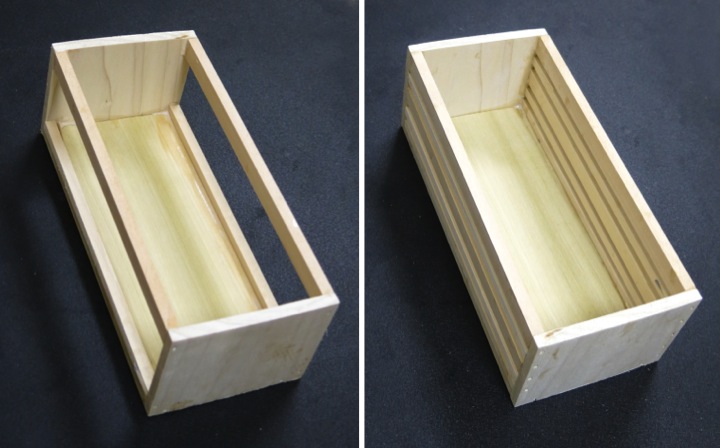
In addition to the wood glue I used my brad nailer to hold each of the slats and the ends together and make it a little sturdier. If you don't do that be sure to clamp the crate until the the glue has fully dried. 

To finish, I filled the holes with wood putty, sanded everything smooth and gave the crates a coat of navy blue spray paint.

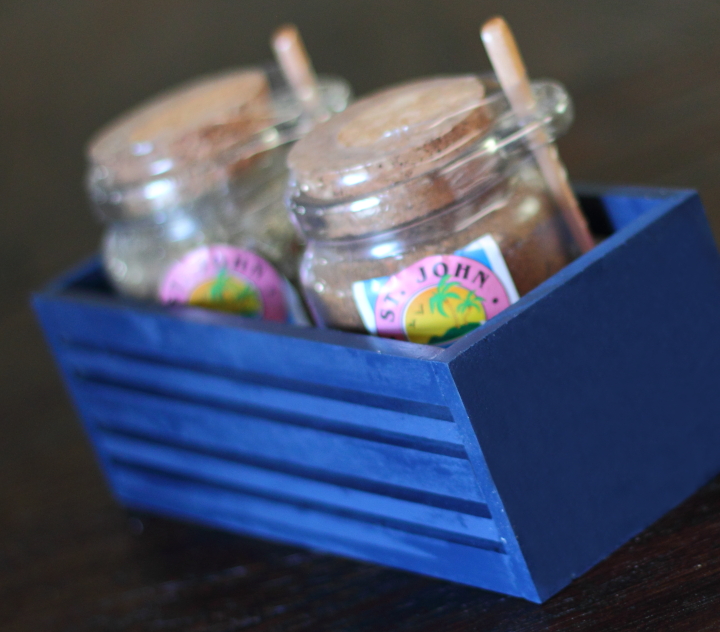
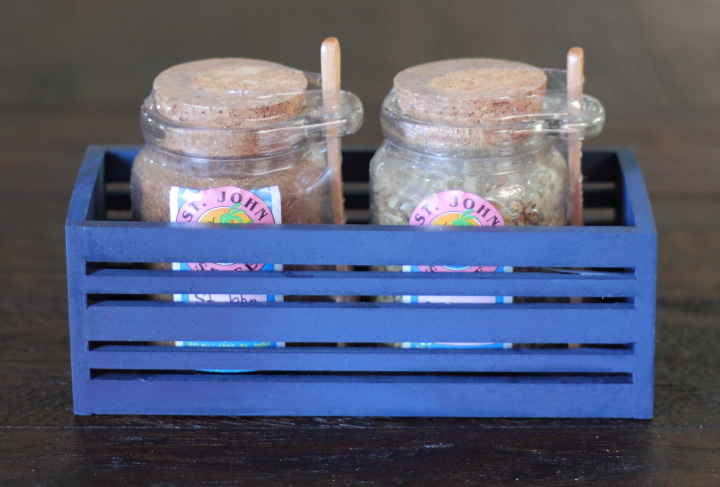
I think the crates turned out great and can be used by the recipient for small storage later. Quick, easy and cute!

Wednesday
Aug152012

Simple Flower Arrangement With Washi Tape Vase 

Yesterday I made a simple flower arrangement for someone special who is going through a tough time right now. I went to the grocery store and picked out a bunch of colorful alstroemeria and a bunch of gerbera daisies and set to work.

I started by gussying up a plain glass vase to match the flowers that I had purchased. Since the flowers were fuchsia and deep pink I picked out a few different washi tapes from my craft stash in those hues.

Starting from the bottom, I wrapped one of the washi tapes around the vase, careful to keep it straight and even. It took a little bit of effort to make sure that by the time I wrapped it around the ends would meet up.

Once the first line of tape was level it was easy to wrap the remaining tapes, using the tape below as a guideline. I left about 1/4" between each line of tape so that a bit of the stems could peek through. 

With the vase completed I started arranging the flowers. I bunched up the gerbera daisies in the center and then started adding the alstroemeria around the outside edges. I adjusted the stems until I had them the way I wanted then secured them with a rubber band and trimmed them to fit in the vase.

I think that the flower arrangement turned out fun and bright and I hope it brings some cheer to the recipient.

Sunday
Aug052012

Sharpie Train Coffee Cup For Grandpa's Birthday

My grandpa loves trains so I usually make something train related (like this Soo Line fleece blanket) for him when I give him gifts. 

This year as I was trying to figure out what to make him for his birthday I was inspired by all of the links on the internet (like here and here) about customizing ceramics by drawing on them with a black Sharpie marker and then baking them in the oven to set the design. I thought this would be a perfect technique to make a train coffee cup for my grandpa.

I brainstormed about what design I should make and decided that a cartoon aerial view of train tracks would be cute. I started by drawing a set of thin parallel lines for the tracks on the mug. At two spots I stopped and drew a series of rectangles to represent the top view of the train. I went back with a thicker black Sharpie and drew in the railroad ties over the tracks. I wanted a little color so I filled in the train cars with red, blue, green and aqua Sharpies (with the caboose being red of course!). I also added some puffy smoke coming from the train engine.

The cup still looked a little plain to me so I drew in stripes along the bottom part of the cup with the various colored Sharpies. I made a random pattern and alternated thin and thick lines.

Once I was happy with the design I popped the mug in the oven at 350° F for thirty minutes to set the design and then let it cool. The cup seems to hold up well to hand washing, but I've read that the dishwasher can cause the design to fade.

Since I free handed everything there is an inconsistent wave to some of my lines, but I like the look because it shows that it was a handmade gift. Hopefully Grandpa likes it! 

Have you tried customizing anything with a Sharpie? What did you make?

Tuesday
Jul032012

Making A Child's Apron from a Tea Towel

A special little lady that I know is turning ten so I decided to make her an apron for her birthday since she loves to cook and help out her mom in the kitchen.

As I was trying to figure out what fabric to use I happened to see this cute tea towel and I thought it would be perfect to turn into the apron. The tea towel is made from durable twill and I love the graphic silverware motif along the bottom.

I started by measuring 6" in from the top of the towel and 10" down on each side and used a disappearing ink marker to draw a line between the marks. I drew a parallel line 1" (my ribbon width plus a little extra for my seam) from the original line and then used my rotary trimmer to cut off the excess 1/2" past the second line.

I placed the tea towel right side down on my ironing board and then ironed over the edge along the outermost line. I then folded over the edge again, ironing along the inner line. I pinned it down and then sewed 7/8" of an inch from the folded edge which gave me a channel for my ribbon. I then repeated the same step for the other side. When I was finished I used some water to rinse away the marking guidelines that I had made.

I cut 7' of ribbon and threaded it from the bottom of one channel up to the top and then from the top of the other channel back down. This gave me a loop to go over the neck and then ties for around the back. I trimmed the ribbon on an angle and then used a dab of fray check to make sure it wouldn't unravel.

The measurements that I used worked for the dimensions of my tea towel and the size of the little lady I am making this for. If you are trying this, you may need to adjust according to your needs to make things proportional. Also, my ribbon is grosgrain and seems to stay in place, but if you use something more satiny that is slippery, you may want to add a stitch or two to keep the ribbon in place or knot the ends of ribbon so it doesn't slide out.

The project was really easy to make and I think it turned out cute. I hope that the birthday girl likes it!

Sunday
Jun172012

How to Wrap Gifts Like A Japanese Department Store

One of the things that I always thought was cool while living in Japan was the method that the department stores would use to wrap gifts. They wrap the gift with the paper on an angle, tucking the excess paper in as they go and the final result requires only a single piece of tape at the end. It always looks quite elegant and I would watch amazed as the department store clerks would beautifully wrap up something I bought so quickly and efficiently.

With one of my friends moving to Chicago I bought her a little book about the town as a going away gift and thought it would be fun to wrap in a Chicago map. I've been meaning to try to wrap something Japanese Department Store style and this seemed like a good opportunity.

I had seen it done a ton of times so I thought it wouldn't be hard but it is definitely a little more difficult than it looks. I tried it out with a scrap piece of paper before I wrapped it for real with the map and I am glad that I did. Getting the right angle and making sure the paper is big enough to cover your gift, but not so big that you have too much excess paper to tuck in is a little tricky. I think with a little practice it would be fairly simple to get the hang of though.

To wrap the gift place it in the bottom right corner of your paper at an angle so that you can fold a small amount of the corner of the paper over the bottom of the gift. Next, fold the paper over the right side of the gift, tucking in the excess paper at the corner so the paper lays flat.

Once you have the bottom and right side folded over, you flip the gift over itself on the table, tucking in excess paper on the right as you go. Now the gift is mostly covered with paper flaps still remaining on the left and top. Fold the left side over the gift, tucking in the excess paper and the finish by folding down the top over the gift. The wrapping paper can now be secured with a single piece of tape on the top flap. I finished my gift off by adding a handmade Bon Voyage card and some baker's twine with a bow.

I am happy at how my first try at Japanese Department Store gift wrapping came out and I'll have to try it again. If you are curious how the experts do it, here is a video of a lady slowly explaining how to wrap a gift (it's in Japanese but you can see how it is done) and here is a video of an Isetan Department Store Clerk in action wrapping a gift. Pretty neat, don't you think?

Saturday
May262012

DIY Monogrammed Cocktail Picks

Tomorrow I am attending a wedding and me being me, I just finished up making the gift today. Nothing like waiting until the last minute!

For the bride's wedding shower gift I had purchased some bar related items from the couple's wedding registry and then made white and navy drink coasters to go along. I thought it would be fun to coordinate the shower gift with the wedding gift so I bought a set of martini glasses that they had registered for and then made these navy monogrammed cocktail picks for them.

To make the cocktail picks I started by purchasing some plain, inexpensive stainless steel cocktail picks to use as my base. I cut eight small equal size pieces from some navy clay and then rolled each piece into a ball between my palms. I pushed a cocktail pick into each ball and then reshaped them to make them into flat discs. I finished them off by stamping an initial into them and then baking them in the oven per the clay manufacturer's instructions.

The cocktail picks were easy to make, but it did take me awhile to be able to stamp the clay in the center evenly. I had several at the beginning that were off kilter and that I had to reform and restamp. If you are going to try this at home, make sure to use a clay that is safe around food.

I think the picks turned out cute and I hope that the soon to be Mr. & Mrs. H enjoy them!

Friday
May042012

Spice Jar Wedding Favors

After sharing the wedding flowers I made for the small wedding reception for my friends, Pam and Pete, that I hosted at my house a few years back I thought I would also share the wedding favors.

We had Indian food catered and so I thought little jars of curry powder would make a nice favor. I got little spice jars from Cost Plus World Market and filled them with curry powder that I had bought in bulk.

To decorate the jars I made little P&P tags on my word processor, printed them out and trimmed them into squares. I punched a hole in the corner and then tied on the tags with a pumpkin colored ribbon. 

The favors were super easy to make and inexpensive, too. Everyone thought they were cute and the curry powder was a useful gift as well.

Tuesday
Apr242012

DIY Stuffed Duck

I made this little stuffed duck for a sweet young lady's sixth birthday. She loves ducks and has a stuffed duck collection so I thought that I would make her one to add to her growing flock. 

To make the little duck I started with the pattern from Martha Stewart's washcloth duckies and modified it to fit my needs. I enlarged the pattern by 400% on a photo copier, pinned the pattern to some cream colored fake fur and cut out the pieces. Later when I was piecing the duck together I found that with the pattern enlarged the oval bottom piece was way too big and I had to cut it down to a circle to make it all still work.


Duck Body Assembly

I pinned the right sides of the two duck body pieces together and sewed around the edges, leaving the bottom open. I then pinned the bottom circle to the opening of the body and sewed around the edge leaving an opening for turning. I pulled the body right side out through the opening, stuffed it using polyfill and hand stitched the opening shut. Wherever I had joined two pieces the fur was caught in the seam, so using the eye side of a needle I teased the trapped fur out which made the seam invisible.

Wing Assembly
For the wings I followed the same basic process as the body: pinned right sides together, stitched around the edge leaving a small opening, turned right side out, stuffed with filling and then hand sewed the opening shut. After finishing the wings I hand sewed them to either side of the body and then tweezed out the fur trapped in the wing seams just like I had on the body.

Final Touches
To make the duck bill I cut out an elongated oval from gold felt and then ironed it in half. I then pinned it open onto the front of the duck's head and attached it by backstitching along the iron line. I finished up the duck by sewing on black buttons for eyes.

Have you ever made any stuffed animals? How did they turn out?

Sunday
Apr222012

DIY Hunger Games Charm Bracelet

As I was trying to figure out what to get a special young lady for her thirteenth birthday I was really stumped. It's been over twenty years since I was thirteen and I have no idea what is cool for that age. I did know that she has read the The Hunger Games trilogy multiple times and had a Hunger Games themed party with her friends so I came up with the idea of making her a Hunger Games charm bracelet.

To start I bought some rectangle picture frame charms, chain and a clasp. I also found some cute little birds that looking like mockingjays but they were brass and wouldn't match the rest of the silver toned pieces I bought. I quickly fixed that with some coats of spray paint on the front and the back to turn the birds black.

To make the Hunger Games charms I downloaded pictures of the book covers from the internet and printed them out small enough to fit inside the picture frame charms. I cut them out and adhered the clear plastic that came with the charms over the little print outs. I then secured the book covers to the picture frame charms using a little dab of hot glue.

I started assembling the bracelet by putting five links in between each bird and two on the ends. The links were easy to open up using a small needle nose pliers. I added a clasp on the end of the chain and then added the book cover charms with an additional link.

I think that the bracelet is cute and I hope it is cool enough for a newly minted teenager. It would be easy to adapt to another theme and I just may have to make one of a different style for myself. 

Friday
Apr202012

DIY Mother's Day Fruit Soaps

I just booked a flight to head down to my grandparent's place in Florida for Mother's Day which has prompted me to start brainstorming about what to make this year for gifts.

Last year for Mother's Day I decided to make some fruit soaps for the special ladies in my life. I bought some square molds and tried the soap instructions from the April 2011 Martha Stewart Living. I decided to make lemon, orange, strawberry and raspberry. The instructions were clear and the soaps were easy to make but I found that they darkened up a lot as the fruit purees sat in the warm soap. If you try this, less is better when you add the fruit purees. You can see in my picture that the raspberry soap on the bottom turned out a really deep burgundy color.

After the soaps cooled I popped them out of the molds and stacked them with squares of vellum between each soap. To package the soaps I wrapped a strip of vellum around each stack, trimming the ends with scalloped scissors. I threaded white paper flowers on small yellow brads and used them to secure the vellum. To finish I wrote "Happy Mother's Day" with a white gel pen on strips of cranberry cardstock and tucked them behind the flowers. 

The soaps were a big hit with everyone and something I may make again for myself sometime.

Are you making any gifts for Mother's Day this year? What are you going to do to celebrate?