Welcome

My name is Lisa and I'm a crafty girl with wanderlust working as an engineer by day. My blog chronicles projects in my home as well as pictures and stories from my travels.

Search


Instagram

Blog Index
The journal that this archive was targeting has been deleted. Please update your configuration.
Navigation

Entries in Gifts (36)

Monday
Dec192011

Monogrammed Fleece Scarves

I wanted to make something fun and personal for Frank's nieces for Christmas and I thought that fleece scarves would be cute. I made the scarves in each girl's favorite color and then appliqued each girl's first initial on the scarf.
To make the scarves I started off with a piece of fleece and used my rotary cutter and quilting ruler to cut it 6" wide and then cut 1/2" wide fringe on the ends.

For the monogram applique I printed out each girl's initial in the font Georgia and cut it out. I placed the letters right side down on a coordinating piece of felt, traced them and then cut them out.

Frank and I are heading to New York for a pre-Christmas vacation so I had plenty of time on my hands during our drive yesterday. After I had done all the cutting at home I brought the scarves with me to do the hand stitching in the car. I pinned the felt letters to the scarves and used a small stitch to applique them, hiding the tails of my thread under the letters. 

I bought the fleece when it was on sale half off and got the felt at a ¥100 shop (Japanese version of a dollar store) when I was in Japan. With the fleece, thread and felt each scarf cost under three dollars and took less than an hour to make. I am really happy with how they turned out and hope that the girls like them on Christmas.

Sunday
Dec112011

Hand Rubbed Sage Holiday Gifts

With two weeks until Christmas I've been in full swing with holiday preparations. I thought I would share a holiday gift that I made for some friends and family last year.

At the end of the summer I had huge quantities of sage left in my garden. I didn't want it to go to waste so I harvested it and dried it by hanging it upside down in a dry location using twine.

To turn the dried leaves into hand rubbed sage powder I placed the leaves in mesh colander with a bowl underneath.  Using my fingertips I rubbed the leaves through the collander which turned it into a fine, fluffy powder. 

For storage I found cute plastic containers at Target and filled them with the hand rubbed sage.

To make the labels I used a picture of sage from my garden as a background. I added "sage" and "from Lisa's garden" using word art and then printed it out of matte photo paper. I trimmed the prints into circles and attached the labels to the containers with craft glue. 

The sage containers went over well with the recipients and it turned out to be a great way to use up my over abundant supply of sage before the frost set in.

Wednesday
Dec072011

Wedding Album for Ryan & Tsukasa

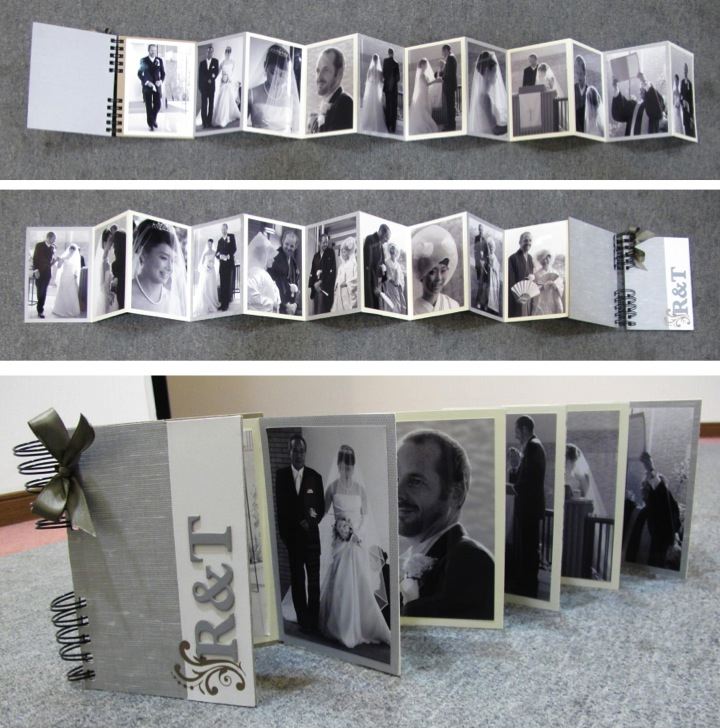
At the end of this summer two of my friends from my time living in Japan, Ryan and Tsukasa, got married in Nagoya and I was honored to be able to attend and be a part of their special day. Being back in Japan this week was the first time I've been able to see them since they were married and have a chance to give them this this album I made with pictures I took at their wedding.

To create the album I started with a small album that had a chipboard cover and 4-1/2" x 6-1/2" accordian pages. I removed the rings from the covers and adhered grey patterned paper to each side using an X-acto knife to cut out the holes for the rings. I reassembled the album and tied a dark grey bow of satin ribbon to the rings.

To decorate the front cover I added a strip of white pearlescent paper and finished it with a rub-on swirl embellishment and Ryan and Tsukasa's initials in grey chipboard.

For the inside of the album I wanted to keep it simple to keep the focus on the photographs so I just added grey patterned paper to every two or three pages. After adding the pictures the album was complete.

I am so happy for Ryan and Tsukasa and I hope that they have many years of happiness and joy ahead of them. 

Tuesday
Nov292011

Baby Quilt for Vanessa's Little Man

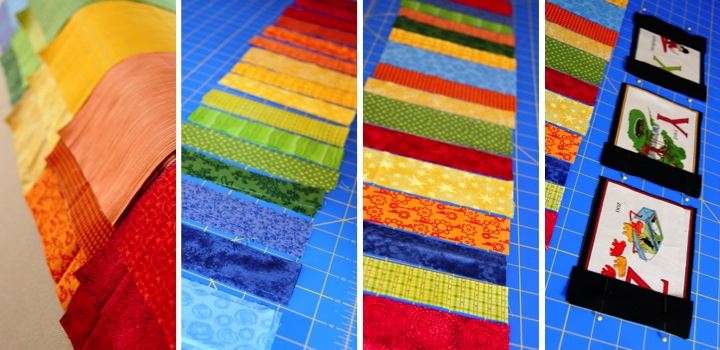
When my roommate from grad school, Vanessa, had her little man I wanted to make a baby quilt for him.  Her nursery items were full of bright, vibrant colors and when I found the Punctuation Alpha Card fabric by Moda I knew it would be perfect.  

For the center of the quilt I cut out each alpha block and then pieced the blocks together with black sashing. I assembled 'D' - 'W' into a rectangle, made a strip of 'A' - 'C' and 'X' - 'Z' and then set the three pieces aside.

For the outside border of the quilt I went through my fabric stash and pulled out a bunch of bright scraps in rainbow colors. I cut each scrap to 6-1/2" and then cut strips in random widths from 1" to 2-1/2".  I arranged the strips in a random order and sewed them together. I then added a section of the border to the top of the 'A' - 'C' strip, the bottom of the 'X' - 'Z' strip, and both sides of the 'D' - 'W' rectangle.

To make the corners I made four rectangles of the colored strips 11" x 13", two with the strips going vertically and two with the strips going horizontally.  I then made a diagonal cut across each of the blocks and then reassembled the vertical strip and horizonal strip triangles to make the mitered corners.

To finish the quilt top I sewed a mitered corner block to each side of the 'A' - 'C' and 'X' - 'Z' strips and assembed the 'A' - 'C' strip,  'D' - 'W' rectangle and 'X' - 'Z' to each other.  I basted the quilt top to the batting with an alphabet print for the quilt back and then quilted it with a straight pattern.  I completed the quilt by adding black binding around the edges.

Vanessa loved the quilt and it really warmed my heart to see it in her son's nursery when I visited her in DC this past summer.  It is far from a perfect quilt with some uneven seams and stiches but it was made with love for a very special little man and his wonderful mom. 

Monday
Nov282011

Kitchen Island for Mom

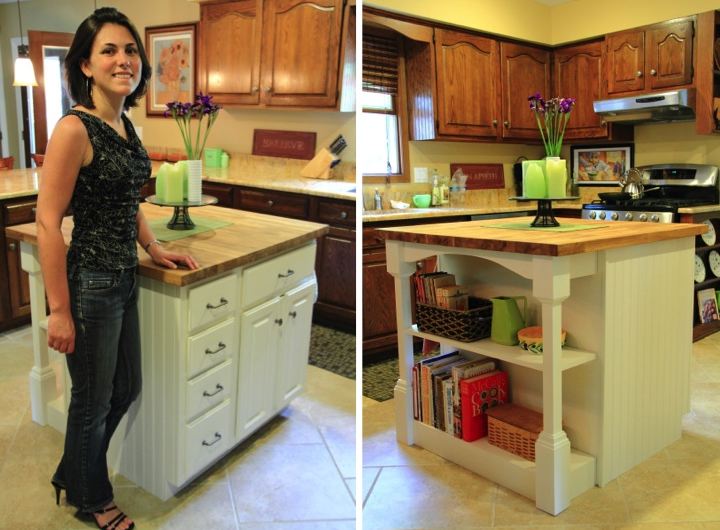
As I am getting in the swing of planning out my Christmas gifts for this year I thought I would share the gift I made for my mom for her birthday/Christmas gift last year.  She and her husband were in the final stages of remodeling their kitchen and the last item they needed was a kitchen island so I decided to build it for them as a gift.  

I started by repurposing two old cabinets as the foundation for the island. They were different depths so I build out a frame to make it square and then boxed the cabinets in with a sturdy piece of plywood on the back and beadboard on the sides. The hinges to the doors from the cabinet were removed and retrofitted with a rev-a-shelf to allow for easy access to a pull out a garbage and recycling bin.

On the backside I came up with the idea of making an open bookshelf for my mom to store her cookbooks and other knick-knacks since she already had plenty of seating in her kitchen. I made the posts by taking 2x2s and wrapping them with 1x6s (for the top), 1x10s (for the bottom) and some scrap molding. For the shelf I screwed a ledge into the back of the plywood and attached it to the posts using my Kreg Jig.

To finish it off the holes were patched with wood filler and sanded down.  With a few coats of white paint and new hardware it was almost complete.  For the top my mom wanted butcher block, so she had a piece of the Ikea Numerar in oak cut to size (I got the leftover scrap for a project for my kitchen) and mounted that for the countertop. 

Along the way I wasn't sure if it would come together well and there were a number of frustrating times (including a chop saw that wasn't cutting square and a wrong molding cut that almost made me run short on molding to wrap the posts) but the end product turned out nicely. My mom and her husband are happy with it and that is what is most important to me.

Wednesday
Nov232011

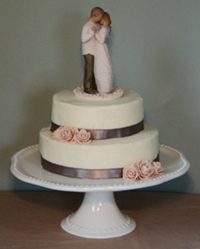
A Wedding Cake for Tammy and Drue

Earlier this month I had the honor of making a wedding cake for my friends, Tammy and Drue.  At their request the cake is a yellow cake with buttercream icing.  

Tammy's only guidance about the cake design was that she wanted to use the Willow Tree Promise Cake Topper since she collects Willow Tree figures to commemorate important events in her life.  Using the cake topper as inspiration I made fondant roses to match the base of the topper and paired them with ribbon wrapped around the base of each layer.  

This was my first time using ribbon on a cake and I found that even though the ribbon was double-sided, grease from the icing was bleeding through the ribbon.  I removed the ribbon and started again by ironing freezer paper onto the back of a new piece of ribbon before putting it on the cake.  The freezer paper provided a barrier that seemed to work well and kept the ribbon looking fresh and pretty.

I feel lucky that I had a small part in Tammy and Drue's special day and I wish them all the best as they embark on married life together.

Page 1 ... 1 2 3 4