Welcome

My name is Lisa and I'm a crafty girl with wanderlust working as an engineer by day. My blog chronicles projects in my home as well as pictures and stories from my travels.

Search


Instagram

Blog Index
The journal that this archive was targeting has been deleted. Please update your configuration.
Navigation

Entries in Renovations (53)

Monday
Dec102012

Not At Work Today

I'm not at work today. I'm also not going to work tomorrow or the day after that. In fact, I'm not going back to work until January 3. 

My company doesn't allow people to carry their vacation over from year to year. I had two weeks of vacation left followed by my company's holiday shutdown which leaves me with a nice three and a half week break from work. After putting in a lot of very long hours in the past few months this break sounds like heaven to me.

I've got some wonderful relaxing plans for my time off that I am looking forward to. This past weekend started off my break with a trip to Amelia Island, Florida for the wedding of one of Frank's college friends, Cindy. The picture at the top of this post was the amazing view from our room. It was a truly beautiful event and I will have to share some of the details later.

This week I am at home and plan to work on finishing up making my Christmas presents. Making presents is one of my favorite things to do and I am happy that I will have a solid week to have fun with it. After that I am hoping to have a little time left over to get some more cleaning and organizing done in my craft room and maybe even tackle building the bench in my mudroom. It still looks no different than when I finished building the shelf back in August.

Next week, Frank and I are off to Cartegena, Colombia for a week of relaxing and good food before coming back home to celebrate Christmas. After that we are heading back to Florida (to Tampa this time) to watch Michigan play South Carolina in the Outback Bowl on New Year's Day. That wraps up my vacation plans and then it is back to work.

What plans do you have for the holidays? Are you traveling or staying home? Are you done with your holiday shopping or have plans to make some fun things for your loved ones?

P.S. I am still in my jammies and it is almost lunchtime. I love this! 

Tuesday
Sep182012

Projects Revisited

Recently I've been out of town a lot (for fun and for work) plus with football season starting and a visit from my sister, I haven't had much chance to work on some new projects lately. Hopefully that will change this week, but for now I thought I would give a little rundown about how some of my projects are working out for me a few weeks or months down the line.

Fabric Organization
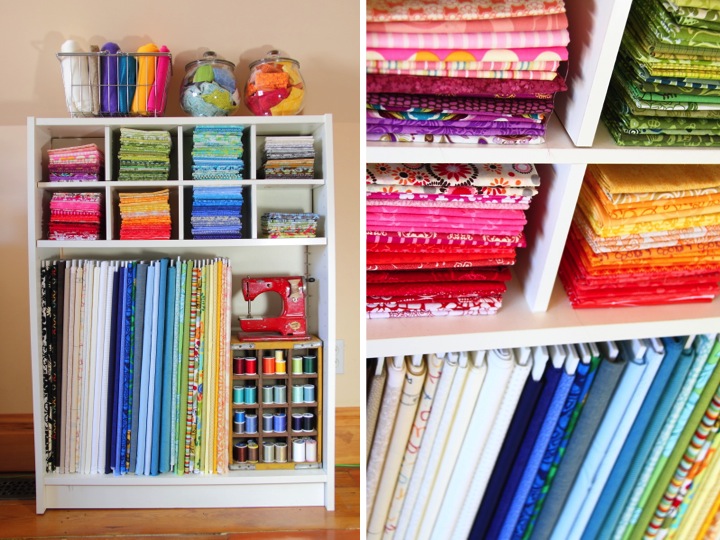
I used an Ikea Billy Bookcase with a CD insert for fabric storage in my craft room creating bolts out of foam core for the pieces that were at least half a yard long. The CD insert has the perfect sized cubbies for my fat quarters and my scraps are stored in baskets and jars I already had. I also used an antique Japanese soda crate to store my thread. I have really liked how this has turned out because it is really easy for my to see exactly what I have on hand and not have to go digging through things to find a fabric that I am looking for. My only problem is that I am starting to outgrow this solution, having acquired a few more fat quarters than will comfortably fit in my cubbies.  

Keeping Plants Watered During Vacation in the Bathtub
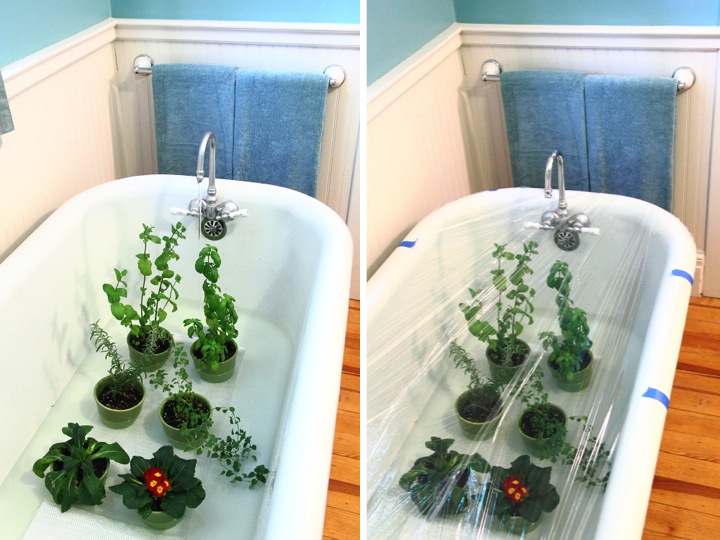
I tried a trick that I read online to keep my plants from dying while on vacation, namely putting them in the bathtub with a little water and then covering it with plastic wrap to effectively create a terrarium. I tried this while Frank and I were on vacation in Italy earlier this year. I have to say that it worked a little too well. The soil in the plants was very, very damp when I came home. Some of my plants, like the basil, did well with all the moisture but it was too much for my rosemary plant and it died. I think that I would try it again (it was definitely better than all of my plants dying while I was out of town!) but I would cut a lot more holes in the plastic wrap to let more of the water escape.

New Mailbox
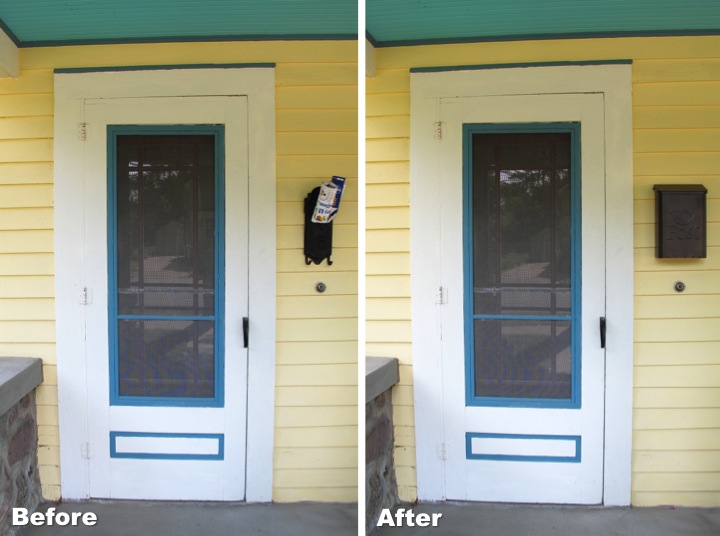
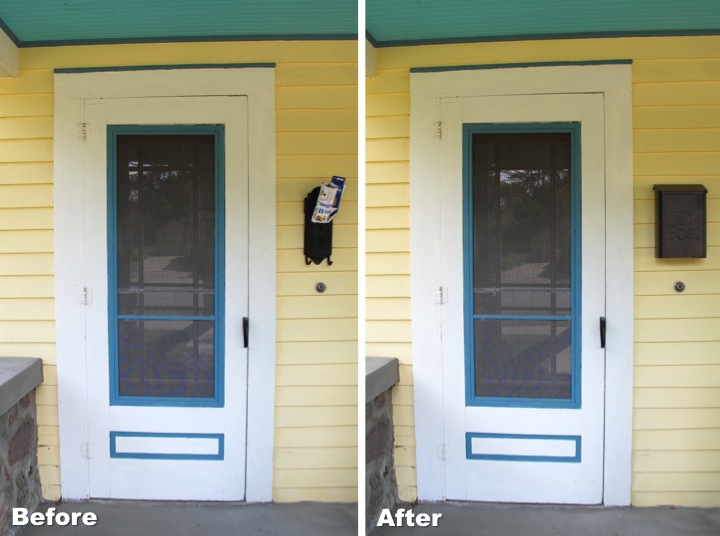
The antique cast iron mailbox that I had been using was just too small and my mail was always overflowing and getting bent when it was delivered. After hunting on eBay for a while I found a larger orange vintage mailbox that I made over with some oil rubbed bronze spray paint and hung out front. I absolutely love that my mail doesn't get squished anymore but my problem is that I am too short for it. Because of the wood siding on my house I had to hang it between the angled slats such that there is space for the lid to swing open. One slat farther down would obstruct the door bell, but where it is currently placed makes it hard for me to reach the bottom of the mailbox since it is so deep. I need to get a thin piece of wood to mount on top of the siding and then mount my mailbox on top of that to fix it, but I haven't done it yet. Once I do that I think it will be perfect. Either that or I need to grow a few inches.

New Dining Room Chairs
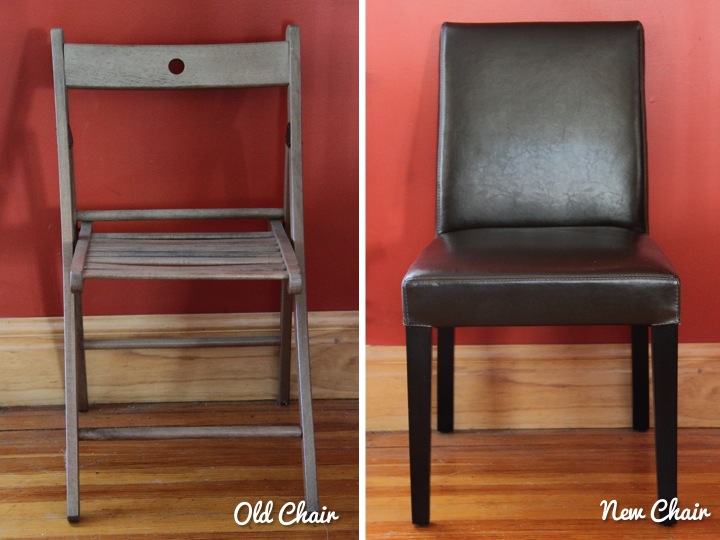
After years of using some Ikea folding chairs that had seen better days in my dining room I scored a great deal on Craigslist on a set of eight dining room chairs from Crate and Barrel for only $500. I could not be happier with the chairs. Not only were they a super fabulous deal, but they are so comfortable and I love sitting in them. They are also in fabulous shape and you can't tell that they aren't new. I can't say enough about how happy I am with this purchase. I still need to do something about making or buying a bigger table so the chairs comfortably fit, but those things take time.

Front Porch Makeover
I did a few projects on my front porch this summer to spruce it up. First up was my self watering planter. I checked the water level once a week and it worked really well until I was an idiot and went to Japan and didn't check the water level before I left. Not surprisingly, if the water reservoir is empty the self watering doesn't work. It was working really well up until then so I would definitely do it again. I also joined two rugs together using duct tape to make a runner on my porch. It has held together really well and I have had no issues with it coming apart. My other little decor items on the porch, like the house silhouette art I made and my geisha vase, have stood up well being outside with no issues or damage. The teal spray paint on my table has also held up well with no fading of the fun, bright color so far.

I could keep going but I'll stop for now. If there are any of my other projects that you would like an update on, please let me know. I'd love to share. Also, how about your projects at home? What has worked out really well for you? Has anything gone not quite as well as planned?

Friday
Sep142012

Master Bathroom Renovation Recap 

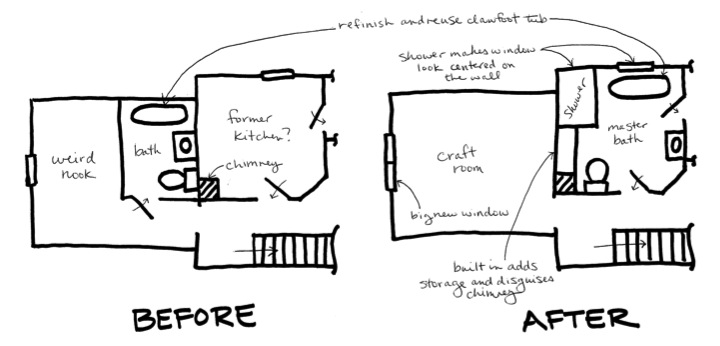
I realized that although I had finished up my master bathroom I had never put together an overall post with pictures from around the whole room. I thought I'd start by sharing the floor plan in the back portion of the upstairs when I bought the house and what I revamped it to.

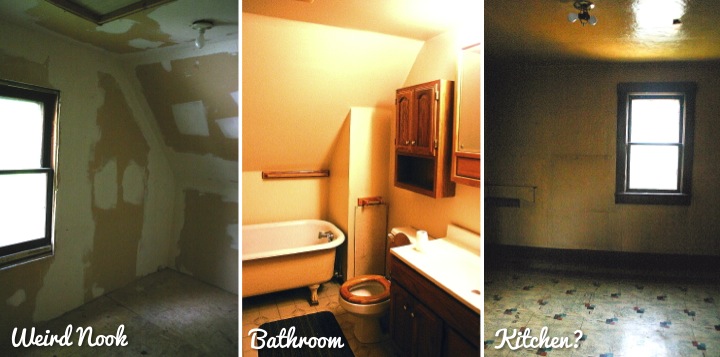
The previous owners had taken the 13-1/2' x 13-1/2' room in the back and carved out a 5' x 8' space to create a bathroom. It left a really weird nook in the rest of the space that they had drywalled but never finished. The whole thing was quite strange. The room next door was a nice size at 10' x 10' (with a little angle cut off the corner) and seemed to be used as a kitchen at some point based on pipes sticking out of the wall and some teacup wallpaper in the closet. It seemed to me that a better use of the space was to make the old kitchen room into a master bathroom which would then leave a large space in the back room for me to make a craft room.

I spent a lot of time trying to figure out how to layout the new bathroom. The window was off center in the room so by placing my shower in the corner I was able to make the window look like it was centered on the wall. Most of the old bathroom was unsalveagable but I saved the old claw foot tub and placed it under the window. In one corner of the bathroom was a bump out for the old chimney. In order to make it less pronounced looking and give myself some storage I decided to put a built in in the space between the chimney and shower. I kept the door locations the same and from there it was easy to determine the location for the toilet and sink.
Here a few pictures of the space before. Yeah, I know that it looked like a scary old haunted house and I am crazy to have bought the place. Looking back at the old pictures encourages me because it reminds me how far my house has come even though there is a lot more left to do.
Okay, now for the fun part, the after pictures. The room was gutted to the studs with new electrical, HVAC and plumbing. Putting the room back together the bathroom was drywalled and new trim was installed including beadboard wainscoting around the room. The old linoleum was torn out and the floors were refinished. Those major renovations required me to hire some professionals for some things as well as get the helping hand of a friend for some others.

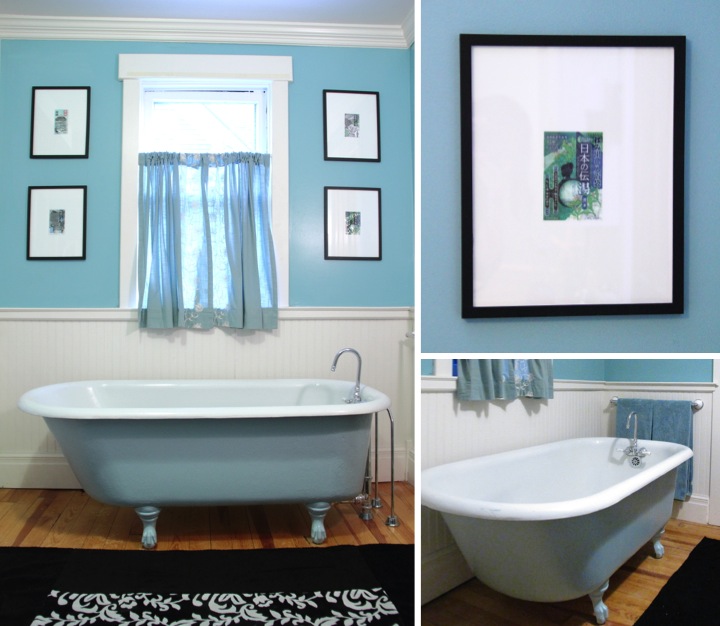
For a color scheme I thought teal and white with a few hints of black would be bright and refreshing. Since my house is over a hundred years old I wanted to keep a vintage feel to my bathroom. Also, since I lived in Japan and really enjoyed their strong culture around bathing (i.e. going to hot springs (onsen) for bathing, taking regular soaking baths at home) I included some small Japanese touches in my bathroom's decorative accents as well.

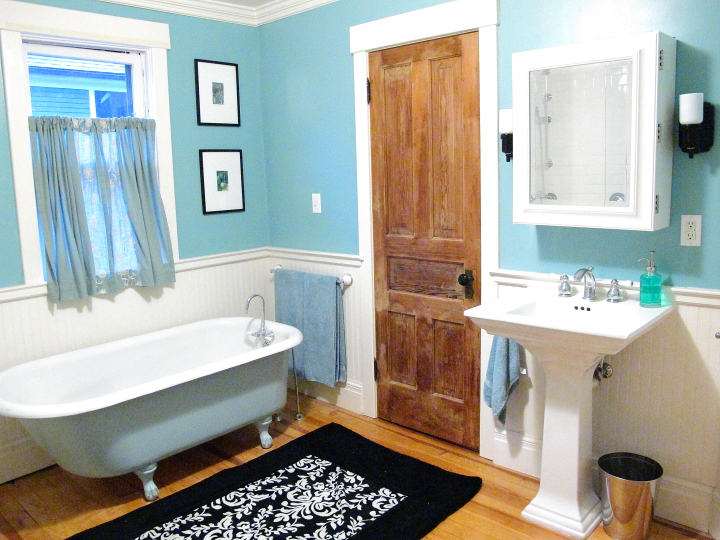
My clawfoot bathtub was salvaged from the old bathroom and while the porcelain on the inside was in great shape the outside paint was beige and chipping off. I refinished the outside with a pale teal paint and then added a new vintage style chrome faucet with white handles. On the floor in front of the bathtub I made a rug by sewing together some towels. On the walls flanking the window, I framed some pretty decorative packaging from Japanese bath salts.
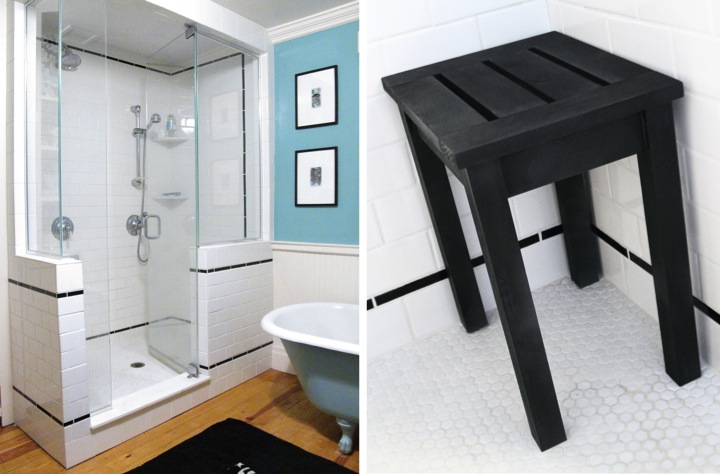
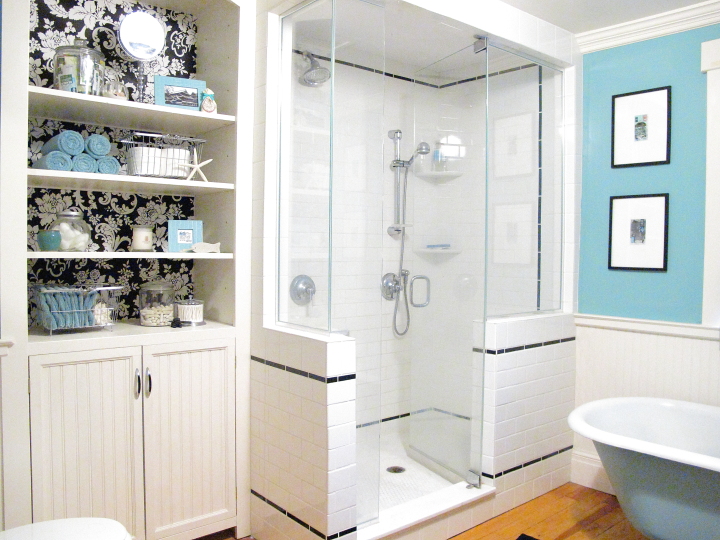
I made the shower 3 feet by 5 feet which was spacious enough for two shower heads. I also wanted it to be open so I designed it to have the knee walls with clear glass above and splurged to have custom glass installed (I think it was worth it!). With all the space in the shower I decided to build myself a little shower stool to fit in the corner.

This was my very first experience in tiling and being an engineer I was pretty anal retentive about the way I lined up the tile and wrapped the pattern around the corners. I bought a used wet tile saw from a guy off of Craig's List for $100 and it was worth every penny! I chose 3" x 6" white field tile to give a vintage subway tile look plus as an added bonus it was inexpensive. For my accent liner bars I thought that black tile was a good neutral choice so that it left me free to change up the colors in the bathroom in the future without worrying about the tile color.
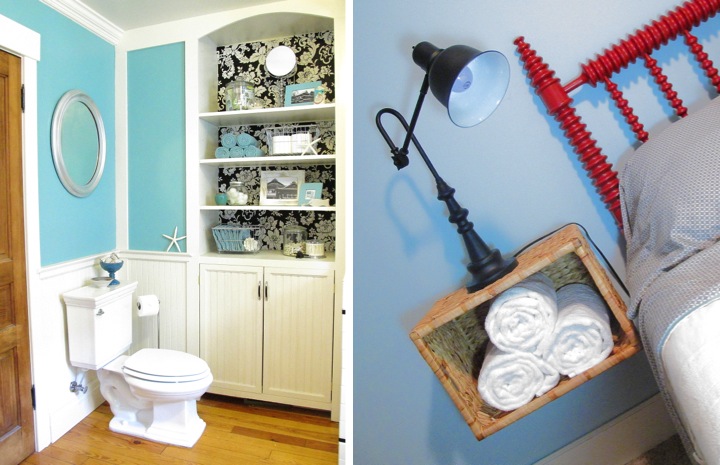
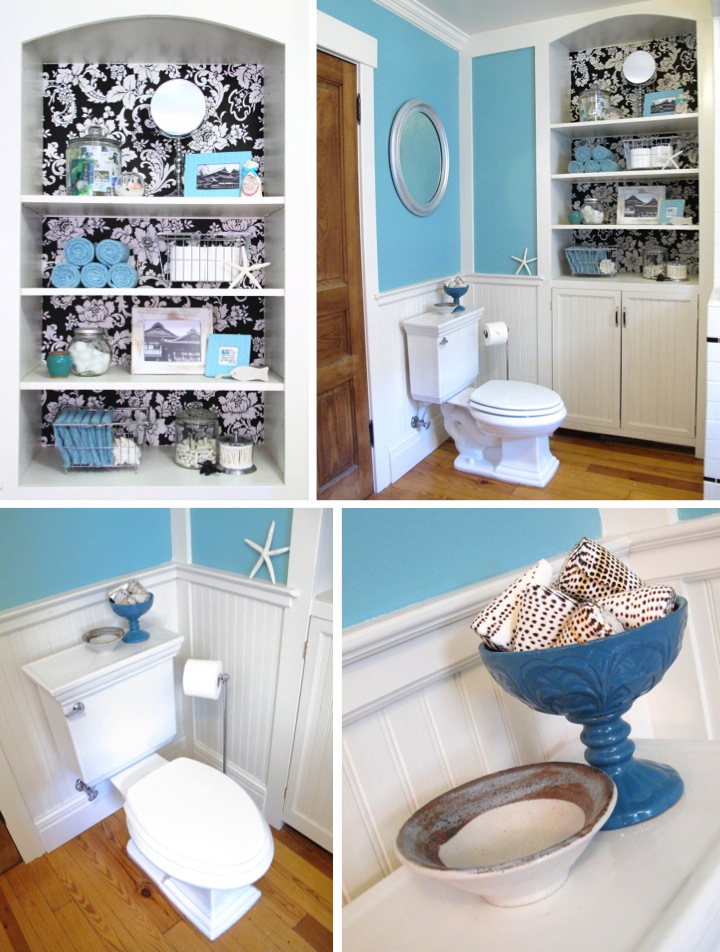
My built-in is one of my favorite parts of the room. I designed it to have open storage up top as well as some concealed storage down low. For fun I added some black and white damask patterned wallpaper to the back of the top of the built-in. I had a lot of fun arranging the shelves with practical bath items, like towels and my Japanese bath salts, and decorative items, like white coral that I picked up on a beach in the USVI and framed pictures that I took of a famous Japanese onsen. 

Above the toilet I made over a free mirror with some silver spray paint to tie in with the chrome fixtures in the room. On the back of the toilet I have displayed a little white bowl that I made at a pottery studio in Seto, a town famous in Japan for pottery. Seeing it every day brings back some good memories. Since space was tight and I didn't want to add holes to my beadboard, I chose to use a free standing toilet paper holder.
Since I had plenty of storage in the built-in I chose a pedestal sink to keep the bathroom looking open as well as maintain the vintage feel. Like the shower and tub, the new fixtures are chrome with white handles in a vintage style. I thought about building my own medicine cabinet, but then found this one at the Pottery Barn Outlet for such a great deal that I couldn't resist.

For lighting I bought a pair of black porcelain sconces that are vintage reproductions. I have a matching black porcelain ceiling fixture that I paired with a vintage glass globe that I found on eBay. I love how the globe is white on the sides and has the detailed deco pattern in the clear glass on the bottom. My ceiling fan came with a plastic vent cover that I felt didn't go with the look of the bathroom so I built my own vent cover out of wood and some perforated metal.
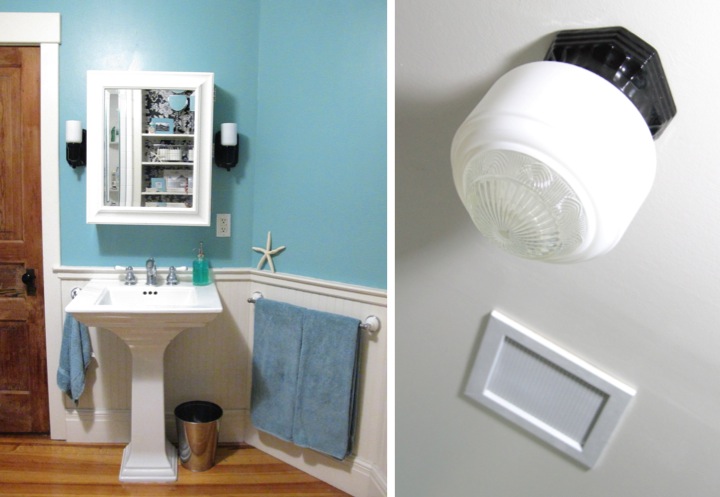
Inside my medicine cabinet I added some more wallpaper and then organized by using some inexpensive black and white cardboard containers. The bottom of my built-in was organized with some more cardboard containers and wire baskets. By nature I am not an organized person (some days Pigpen has nothing on me) and the little containers really help me to corral things and have some semblance of order. These shelves are by far the neatest area in my house right now. I really wish I was kidding but unfortunately I am not. 

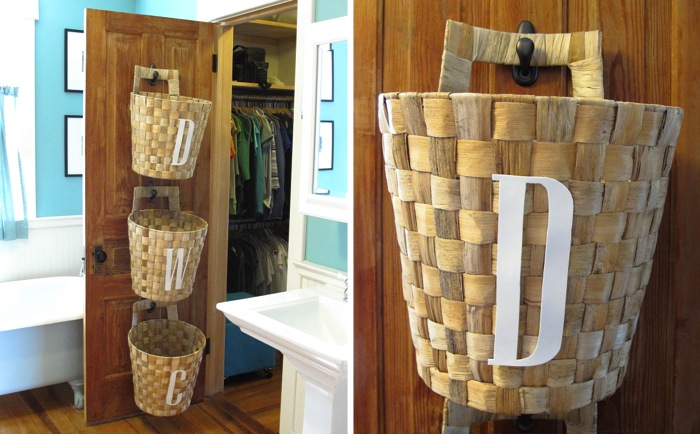
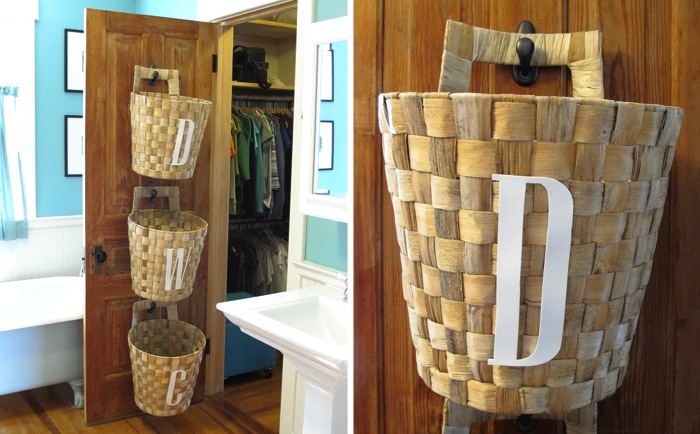
On the back of the door next to the sink (which leads to my master bedroom closet and then on to my master bedroom) I hung up and labeled baskets to sort my laundry. This has really me to keep my piles of laundry off the floor. Now when a basket is full I can just take it off the hook and down to my laundry room.
Well, there you have it, more detail than you would ever want to know about my bathroom. It has been a lot of work but I really love it and I wouldn't want to change a thing (for now that is!).
If you are curious, here is a list of sources for the room. As a disclaimer I started remodeling it back when I bought my house and many of the decorative/storage items I have had for years and years so some items are discontinued and there are a few things I where I just don't remember.

Wall Paint: Valspar Lyndhurst Duchess Blue
Trim Paint: Valspar Betsy's Linen
Bathtub Paint: Valspar Beach House
Ceiling Light Fixture: Rejuvenation Mathison Streamline Porcelain Ceiling Fixture
Ceiling Light Shade: Vintage from eBay
Sconces: Rejuvenation Adrian Streamline Wall Bracket
Shower Door: Custom by Wolverine and Moore Glass
White Shower Wall Tile: American Olean 3-in x 6-in Starting Line White Gloss Ceramic Wall Tile
Black Shower Tile: American Olean 1-in x 6-in Linea Gloss Black Ceramic Tile Liner
Shower Floor Tile: The Tile Shop Hex Matte White .75 x .75 in
Pedestal Sink: Kohler Memoirs (Base Link)
Toilet: Kohler Memoirs
Medicine Cabinet: Pottery Barn Sonoma Wall Mounted Medicine Cabinet (purchased at Pottery Barn Outlet)
Built-in Cabinet Handles: Lewis Dolin Retro Pull
Wallpaper: Norwall Black & White BK32032
Black & White Cardboard Bins: Target One Spot
Wire Baskets: Target
White Reclaimed Wood Picture Frame: Mulbury Gallery (purchased at an art fair in Australia)
Teal Leather Picture Frames: Papyrus
Black Wall Frames: Meijer
Toilet Paper Holder, Cotton Swab Container, Stand Mirror: HomeGoods
Soap Dispenser: Target
Large Starfish: Michael's
Towels: Target Room Essentials
Rug: Made from HomeGoods Towels 
Laundry Baskets: Ikea Nasum
Saturday
Sep012012

Resolution Recap: August 2012

During August I continued work on tackling my two 2012 New Year's resolutions of purging and organizing my home and finishing up some of the many projects I have going on around the house.

Despite being really ill at the beginning of this past month I managed to get a lot of things done. My purging wasn't so great but I made up for it in spades by finishing up a lot of items around the house. I think that all in all it balanced out in the end.

I'm especially excited about what I got done on my back entry during the end of this past month and hope to wrap that up project in September. I'm having a great time in Dallas (I'm here for the Michigan vs. Alabama game) right now but I also can't wait to get home and get cracking on building the bench for my back entry. 

Resolution 1: Purge & Organize
I did not come anywhere near close to my goal of having a volume of at least one trash cart (between my recycling and regular trash) out on the curb on garbage pick-up morning every Monday in August. Hopefully I am a little better in September. Here's my breakdown:

- August 6: 1/4 full trash + 1/4 full recycle = 1/2 total
- August 13: 1/2 full trash + 1/2 full recycle = 1 total
- August 20: 3/4 full trash + 1/2 full recycle = 1-1/4 total
- August 27: 1/4 full trash + 0 recycle = 1/4 total

On the organizing front I came up with a laundry sorting solution from baskets that I hung up on the back of my closet door.

Resolution 2: Finish Up Projects
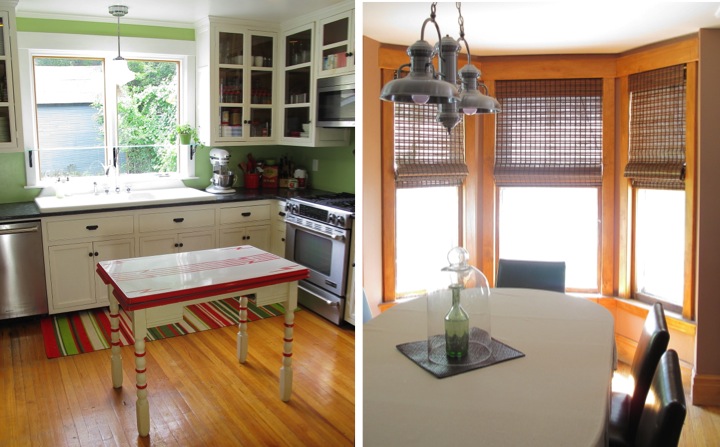
I was super productive on the projects front this month despite being really sick at the beginning of August. For my kitchen I found a vintage table to replace the island that wasn't working for me and finally hung blinds in my dining room.

In my bathroom some simple upgrades made a big difference for me. I customized a pillow for my guest room and also came up with a floating basket solution for the night stands. 

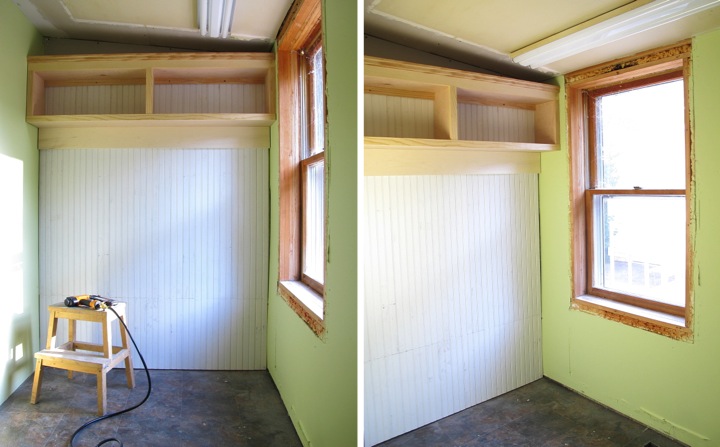
My biggest progress was in my back entry where I taped and mudded the drywall, primed, painted and hung beadboard and then built a storage shelf.

How are you coming along on your New Years Resolutions? Did you work on any home projects in August? 

Thursday
Aug302012

Building A Storage Shelf For My Back Entry

With my beadboard installed and the trim board for my hooks in place I was ready to get building. I decided to tackle the shelf first since that would be easier to install without the bench in the way.

For my shelf design I planned it together with my bench so that I could cut everything but the bench top and face framing pieces from a single piece of plywood. Also, the width of my space is a little strange and the shelf couldn't be too deep because of my window location. If you were going to make this yourself, you would need to adjust your measurements according to your space, but here was the cut list that I used.

3/4" plywood ripped to 7-7/8" wide
- 2 @ 60-1/2" (top, bottom)
- 3 @ 12" (sides, middle support)

Pine 1x2
- 1 @ 60-1/2" (bottom face frame)
- 3 @ 11-1/4" (vertical face framing)
- 2 @ 28-3/4 (shelf supports)

Pine 1x4
- 1 @ 60-1/2" (top face frame)

Pine decorative trim
- 1 @ 60-1/2" (top face frame accent) 

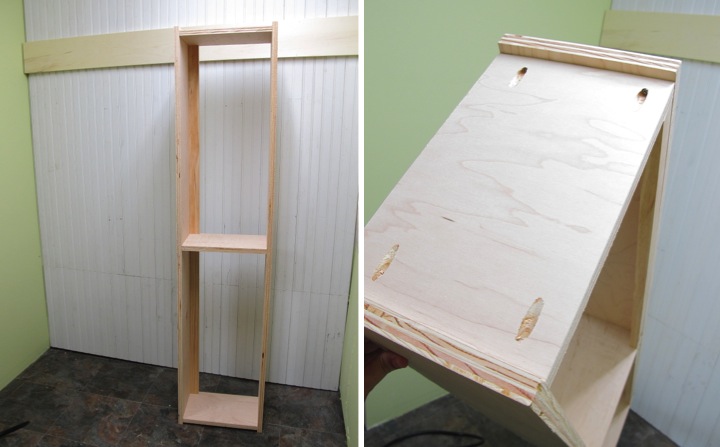
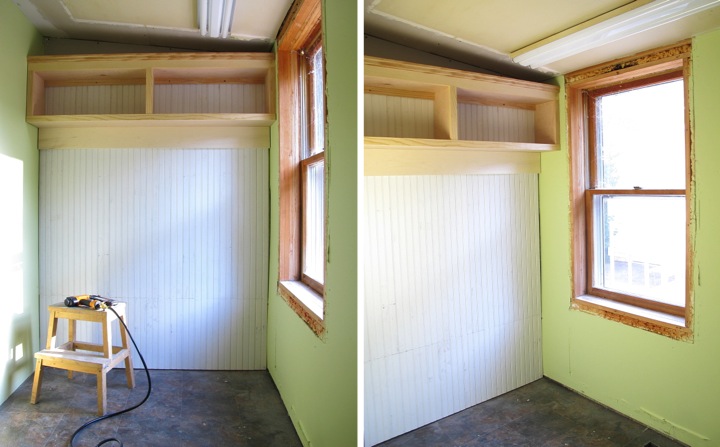
I started by making the box of my shelf out of the plywood. I countersunk screws into the top and bottom to attach the middle support. I offset the sides by 3/8" from the end so that the amount of face framing extending past the support would match the middle piece. I attached the sides using pocket holes on the outside since that wouldn't be seen.

On the back I attached 1x2 supports which help to keep the shelf square since there is no back. They also provide me with a way to attach my shelf to the wall studs.

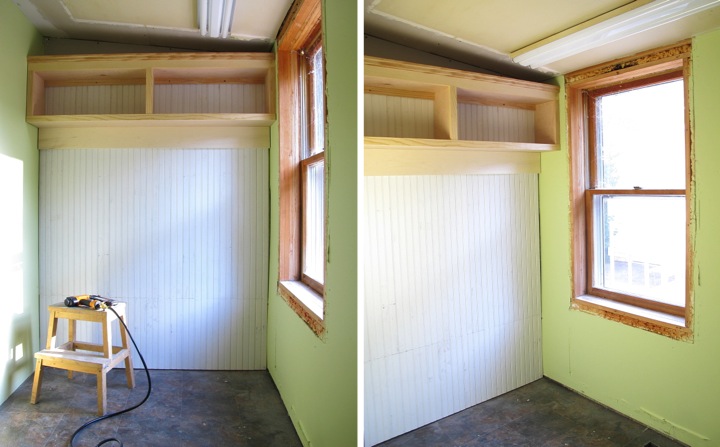
With the box built it was time to hang the shelf. Before I had installed the beadboard I wrote down the measurements of my stud locations based on where the drywall screws were located. I used a countersink bit to predrill holes in the supports in the correct locations. I just lined up the shelf along the top of the 1x6 trim piece that was already level and used 2" screws to attach the shelf to the studs.

I double checked the shelf was level and then set about framing the face. I attached the bottom first then the vertical pieces and added the 1x4 along the top last. For some added interest I also attached some trim along the top that I also plan to use for my bench.

I think the shelf turned out cute and I can't wait to prime and paint it and add the coat hooks. I plan to do the finishing work at the same time as the bench so I need to build my bench first though.

Here is where I now stand with my back entry to-do list:

- Mud, tape, and sand the seams and screw holes on the unfinished drywall
- Prime and paint walls
Back the wall with beadboard and add hooks
Build a storage shelf and install
- Build shoe bench and install 
- Paint the bench, beadboard and shelves white
- Replace light fixture
- Repair ceiling and paint
- Replace the window trim
- Add baseboards
- Sew a cushion for the bench
- Sew curtains for the window 

There is lots left to do but it feels good to be crossing some items off the list. Have you been building anything for your home lately? Did it turn out like you expected?

Tuesday
Aug282012

Painting & Installing Beadboard For My Back Entry

Picking up from where I left my back entry, on Sunday I sanded down all the mudded seams and screw holes. The trick for me to make sure it is perfectly smooth is to check it by running my hand over the wall to find any imperfections. After I was done I ran a tack cloth over the wall to remove any dust.

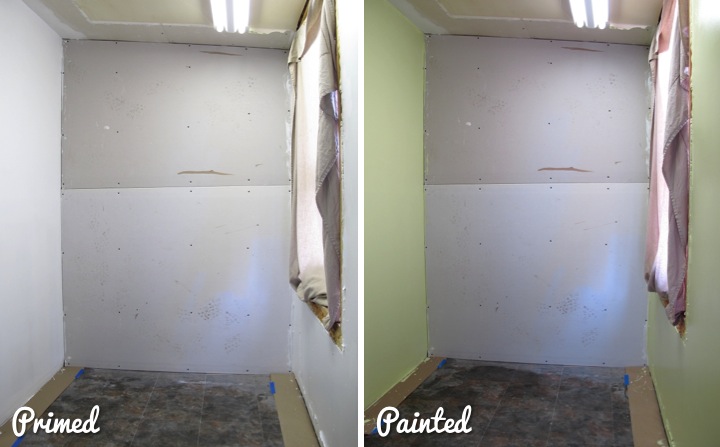
I primed the walls with Kilz and then followed up with two coats of Valspar Soothing Aloe. I really like how cheerful and bright the color is. It's a shade or two lighter than my kitchen making a nice transition between the rooms. 

I have to repair and paint the ceiling still from where I took out the soffit, but since the ceiling flows through to the laundry area which also needs some ceiling work I am going to do that all at the same time later.

On a side note, don't you just love the old tablecloth I have hanging in the window? I need something to keep the sun from beating on me while I am working back there and I don't want anything that I would care about ruining. Is it ugly? Definitely, but it is serving a needed purpose.

With the side walls painted it was time to attack the back wall. At my local Habitat for Humanity ReStore I had picked up two large bundles of primed pine beadboard for just $10 about a year ago. I knew it would be perfect for the back wall. It was a little scuffed up, but in great shape so once it is painted I think it will look great.

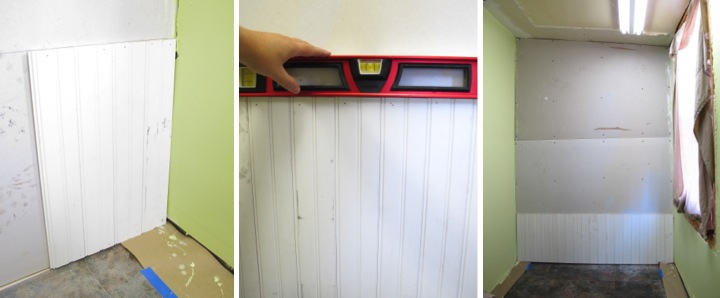
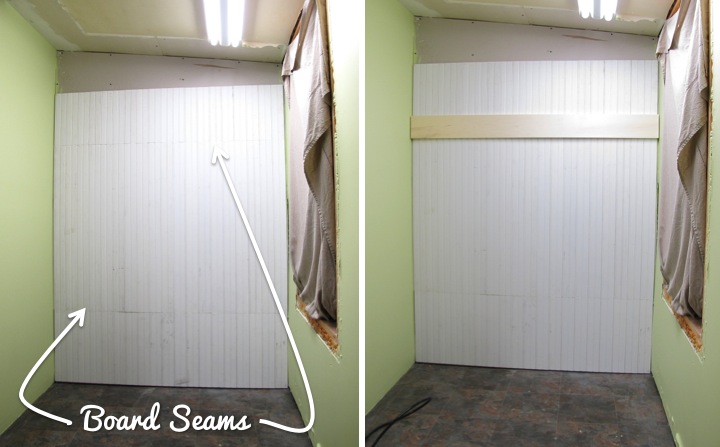
The height of the beadboard was 48" so I had to be strategic about cutting it so that seam lines would fall behind trim pieces and be hidden. For the bottom course of boards I trimmed everything to 19" which would fall right under the trim piece on top of the bench I planned to build.

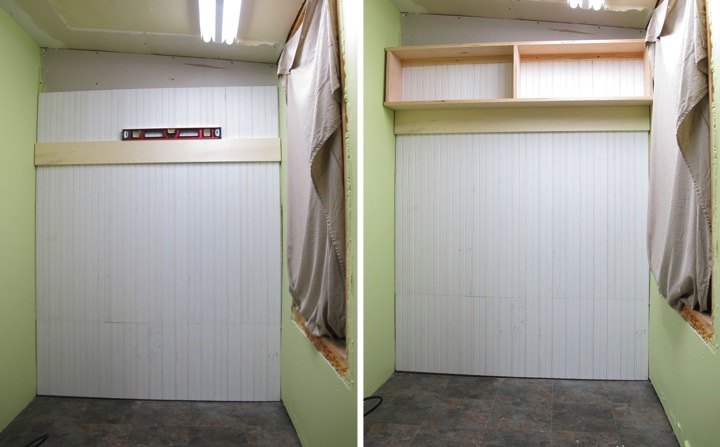
With my house over a hundred years old nothing is square so I figured out the highest point on the floor, measured up 19" and then used a level to mark a level line across the wall from that point. I set my first piece of beardboard against the corner aligned with my mark and then checked it was plumb vertically as well with my level. Getting the first piece level and plumb was very important otherwise the whole wall would be off.

With the first piece in position I tacked it to the wall at the top and bottom with my brad nailer where the holes would later be covered by trim. I slid the next piece into the notch, tacked it down and repeated until I had spanned the whole wall. Every five or six boards I would double check that I was staying level by placing my level on top.

With the first course done I put up a second course in the same way that was 43" tall followed by a final course that was 14" tall. Originally I had planned to take the beadboard up the entire back wall but I decided against it so I will need to finish the little bit of exposed drywall when I fix the ceiling.

After finishing up the wall I put up a piece of 1x6 that the hooks will hang from. My shelf will go right on top of it and getting a 1x6 level is much easier than the shelf so I started by hanging the 1x6. I did it by measuring up from the floor in the middle where the top of the piece needed to be and then tacked it with one brad nail. I then set my level on top and nudged it around the brad (which acted as a pivot point) until it was level and then tacked down the rest of the board. If you look closely at the pictures below you can see that this trim piece completely hides the top beadboard seam. 

It feels good to get a little traction on a project that I have been putting off. There is still a long way to go, but it is starting to look like something now. Next up is to build a shelf up top and then a shoe bench down low.

Are you tackling a project you had put on the back burner for a while? What have you done to make a more your back entry more functional? 

If you are interested, read about my ideas to transform this little nook in my back entry into a useful space here: Plans For My Back Entry

Sunday
Aug262012

Progress on My Back Entry

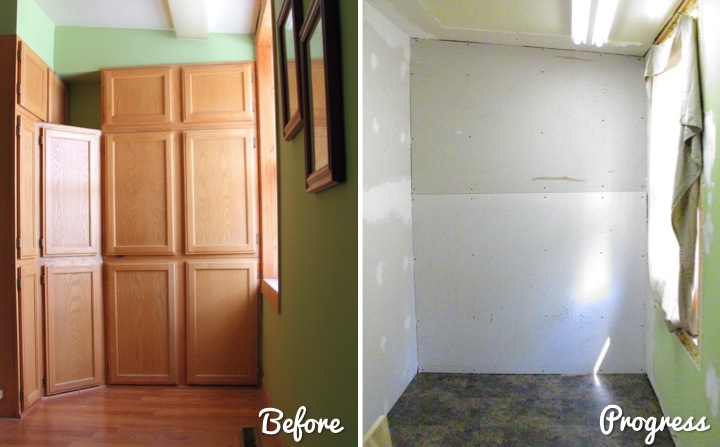
I mentioned back in June that I had some plans for my back entry but hadn't made any progress on it until yesterday. As a recap, my basic idea is to get rid of the weird cabinetry and build a shoe bench with hooks in the space instead.

As you can see in the picture below, the cabinets and soffit are torn out and the pergo flooring has been replaced. The next step was to mud and tape the drywall that was left unfinished behind the cabinets which I did yesterday. Because I am going to be covering up the back wall I left it alone. I definitely don't feel the need to do more work than necessary! It doesn't look pretty right now but at least I'm finally making some progress.

I also picked out and purchased the wall color that I am going to use. It's a pale yellow-green called Soothing Aloe by Valspar. There is only one window in the back entry/laundry room area so I wanted to get something light and cheerful. Unfortunately, today I have to sand all the mud from yesterday before I can prime and paint. I can't wait to finally get some color on those walls! Well, it's off to do some sanding for me... 

Have you been working on any projects recently that you put off? What do you have in your back entry to make it functional?

Friday
Jul132012

Dining Room Then & Now 

Somedays I get overwhelmed with all of the things I need to finish up around my home. Since I got my new dining room chairs a few weeks ago I keep thinking about all the things left that still I want to do in there like get a larger table, make curtains, change the paint color, add some wall art and replace the buffet with a built-in. The list just goes on and on. Don't even get me started on other rooms in the house.

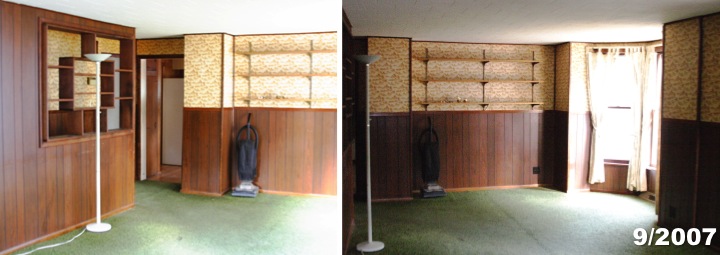
When I start to get discouraged it helps for me to reflect on how far I've come. When I first bought my house in September 2007 the dining area, like the rest of the house, was a nasty wreck. The floor was covered in green threadbare carpet riddled with stains. The crumbling plaster lathe walls original to the house had been covered up with faux wood paneling and wallpaper instead of being repaired. Likewise the crumbling ceiling had been hidden by a cardboard tile drop ceiling. The previous owners had been heavy smokers and everything reeked and was full of nicotine stains. The wallpaper which looked like it was yellow was discovered to be originally white based on the areas that had been hidden under the paneling. The whole place was in one word gross and everything needed to go.

After gutting everything to the studs, the situation got worse. Building practices in the late 1800s don't always meet modern building code. It turns out that the ceiling joists over the dining room and living room were huge beams about 8" x 8" spaced 48" apart. That is not anywhere even remotely up to code and so I ended up having to have the beams sistered with steel C-channel to give the proper support for the second floor load. On the bright side I discovered that the hardwood floor hiding under the carpet was in good enough shape to be saved.

With this part of the house in complete remodel I took the opportunity to rework the floor plan as well. Upon walking in the house a long wall created a strange hallway parallel to the dining room and living room. I had that pulled down which required moving some ductwork and electrical and enlarging the chase next to the bay window.  That really opened up the first floor, but the biggest change came from making a pass through into the kitchen. I love that I can see through to the back window of my house from my front door and the pass through is great for entertaining. Opening things up also made the bay window a focal point on the first floor instead of being hidden away.

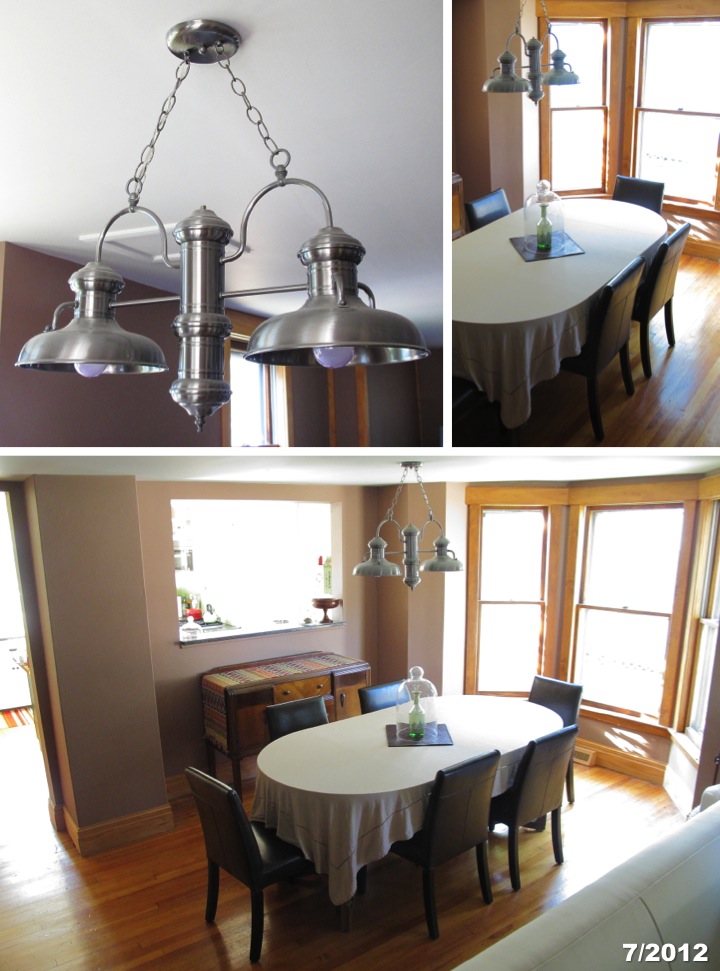
With the structural changes done the walls were drywalled and painted and the hardwood floors were refinished. The original trim was too badly damaged to be reused but new trim to match the original profiles was put up around the windows and for the baseboards. My favorite part of the dining room remodel is the Hi-Lite two-light island pendant that I got on sale for $200. It has a beautiful finish and the price was a fraction of other similar fixtures.

Standing back and looking at the room as it is now, I still see the laundry list of items I want to complete to finish the space and give it some personality. But it is good for me to stop and take a moment to remember how far it has come and that the hard part is behind me.

Friday
Jun152012

Plans for My Back Entry

The back entry of my house when I bought it was a strange warren of lots of cabinets. The landing at the top of the stairs right as I would come in was especially strange, with a combination of angled corner cabinets topped by a cabinet that disappeared into a corner. Very strange!

Although all the random cabinetry didn't really make sense, it was relatively new and I had bigger fish to fry when I first bought the house, like making a useable kitchen and getting a functioning bathroom upstairs, so the back entry was pretty much left alone. The only thing I did was paint the walls green to match my kitchen (they were originally cream) to cover up the smoke smell in the room. The picture to the left was taken after I had painted.

Last year I started to tackle the area and ripped out the little section of cabinets on the landing and replaced the Pergo flooring with some grey slate linoleum tile. I originally thought about using real slate tile, but I live in the Midwest and with snow and rain this back entry with a few stairs has the potential to be wet a lot and I was afraid real tile would be too slippery.

Anyway, that is as far as I got before I lost momentum and stopped working on it. My long term plan is that I want to create a useable entryway with the little nook that now exists where the cabinets were. I want to build a bench with shoe storage and then have some hooks on the wall for coats and shelf for baskets of gloves and scarves.

Unfortunately, when I pulled out the cabinets I found unfinished dry wall so I have a long way to go. Here is what I want to do:

- Mud, tape, and sand the seams and screw holes on the unfinished drywall
- Prime and paint walls
- Replace the window trim
- Build shoe bench and install
- Back the wall with beadboard and add hooks
- Paint the bench, beadboard and shelves white 
- Build a storage shelf and install
- Add baseboards
- Sew a cushion for the bench
- Sew curtains for the window 

I'm thinking of painting the walls a pale avocado color that will be a bit lighter than my current color and still work well with my kitchen. This entry spot has some nice natural light with the window but as you turn the corner it gets a little dark and I want to lighten it up. I think that with the white bench and shelving and the grey flooring will make a nice combination.

What do you think? What are your must haves for a back entry to make it useful?

Monday
Jun042012

New Mailbox

When I bought my home I quickly ditched the 1970s style mailbox and replaced it with a vintage cast iron one that I found on eBay. I love the style of it, but unfortunately it is a little small for modern mail so I have been looking for something else. 

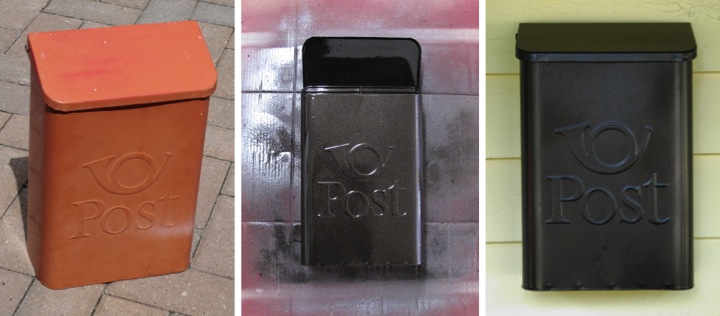
Finding a vintage metal mailbox that is larger than what I had was actually pretty difficult. Finally I found on eBay a burnt orange mailbox that was plenty big to fit my mail. I scooped it up for $9.99, gave it a thorough cleaning and refinished it with a few thin coats of oil rubbed bronze spray paint.

I have to say that I like the charm of my old cast iron mailbox better, but it wasn't worth having my mail all bunched up and bent. The new mailbox is still cute and I can now recieve my mail flat. I'll have to think of something fun to do with my old mailbox now.

What do you think? Have you ever had any too small mailbox issues?