Welcome

My name is Lisa and I'm a crafty girl with wanderlust working as an engineer by day. My blog chronicles projects in my home as well as pictures and stories from my travels.

Search


Instagram

Blog Index
The journal that this archive was targeting has been deleted. Please update your configuration.
Navigation

Entries in Renovations (53)

Friday
Jun012012

Resolution Recap: May 2012

Last month my 2012 New Year's resolutions of purging and organizing my home and finishing up projects around the house went by the wayside a bit but I was back on track in May. I am happy with what I accomplished, especially the garage cleaning.

Resolution 1: Purge & Organize
I met my goal of having a volume of at least one trash cart (between my recycling and regular trash) out on the curb on garbage pick-up morning every Monday in May, even on the Monday following my weekend trip to Florida. Here's my breakdown:

- May 7: 3/4 full trash + 1/2 full recycle = 1-1/4 total
- May 14: 3/4 full trash + 1/4 full recycle = 1 total
- May 21: 1 full trash + 1 full recycle + 3 SUV loads full (from garage cleaning) = tons!
- May 28: 1 full trash + 1/4 full recycle = 1-1/4 total

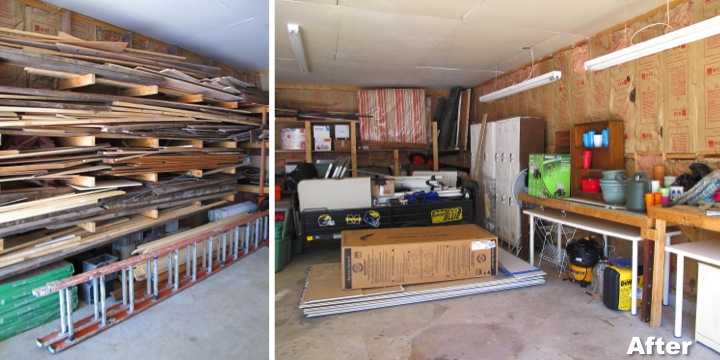
On the organizing front Frank helped me clean and organize my garage. It definitely needs more work, but it is so nice to have space in there to work on projects now. I also did some blog organizing creating my Projects tab with thumbnails of projects as well as my Away tab with a clickable map of where I have traveled.
Resolution 2: Finish Up Projects
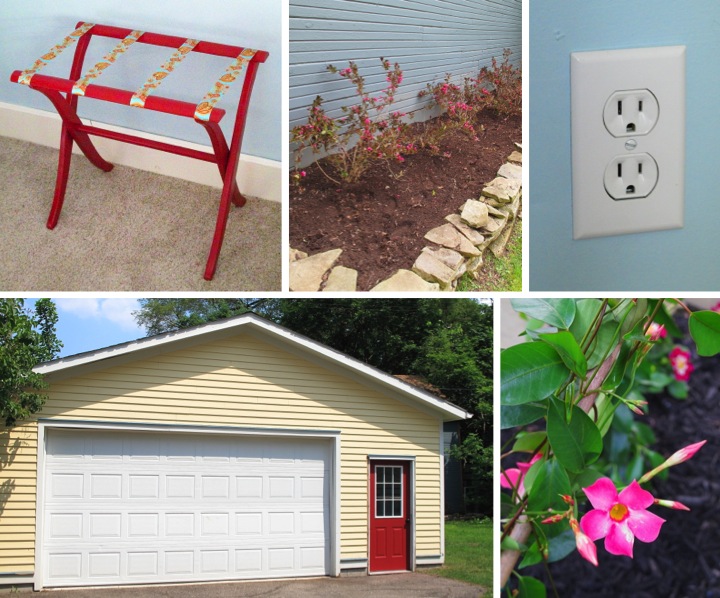
I got a lot of gardening work done outside in May including new plantings in my front beds and clearing out my back bed. In my guest room I got a little more done, replacing the old outlets and making over a luggage stand that I rediscovered during my garage cleaning. I also spruced up my garage door by painting it red and replacing the door knob and worked on my application to the historic district for new shutters and two replacement windows

In June I hope to fix the trim on the garage door and maybe get some things done in my back entry/laundry room.

How are you coming along on your New Years Resolutions? Did you finish up any big projects in May? 

Tuesday
May292012

Painting My Garage Door Red

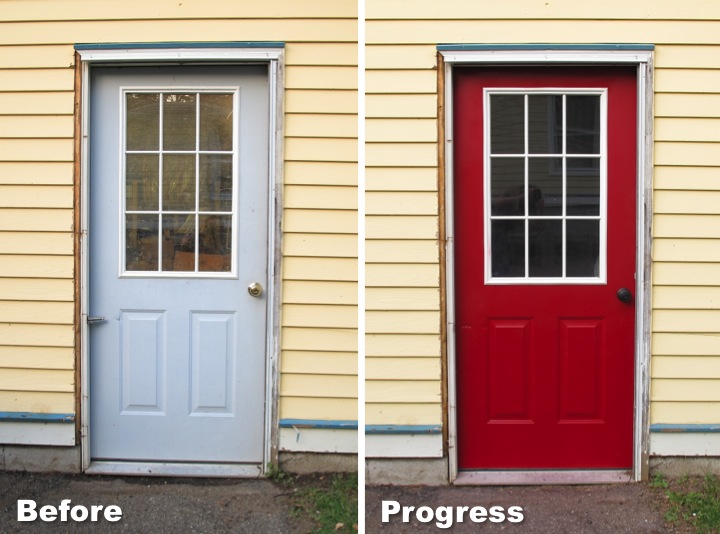
Earlier this year a strong gust of wind during a storm caught the screen door on my garage and yanked it off along with a piece of the door trim. Since the screen door was mostly a hassle I decided that I am not going to put it back on and instead just spruce up the door and frame without it.

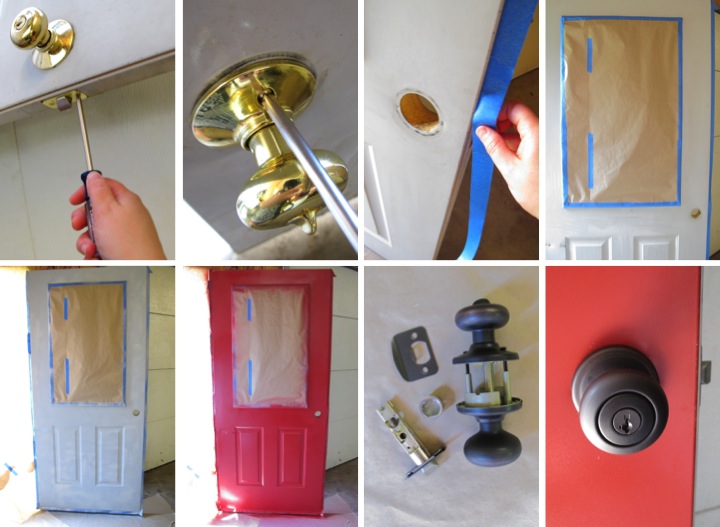
To start I thought that painting the door red would really make a nice improvement. It was a pale grey color which was very blah and always looked a bit dingy. I began by cleaning the door and removing the old door knob by taking out the screws from the latch and inside knob. I then taped around the perimeter of the door to mask it and put paper along the floor and garage wall. I also taped around the window and covered the glass with paper.

Once everything was prepped I primed the door with grey spray paint primer and then applied a few coats of red spray paint. Once everything was dried I installed a new door set with an oil rubbed bronze finish. 

I love the new door color. I think it looks great with the yellow, teal and white color scheme and really brightens up the garage. The formerly boring door now looks fun and inviting.

I still need to replace the trim around the door and do some paint touch-ups but painting the door was definitely a step in the right direction.

What do you think of the new door color? Do you have a fun color on your garage door or one of your house doors?

Saturday
May192012

Plans for Some Added Curb Appeal

I live in one of Ann Arbor's historic districts so I am not allowed to change anything about the front of my house (painting is an exception) without filing an application to the Historic District Commission and getting approval. On the one hand this is great because it preserves the character of my neighborhood. On the other hand it can be frustrating sometimes when I've had to deal with the process myself. Back when I was remodeling my upstairs it took two application tries and several months to get a window replacement approved so that my master bedroom could be brought up to code for fire egress.

It has been a few years since I have applied for any changes but I am about to try again. Although painting my house was a huge improvement it still looks a bit plain to me. I want to do two things to give my home a little added curb appeal.

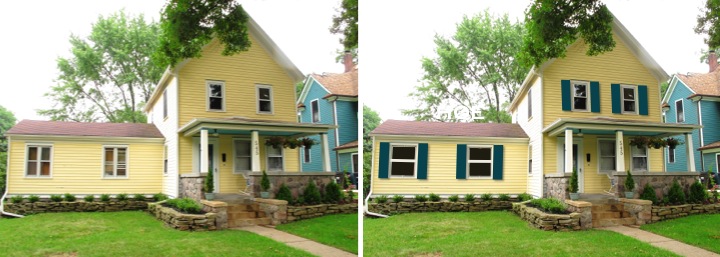
First, I want to add some shutters on four of the front windows. I think I have a pretty good case to get approval since I found old shutters in the crawl space above the side wing and there is some remaining shutter hardware on some windows. If it gets approved I am thinking of painting them dark teal to match the trim on the house.

Second, the side wing has weird side by side double hung windows that were put in during the seventies. They clearly don't fit in with the period of the house so I think that I have a good chance to get approval for replacing them with double hung wood windows. Along with being ugly the current windows also don't meet code for fire egress which is another reason I want to get them replaced.

I drew up a little sketch on my computer of what my house looks like now and my proposed changes.

What do you think? To me switching the side wing windows makes them seem bigger and the shutters add some character and make things a little less plain. It will likely be a while before I can get approval and actually implement either of these ideas, but it is time for me to get the ball rolling and submit my application. Wish me luck!

Tuesday
May012012

Replacing Outlets

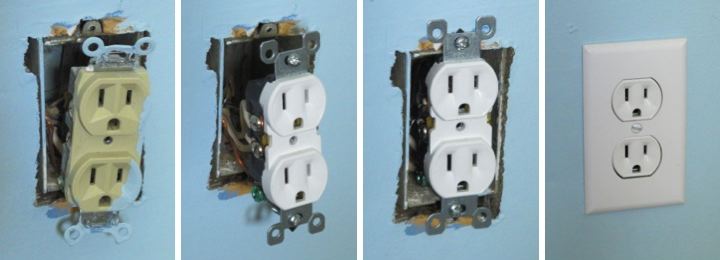
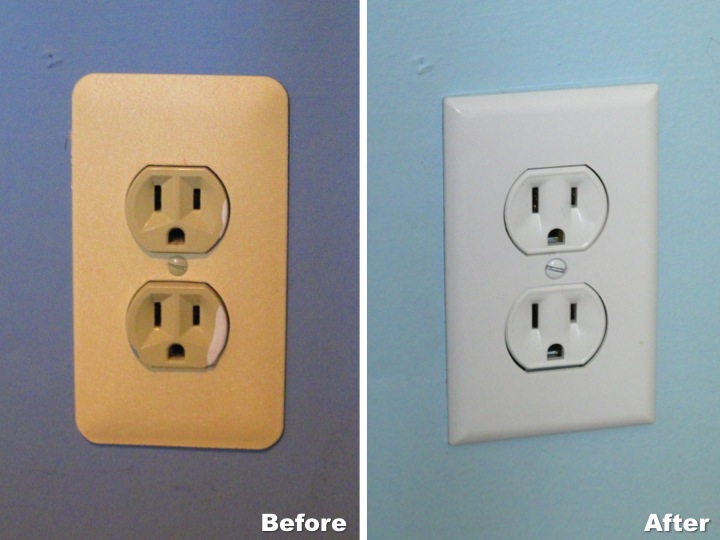
After I repainted my guest room on Saturday I decided that something needed to be done about the old, ugly outlets in the room. They were a yucky tan color with metal cover plates and just looked dirty and old. Since I already had the covers off due to painting I figured it was an opportune time to replace them.

Replacing an outlet is really simple, but due to the fact I don't want anyone to hurt themselves by misunderstanding what I might write, I'll let you look it up from professionals instead of giving the details here. I will say one thing, however. The most important thing is to make sure that you kill the power before you start. I am a little paranoid so I cut the power with my house's main circuit breaker instead of just the circuit I am working on. No shocks for me, thank you very much!

It took me about five minutes to swap out each outlet with a new white outlet and a new white cover plate. It is just a little detail but I think it definitely helps make the room look cleaner and more updated.

Sunday
Apr292012

Fresh Coat of Paint for My Guest Room

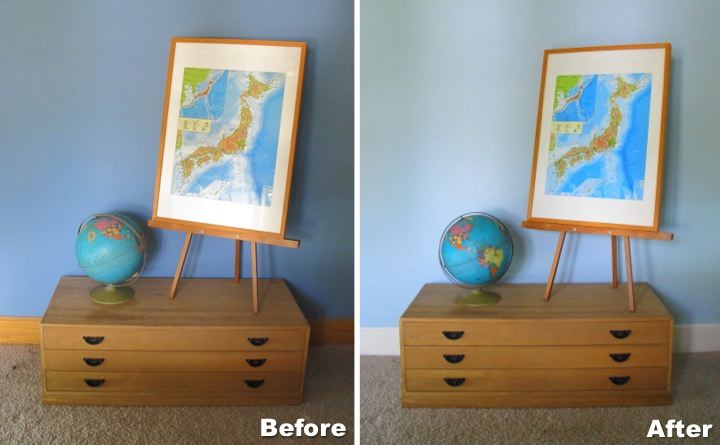
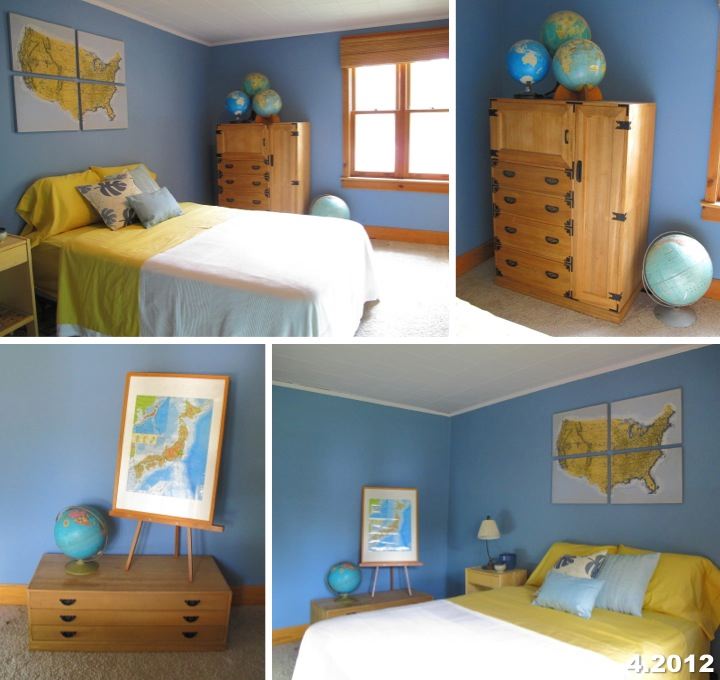
The first thing I decided to do to spruce up my guest room was to give it a fresh coat of paint. I really like the blue on the walls but the saturated color makes the room seem a little small so after looking at about thirty swatches of lighter shades of blue I settled on Valspar Inhale which seemed like a nice, light neutral looking blue.

I also wanted to paint my trim white. To save money I had the trim around the windows and doors made out of the salvaged wood paneling that had previously lined my stairs. Now I am not such a fan of the look since the wood had knots in it and looks a bit too country for me. Painting it white gives the trim a cleaner look which matches my style more.

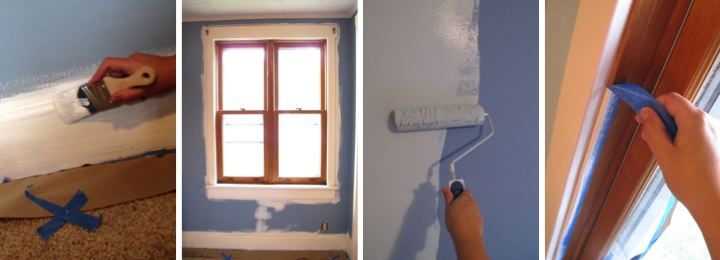
To prep the room I moved my furniture to the middle of the room and removed my switch plates. Since I wasn't doing the ceiling I only taped down paper around the perimeter of the room. I planned to cut in by hand for the trim so I didn't do any taping there, but on the inside of the window I wanted to be extra careful so I taped there. When you remove tape, always do it at an angle to reduce the chance that some of your paint will come up with your tape.

I started by using two coats of a stain blocking primer on the trim followed by a two coats of a warm white, Chamois Cloth, which was part of the discontinued Martha Stewart Colors Valspar line. I like the color and I had some on hand because it is the same paint that I used for the trim in my master bathroom. Because I was going to do the walls afterward I made sure to overlap the white onto the walls so that I would have a nice area to cut in against later.

With all of the coats of primer and paint to make sure that the knots and grain wouldn't show through, the trim took a long time. The walls were a comparative breeze. Because the color I bought was a Valspar Signature color, it could only be mixed up as a paint with primer so the coverage was really good. In fact, I had planned on two coats but when I looked at how the first coat dried I decided a second coat was unnecessary.

I am really happy with the new color of the room. The white trim and lighter blue make it seem bigger and will allow me to add some brightly colored accents without overwhelming the room.  I have a bunch of ideas to try out in the room and with the fresh slate the new wall and trim color gives me I am ready to go. 

What do you think of the new, lighter color? Have you been doing any painting around the house? Do you have any plans to do so in the future?

Monday
Apr232012

Plans for my Guest Room

My friend, Erin, is going to be visiting in a little over two weeks so I thought I would switch gears from working on my study and cozy up the guest room before her arrival.

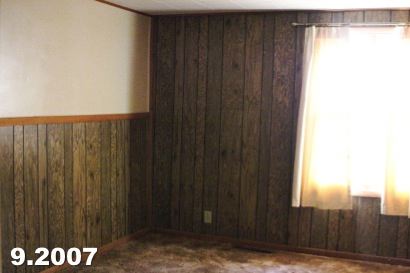
When I first bought my house this room in my side wing was one of the better of rooms in the house. It wasn't great but at least after I pulled down the fake wood paneling there was drywall hung (but not finished) underneath. The ubiquitous ceiling tiles were dingy looking and the carpet was stained and filthy.

I decided that I would live out of this room while the main part of my house was in full tear down to the studs mode so that meant I had to get it in shape quickly. After tearing down the fake wood paneling and I worked on mudding and sanding all of the drywall seams and screw holes. After that I primed and painted the walls blue and the ceiling white. With new trim work around the window and doors and some new carpeting the room was liveable.

I remember when I had the carpet guy come in to quote the job I asked him how quickly he would be able to schedule me in. He replied, "Why does it matter? It's not like you are living here anyway," referring to the fact that my house was completely torn up and in shambles. I told him that actually I was planning on living there because I had to be out of my apartment by the end of the month. He laughed and told me he wouldn't live there and I must be a tough woman.

Since getting the room habitable, I haven't done much in there other than set it up as a guest room. I have long term plans to replace the pressed cardboard ceiling tiles with bead board or drywall and get rid of my cheap carpeting for hardwood. I also want to replace the old hallow core door and bi-fold closet doors with solid wood doors that match the rest of the house.

I won't be able to get to any of that before Erin comes but I would like to freshen up the room and make it more comfy and welcoming before she arrives. Right now the room seems too blue and yellow and too barren to me. I'd like to get some curtains to add to the bamboo blinds, make a headboard and add some art to the walls. I love my tansu chests that I bought for my apartment in Japan so I'll keep those in the room but the current night stand is doing nothing for me (I bought it from the As-Is section of Ikea when I was in grad school). Back in Japan the short tansu chest was my coffee table and it worked well because my couches were also low to the ground. Now with the scale of U.S. sized furniture it looks a little short and out of place so I am thinking of seeing if I can turn it into a console table.

I have lots of plans and am short on time but hopefully I can knock a few items off the list before Erin comes. Wish me luck!

Thursday
Apr122012

If My Walls Could Talk

When I gutted my house to the studs I discovered a lot of things. Some things were unpleasant surprises, like a huge raccoon nest in my entryway wall. I evicted them.

Some things were really interesting like deducing some history of the house based on the wall framing. My house was originally about 18' x 26' and only one and a half stories tall. It was neat to discover the original roof line when the walls were opened up. At some point the roof was raised making the original section a full two stories and a back addition (where my kitchen and craft room are located) was added on. A side wing, which I was told by a few older residents in my neighborhood was at one point a little local grocery store, completed the building of my house. I think it is neat that my house evolved in four stages and I wish I knew more about the history behind each of the additions.

Besides uncovering some of the building history, opening the walls also revealed an unintentional time capsule of objects left inside the walls. Many of the items, like newspapers or calendars, were paper and were almost completely disintegrated, but some items, like the whiskey bottle in the picture below was salvageable. On the left is a photo of how I found it and on the right is how it looks after I cleaned it up. I wonder how it came to be in my wall and who it once belonged to. I'll never know, but it is fun to uncover these little bits from the past from my house and think about what a long history my house has had.

Friday
Mar302012

Organizing My Tools

To say that my small hand tools were in a bit of a mess would be the understatement of the year. Instead of having anything organized I would accumulate small piles of tools in various rooms depending on what projects I was working on. This system (or lack thereof) clearly wasn't working and I wasted a lot of time looking for things. Something had to be done.

I set off to Lowe's in search of a storage solution. I wanted something inexpensive where I could easily see everything. Using five gallon buckets with an organizer completely fits the bill for me. Because I have a lot of stuff I got two buckets and generally organized painting and dry walling supplies into one and my clamps and other miscellaneous items into the other. I'm thinking that I need to get another one for storing my sanding discs and sanders as well. So far these buckets have worked well for me and the time I used to waste looking for things is now devoted to getting things done more quickly.

What do you do to keep your DIY supplies under control? Do you have creative ideas for storing your tools?

Thursday
Mar292012

How to Patch Up a Hole in the Wall

Now that I am back in town it is time for me to get working on my study again. Due to an outlet getting moved I had a nice big hole in my wall next to the closet that I needed to patch up and some dirty fingerprints left by the electrician to clean up and paint over.

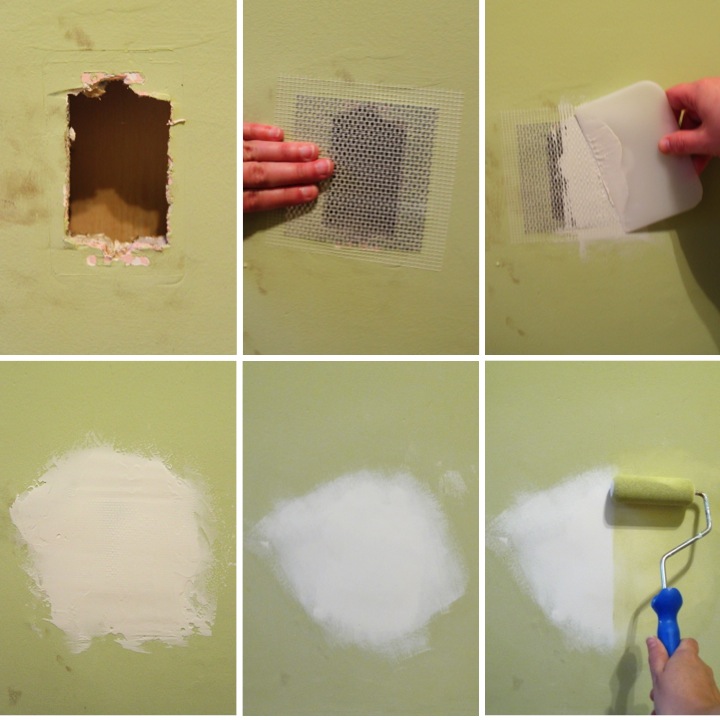
Since it was a large hole I used a 4" x 4" aluminum wall patch to cover it. Generally, you should get a patch that is large enough to extend an inch past the hole on all sides. After removing the backing I placed the self adhesive patch over the hole. I then applied a layer of drywall compound over the patch feathering it out at the edges. It doesn't need to be perfectly smooth, but the smoother it is, the less you will need to sand.

After letting it dry overnight I put another coat of drywall compound on over the patch. Once that was completely dried I sanded it smooth. To make sure it was perfectly flat I ran my hand over it to check if I could feel any remaining unevenness or roughness.

With the patch complete I primed over it with a coat of Zinsser primer and then finished it off with two coats of wall paint. This was a simple and easy project requiring only about twenty minutes of hands on time, but it was something that I needed to get done in the room. I am now one tiny step closer along my way in getting the room together...

If you are interested, check out the rest of my study renovation posts: Study Blog Posts

Monday
Mar122012

Stairway: Then and Now

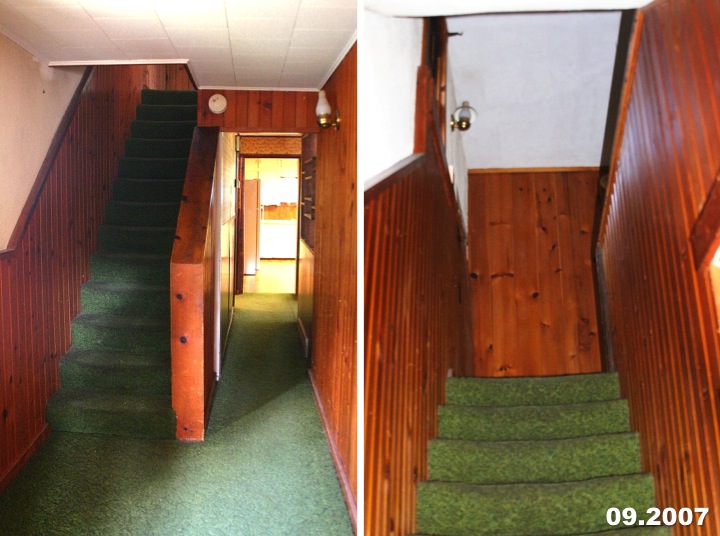
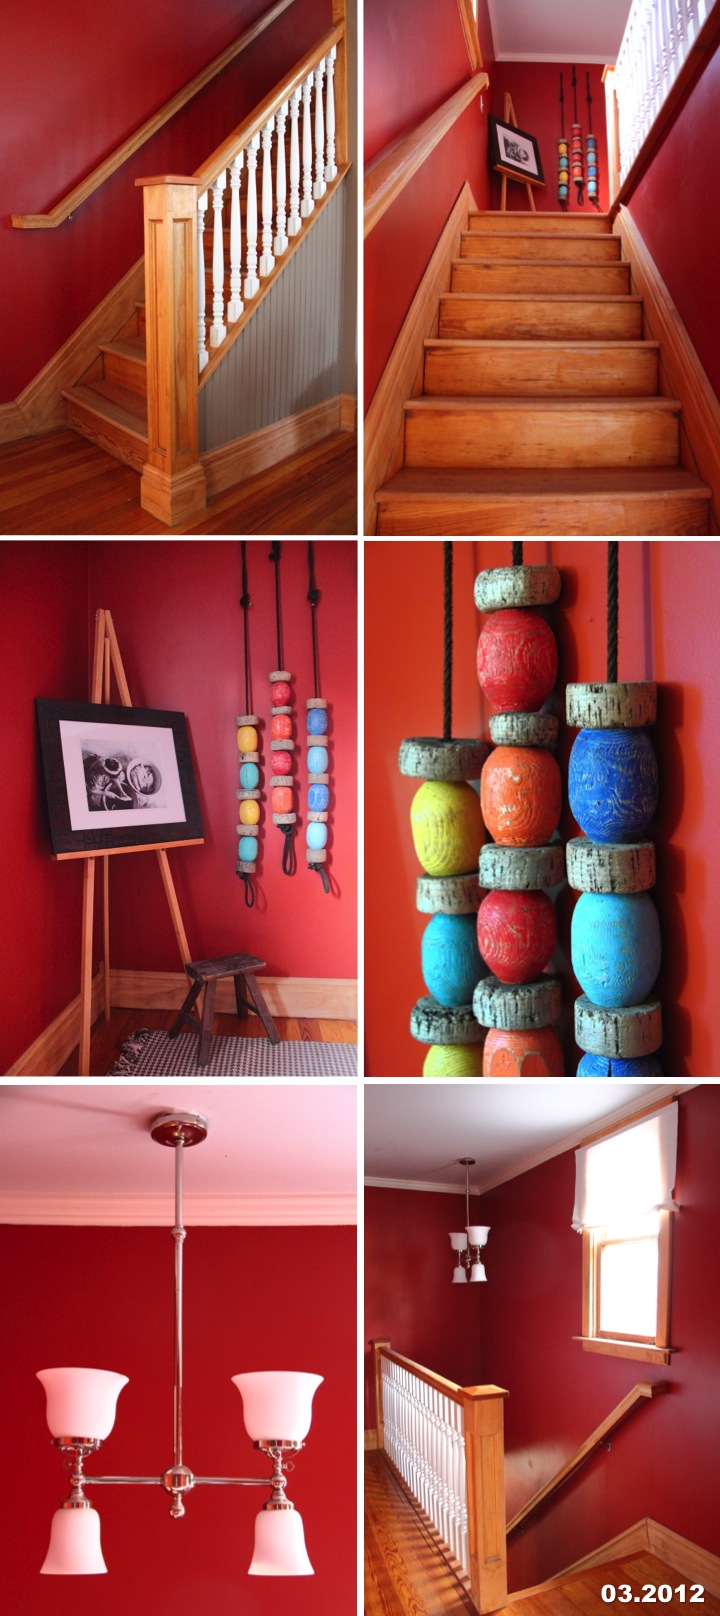
When I bought my house in September 2007, the stairway up to the second floor was a hideous mess. The stairs were covered with worn out, filthy green carpeting and the wood paneling surrounding it made everything feel claustrophobic. The fact that a small wall mounted hurricane style light was the only illumination didn't help anything either. Not only did it look bad, but it was also not up to code with no hand rail and a head clearance issue.

After moving in, the whole stairway was gutted. The wood paneling was saved and cut down for trim in the back bedrooms, but everything else ended up in the dumpster. There were wood treads under the carpet, but they had been notched when the wood paneling was installed so they needed to be replaced. The plaster behind wood paneling was crumbling so that was torn out and new drywall was installed. For fun I picked a tomato red color for the walls. Drywall also replaced the ceiling tiles and crown molding gave it another special touch. 

Instead of the closed in look that the old walls of paneling made, using balusters along the stairs made everything more open and airy. Adding a handrail and angling the ceiling brought everything up to code. I found a pretty light fixture for a steal at the Pottery Barn Outlet and installed it over the stairs to brighten things up. 

The top of the stairs has a great little space for some decorating. Currently, I have an easel that I bought at Ikea holding a black and white picture that I took of a woman preparing fish in Chuuk, Micronesia. I was on a set of stairs looking over the woman when I took the photo so I thought it subtly tied in. To the right of the picture I have three sets of vintage fishing buoys that I picked up at a flea market in Florida. I love their bright colors and how they have worn with age. A small wooden stool that I bought at a flea market in Japan and a chocolate and cream houndstooth check rug from Pier 1 finish off the top of my stairs.

I love how cheerful and bright my stairway is and the difference between now and when I bought my home is like night and day.