Welcome

My name is Lisa and I'm a crafty girl with wanderlust working as an engineer by day. My blog chronicles projects in my home as well as pictures and stories from my travels.

Search


Instagram

Blog Index
The journal that this archive was targeting has been deleted. Please update your configuration.
Navigation

Entries in Renovations (53)

Sunday
Jan292012

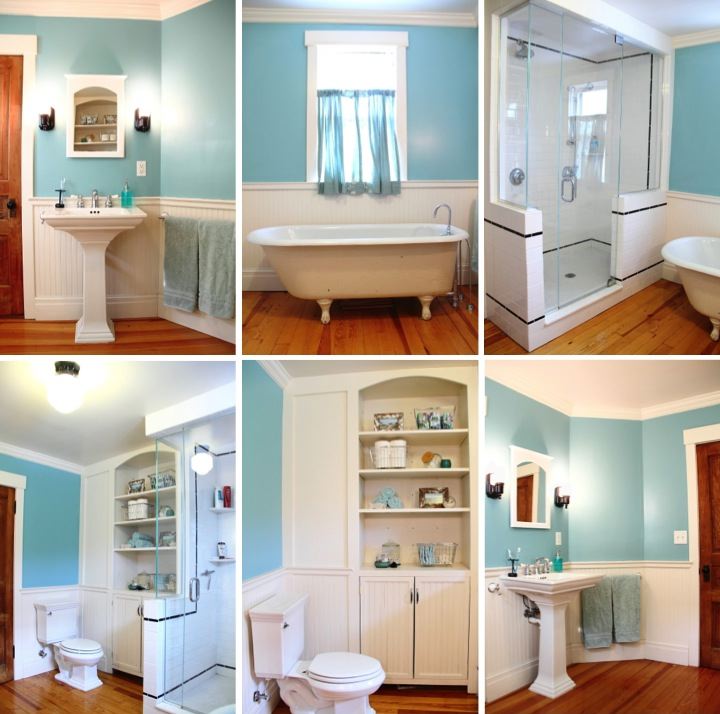
Sprucing Up the Bathroom Built-in


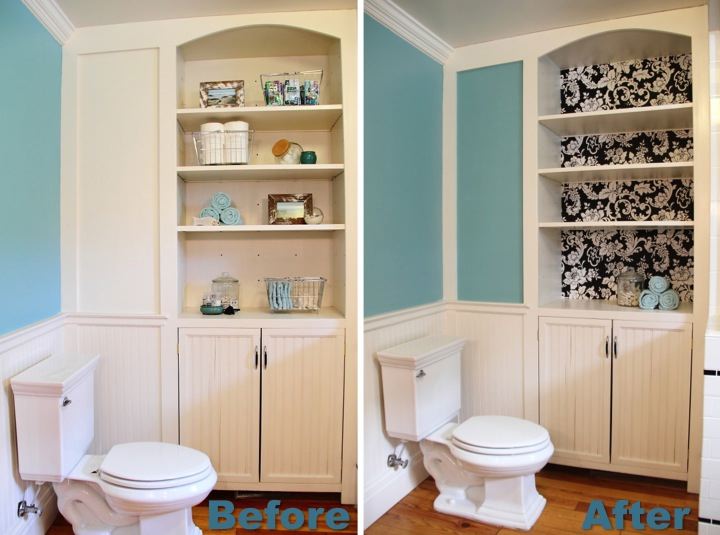
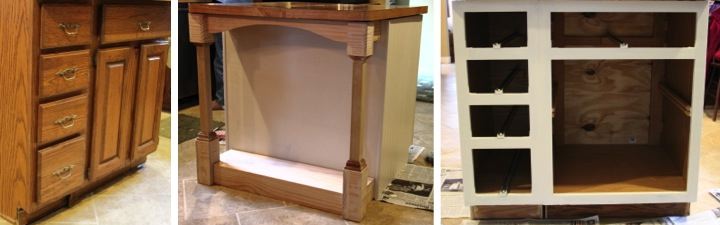
I love this built-in, but as part of finishing up my master bathroom I wanted to spruce it up a little bit. It was all white and just seemed too white to me. Inspired by the black and white damask towel that I turned into a rug for the bathroom, I thought that some black and white damask wallpaper might do the trick.

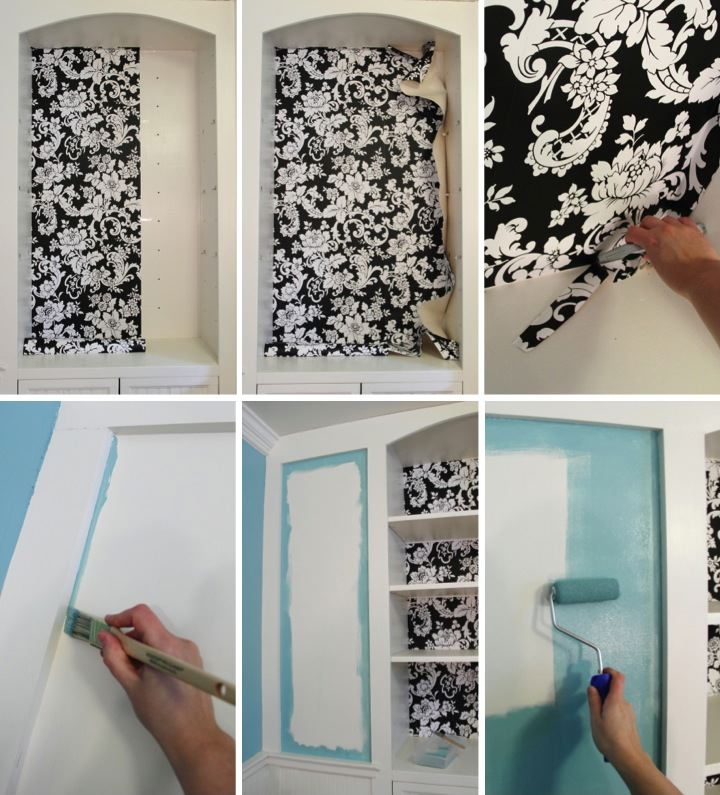
I didn't want to do anything permanent since I wasn't sure if I would like it or not so instead of applying the wallpaper using the paste on the back I decided to use double sided tape. I ran a strip of tape right along the perimeter of the back, across the place where the seam would be and then in various spots around the middle of the built-in. After that I hung the first piece of wallpaper, with extra along the top and bottom, smoothing it down against the double sided tape. I then hung the second piece the same way, lining up the pattern along the seam. After both pieces were secured, I ran a razor blade around the edges to trim off the excess paper. On the second piece there was so much overhang that I ended up cutting it to an inch to get rid of the bulk before doing the exact trim with the razor blade.

I'm not sure how well it will hold long term, but the double sided tape seems to be doing the trick and will at least give me some time to decide if I want to make it permanent.

After paper the back of the built-in shelves I wanted to paint the part that boxes in the old chimney to match the rest of the walls in the bathroom. Luckily I had some of the paint saved and it was in good shape still. Typically I like to cut in my edges by hand since I have a pretty steady hand and it saves time instead of taping. After two coats of paint with a small foam roller I was all done. Since I had the paint out I also did some minor paint touch ups around the rest of the bathroom that I had been putting off. 

So far I think it is a big improvement and I like the way that it looks. Now I get to have some fun figuring out what to put on my shelves!

 
If you are interested, check out the rest of my bathroom posts here: Bathroom Blog Posts

Friday
Jan132012

Plans for my Master Bathroom

As part of my New Year's resolution to get projects finished up at my house I thought that I would tackle my master bathroom first since there isn't too much to do and it would be an easy first step.

When I first moved in, the room where my bathroom is seemed to have been used as a kitchen at some point since there were some remnants of plumbing sticking out of the wall and some remnants of tea kettle wallpaper. It was a great, nice sized space (10' x 10') with hardwood floors but there were no outlets and the horsehair plaster was crumbling off the walls and ceiling. The room is adjacent to the two tiny rooms that I combined to make my master bedroom so I decided to make it into my master bathroom.

The room required a complete renovation, tearing everything down to the studs, adding all new electrical, plumbing, and HVAC and refinishing the floors. I moved in the cast iron tub from the tiny upstairs bathroom and built a 3' x 5' walk in shower that I tiled with subway tile for a period look in keeping with my house. The built-in provides a nice storage space and also makes good use of the niche left after the chimney was boxed in. Having the built-in also allowed me to use a pedestal sink instead of having a vanity which I liked for having an open look in the bathroom. The lighting fixtures are vintage reproductions and I bought the antique glass shade for the overhead light on eBay. I wanted the bathroom to be be bright and cheery so I painted the room a fun teal color. One of my favorite parts about the bathroom is the wainscoting that goes around the room which I think adds a lot of charm. The pictures below show how my bathroom is currently, starting with the sink and going counter-clockwise around the room.

While I love how things have turned out in my master bathroom, I have a ton of small projects to finish up before I will feel like it is complete. Here's my current to-do list:

- Paint the outside of the tub teal (it is currently a light creamy yellow)
- Replace the cheap, temporary mirror with a medicine cabinet
- Add shelving to the inside of the built-in cabinet
- Jazz up the built-in with some color
- Make a wood vent cover to go over the ceiling fan (the plastic cover that came with the fan just doesn't fit in with the vintage look of the bathroom) 
- Make a rug to go in front of the bathtub
- Add some wall art and do some paint touch-ups

I'm still out of town right now, but I'm looking forward to start tackling some of these projects when I get home. 

Monday
Nov282011

Kitchen Island for Mom

As I am getting in the swing of planning out my Christmas gifts for this year I thought I would share the gift I made for my mom for her birthday/Christmas gift last year.  She and her husband were in the final stages of remodeling their kitchen and the last item they needed was a kitchen island so I decided to build it for them as a gift.  

I started by repurposing two old cabinets as the foundation for the island. They were different depths so I build out a frame to make it square and then boxed the cabinets in with a sturdy piece of plywood on the back and beadboard on the sides. The hinges to the doors from the cabinet were removed and retrofitted with a rev-a-shelf to allow for easy access to a pull out a garbage and recycling bin.

On the backside I came up with the idea of making an open bookshelf for my mom to store her cookbooks and other knick-knacks since she already had plenty of seating in her kitchen. I made the posts by taking 2x2s and wrapping them with 1x6s (for the top), 1x10s (for the bottom) and some scrap molding. For the shelf I screwed a ledge into the back of the plywood and attached it to the posts using my Kreg Jig.

To finish it off the holes were patched with wood filler and sanded down.  With a few coats of white paint and new hardware it was almost complete.  For the top my mom wanted butcher block, so she had a piece of the Ikea Numerar in oak cut to size (I got the leftover scrap for a project for my kitchen) and mounted that for the countertop. 

Along the way I wasn't sure if it would come together well and there were a number of frustrating times (including a chop saw that wasn't cutting square and a wrong molding cut that almost made me run short on molding to wrap the posts) but the end product turned out nicely. My mom and her husband are happy with it and that is what is most important to me.

Page 1 ... 2 3 4 5 6