Welcome

My name is Lisa and I'm a crafty girl with wanderlust working as an engineer by day. My blog chronicles projects in my home as well as pictures and stories from my travels.

Search


Instagram

Blog Index
The journal that this archive was targeting has been deleted. Please update your configuration.
Navigation

Entries in Home Decor (63)

Wednesday
Aug222012

Basket Night Stands for My Guest Bedroom

While working on my guest room I needed a solution for a pair of nightstands. Looking around it was hard to find a matching pair of anything and anything new that looked decent seemed too pricey. 

I wanted something on the small side since the room isn't very big and there isn't a lot of space. Color and finish was also an issue. With the red headboard I wanted something neutral that wouldn't compete too much. On the otherhand I didn't want wood because the wood from my console table and dresser from Japan seemed like enough in the room.

After thinking about it, floating baskets mounted on the wall seemed like a perfect solution. I hunted around looking for something that was large enough and didn't have angled sides. I also needed to find something with a tight weave that would be flat enough to act as a table top. Finally I found a pair of banana fiber baskets that fit the bill and were only $14.99 each. I couldn't put them in my cart and check out fast enough.

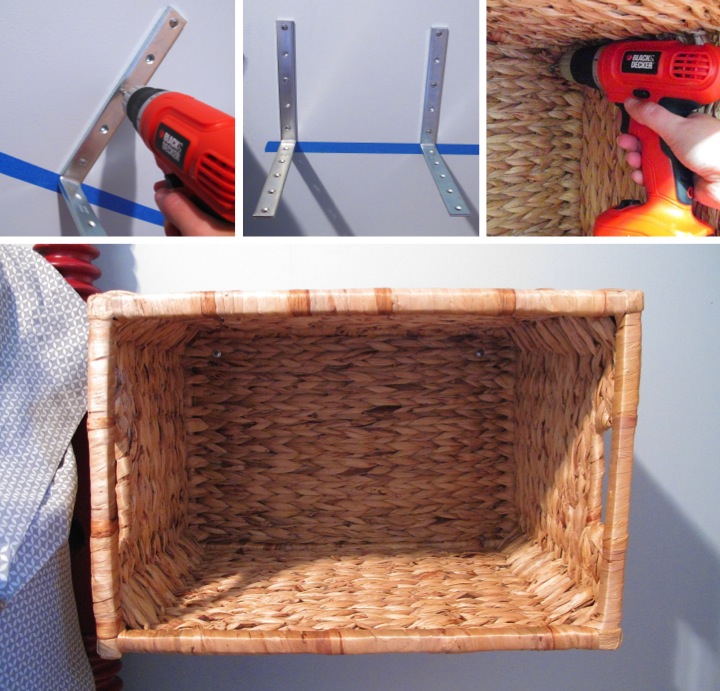
I now needed to figure out a way to secure them to the wall in a sturdy way. I looked around at Lowe's and found some sturdy 10" L brackets. The baskets are 12" deep so it was just the right length to give the baskets enough support without sticking out so far than the brackets would be visible once mounted.

I measured up 16" from the floor and used a level to tape off a level strip of painter's tape. I then used the tape as a guideline to mount the brackets to the wall. For each basket I used two brackets with one screwed into a stud and the other attached to the wall with anchors.

I set the baskets on the brackets and to make sure they didn't tip I secured them by screwing a screw in each of the top inside corners. Unless you look at the basket straight on you can't see the screws or brackets making the baskets look like they are floating on the wall.
With my bedside tables installed I had some fun decorating. On each of the night stands I put a new lamp. I like the apothecary style of the lamps with the adjustable arms and shades. I also like how the oil rubbed bronze finish ties in with the hardware of the console table and dresser from Japan that I have in the room. 

Using the baskets left me some nice open storage space that I wanted to use for some amenities for my guests. On the left side I rolled up some bath towels for guests.

On the right side I found a little red wire basket that I filled up with some wash clothes to match the towels. I also wanted to include some small bath products in case my guests had forgotten something. I took a little white and blue bowl that I made in Seto, Japan and filled with with some fancy hotel samples than I had saved from when Frank and I were in Sicily earlier this year.
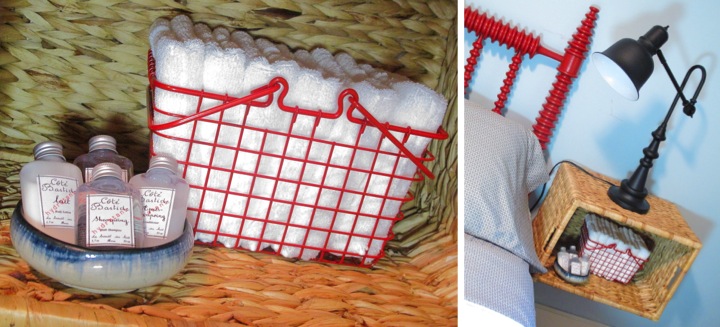
I like how the baskets turned out. The make a great solution that doesn't take up much space. I also like the empty space underneath which keeps the room from looking too cluttered.

The room is starting to come together. I still have more to do, like make some art for above the bed and make some curtains. I can't wait to get it all finished.

Have you been doing any updates on your home? What have you done to make your guest room cozy?

Monday
Aug202012

Simple Pillow Customization

With my headboard painted red in my guest room I have been on the lookout for some throw pillows to add to the bed.

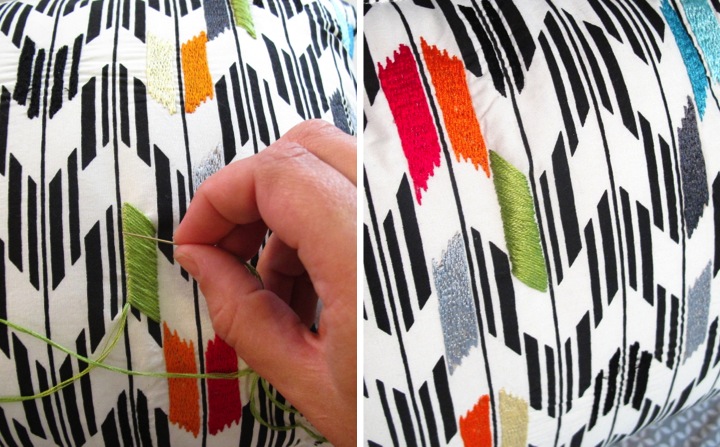
I ran across a cute little rectangular pillow at Target with a black and white design that had some colors embroidered over it. With red, orange, yellow and blue as the accent colors of the pillow it was almost perfect. It only needed a little green to be just right for the room.

I thought about it a bit and decided to buy the pillow. I grabbed some green embroidery thread and used a satin stitch to cover a few of the pattern shapes with green.

The change is a subtle one, but it pulls the pillow together to fit in with the color scheme that I have for the guest room. I'm really happy that I got the pillow and that this simple customization was so easy. Sometimes the little touches are just what is called for.

Have you made any little changes to something store bought recently to customize it for your home?

Tuesday
Aug142012

New (To Me) Vintage Kitchen Table

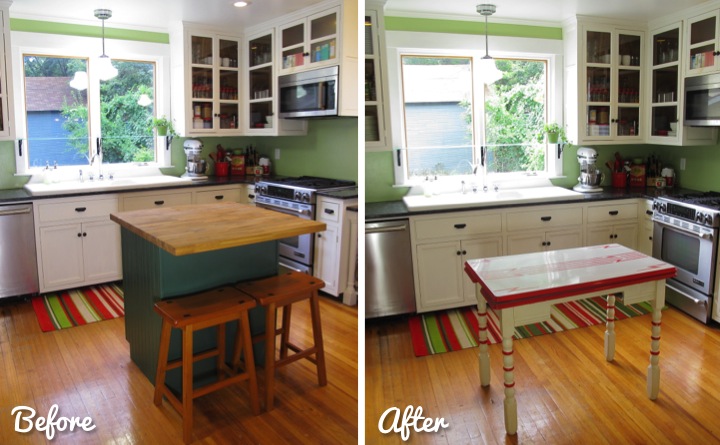
I love my kitchen. It's a nice size at 13-1/2 feet by 13-1/2 feet which gives me lots of space. Last year I decided to make use of some of the open floor space and have some seating by making an island out of salvaged cabinets like I did for my mom previously. I've never really been happy with it because it it blocks the view of my sink, which is my favorite part of my kitchen.

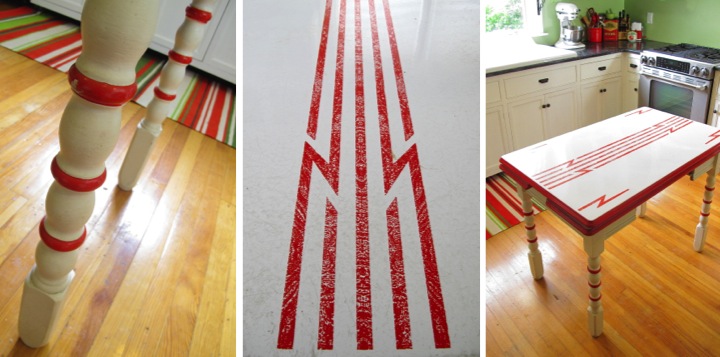
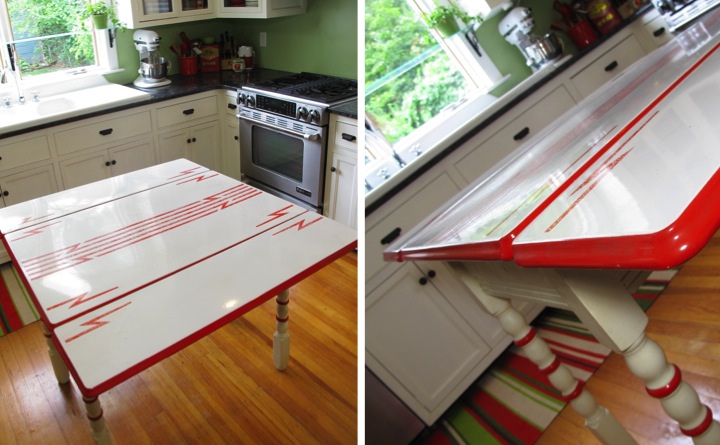
On Saturday I went to one of my favorite places to find things, The Treasure Mart. It's a consignment shop in town selling housewares and furniture ranging from antiques to mid-Century with a few more modern pieces scattered in. On this trip, buried under a bunch of toys and hiding behind a Betty Boop poster and a framed picture of a statue of Buddha I spotted an awesome vintage table. The table had a white and red enamel table top with leaves that pulled out at either side. I knew it would be just perfect in my kitchen.

The cherry on top was the price. The table was originally marked $100 but I got it for $60. The Treasure Mart marks the date that items come in and every month that it sits in the store the price gets reduced by 10%. Since the table had come in back at the end of March I got a 40% discount. What a great deal! In no time I purchased the table, squeezed it into the back of my little hatchback and had it home.

I think the table looks great in my kitchen and it makes everything more open. The red and white is so cheerful and lightens things up a lot more than the heavy cabinet island.

The table has some light scratches so I need to figure out how to spruce that up.  Also, the legs are cream so I plan to paint them the same color white as my cabinets. I also want to find some new stools to go with the table.

The pull out leaves are wonderful and nearly double the workspace when necessary. Being an engineer I love the old wood glide and and spring mechanism that makes the leaves work. I like the flexibility of being able to have them open or close them up.

Do you think that the table looks better than the island? Do you have any tips for sprucing up enamel? Have you scored any great deals lately?

Wednesday
Aug012012

Resolution Recap: July 2012

During July I made a little bit more progress toward tackling my two 2012 New Year's resolutions of purging and organizing my home and finishing up some of the many projects I have going on around the house.

Just like in June I was out of town a lot this past month, this time to Canada and then to Japan for work. I am happy with what I did manage to accomplish while I was home, though.

I should be home more in August so I have some big plans for next month and hope to make some progress on my back entry that I didn't get around to in July. I'm not always as productive as I wish, but I keep trying to plug away at it each month.

Resolution 1: Purge & Organize
I met my goal of having a volume of at least one trash cart (between my recycling and regular trash) out on the curb on garbage pick-up morning every Monday in July, except when I was in Japan and sick. Here's my breakdown:

- July 2: 3/4 full trash + 1/4 full recycle = 1 total
- July 9: 1/2 full trash + 1/2 full recycle = 1 total
- July 16: 3/4 full trash + 1/2 full recycle = 1-1/4 total
- July 23: Nothing (In Japan)
- July 30: Nothing (In Japan and sick) 

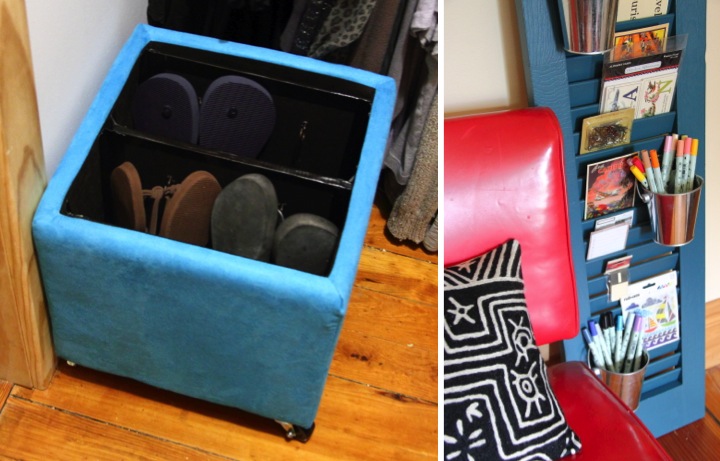
On the organizing front I did two projects. In my craft room I made a free standing organizer from a tall shutter that I found from the Ann Arbor ReUse Center. For my closet I converter an ottoman to store my flip flops. I also put casters on the ottoman to raise it up a bit so I can use it as a step stool to reach the high shelves in my closet.

Resolution 2: Finish Up Projects
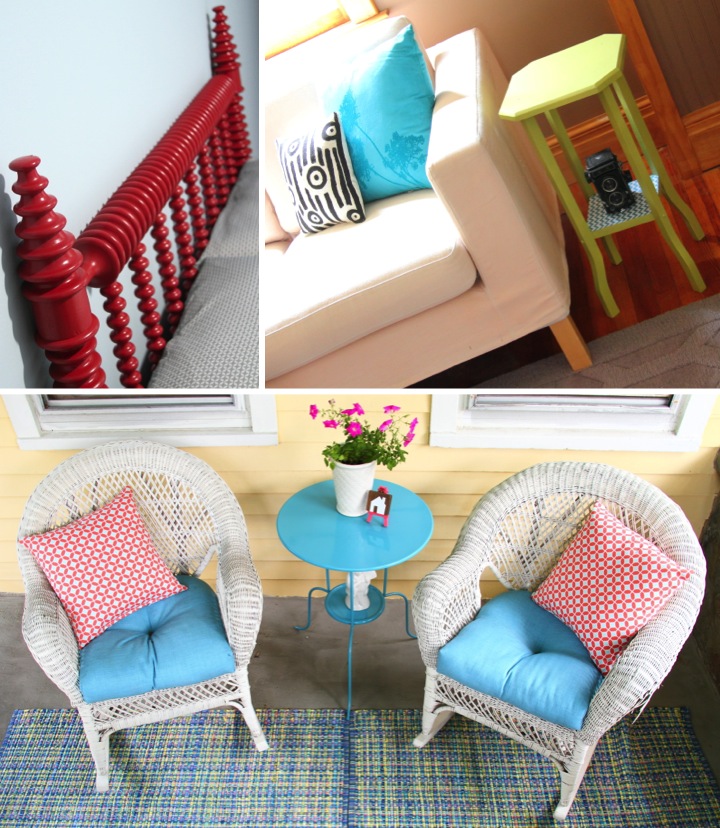
Even with my limited time at home this month I managed to tackle a few little projects at home. I found an old wood headboard for $25 and made it over for my guest room with some red spray paint. In my living room I did a make over on a little side table with some scrapbook paper and sprout spray paint. Out on my front porch I finished the make over that I started last month by adding some pillows and making decor items.

How are you coming along on your New Years Resolutions? Did you finish up any big projects in July? 

Tuesday
Jul312012

Dining Room Bookshelf Souvenir Collection

When I shared about my dining room previously Kathy had asked about what was to the left of the pictures that I had shared. Between being out of town in Japan and being quite sick since the middle of last week I haven't had a chance to post about it up until now.

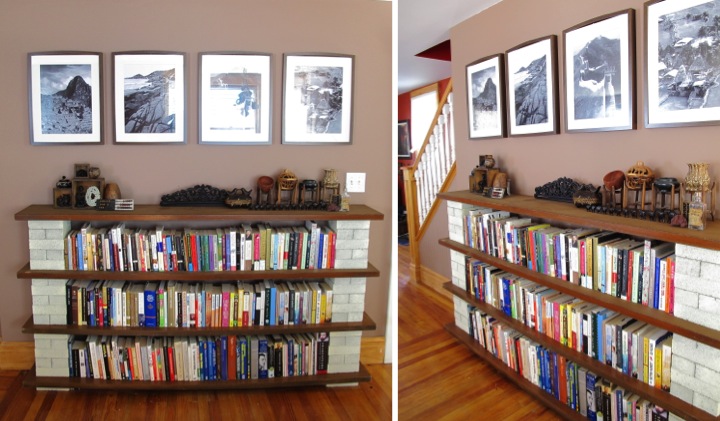
That area is opposite from the dining room bay windows and features a small wall between my stairs and the hallway doorway to the side wing of my house. On that wall I can't have anything that sticks out from the wall very much or it would impede traffic from the living room to the kitchen. I always need to have more book storage so I built a bookshelf from bricks and bi-fold closet doors for the spot. I previously shared a tutorial about how to make the bookshelf here.

Above the bookshelf I have black and white 12x18 enlargements from pictures that I took. I framed the photos in some inexpensive 16x20 Ribba frames from Ikea. From left to right the pictures are Machu Picchu in Peru, Florianopolis in Brazil, the Great Wall in China and Banaue Rice Fields in the Philippines.

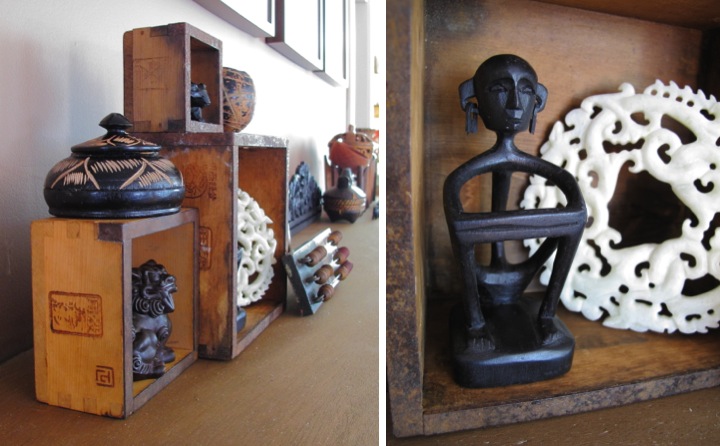
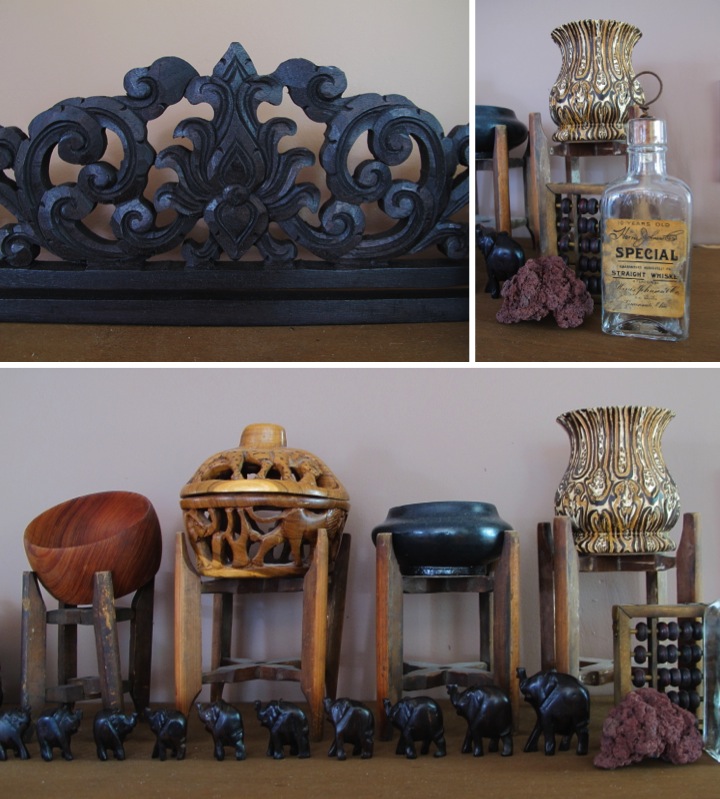
On top of the bookshelf I have arranged several of my souvenirs from various trips. The left side has a vignette arranged in some antique boxes that I bought in Japan at a flea market. I love the dove tails joints on the box and the embossed markings on the sides.

In my medium box on the left I have one of a pair of shisa (guardian lion dogs) from Okinawa in Japan. On top of the box is a little wooden carved container from the Carribean.

Inside the large box I have a rice god statue that I bought while hiking around Banaue in the Philipines. I picked that particular statue because I liked his dangling earrings. Behind the statue is a jade carving that I found at a market in Beijing which I had a lot of fun haggling over the price about.

Up in the top little box is a wood carving of a black bear from Hokkaido. To the right of the boxes are two carved coconut cups that I bought in Guatemala.  In front is an abacus that I bought at the flea market at Toji Temple in Kyoto.

On the right side I have a series of bowls perched on Japanese silk bobbins called itomaki (木製糸巻). The bowls from left to right are a hand carved redwood bowl from California and a bowl from South Africa carved with the big five African game animals. Following is a bowl that I made in Seto, Japan and a vase I got in New Zealand carved from a native tree fern, mamaku.  

Just to the left of the bowls I have a carved vessel with two birds perched on top that I bought in the Philippines on the same trip I bought the little rice god statue. To the left of that is a carved hanger for tapestries that I found at the Night Market in Luang Prabang in Laos.

Directly in front of the bowls is an African elephant calendar I bought in South Africa. The twelve miniature elephant carvings each represent one month of the year. Arranged in order by height, you flip the direction of one elephant for each month that has passed.

To the right of the bowls I have a bottle that I discovered in my house's walls, a little abacus and a rock I picked up while hiking Mt. Fuji. 


I know that the top of the bookcase is overcrowded and a bit cluttered looking, but each of these items is really special to me and can't imagine not displaying everything.

Wednesday
Jul182012

Headboard Makeover for My Guest Room

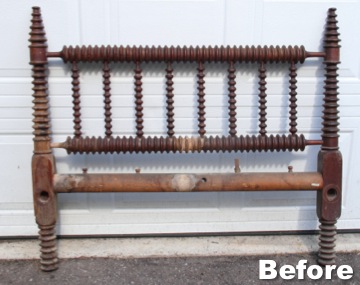
About a week and a half ago, I was at the Ann Arbor ReUse Center wandering around looking for treasures when I stumbled upon this really cool wooden headboard for just $25.

The wood was cracked and in terrible shape, but I knew that with a little bit of work it would be perfect in my guest room. I just loved the rounded spindles that looked like stacks of beads. I loaded it up in the back of my little hatchback and took it home.

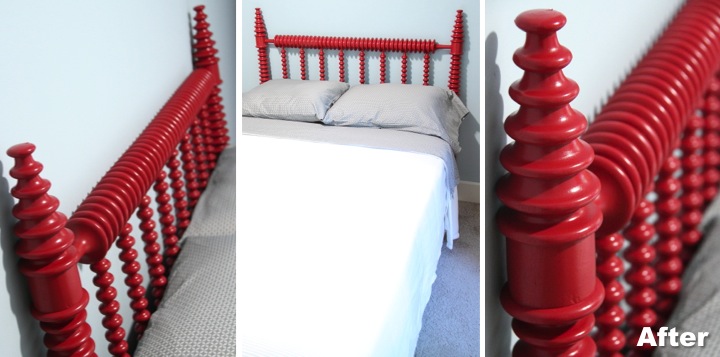
As a first step I gave the headboard a good washing to get rid of all the dust and gunk that had accumulated on it over time. I patched a few large cracks and then used some grey spray paint primer to give it an even base. With a few light coats of red satin spray paint and a few days of drying, my headboard was ready for the guest room.

I chose the red because I thought it would stand out nicely against the pale blue walls and pick up some of the red in the vintage travel posters that I have across the room over the console table that I made from a Japanese chest.

I am so happy to finally have a headboard in the guest room. I think the final result is quite striking. I got some new grey sheets with a tiny, subtle geometric pattern, but now the bed needs some fun throw pillows and some art above it as a next step.

What do you think? Do you like the red or would you have gone with another color?

Monday
Jul162012

Storage Ottoman Makeover For My Closet

My closet is a complete and total mess. Having enough space isn't the issue. It's a nice size for an old home with about 42" of hanging space on either side of the door. I have access to it from my room and then can walk through it to the master bathroom. Unfortunately, it is completely unorganized and I have all sorts of junk on the floor. I added a second hanging bar on one side, but that is all I have really done recently. The woodwork needs to be painted and I'd also like to paint the walls something other than white. I have a lot of shelving but because I am so short I can't reach it so it is currently wasted space.

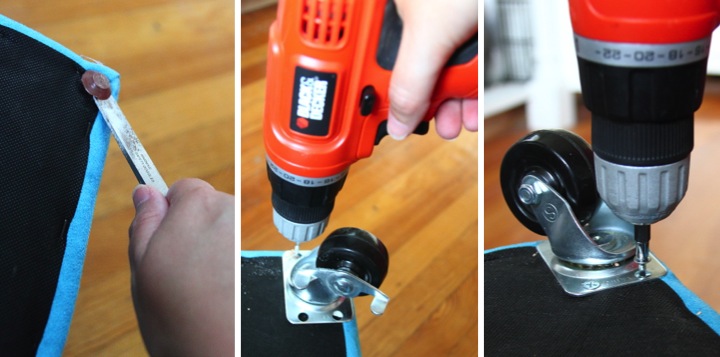
As a first step to make my closet more usable and organized  I decided to make it easier to access my shelves. I had this little turquoise suede ottoman that I thought would be perfect to make into a step stool. I wanted to be able to move it around easily so I decided to put it on casters. I didn't want it to slip out from under me when standing on it so I bought two locking casters and two regular swivel casters.

To mount the casters I started by flipping the base of the ottoman upside down and prying off the small feet that were on the ottoman. I then placed the casters in each corner of the ottoman with the two locking ones in opposite corners. I predrilled holes and then screwed them into the base.

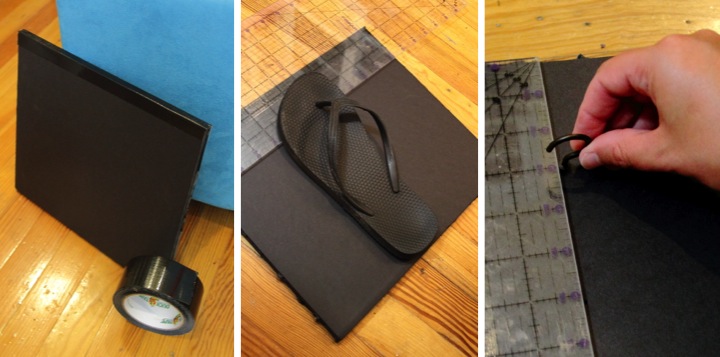
Now that the ottoman was rollable I decided to make the inside more useful as well. I have a lot of flip flops but no good place to store them and I thought this could be just the ticket. I used some black foam core, large cup hooks and black duct tape to make some partitions for my flip flops to hang from. I cut four pieces of foam core the width of the inside of the ottoman and 1/2" shorter than the height.

For the center I doubled up two pieces and put a piece of duct tape over the top of them to join them. I used a flip flop for a guide and determined that the hooks needed to be 2-1/2" from the top of the foam core. I then poked a cup hook into the foam core 3" from each side and 2-1/2" from the top. I repeated the same on the back side as well. I found that the hooks had a tendency to spin when I tried to hang the flip flops on them so I pulled them out, added a dab of hot glue and then replaced the cup hooks.

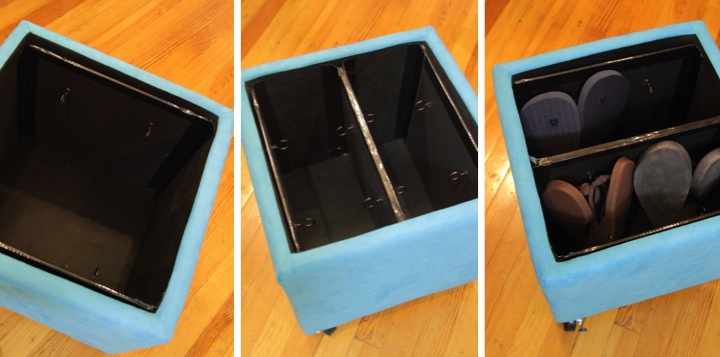
For the two end partitions I did the same process as above, but with a single piece of foam core and with hooks on only one side.

With all of my partitions complete I was ready to assemble everything in the ottoman. I placed the end partitions against the side and used duct tape along each edge to secure them to the ottoman. I then put the middle partition in the ottoman and taped it down as well. I finished by hanging some of my flip flops in the ottoman.

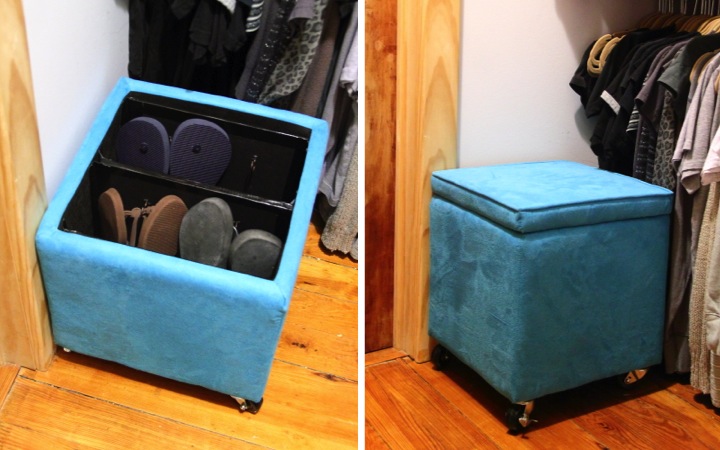
I moved my ottoman into my closet and it fit perfectly. I can also now reach my closet shelves when I stand on it which is really convenient. 

Now I need to find where the rest of my flip flops are hiding around the house and wrangle them in my new and improved ottoman.

Friday
Jul132012

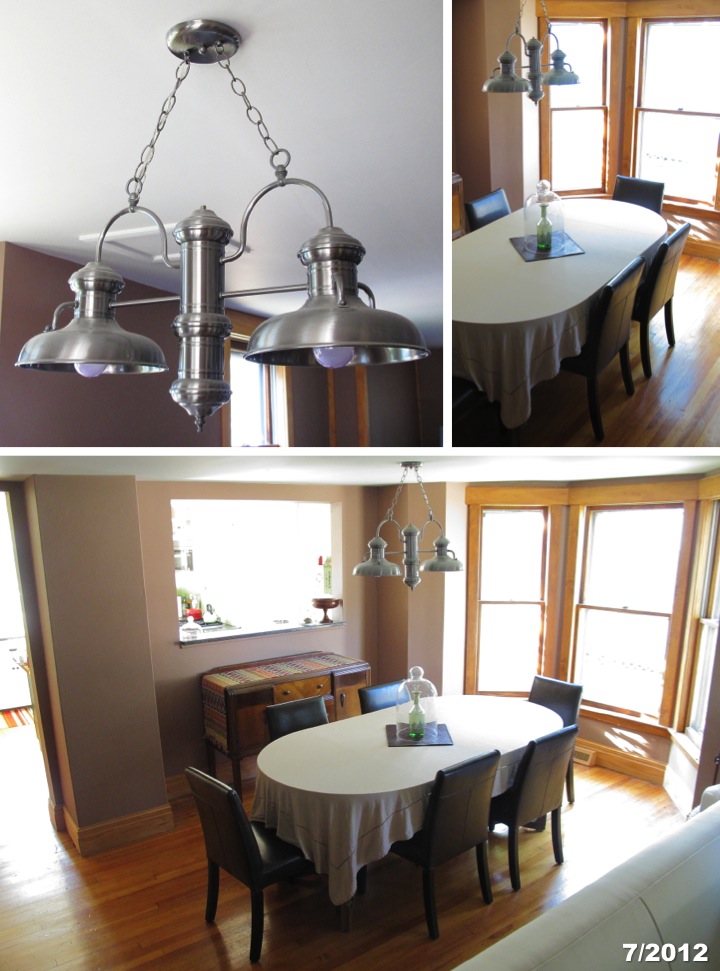
Dining Room Then & Now 

Somedays I get overwhelmed with all of the things I need to finish up around my home. Since I got my new dining room chairs a few weeks ago I keep thinking about all the things left that still I want to do in there like get a larger table, make curtains, change the paint color, add some wall art and replace the buffet with a built-in. The list just goes on and on. Don't even get me started on other rooms in the house.

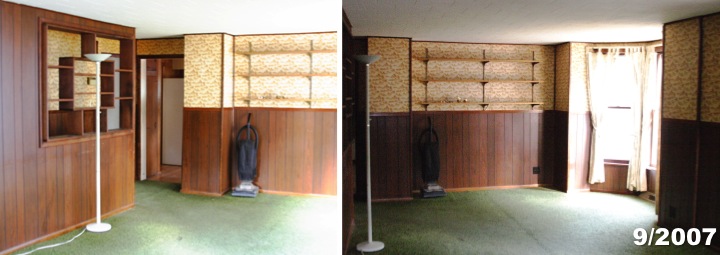
When I start to get discouraged it helps for me to reflect on how far I've come. When I first bought my house in September 2007 the dining area, like the rest of the house, was a nasty wreck. The floor was covered in green threadbare carpet riddled with stains. The crumbling plaster lathe walls original to the house had been covered up with faux wood paneling and wallpaper instead of being repaired. Likewise the crumbling ceiling had been hidden by a cardboard tile drop ceiling. The previous owners had been heavy smokers and everything reeked and was full of nicotine stains. The wallpaper which looked like it was yellow was discovered to be originally white based on the areas that had been hidden under the paneling. The whole place was in one word gross and everything needed to go.

After gutting everything to the studs, the situation got worse. Building practices in the late 1800s don't always meet modern building code. It turns out that the ceiling joists over the dining room and living room were huge beams about 8" x 8" spaced 48" apart. That is not anywhere even remotely up to code and so I ended up having to have the beams sistered with steel C-channel to give the proper support for the second floor load. On the bright side I discovered that the hardwood floor hiding under the carpet was in good enough shape to be saved.

With this part of the house in complete remodel I took the opportunity to rework the floor plan as well. Upon walking in the house a long wall created a strange hallway parallel to the dining room and living room. I had that pulled down which required moving some ductwork and electrical and enlarging the chase next to the bay window.  That really opened up the first floor, but the biggest change came from making a pass through into the kitchen. I love that I can see through to the back window of my house from my front door and the pass through is great for entertaining. Opening things up also made the bay window a focal point on the first floor instead of being hidden away.

With the structural changes done the walls were drywalled and painted and the hardwood floors were refinished. The original trim was too badly damaged to be reused but new trim to match the original profiles was put up around the windows and for the baseboards. My favorite part of the dining room remodel is the Hi-Lite two-light island pendant that I got on sale for $200. It has a beautiful finish and the price was a fraction of other similar fixtures.

Standing back and looking at the room as it is now, I still see the laundry list of items I want to complete to finish the space and give it some personality. But it is good for me to stop and take a moment to remember how far it has come and that the hard part is behind me.

Sunday
Jul082012

Decorating My Front Porch

Now that I've done a few little things to spruce up my front porch, like make a self-watering planter, spray paint my table teal and lay out a new rug, I thought it was time to decorate a little.

I wanted to add a few cute things, but because it is outside I didn't want to add anything valuable in case they got ruined.

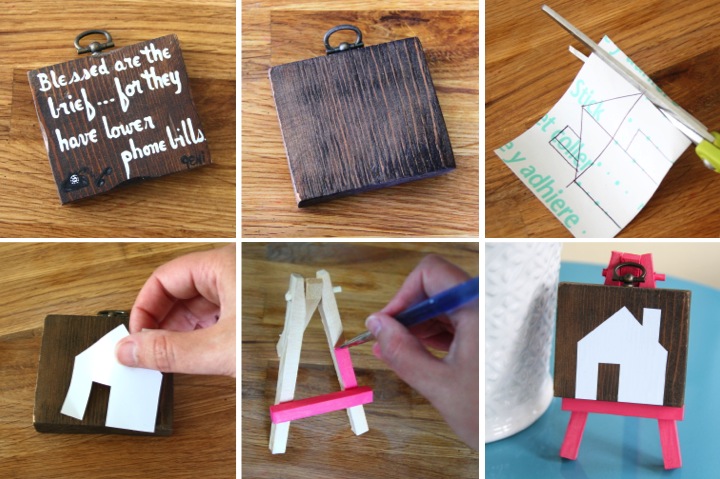
My first addition was inspired while I was perusing the Ann Arbor ReUse Center. I found a tiny wooden plaque that someone had hand painted with the message "Blessed are the brief...for they have fewer phone bills." At first glance it was pretty tacky, but when I flipped it over the backside was a nice already stained plaque in good shape. It was only $0.50 so I was sold.

Once I got home I decided that I wanted to add a little house silhouette on the front of the plaque. I had some extra vinyl left over from when I made my templates for etching my Limoncello bottles so I used that. I sketched out a house outline on the back of the vinyl, cut it out and adhered it to the plaque.

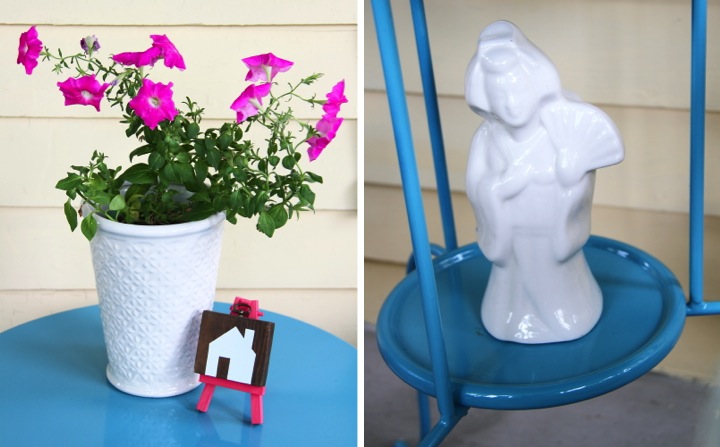
I needed something for the plaque to stand on and a tiny wood easel that I bought for a dollar from Jo-Ann Fabrics did the trick. I wanted to add a little color so I painted it coral pink with some craft paint. Once the paint was dried I set up the easel on my front porch table and placed the little plaque on it.

With my little home plaque joining my self watering petunia plant on the top of the table, I turned to finding something to go on the lower shelf of the table. Rummaging through some old things I came across this white ceramic geisha drink glass and thought it would be perfect. When I turned twenty-one I celebrated by going out to Benihana (yeah, I am a wild one!) for dinner and my very first legal alcoholic drink was a fruity mixed drink in that glass. Over the intervening years I've held onto it but it really hasn't done much other than collect dust. It was just the right size and proportion to fit on the shelf so outside it went.

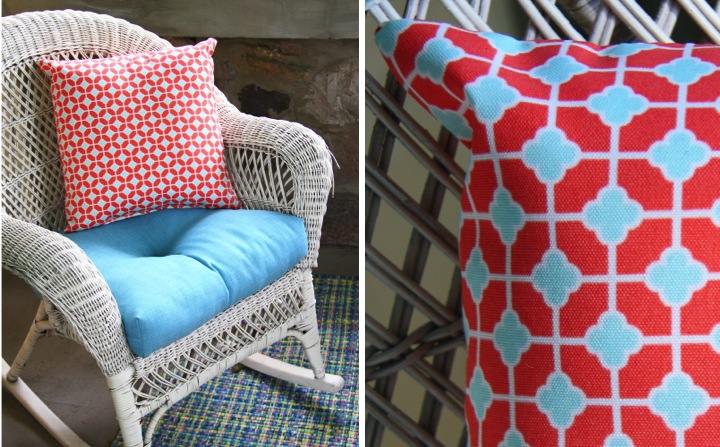
While I was at Home Depot picking up some paint I stumbled across these coral pink and light blue outdoor pillows on sale for $11. The pattern picks up the colors in my scheme and looks bright and cheery. They are also very soft and comfy which will make relaxing on the front porch even better.

I'm pretty happy with how everything has come together and while I am sure that I will probably do some tweaking later, I think it is basically finished...for now.

Are you enjoying your front porch this summer? Is it someplace that you enjoy hanging out? Have you done anything to decorate it? 

Monday
Jul022012

Living Room Side Table Makeover

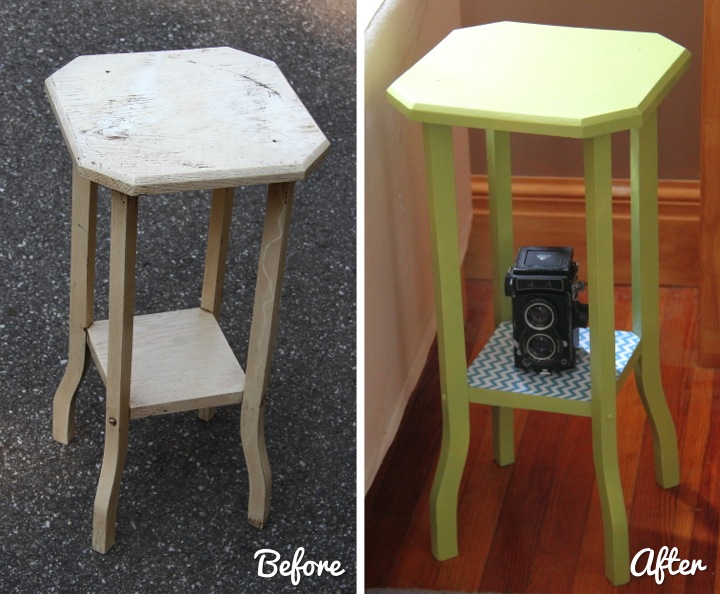
On Saturday I dropped off two donation boxes at the Ann Arbor ReUse Center full of household goods that I had purged from my home. While I was there I couldn't resist looking around a bit and I picked up a cute but very battered little end table for $5.

I have wanted a table to go on the end of my love seat in my living room for a while, but I needed something with a small footprint since I don't have much space. I think the little table I found was meant to be a plant stand but it is just the right size for my purposes. The height is great and now I have a spot for guests to place a drink when I am entertaining at my home.

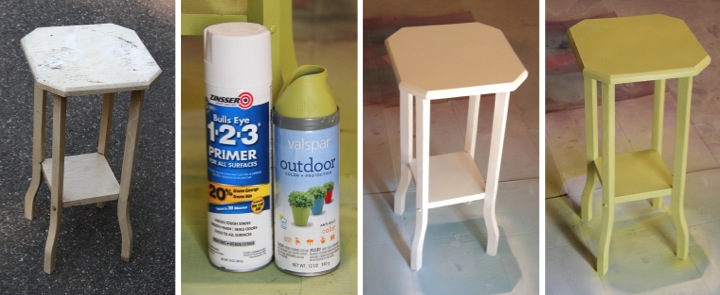
The table was sturdy and the wood was in good shape, but the cream paint finish was grungy and quite poorly applied. I cleaned up the table and gave it a coat of spray primer followed by two light coats of spray paint in Spring Sprout.

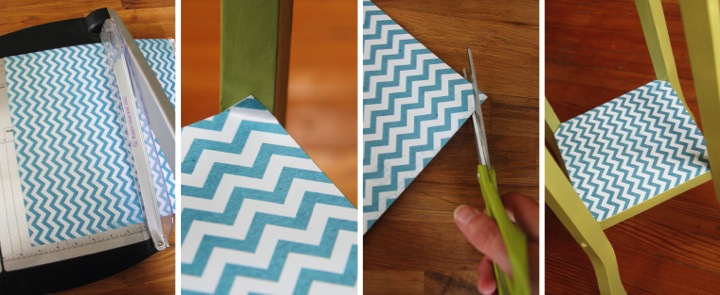
Once I let the table dry for a day I decided to add some paper to the bottom shelf for fun. I measured the shelf and then cut a piece of teal chevron scrapbook paper down to a square of the right size. The shelf attaches to the legs at an angle so I needed to trim off the corners to make the paper fit. I placed the paper on the shelf and then folded the paper up where it hit the leg. This gave me a guideline for trimming the corners and ensured a perfect fit.

I think that the table turned out really cute and I can't beat the price of less than $11 ($5 table + $4.98 spray paint + $0.89 paper). It looks really bright and cheerful now.

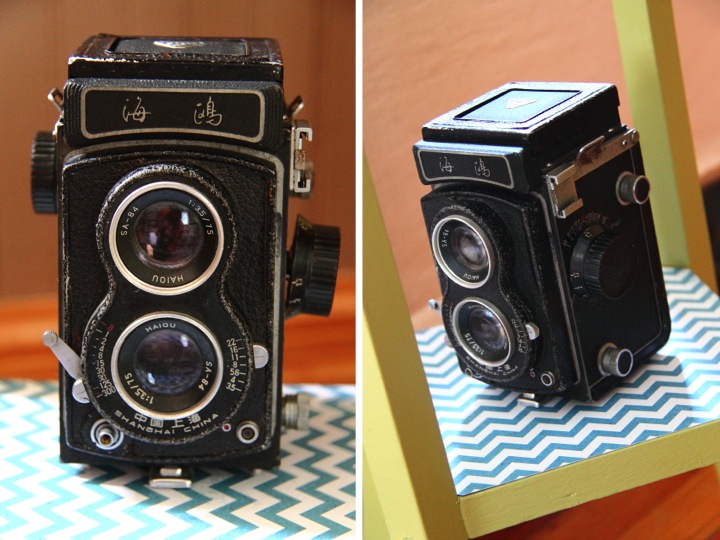
The table fits wonderfully next to my love seat. I thought that the little shelf would be the perfect place to display the vintage camera that I picked up at a little flea market in Shanghai, China. It isn't in working order but when I saw it I couldn't resist buying it, loving taking photos as much as I do. My favorite part about it is that it actually has markings on it indicating that it was manufactured in Shanghai. 

Have you made over anything recently? Are you up to any spray painting? I think I must spray paint something once a week. It's a compulsion I tell you!

This post is linked to the "Thrift It Challenge" on Our Fifth House.