Welcome

My name is Lisa and I'm a crafty girl with wanderlust working as an engineer by day. My blog chronicles projects in my home as well as pictures and stories from my travels.

Search


Instagram

Blog Index
The journal that this archive was targeting has been deleted. Please update your configuration.
Navigation

Entries in Home Decor (63)

Wednesday
May022012

Simple Carnation Flower Arrangement

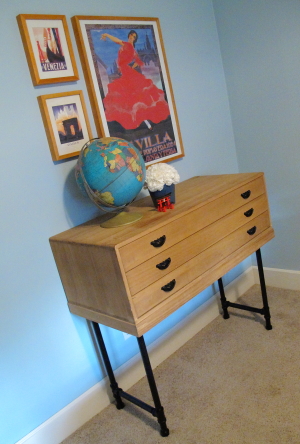
When I want to brighten up my home with flowers I love buying grocery store carnations to make a simple arrangement. I just made one to display on the console table in my guest room and I thought I would share how easy it is to do it.

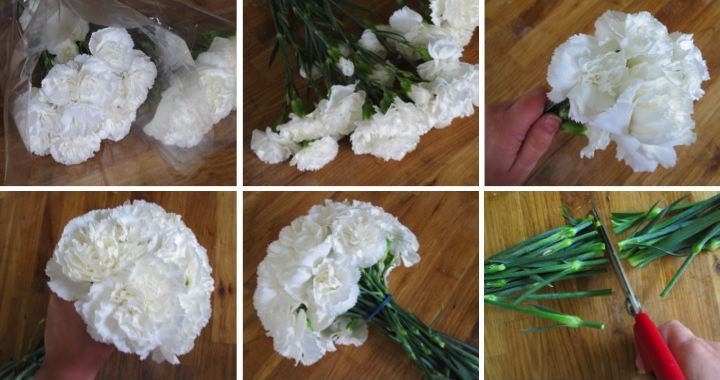
Depending on the size of arrangement I want to make I use two to three bunches of carnations. I like to try to find bunches that have slightly different shades of flowers to give the arrangement a little more depth.

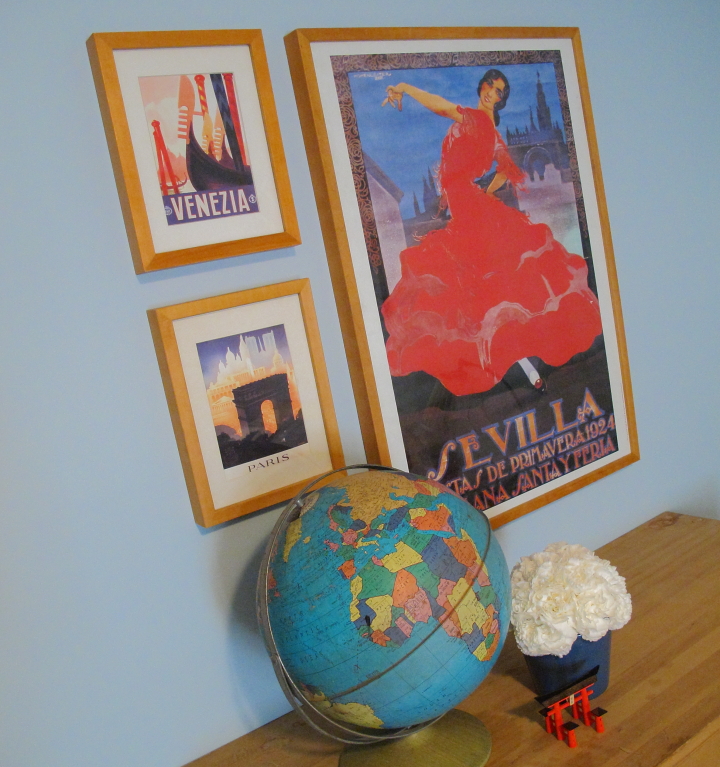
After opening up the bunches, I start to gather up stems in my hand, arranging them as I go to form a tight puff of flowers. Once I have built up the bouquet to the size that I would like I secure them close to the flowers with a rubber band and then trim the stems to fit in my vase. I always use an opaque pot or vase, but if you wanted to use a clear vase you could disguise the rubber band by tying a pretty ribbon over it.

I like this arrangement for two reasons. First, I can make it in about five minutes and I don't need any special flower arranging items, like frogs. Second, the carnations can last several weeks if taken care of which means pretty flowers in my house for a long time with little effort and little money. You can't beat that!

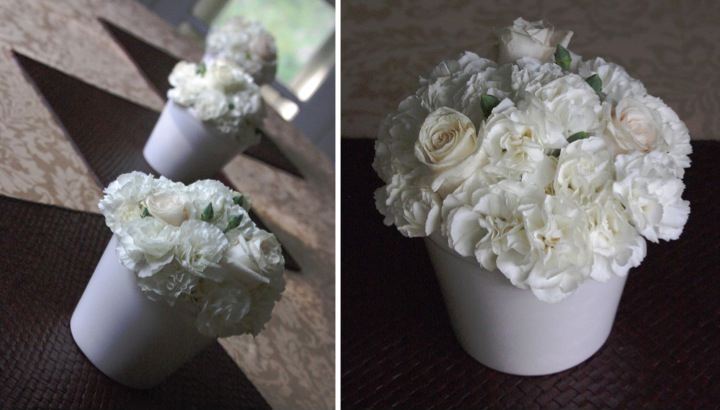
A few years ago when my friends, Pam and Pete, got married I hosted a small reception for them at my house. For the flowers I did a variation on this arrangement, just adding in a couple of white roses and the carnation buds into the mix. It made for a pretty table without breaking the bank.

Monday
Apr302012

Turning a Chest into a Console Table

I love the little tansu chest that I bought for my apartment while I was living in Japan, but at only 14" high it has been hard to incorporate into my home in the U.S. without it looking like a piece of doll furniture.

To solve my problem I decided to try to turn it into a console table. I wasn't able to find wood with the fine grain to match the chest for legs so I decided to match the black metal pulls instead.

While I was trying to figure out what to do I remembered seeing a DIY Industrial Cart on Ana White's site that used pipes between the shelves which inspired me to use pipes for the legs. 

I chose to use 3/4" black pipe which I thought would be sturdy enough to support my light chest. To start I threaded two tees onto each end of a 10" nipple. On the bottom of each tee I threaded a 3" nipple followed by an end cap. On the top of each tee I threaded an 18" pipe topped by a flange. I repeated the same process for the second set of legs.

Once I had the legs assembled I gave them a coat of tinted primer followed by two coats of matte black spray paint. After they were thoroughly dried I flipped my chest upside down and lined up the legs where I wanted them to be on the bottom of the chest. I marked where the flange holes would be and then pre-drilled holes for my screws. I then put the legs back on the chest and screwed them on to complete the transformation into a console table.

Comparing how short and out of place the tansu chest looked before, to how it has now become a piece of featured furniture in my guest room makes me really happy. I think elevating the chest has made a world of difference. The legs are quite sturdy and as an added bonus with the chest raised up I now have easy access to the outlet on the wall which was previously hidden.

After the console table was done I had a bit of fun decorating. I picked up the Sevilla, Venezia and Paris prints and poster during my travels and framed them in Ikea Ribba Frames. I have had the tin globe for several years and actually used for the photo in my banner. The tiny red torii gate is a souvenir that I bought while visiting Miyajima in Japan. I finished my display off by arranging a bouquet of carnations in a little blue pot. 

With this transformation I have one little corner of my guest room feeling cozy and welcoming. Now I need to get on doing something about the ugly bi-fold doors on the closet and making a headboard.

Sunday
Apr292012

Fresh Coat of Paint for My Guest Room

The first thing I decided to do to spruce up my guest room was to give it a fresh coat of paint. I really like the blue on the walls but the saturated color makes the room seem a little small so after looking at about thirty swatches of lighter shades of blue I settled on Valspar Inhale which seemed like a nice, light neutral looking blue.

I also wanted to paint my trim white. To save money I had the trim around the windows and doors made out of the salvaged wood paneling that had previously lined my stairs. Now I am not such a fan of the look since the wood had knots in it and looks a bit too country for me. Painting it white gives the trim a cleaner look which matches my style more.

To prep the room I moved my furniture to the middle of the room and removed my switch plates. Since I wasn't doing the ceiling I only taped down paper around the perimeter of the room. I planned to cut in by hand for the trim so I didn't do any taping there, but on the inside of the window I wanted to be extra careful so I taped there. When you remove tape, always do it at an angle to reduce the chance that some of your paint will come up with your tape.

I started by using two coats of a stain blocking primer on the trim followed by a two coats of a warm white, Chamois Cloth, which was part of the discontinued Martha Stewart Colors Valspar line. I like the color and I had some on hand because it is the same paint that I used for the trim in my master bathroom. Because I was going to do the walls afterward I made sure to overlap the white onto the walls so that I would have a nice area to cut in against later.

With all of the coats of primer and paint to make sure that the knots and grain wouldn't show through, the trim took a long time. The walls were a comparative breeze. Because the color I bought was a Valspar Signature color, it could only be mixed up as a paint with primer so the coverage was really good. In fact, I had planned on two coats but when I looked at how the first coat dried I decided a second coat was unnecessary.

I am really happy with the new color of the room. The white trim and lighter blue make it seem bigger and will allow me to add some brightly colored accents without overwhelming the room.  I have a bunch of ideas to try out in the room and with the fresh slate the new wall and trim color gives me I am ready to go. 

What do you think of the new, lighter color? Have you been doing any painting around the house? Do you have any plans to do so in the future?

Wednesday
Apr252012

Spray Paint Makeover & Japanese Pottery Fun in Seto

I've been trying to find just the right thing to put on the back of my toilet in my bathroom since it looks a little empty and plain. When I spotted this little chalice for two dollars at the Ann Arbor Reuse Center I knew it was a diamond in the rough.

The gold paint with the speckled red finish on the interior was absolutely hideous, but it had a cute shape and with a few coats of teal spray paint it was the perfect vessel to house a few shells and sit on the back of my toilet. I never stop being amazed at the power of a little spray paint. 

As a fun aside, I made the little bowl sitting next to the chalice when I was living in Japan. Not too far away from where I lived is a small town called, Seto, which has been famous for its pottery for centuries. In fact the generic word for ceramics in Japanese is setomono (瀬戸物) which literally means Seto objects. I signed up with my friend, Trisha, to go to one of the pottery studios, Kasen, to learn about traditional pottery in Seto and try our hand at making some of our own pieces.  

The owner of the studio, Hiroshige Kato, is a twelfth generation potter using clay from the same place as his forefathers 400 years ago. He showed us the spot where he digs for clay as well as how his kilns work and the traditional glazes used in Seto.

Back inside the studio Kato-sensei taught us how to knead the clay and then form bowls and plates on the potter's wheel. After the introduction we had an hour to play around making our on creations. Trisha was a little overly ambitious on the wheel and when her clay got a little off center had a few bowl collapses. She decided to keep one of her collapsed pieces anyway deeming it art and as a result Kato-sensei started calling her "Special Artist." Trisha decided the nickname was a badge of honor and we had lots of fun joking about it.

The whole experience was an awesome time and a really great deal, too. The cost was ¥2000 (about $20 at the time) for the class and then ¥500 (about $5 at the time) for each piece that you decided you wanted to have fired. In the end I decided to have seven of my bowls fired and picked out different glazes for them. After a few weeks the bowls were available to pick up at the studio. I love having my pieces around my home because in addition to being pretty they remind of the fun time Trisha and I had making them.

If you ever find yourself in Aichi prefecture in Japan I would highly recommend arranging to take a class at Kasen. The price structure is a little different than when I did it and the exchange rate has also changed, but it is still very reasonable and it is a really great chance to have a hands on experience making Japanese pottery.

Have you recently spray painted anything totransform it? Have you ever tried your hand at throwing pots? Did it turn out well or did you make some "Special Artist" pieces? 

Monday
Apr232012

Plans for my Guest Room

My friend, Erin, is going to be visiting in a little over two weeks so I thought I would switch gears from working on my study and cozy up the guest room before her arrival.

When I first bought my house this room in my side wing was one of the better of rooms in the house. It wasn't great but at least after I pulled down the fake wood paneling there was drywall hung (but not finished) underneath. The ubiquitous ceiling tiles were dingy looking and the carpet was stained and filthy.

I decided that I would live out of this room while the main part of my house was in full tear down to the studs mode so that meant I had to get it in shape quickly. After tearing down the fake wood paneling and I worked on mudding and sanding all of the drywall seams and screw holes. After that I primed and painted the walls blue and the ceiling white. With new trim work around the window and doors and some new carpeting the room was liveable.

I remember when I had the carpet guy come in to quote the job I asked him how quickly he would be able to schedule me in. He replied, "Why does it matter? It's not like you are living here anyway," referring to the fact that my house was completely torn up and in shambles. I told him that actually I was planning on living there because I had to be out of my apartment by the end of the month. He laughed and told me he wouldn't live there and I must be a tough woman.

Since getting the room habitable, I haven't done much in there other than set it up as a guest room. I have long term plans to replace the pressed cardboard ceiling tiles with bead board or drywall and get rid of my cheap carpeting for hardwood. I also want to replace the old hallow core door and bi-fold closet doors with solid wood doors that match the rest of the house.

I won't be able to get to any of that before Erin comes but I would like to freshen up the room and make it more comfy and welcoming before she arrives. Right now the room seems too blue and yellow and too barren to me. I'd like to get some curtains to add to the bamboo blinds, make a headboard and add some art to the walls. I love my tansu chests that I bought for my apartment in Japan so I'll keep those in the room but the current night stand is doing nothing for me (I bought it from the As-Is section of Ikea when I was in grad school). Back in Japan the short tansu chest was my coffee table and it worked well because my couches were also low to the ground. Now with the scale of U.S. sized furniture it looks a little short and out of place so I am thinking of seeing if I can turn it into a console table.

I have lots of plans and am short on time but hopefully I can knock a few items off the list before Erin comes. Wish me luck!

Thursday
Apr122012

If My Walls Could Talk

When I gutted my house to the studs I discovered a lot of things. Some things were unpleasant surprises, like a huge raccoon nest in my entryway wall. I evicted them.

Some things were really interesting like deducing some history of the house based on the wall framing. My house was originally about 18' x 26' and only one and a half stories tall. It was neat to discover the original roof line when the walls were opened up. At some point the roof was raised making the original section a full two stories and a back addition (where my kitchen and craft room are located) was added on. A side wing, which I was told by a few older residents in my neighborhood was at one point a little local grocery store, completed the building of my house. I think it is neat that my house evolved in four stages and I wish I knew more about the history behind each of the additions.

Besides uncovering some of the building history, opening the walls also revealed an unintentional time capsule of objects left inside the walls. Many of the items, like newspapers or calendars, were paper and were almost completely disintegrated, but some items, like the whiskey bottle in the picture below was salvageable. On the left is a photo of how I found it and on the right is how it looks after I cleaned it up. I wonder how it came to be in my wall and who it once belonged to. I'll never know, but it is fun to uncover these little bits from the past from my house and think about what a long history my house has had.

Sunday
Apr082012

Simple Easter Arrangement

Happy Easter! To me nothing represents the renewal of Spring like pussy willows so I decided to use them to make an Easter arrangement for my table.

Making this was super easy. To start I just put a bunch of pussy willows that I picked up at our Farmer's Market for a few dollars in a rectangle glass vase. To spruce up the plain vase a bit I took a strip of 6" painting masking paper, folded it in half and wrapped it around the vase, securing it with some double sided tape. I wanted to add a little spring color so I tied a bow around the paper with some spring green satin ribbon.

I needed a little something else so I made nests out of a trio of little wooden bowls that I picked up in a market in Brazil a few years back. I crumpled up some more masking paper and tucked a little bit in each bowl. I then cradled a single egg in each one and arranged the little nests next to the pussy willows.

I like that it turned out simple, yet with strong Spring feel. Now I need to get myself geared up to attack some Spring cleaning later this week. It's much more fun to decorate, though...

Did you do any decorating for Easter or for spring? Have you accomplished any Spring cleaning (unlike me)?


Monday
Mar122012

Stairway: Then and Now

When I bought my house in September 2007, the stairway up to the second floor was a hideous mess. The stairs were covered with worn out, filthy green carpeting and the wood paneling surrounding it made everything feel claustrophobic. The fact that a small wall mounted hurricane style light was the only illumination didn't help anything either. Not only did it look bad, but it was also not up to code with no hand rail and a head clearance issue.

After moving in, the whole stairway was gutted. The wood paneling was saved and cut down for trim in the back bedrooms, but everything else ended up in the dumpster. There were wood treads under the carpet, but they had been notched when the wood paneling was installed so they needed to be replaced. The plaster behind wood paneling was crumbling so that was torn out and new drywall was installed. For fun I picked a tomato red color for the walls. Drywall also replaced the ceiling tiles and crown molding gave it another special touch. 

Instead of the closed in look that the old walls of paneling made, using balusters along the stairs made everything more open and airy. Adding a handrail and angling the ceiling brought everything up to code. I found a pretty light fixture for a steal at the Pottery Barn Outlet and installed it over the stairs to brighten things up. 

The top of the stairs has a great little space for some decorating. Currently, I have an easel that I bought at Ikea holding a black and white picture that I took of a woman preparing fish in Chuuk, Micronesia. I was on a set of stairs looking over the woman when I took the photo so I thought it subtly tied in. To the right of the picture I have three sets of vintage fishing buoys that I picked up at a flea market in Florida. I love their bright colors and how they have worn with age. A small wooden stool that I bought at a flea market in Japan and a chocolate and cream houndstooth check rug from Pier 1 finish off the top of my stairs.

I love how cheerful and bright my stairway is and the difference between now and when I bought my home is like night and day.


Saturday
Mar032012

Plans for My Study

With my bathroom complete I am excited to get going on my next home project. I thought that fixing up one of the rooms in my side wing to make into a study for myself would be nice.

When I bought the house this room was by far in the best condition so I haven't done much with it. Unlike the rest of the house the walls were finished drywall so apart from patching an excessively large plumbing access hole in the wall that had been covered with a cork board (honestly, what were the previous owners thinking?) all I did to the walls was paint them pale green. With fresh paint throughout the room, a cheap temporary closet door and a bamboo blind that I bought on super sale the room was passable and I moved on to more pressing things.

Now I'd like to make this room into something usable for me. I already pulled down the pressboard ceiling tiles that the previous owners had stapled to the ceiling and found beadboard. Based on that discovery along with the ceiling slope and the fact that the room is set down two steps below the rest of the house makes me think that it was once a porch that was later enclosed. I love the beadboard so I am planning on trying to salvage it by pulling out the staples, patching the holes and refinishing it.

After the ceiling the biggest project in the room will be replacing the flooring. This is also the only room in the house where I haven't replaced or refinished the floor and I would like to add hardwood. I want to do the same for the rest of the side rooms (they currently have some cheap carpet I had put down for a short term solution in 2007) so I may wait and do all the floors at the same time.

I have a few other to do list items for the room like new trim for the door, closet and window, new doors for the closet and room (flimsy hollow core doesn't fit in with the solid wood five panel doors I have elsewhere) and crown molding. I'm also excited to make the room functional with a desk and daybed and then decorate, which is always the most fun. I can't wait to get started!

Monday
Feb272012

Refinishing My Bathtub

My last big task to finish in my bathroom was refinishing the outside of my old cast iron bathtub. The porcelain inside was in great condition but the outside was another matter. From afar it didn't look terrible but the paint was peeling a bit and the pale yellow color didn't match the bathroom's color scheme.

I looked up a bunch of things online about refinishing the outside of a bathtub and set to work. I covered the floor around the tub and used a stripper approved for indoor use to start removing the layers of paint. I had no idea how much paint was built up on the tub. Cream, yellow, green, peach... Just about any pastel color you could think of had graced the tub at one time or another. I kept applying stripper, waited for it to do its magic and then scrapped off yet another layer of paint. After I had most of the paint off I used my sander to get a smooth surface on the tub.

I was so excited when it was finally time to paint. After putting a coat of it on, however, I knew it was all wrong. The color was too bright and too blue to work well with my wall color. Frustrated, I headed to Lowe's with a sample of the wall color and of my original tub color choice to pick out something else. I found a color that was a bit more green hued and duskier, bought a quart in semi-gloss and returned home to try again.

Immediately I knew the second color was the perfect choice. After two coats I was really happy and eagerly pulled up the paper around the tub to clean up. Unfortunately, some of the stripper had dripped and soaked through the paper causing the finish on my floor to bubble up in a few places. I felt sick and couldn't believe that I had done this. I used a fine grit sandpaper to sand it off so you can't really see it anymore. I'm not sure if I should refinish my floor or if there is anything else I can do. If I do refinish it I'll wait until it gets warmer so I can have the windows open for ventilation. What would you do? Have you ever done anything like this? Do you have any suggestions about what I should do?

Anyway, apart from my floor mishap, I love how the tub turned out. It looks fresh and new and it ties into the rest of the bathroom so much better now. I just need to make my ceiling fan vent cover and I'll be all done with my bathroom to-do list.

If you are interested, check out the rest of my bathroom posts here: Bathroom Blog Posts