Welcome

My name is Lisa and I'm a crafty girl with wanderlust working as an engineer by day. My blog chronicles projects in my home as well as pictures and stories from my travels.

Search


Instagram

Blog Index
The journal that this archive was targeting has been deleted. Please update your configuration.
Navigation

Entries in Home Decor (63)

Saturday
Jun302012

Front Porch Rug

As I was sorting through things at my house I rediscovered a pair of 30" x 50" woven rugs.

When I lived in California I would frequently stop by the Crate and Barrel Outlet Store in Berkeley for some fabulous deals. I picked up these rugs for a ridiculously cheap price (around $10, if I remember correctly). After I moved to Michigan I didn't really have a place where they fit in my house so they have just been sitting packed away.

When I stumbled upon them again I thought that they would be perfect on my front porch. The weave has a royal blue with teal, yellow and pink which really ties together all of the colors I have out front. They aren't meant to be outdoor rugs, but they are sheltered from the elements by the porch roof and since I already had them and wasn't using them I figured I have nothing to lose. 

I decided to make a runner out of the rugs. To attach them together I used the marvel of modern life: duct tape. Is there anything you can't use duct tape for? It really is amazing...

I flipped one of the rugs face down and adhered a piece of duct tape along the edge, overlapping half of the tape on the rug. I then flipped it right side up and then aligned the edge of the second rug so that they butted up together snuggly. I pressed the rug firmly into the tape and then flipped them upside down once more. I added some cross pieces of duct tape to ensure they wouldn't pull apart. After that I flipped the rugs right side up again and I was done. 
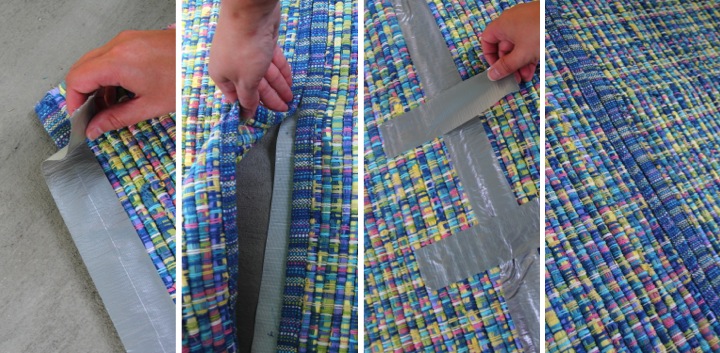
You can see the edges of the rug since the edge binding is a little different, but the rug pattern is so busy I don't think it is very noticable. I think the rug looks great and really makes the porch a cohesive space.

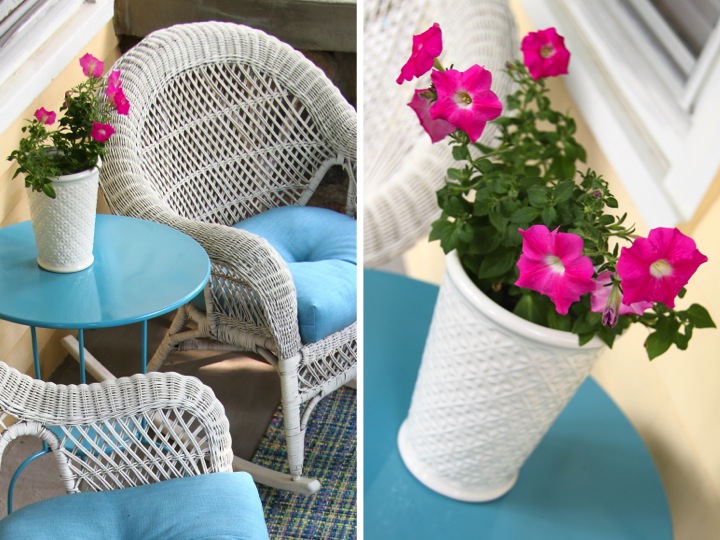
While I was out on my porch taking pictures I thought I would give an update on my self watering planter that I made using a soda bottle. Two weeks later in ninety degree heat, my petunia is thriving. It has been blooming nonstop and I couldn't be happier. I checked on the water in the resevoir today and it was a little low so I added some, but that is all the maintenance I have had to do.

I decided to switch out the pot I had set the planter inside. I found this white pot on clearance at Target for $6 and liked that it wasn't as tall as the pink tin I had originally used. I think it looks more balanced now.
I love spending time on my front porch and this latest update makes it feel even more cozy and welcoming to me. Have you been hanging out on your front porch this summer? 

Tuesday
Jun262012

New Dining Room Chairs

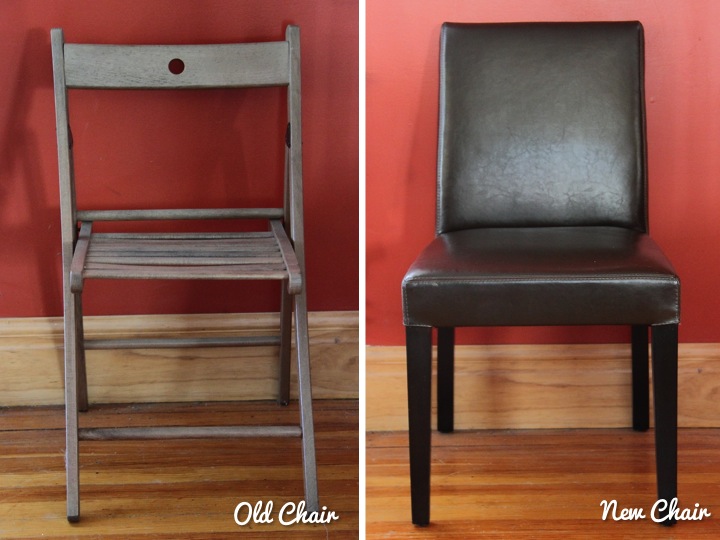
I am so excited that I got new dining room chairs yesterday. Well, they aren't brand, spanking new but they are new to me and I couldn't be more thrilled.

For the past several years I have been using Terje Folding Chairs from Ikea as my dining room chairs. I have also used the chairs outside and between exposure to the elements and the number of years they have been in service the chairs have been looking quite rough. I have wanted to get some nicer chairs that were more durable and comfortable, but everything that I liked seemed to be a minimum of $200 per chair. I wanted a set of eight and I couldn't justify the expense.

Yesterday morning as I was perusing Craigslist before work I found a posting for a set of eight Lowe Chocolate Leather Side Chairs from Crate and Barrel for $500. These chairs sell for $199 each so after tax the set would have been nearly $1700 for me if I bought them new. I quickly emailed the seller and anxiously awaited a response. I finally heard back that someone was going to stop by to look at them the next day but she would sell to the first offer.

As soon as I got out of work at seven yesterday evening I headed over to check out the chairs. They were in mint condition and the seller mentioned that they barely use their dining room. I was sold on them, but could only fit two of the chairs in my little hatchback. Luckily, Frank has an SUV so he helped me pick up the remaining six a bit later in the evening.

I love the chairs and they instantly made my dining area look nicer. They are also really comfortable and I just couldn't beat the price at over 70% off. The only issue is that the chairs don't fit well at the heads of my table with the way the table legs are angled. It is a junky laminate top table that I bought for $10 several years ago so this just gives me a good excuse to look around for a replacement.

So what do you think of the new chairs? Have you gotten any killer deals lately that you can't believe?

Saturday
Jun232012

Going Away Party For Trisha

My friend, Trisha, is moving out of state for a new and exciting job so last night I had a little dinner party for her and some friends over at my house.

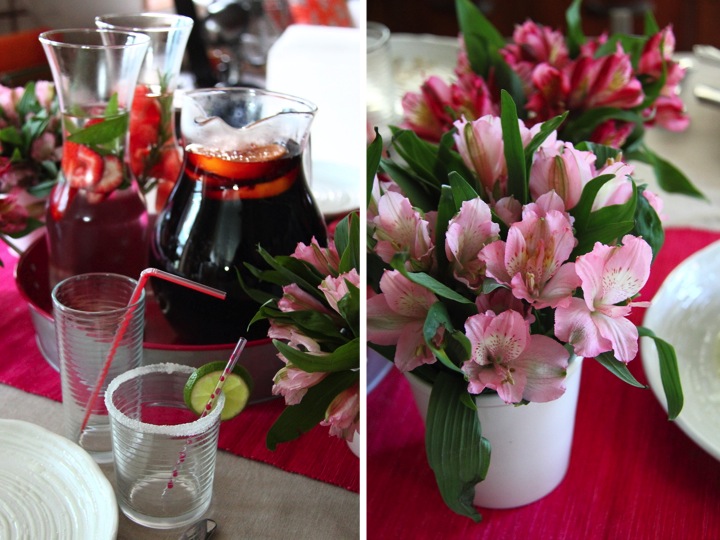
To set the table I started off by laying out a kraft colored linen tablecloth and then laid out a pink table runner and pink napkins at each place setting. I also laid out two glasses at each place setting. The short, wide glass was for sangria decorated with a sugared rim and a lime slice with a short pink polka dot straw and the tall, skinny glass was for water with a tall pink bendy straw. 

For flowers my grocery store had bunches of alstroemeria on sale for $3 each so I bought four bunches in two shades of pink and placed them on the table in little white flower pots.


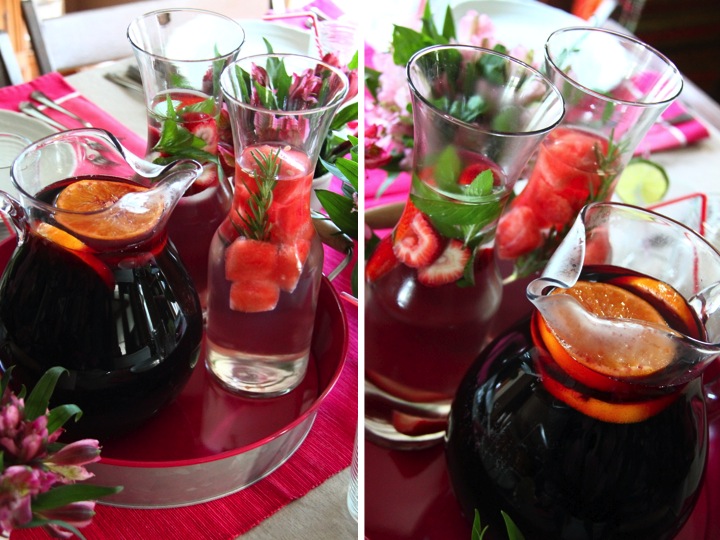
For drinks I made two different flavored waters, strawberry-mint and watermelon-sage, and set them out in glass carafes. For those who wanted alcohol, I sliced up some oranges and put them with some sangria in a pitcher. I placed my drinks in a pink metal tray at the center of the table.

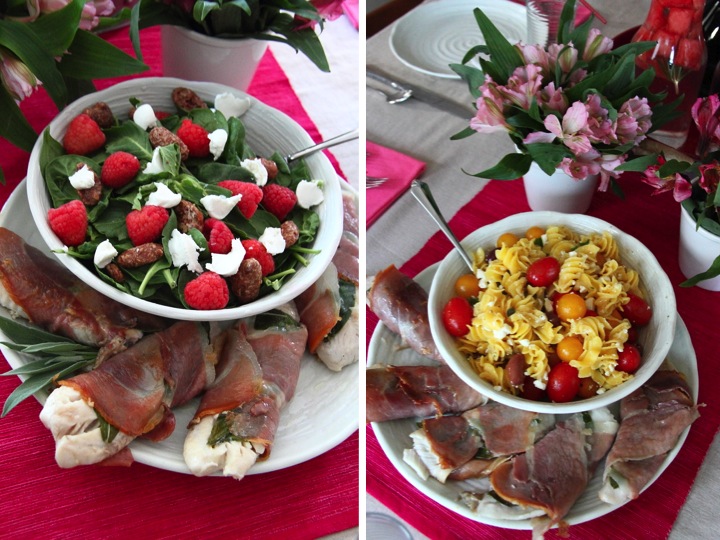
For food I had to be careful of my menu to make it gluten-free. I used a quinoa-corn pasta to make a pasta salad with cherry tomatoes, feta cheese, kalamata olives and parsley. I also made a spinach salad with goat cheese, raspberries and sugared pecans and tilapia wrapped in sage and prosciutto. 

We had a fun time and it was so nice to have everyone over and celebrate our friendship with Trisha. Good luck with your move, Trisha! We love you!

Tuesday
Jun192012

How to Mount Photos

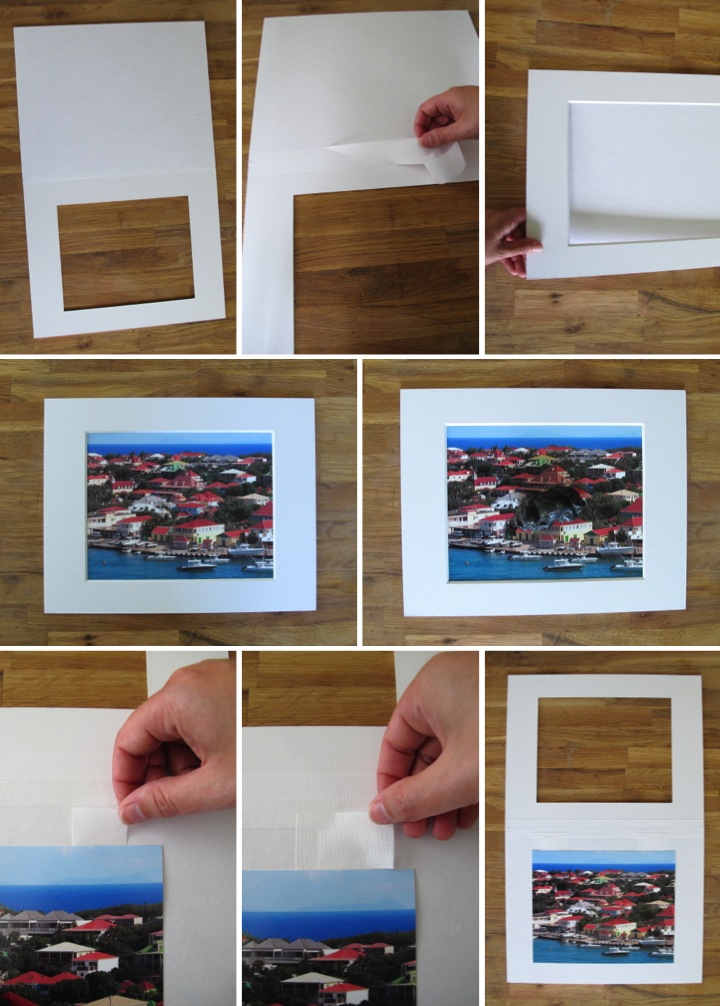
While I was mounting the photos from my giveaway to celebrate my six month anniversary of blogging I thought I would share how to do it. Pictures can buckle when the mount board, mat board and picture expand and contract at different rates when the temperature changes. By hinging the mat board to the mount board and hanging the photo from T-hinges you keep the picture as free to move as possible and minimize the chance of warping.

To mount a photo you need a mat board and mount board that are the same size and some linen tape. Start by laying your mount board face up with the mat board face down and align their edges. If the thicknesses of the mat board and the mount board aren't the same put something underneath the thinner one so that they are level. Cut a piece of linen tape the width of the boards and then lay it along the seam between them to make a hinge. Flip the mat board down and so that it is right side up.

Now that you have hinged the mat and mount board the next step is to mount the photo. Place your photo under the mat board and adjust it to the position you want. Once you have it where you like it, place a paper weight on the photo to hold it in place and then flip the map board back. Cut two short pieces of linen tape. Carefully lift up the top corners and slip the tape halfway under with the sticky side up. Cut two more pieces of linen tape and then place them sticky side down over the previous pieces of tape. The picture will now be hanging from the two tape T-hinges. To complete just remove the paper weight and flip the mat board pack over the picture. Your picture is now ready to frame.

Monday
Jun182012

Scrabble Tile Wall Art


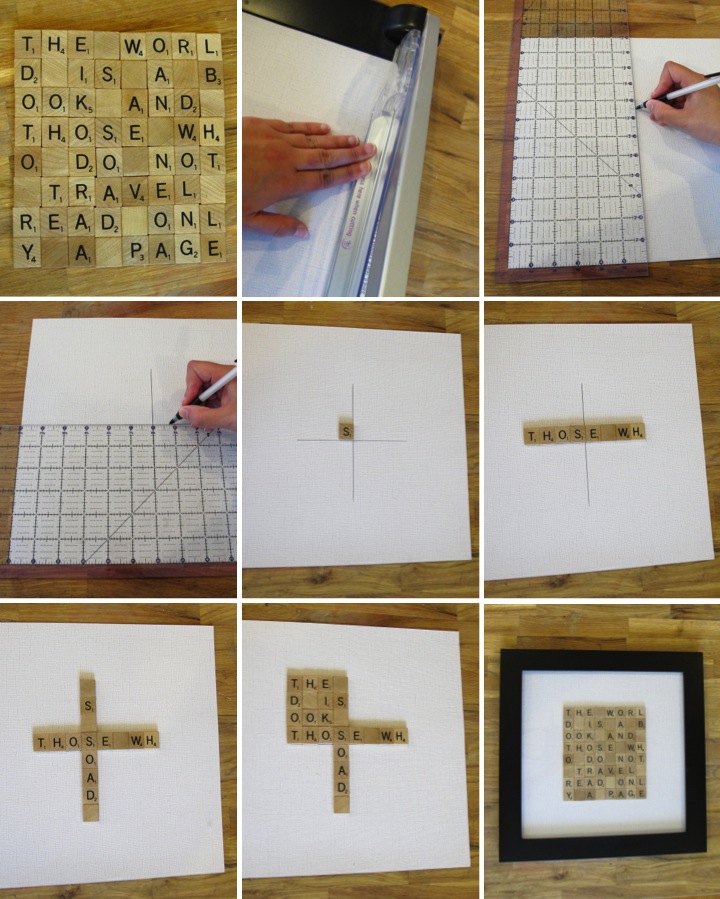
I love playing Scrabble so I've been meaning to make some kind of wall art for a while with Scrabble tiles. After thinking about it for a bit I decided I wanted to write out a quote with the tiles and instantly the following quote by St. Augustine came to mind, "The world is a book and those who do not travel read only a page." To me it is perfect for the project for so many reasons. I love to travel so the quote resonates with me plus the reference to books reflects my love of reading and ties back to the word game of Scrabble.

With my idea set I bought some wooden Scrabble tiles on eBay and then laid out my quote design into an 8 tile by 8 tile square. I didn't have enough blanks so I just flipped over some letters that I was unlikely to use later (like Z and Q) for my extra spaces.

I also bought a piece of white textured scrapbook paper and a 12" x 12" picture frame. The frame came with a double mat about the thickness of a Scrabble tile so I knew it would be able to fit my project. I trimmed my paper to fit in the frame  and then measured to the center of the paper, drawing a vertical line just a bit shorter than the height of my tile design. I repeated the same procedure in the horizontal direction. This gave me guidelines to be able to make everything straight and centered.

I started by using a tiny dab of hot glue to adhere the tile that went in the corner of the upper right quadrant, aligning it with my guidelines. Working from the center out I then attached the rest of the tiles in that line. Next, I placed the tiles along the vertical guideline, again working from the center out. To finish up I filled in each quadrant in the same manner.  After that I just popped the paper in my frame and it was ready to hang.

I decided to hang my Scrabble tile quote over a bookcase that I have in my upstairs hallway. I paired it with a carved wooden vase that I picked up in the little mountain village of Batad in the Phillipines. Inside the vase I put my Chuukese love sticks that I bought when I was visiting Micronesia to go scuba diving. I placed my framed butterfly wings from Costa Rica on a small easel to finish off my display. I think that my new Scrabble wall art and display arrangement definitely perks up this little nook of my home.

Saturday
Jun162012

Treasures From My Travels: Sea Glass Souvenir Display

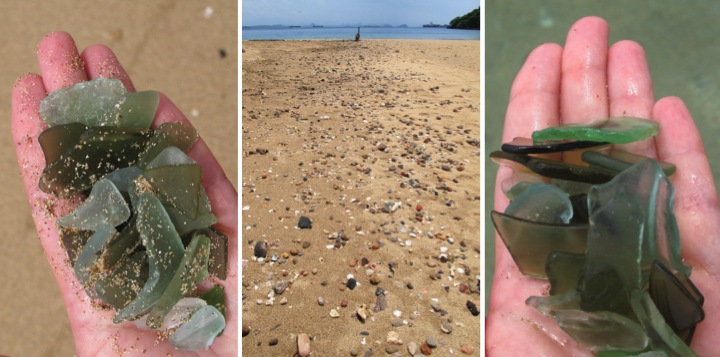
When I posted about the souvenirs that I bought during my recent trip to Panama I forgot to mention a free souvenir that I literally picked up. On the day that Missy and I spent on Isla Taboga, an island off the coast near Panama City, we lounged at the beach for a good part of the day and cooling off in the water in an attempt to escape the ninety degree heat.

There was a lot of sea glass washed up on shore so we decided to collect some, rinsing the sand off in the ocean. I gathered a handful of pieces but Missy lives in the Caribbean and is a sea glass finding expert so she found a bunch and shared with me. That is sisterly love!

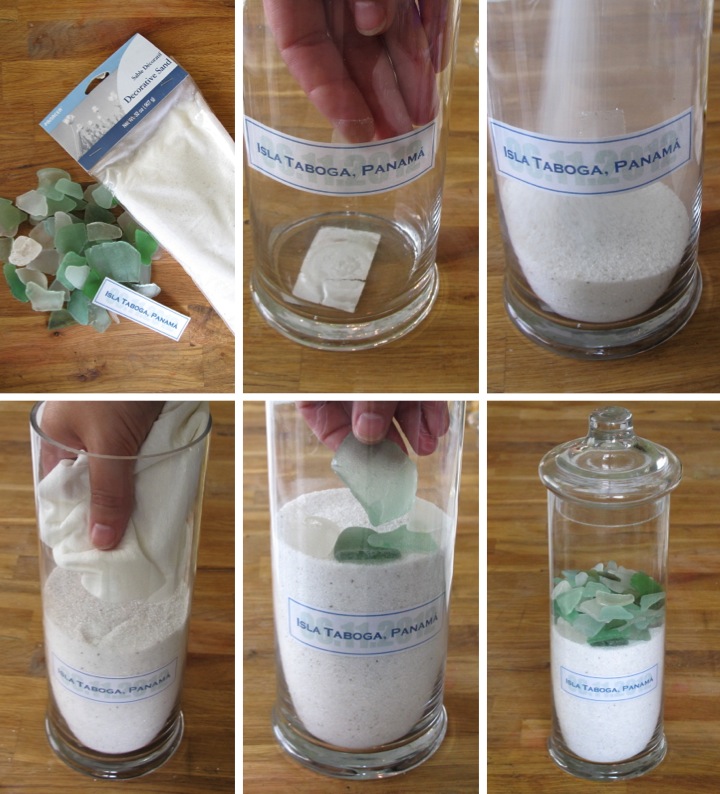
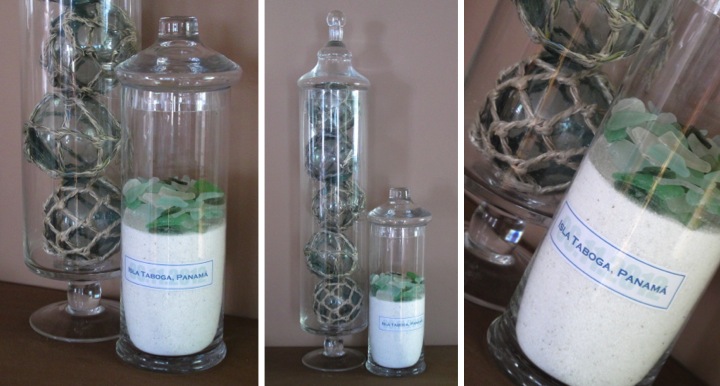
Now that I am home I wanted to do something cool with my sea glass. I found a tall slender glass apothecary jar on sale and thought it would be perfect to use. To make my display I started by printing out a little tag with the location and date and cut it out. I then put a little tape on the top back edge of the label and adhered it to the inside of my glass jar. I used some craft sand and filled up the bottom of the jar until the label was secure but not so much that the tape was covered. I then gently peeled off the tape and added more sand until I reached the level that I wanted. You have to be careful to slowly add the sand so that grains don't sneak in front of the label. Pouring the sand in the jar left a dusty residue on the upper part of the jar so I wiped it clean and then finished my display by layering the sea glass on top of the sand.

I think it turned out cute and it pairs well with the Japanese glass fishing floats that I picked up at the Toji Flea Market in Kyoto in December.

Do you like to collect sea glass? Do you have a fun way to display it in your home?

Thursday
Jun142012

Treasures From My Travels: Panama Souvenirs

Yesterday I returned from a wonderful trip to Panama with my sister. We visited the canal, saw the old colonial city in Casco Viejo and went hiking in the rainforest. We spent a day in El Valle de Anton, a small town located in an extinct volcano crater, and a beach day on Isla Taboga, an island off of the coast near Panama City. During the whole trip we enjoyed some wonderful food and I especially enjoyed the ceviche and fried yucca.

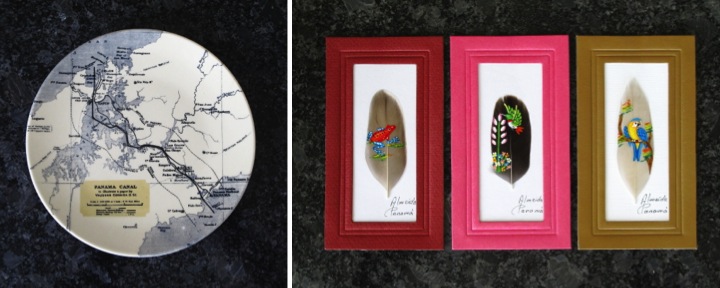
While on my trip I also collected some new treasures to decorate my home. When Missy and I were visiting the Miraflores Locks at the Panama Canal we popped in the gift shop. Although most of the items were a bit too kitschy for our tastes we really liked the plate with an old map of the canal and we both ended up getting one.

Throughout our trip we saw tiny paintings on feathers for sale and I ended up buying three. I love all of the detail on the birds and frog. I'm not so keen on the colors of the mats but that can easily be swapped out when I frame them.

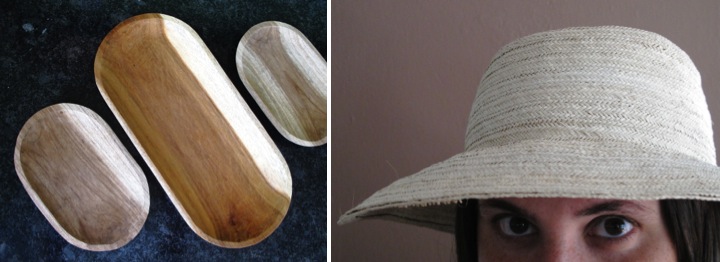
While Missy and I were in El Valle we went to the artisans market and had fun wandering around. One item that we saw a lot of were bateas, which are wooden trays used for tossing corn and rice. Some of them were finely sanded and lacquered but I really liked the unfinished ones that you could clearly tell were handcarved. They also happened to be much cheaper which was another bonus for me. There were some really huge ones I wish I could have taken home but I settled for a mid sized one (B/.5) and two small ones (B/.2 each).

Also at the market, Missy and I couldn't resist getting ourselves some Panama hats. We looked at different hats with different quality of weaving and tried a bunch on until we found ones that we liked. I think it will make a great beach hat.

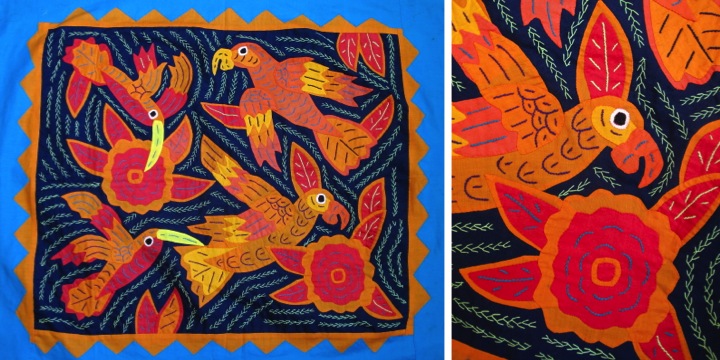
As much as I love all the things I collected on my trip, my very favorite is a mola that I bought from a lady at a stand in Casco Viejo. Molas are part of traditional blouses of the Kuna women, with one panel being used for the front and another for the back. The have very beautiful reverse applique designs in bright, intricate patterns. The one that I bought has bird and flower designs in orange, red, teal and navy. I absolutely love the design and how skilled the tiny stitches are. At B/.42 ($42) it was by far my most expensive purchase but I thought it was worth it for the craftmanship and large size of the mola.

Now that I have had the fun of acquiring these treasures during my trip I get to have the fun of figuring out how to incorporate them into my home. I am thinking of framing the mola for my guest bedroom but other than that I have no plans yet. I'll have to see what I can come up with.

Wednesday
May302012

Treasures From My Travels: Nisshin Flour Milling Sign

I love bringing home things from my travels to decorate my home and each souvenir is special, but my Nisshin Flour Milling sign has a particularly dear spot in my heart.

I bought the sign at the wonderful To-ji Flea Market. To-ji is a beautiful Buddhist temple in Kyoto and on the first Sunday of every month there is an antiques oriented flea market on the grounds. After my friend, Trisha, and I had our debacle of visiting the market with no access to our money (the ATMs were closed) we went back two months later.  

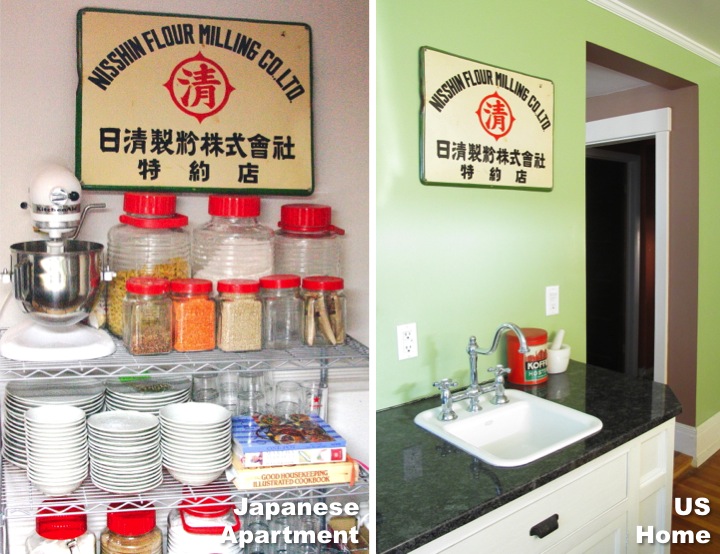
On that second trip to To-ji Flea Market I found my vintage metal Nisshin Flour Milling sign. My kitchen in the US was red and green so as soon as I saw it I knew it would be perfect to hang there when I moved back. I also love to bake so being a flour milling sign gave it extra meaning. I love the worn patina it has with some small rust spots dotting the cream background and green border.

I did a bit of haggling and got the sign for ¥2000 (about $20 at the time) and happily lugged it home. I was not allowed to put holes in the walls of my Japanese apartment and the metal sign was too heavy for Command Strips so I propped it on top of my dry goods storage shelf.

When I moved back to the US I didn't want to pack the sign in my sea shipment (just in case it got lost and also because I didn't want to wait two months for it to arrive) so I put it in the bottom of one of my checked bags on my flight home. It was so heavy to lug that bag around but so worth it. My Nisshin Flour Milling sign was the very first thing I hung on my walls when I moved back into my house. When I was struggling with readjusting to life back in the US, seeing it in my kitchen gave me a sense of continuity and brought back good memories of Japan.


Of course I had to do a little digging into the history of the sign. The first line of Japanese Kanji reads 日清製粉株式會社  and means (yes, you guessed it!) Nisshin (日清) Flour Milling (製粉) Company Limited (株式會社) and the bottom three characters mean Distributor (特約店) so the Japanese didn't really give me any additional information. I did some internet searching and found that the company was founded in 1900 as Tatebayashi Four Milling Company. Later in 1908 when Tatebayashi merged with Nisshin Flour Milling Company, the company incorporated under the Nisshin Flour Milling Company name. The company is still in existence today and Nisshin Flour Milling Inc. is one of the subsidiaries of the holding company, Nisshin Seifun Group Inc. Isn't it amazing what you can dig up online?

It has been nearly four years since I bought my Nisshin Flour Milling sign and it is as special as ever to me. It has graced my kitchen wall on two continents and traveled in my suitcase with me. It also represents different sides of me, loving to travel (Japan) and loving to do things at home (flour) and will always be a treasure to me.   

Linked To: Centsational Girl's Favorite Souvenirs Link Party

Monday
May212012

Folding Luggage Stand Makeover for My Guest Room

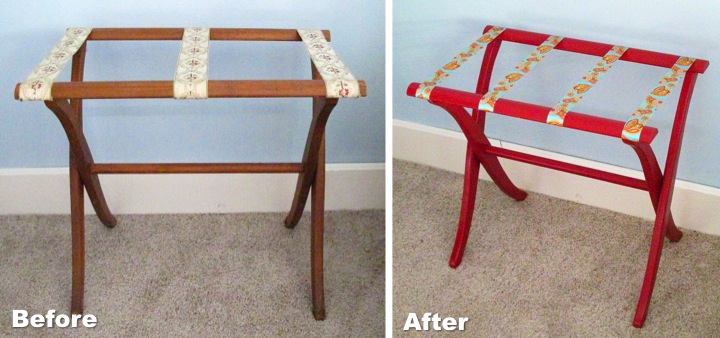
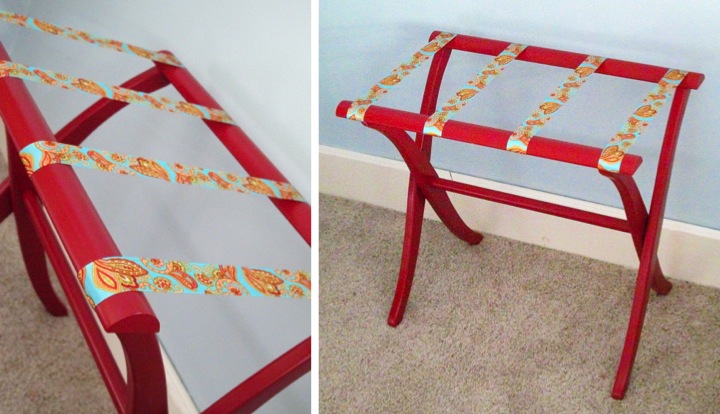
As I was cleaning out my garage on Saturday I rediscovered an old folding luggage stand that I had picked up for a few dollars several years back. It was in nice shape but the color of the wood and the ribbon wouldn't fit in with the style of my guest room so I decided to give it a little makeover.

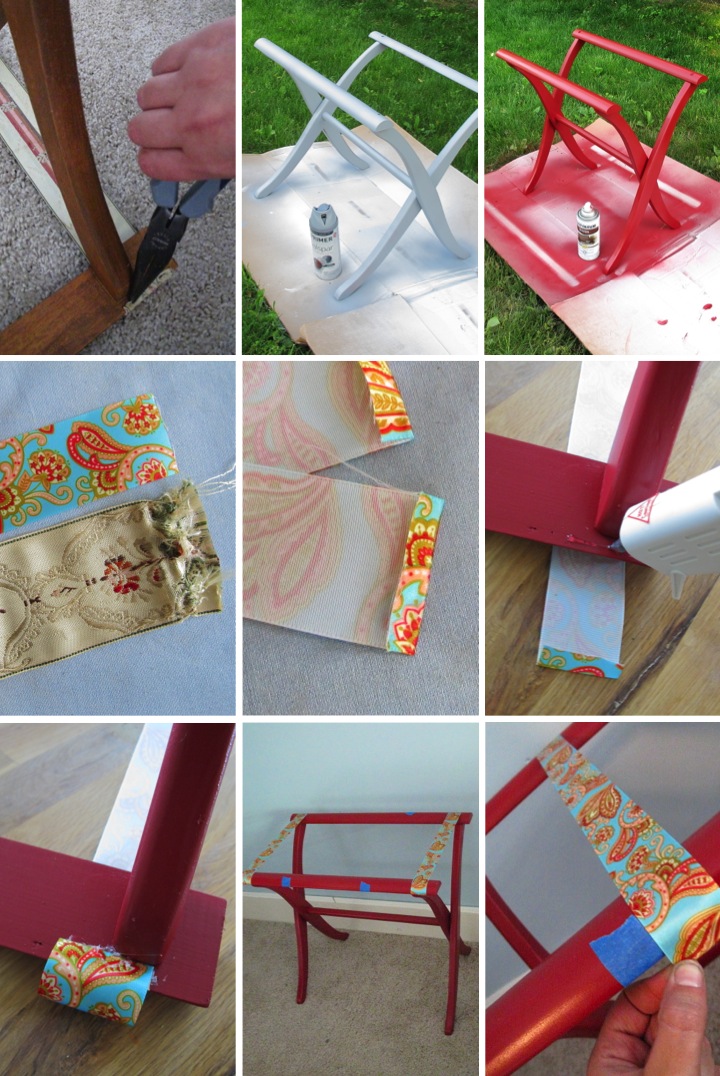
I started by using a needle nose pliers to remove all of the staples that held the ribbon onto the stand. With the ribbons removed I gave the wood stand a good cleaning followed by a light sanding. I then primed it with a grey spray paint primer followed by some light coats of red spray paint. Whenever I am using deeper colors I get better results if I use grey primer instead of white.

After the stand was dry it was time to add the new ribbons. Using the old ribbon as a pattern I cut new ribbons to length and then ironed under 1/4" on each end. Because my old ribbon was 2" wide and my new ribbon was only 1-1/2" I decided to increase the number of ribbons to four.

I started attaching the ribbons by working on the ends. I flipped the stand upside down on top of the ribbons and used a glue gun to glue them to the underside of the stand. For the middle two ribbons I wanted to make sure everything was taut so I stood the stand right side up to attach them. I measured out where they should be placed and marked the spots with blue painters tape and then glued them in place.

I had picked up the stand a few years back and already had the spray paint and primer so my total cost for the project was $3.50 for the spool of ribbon. Not counting paint drying time it took me about forty-five minutes of hands on time to complete the makeover.

The new version of the stand is very bright and cheery and a nice improvement over the way it used to look. I think it will make a fun and useful addition to my guest room.

Sunday
May062012

Treasures From My Travels: Costa Rican Butterfly Wings

When I was visiting Costa Rica I was enchanted by the amazing butterflies that seemed appear everywhere.

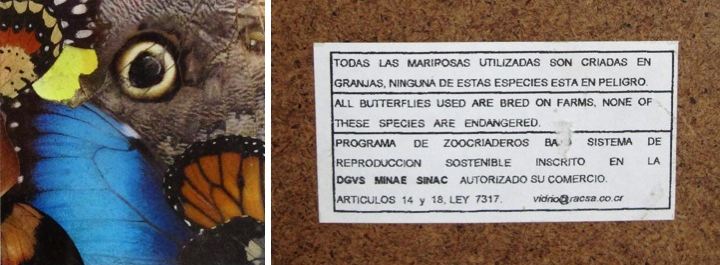
I wanted to bring a butterfly souvenir home with me but I knew that many of the mounted butterflies for sale were captured in the wild and could be endangered. When I found this little collage of butterfly wings at a local artisan market I knew it was perfect.

The butterfly wings in the collage are all from non-endangered farmed butterflies and were collected after the butterflies had already died. I love the colors in the wings and the beautiful patterns they make. It is a lovely reminder of the amazing time I spent in Costa Rica.

If you are interested, check out other items I've gathered along my journeys here: Treasures From My Travels

Page 1 ... 2 3 4 5 6 ... 7 Next 10 Entries »