Welcome

My name is Lisa and I'm a crafty girl with wanderlust working as an engineer by day. My blog chronicles projects in my home as well as pictures and stories from my travels.

Search


Instagram

Blog Index
The journal that this archive was targeting has been deleted. Please update your configuration.
Navigation
Wednesday
May072014

Scandinavia!

Frank and I got home Monday from a wonderful two and a half week trip to Scandinavia. My maternal grandparents have Swedish and Norwegian ancestry so this was a particularly special trip to me. With my combination of jet lag and long days  to start catching back up at work I thought I would just share a few favorite pictures from the trip today. I look forward to sharing more in the future!

Monday
Apr142014

Rearranging the Master Bedroom

After I moved back to the US from living in Japan I set up my bedroom with my bed between the windows. I liked the setup so I never changed much in the intervening years.

When Frank and I got married and he moved in things needed to change. While my full size bed was fine for my life as a single lady Frank is a foot taller than me and there was no way it was going to work anymore. Since we also needed more storage space for Frank's clothing I set about looking for a king size bed frame with storage drawers.

I spent a little while hunting around for something just right. Some frames had drawers only on the sides or only on the ends but I wanted both. I also wanted something that would coordinate well with the antique dressers I inherited from my great grandmother.

Finally I found the Abbott Storage Bed at Art Van. It had a classic style with six deep drawers plus the mahogany stain was just the right color.

Purchasing the king size bed necessitated rearranging the layout of the room. The full size bed had barely fit between the two windows at the front of the house and the king bed looked quite awkward in that spot. After a combination of sketching a few things out and moving things around I came up with a new room layout that I liked.

I started by putting the new king bed centered under one of the windows which opened up the other side of the room. Although I like the night stands that I have, they get in the way of opening the drawers closest to the headboard so at some point I would like to replace them with something wall mounted.

At the foot of the bed I put my one of my great-grandmother's dressers. I plan to remove the mirror from the dresser (it is simply screwed on with brace plates in the back) and mount the TV to the wall in the future.

On the other side of the room I centered Frank's great-grandmother's desk (a new addition to the room) under a window. I angled the second of my great-grandmother's dressers into the corner of the room since it looked too cramped flat against the wall. I love that we have furniture from both my great-grandmother as well as Frank's in our bedroom.

With the furniture layout worked out for the room I have a bunch of small things that I want to do to pull together the room:

- Hang new blinds and curtains
- Hang some art on the walls
- Get an area rug
- Remove the mirror on the dresser and mount the TV on the wall
- Build shelf night stands 

So far Frank and I have loved our new bed and the storage has been a wonderful addition to our room. I'm excited to get the room all organized and finished.

Saturday
Apr122014

Three Teams in Nine Days

Frank has been an avid sports fan ever since he was a young little guy. His very first love was Detroit Tigers baseball with University of Michigan football and basketball being added to his list of favorites shortly thereafter. By middle school he was avidly following the teams and has ever since. This year through a freak alignment of schedules we got to see all three of Frank's favorite teams in a nine day span at the end of March and beginning of April.

The streak began with a trip down to Indianapolis to the Midwest Regional of the NCAA Basketball Tournament to see Michigan play Tennessee. We took Friday afternoon off work and drove to Indianapolis getting there a few hours before the game at Lucas Oil Stadium.

We had nosebleed seats for the game but couldn't care less as long as we were there. Michigan was soundly beating Tennessee in the first half but in the second half Tennessee mounted quite an amazing comeback that had us on the edge of our seats. Thankfully, in the end Michigan held them off to win the game 73-71 and advance to the next round of the tournament.

Two days later we were walking to Lucas Oil Stadium to watch the Michigan-Kentucky game when we were stopped by a fellow Michigan fan. He had a pair of extra tickets that he got from work so he didn't feel right selling them but wanted to give them to another Michigan fan. The tickets were in the sixteenth row in the corner and we were excited to have such luck.

The game was really amazing with every possession quite exciting as the teams battled it out. The game was tied 72-72 near the end of regulation but Kentucky made a three with only 2.6 seconds left on the clock. Michigan made a heroic effort at a final play but when the clock ran out Kentucky won 75-72.

Although we were sad about the Michigan not making the Final Four we didn't mourn the loss too long. We drove back to Ann Arbor from Indianapolis on Sunday night after game and took the day off from work on Monday to see the Tigers play the Royals on opening day at Comerica Park with our friends, Tarek and Haneen.

We headed downtown early to hang out and get chicken shawarmas at Budapest Grill before the game. It was a beautiful day after the long winter and the game was great. Victor Martinez hit a home run in his very first at bat of the season. At the bottom of the ninth the game was tied 3-3 when Alex Gonzalez hit a walk off single for the Tigers to win the game 4-3. It was a fun way to kick off the baseball season. 

On Saturday it was time for the Michigan football spring game where fans can go to Michigan Stadium to watch the team practice and scrimmage. For Frank this means an excuse to have a spring tailgate and we had a small tailgate before the game. Frank also decided that this meant he needed another grill (a small traveling grill) which now brings our grill count up to five. Doesn't every family need a 2.5 grill per capita ratio?

The game itself wasn't terribly exciting but it was fun to catch up with the other tailgaters and hang out in the sun in the stands of Michigan Stadium. Spring has barely begun but Frank is ready for the fall and football season already.

All in all Frank was like a kid in a candy store seeing all of his team play this spring. He is all set for the Tigers to have a great summer and win the World Series followed by having Michigan football win the Big Ten this fall. I hope he is right!

Monday
Mar242014

Vintage Mosaic Tile Border For the Downstairs Bathroom 

One of the things that I have been really excited about doing in the downstairs bathroom was the floor tile. Since my house is over 130 years old I wanted to use mosaic tiles to create a vintage look with a border around the perimeter of the room. I looked at bunch of images for inspiration and found that American Restoration Tile was a particularly great resource. I love the look of the Greek key border, but since the area I have to tile is small I needed a smaller border and settled on creating a square jogging border design.

I bought one sheet each of 1"x1" black mosaic tile and 1"x1" white mosaic tile and tested the pattern to be sure that I liked it. I was sold so I went back to the store and bought enough sheets for the project.

To get started I used a pair of scissors to cut through the mesh backing of the mosaic sheets to create some strips of the black that were two tiles wide and one tile wide and then some strips of the white tile that were one tile wide. I also peeled a bunch of the tiles off from the mesh backing to use to piece together the jogging square.

After I did a dry fit to confirm everything I used a 3/16" X 5/32" V-notch trowel to spread thinset in sections along the perimeter of the floor. This was my first time tiling with mosaics and I really had to be careful with the amount of thinset I was using to make sure that it wouldn't squeeze up between the tiles.

I laid a strip two wide strip of black tiles against the wall followed by a strip of white. I then used the individual tiles to create the jogging square and then added another strip of white and black. I thought a while about how to handle the corners and decided that I liked a simple square the best. There weren't any spacers that I could find that matched up with the spacing on from the mesh very well so I used a combination of eyeballing and a straight edge to keep my spacing even as I went along.

After I finished the border I went back with my 5-in-1 Painter's Multi Tool to scrape up the extra thinset so that I would have a flat, even surface for when I go back to add my field tile.

I had two extra columns in the width of the room and one extra in the length of the room so I had to adjust the pattern a bit in the corners. The most visible corner is the one in front of the tub across from the toilet (in the bottom right corner of the below picture) so I kept that one with the proper spacing. On the corners that are on the wall with the door I added an extra white column on either side of the corner square. For the remaining corner I added an extra white column next to the square and in the first pattern but it will be behind the toilet so it will be hidden. I wish that it worked out to have the exact number of tiles I needed for an even pattern but overall I think it looks balanced.

I'm really excited with how the border has come together and I am excited to bust out my tile saw and add the hex field tile to the floor.

For other related posts about this bathroom renovation check out the history of my downstairs bathroomfixtures for my bathroom renovationplumbing in the downstairs bathroominstalling the floor tile underlaymentinsulating the ceiling, installing the vapor barrier for the shower and installing drywall and cement board. If you are interested in my completed master bathroom renovation check out master bathroom renovation recap.

Tuesday
Mar112014

Drywall and Cement Board for the Downstairs Bathroom

After a hiatus from working on the downstairs bathroom for a few months I finally got back at it. In the fall I had closed up the floor and installed the underlayment, insulated the ceiling and installed the vapor barrier for the shower but then things got stalled with a busy work schedule and travel.

About a month ago Frank and I drywalled the ceiling with him holding the sheets in place while I screwed them in. It was a bit of a challenge in the tight space but we got it up together.

This past weekend I started closing up the walls in the bathroom, starting with the 1/2" thick cement board on Saturday. Cement board is waterproof making it an ideal substrate for tiling the shower surround.

Cutting cement board is the same as the score and snap method for drywall. Using a carbide cutter and a T-square score the cement board panel a few times making a groove in the cement and cutting through the glass fiber mesh.

Next bend the panel so it snaps along the groove.

Finish by using a utility cutter to cut the glass fiber mesh on the back side.

To install the cement board in the shower surround it is important to use screws that are designed for cement board and are rust and corrosion resistant since it is a wet area. The cement board needs to be installed 1/4" above the tub flange and due to its heaviness I had Frank hold it up for me while I screwed it in to guarantee the gap. It sure is handy to have a husband around...

To make the cutouts for the plumbing I used a carbide tip meant for cement board with my handy dandy cut-out tool. Sometimes Frank jokes that he married me for my power tool collection. I don't blame him.

I wrapped up the shower surround on Saturday and moved on to the rest of the room on Sunday. I'm planning on tiling part way up the wall in the main area of the bathroom. Because that area is outside of the wet zone of the shower I could use drywall under that tile but since I had extra panels of cement board on hand I decided to use cement board.

With the cement board all installed I was ready to finish closing up the walls with drywall. I had only one problem: no 1/2" drywall at home. Normally I would sweet talk Frank into going with me to Lowe's with his truck but he had left for a work trip at noon so I was left to my own devices on this one. 

I took measurements of the cuts I would need, packed my T-square, measuring tape and utility knife in my car and headed off to Lowe's. I bought the two sheets of drywall I needed, rolled it out to the parking lot and then just cut the sheets down to what I needed in the parking lot. With my back seats folded down it barely fit but I got it all in.

I could have waited until Frank came home but he won't be back until Friday night and I didn't want to wait. Plus, being stubborn and independent is part of my charm, right?

By Sunday evening I had all of the drywall on the walls and everything closed up. I was pretty exhausted from the weekend (cement board is heavy!) but so glad that the bathroom is starting to look like a room. Next up is mudding and taping the drywall!

For other related posts about this bathroom renovation check out the history of my downstairs bathroomfixtures for my bathroom renovationplumbing in the downstairs bathroom, installing the floor tile underlaymentinsulating the ceiling and installing the vapor barrier for the shower. If you are interested in my completed master bathroom renovation check out master bathroom renovation recap.

Thursday
Mar062014

Sanibel Island Lighthouse Beach

While Frank and I were in Florida this past weekend we stayed at a hotel in Punta Rassa with a view from our room looking out over the Sanibel Causeway and Sanibel Island. Being so close we decided we had to visit the island for a bit and headed over on Monday morning.

We grabbed a quick, delicious breakfast at Over Easy Cafe (Frank got the Crab and Asparagus Omelet and I got the Sanibel Shrimp Benedict with Grits) and then drove out to Sanibel Island Lighthouse Beach. From the parking lot we walked out to the lighthouse on a trail over a wooden boardwalk.

The lighthouse was built of iron in 1884 with a central cylinder tower surrounded by an open skeletal structure. The design was thought to be able to withstand hurricanes by allowing the high winds to pass through. In 1949 the lighthouse was automated and then electrified with the lens replaced in 1962. The 98 foot tall lighthouse is still operational today, flashing a white light.

Walking along the white sand beach we had a lovely view across the water of Fort Myers with Bonita Springs and Naples in the distance. Prior to a causeway being built in 1963 the only access to the island was by boat or ferry. The current causeway linking the island to mainland Florida was built in 2007 as a replacement to the original.

One of the neat things about visiting the beach was the abundance of birds walking along the shoreline and roosting in the nearby trees.

Rounding the point we came across the T-shaped fishing pier. The pier was packed with people fishing and by the looks of things many of them were having quite a bit of success with their catches. We walked out on the pier for a pretty look back at the island and lighthouse before walking back to our car.

We had a lovely morning at Sanibel Island Lighthouse Beach which wasn't hurt at all by the perfect weather and sunshine. My only regret is that we didn't have more time to relax there.

To get to Sanibel Island Lighthouse Beach from Fort Myers take the Sanibel Causeway to Sanibel Island and head east on Periwinkle Way until you reach the end of the road. At the time of this writing parking is $2 per hour and the cost to cross the causeway is $6.

Wednesday
Mar052014

Baby Quilt for Kristen's Little Lady

My friend Kristen just had her first little one last month. She and her husband kept the gender of the baby a surprise so she decorated her nursery to be gender neutral and I drew upon the colors she was using for the baby quilt I made for her. Frank and I got to meet the baby (they had a girl!) a week and a half ago and she was so sweet and beautiful.

I made the quilt using a modified version of a disappearing nine patch. A disappearing nine patch involves making a nine patch block and then cutting it into four smaller blocks. I like to oversize things and then cut it down for a little more accuracy so I adjusted my piecing accordingly.

To make the quilt I used eight different colored fabrics, a patterned white fabric and two different dark turquoise patterns.

Using 44" wide cotton I cut one 5-1/2" wide strip from each of the eight colors, one 5" wide strip from each of the two turquoise fabrics and four 5-1/2" wide and four 5" wide strips from the white fabric.

Next, I started assembling the strips, making four pieced strips by sewing one of the color strips on either side of a 5" wide white strip. I then cut eighteen 5-1/2" tall strips from the pieced color strips.

I then made two turquoise center pieced strips by sewing 5-1/2" wide strips of white on either side of the 5" wide strips of turquoise. I then cut nine 5" tall strips from the pieced turquoise center strips.

To make the nine patches I joined a color strip on either side of a turquoise center strip.

After making nine of the nine patches for the quilt I then cut them apart to make the blocks. I lined up my quilting ruler 2" from each of the seams and cut both vertically and horizontally.

When I was done cutting the nine patch apart the white was 2" wide and the turquoise was a 2" x 2" square.

I then trimmed down the outside edges down to make the disappearing nine patch blocks 7" x 7".

Next I made twelve edge blocks by cutting down the leftover pieced color strips. I cut the blocks 7" tall (5" of color fabric and 2" of white) and 5-1/4" wide.

I started assembling the rows by sewing together five disappearing nine patch blocks (turquoise square to the bottom right) with an edge block on the end (white strip down).

After making seven rows I made the bottom row by sewing together five edge blocks (white strip to the right) with a 5-1/4" x 5-1/4" square from one of the color fabrics on the end.

To finish the quilt top I sewed all of the rows together.

I finished the quilt with a light blue fabric for the backing and bound it with one of the turquoise fabrics that I used. For the quilting I sewed diagonal lines at a random spacing across the quilt.

I am really happy with how the quilt came out. I think it is bright and fun and I hope that Kristen's little girl will enjoy snuggling with it.


Wednesday
Feb262014

An Evening in Charleston

Last week I had a very short trip to Charleston for work. It has been ridiculously cold in Michigan this winter so I welcomed the chance to escape the polar vortex even if was just for a day. I left on a early morning flight with the wings of the plane getting de-iced before take off and arrived in Charleston to beautiful, warm, sunny weather.

After our meetings finished my colleagues and I had an hour and a half before our dinner reservation so we headed to downtown Charleston and took a little detour to drive over the New Cooper River Bridge.

I hadn't been to Charleston in nearly fifteen years so I was looking forward to having a chance to see the town again. We started off at The Battery and walked south along East Battery admiring the beautiful homes along the palmetto lined street.  

We next wandered around White Point Garden located at the tip of Charleston peninsula. The area's important history as an artillery battery to protect Charleston Harbor is reflected by the military relics throughout the park. My favorite part about the park was the beautiful old live oak trees that lined all the paths. The early evening light filtering through the leaves was quite lovely.

Leaving the park we wandered through the nearby neighborhood admiring the gorgeous homes. The architecture is amazing and as a lover of old homes I was in heaven. I particularly loved that several of the old lamps continued to use gas.

It was getting close to time for dinner so we drove up to the market district and had a chance to walk by the historic market on the way to the restaurant. The Market Hall was built in 1841 but the historic market dates back over 200 years. By the time we were there the vendors had packed up for the evening but I remember enjoying wandering around when I had visited before.

For dinner we headed to Hank's Seafood Restaurant which is housed in a lovely renovated turn of the century warehouse. We all shared a tower of seafood which was amazing. My favorite dish was a relish of green tomatoes and sweet corn topped with blue cheese and fried oysters. Being down south, I also couldn't resist a slice of pecan pie.

After dinner we walked around a bit enjoying the warm evening and then went to the rooftop of the Market Pavillion Hotel for a nightcap.

The best thing about the rooftop was the view over historic Charleston, particularly of the Customs House. Designed by Ammi B. Young, the Customs House was begun in 1853 but not finished until 1879 due to a hiatus in construction during the Civil War. The building was restored in the 1960s and is now listed in the National Register of Historic Places.

The next morning I was up before dawn to catch an early morning flight and was back to my office before 10 AM. The trip was all too short but it was a nice escape from the bitter cold and I hope I have a chance to visit Charleston again for vacation.

Friday
Feb142014

Candy Dipped Oreos for Valentine's Day

Happy Valentine's Day! This year I wanted to make a little treat for the people in my department at work for Valentine's Day so I made these candy dipped Oreos to bring in to work today.

To start you will need Oreos, candy melts, sprinkles and wax paper. Lay out some sheets of wax paper and place candy melts into a small microwave proof bowls.

Microwave them for 60 seconds and then stir. If some lumps still remain microwave another 30 seconds and then stir until smooth. Dip Oreos halfway into the melted candy and then place on to wax paper. 

While the candy coating is still wet add sprinkles for a festive touch. Once the candy coating has cooled and hardened you can stack the Oreos on a serving plate or package them in treat bags.

If your melted candy starts to cool making dipping difficult, just put the bowl back in the microwave for a few seconds until it is smooth again.

These have been a favorite festive little treat to make for me since I was back in undergrad fifteen years ago. You can customize them for any holiday or occasion by the colors of sprinkles and candy melts that you use plus they are super quick and easy to make.

If you are interested check out some of my other Valentine's Day related posts: Valentine's Day Mini Heart Cupcakes and Celebrating Valentine's Day (and White Day) in Japan

Thursday
Feb132014

Ribbon and Medal Display

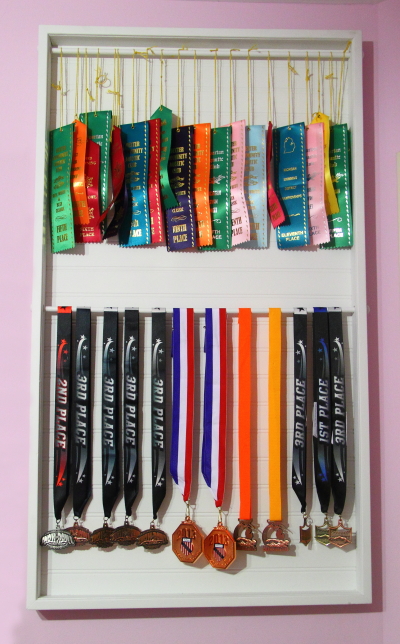
Frank's (and now my!) middle niece is quite a swimmer and has amassed a ton of ribbons and medals from her swim meets. This year as I was trying to figure out what to make for her for Christmas I thought that building her a wall display so she could show off all of her awards would be fun.

After a little bit of brainstorming I came up with the idea of building a simple frame backed with some beadboard and using dowels inside the frame to hang the ribbons and medals on. I determined the dimensions based on being able to have two rows with a little extra space so it wouldn't look too crowded. If you are interested in building this yourself I have some instructions at the bottom of this post about how you can change the dimesions to fit your needs.

Supply List
- 2 - 1x2 @ 6' long
- 10' length of screen molding
- 2 - 3/8" dowels @ 2' long
- Hardboard double bead wainscot
- Package of 1/2" round wood furniture buttons
- 1/2" drill bit
- Nails
- Wood glue
- Paint

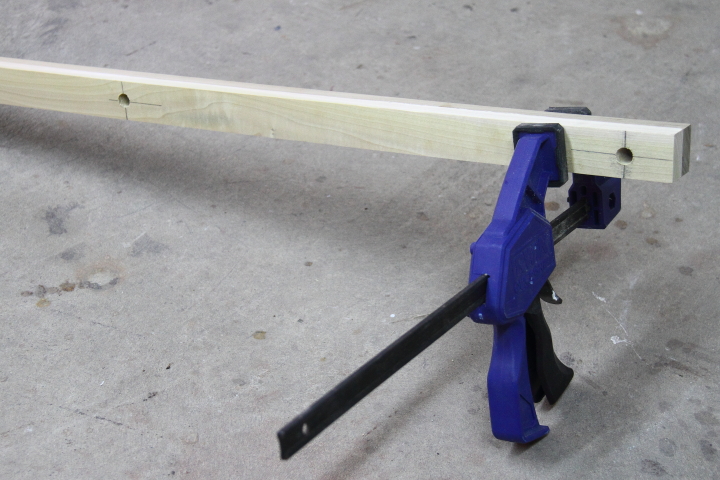
I started by cutting down some 1x2 boards to make the frame. In order to make sure the the opposite sides were the same length I clamped two boards together when making the cuts. I cut the two sides to be 36" and the top and bottom to be 20". 

Keeping the two sides clamped together I used a 1/2" drill bit to drill holes 1-1/2" and 18" from the top. I made the holes an 1/8" larger than the 3/8" dowels so it would be easy to slide them in.

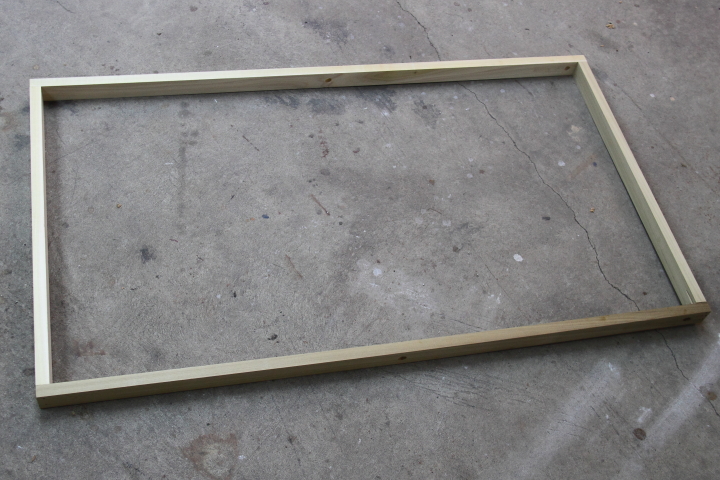
I then used wood glue and my nailer to assemble the frame. I made stoppers for the dowels by plugging the left side holes in the frame by glueing in furniture buttons on the outside.

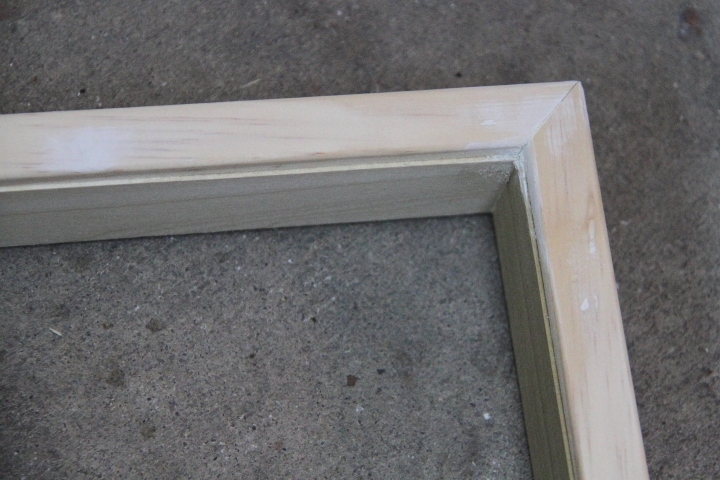
To add a little more detail I trimmed out the front of the frame using screen molding, mitering the corners for a clean look. I then used wood filler to patch my nail holes and sanded the piece smooth.

I cut down the hardboard to be 1/2" narrower and shorter than the frame and then glued and nailed it to the back.

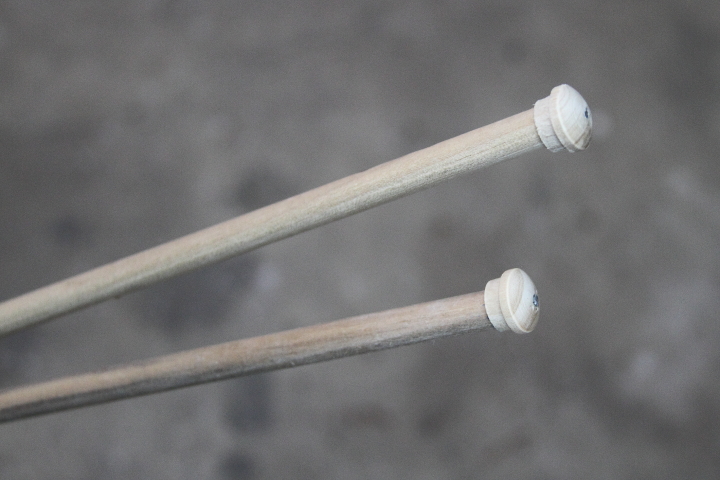
I cut the 3/8" dowels down to 21" and the glued and nailed a furniture button on one end. This was a bit tricky and I split one of the buttons on my first try so I am glad I had a whole package.

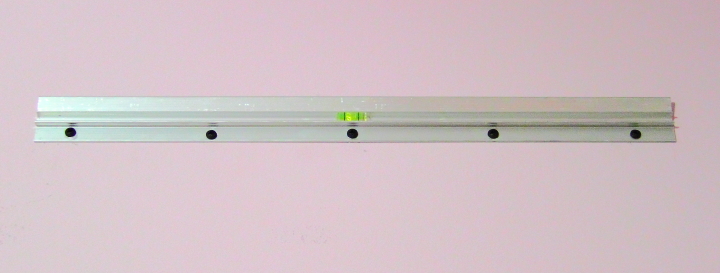
I gave everything a coat of primer followed by two coats of paint. I added the top cleat of a Hangman French Cleat to the back for mounting.

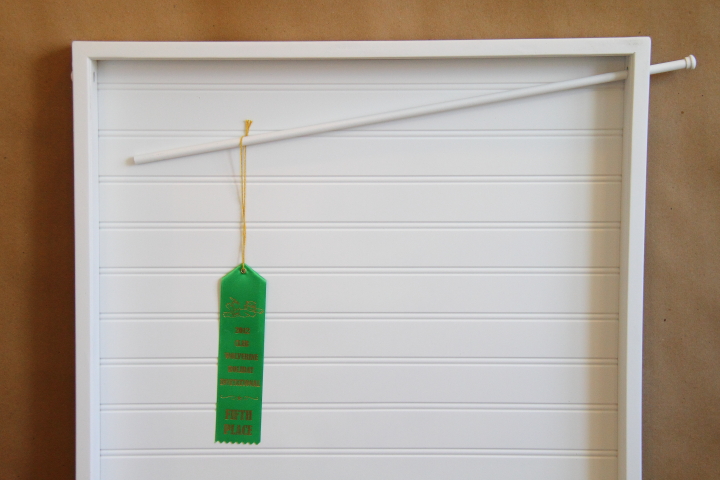
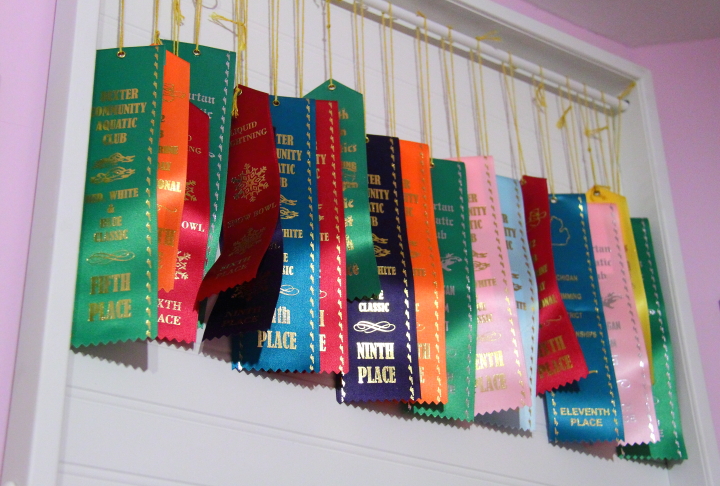
To hang ribbons I put the dowel through the right hole and slipped on the ribbons. Once everything was on the dowel the dowel then slips into the hole on the opposite side of the frame. The furniture buttons act as stoppers and keep the dowel from going all the way through and hide the holes on the outside of the frame.

After opening her gift on Christmas Eve I hung up the display for Frank's niece in her room for her. The French Cleat that I used can hold up to 200 lbs. making it nice and secure. I attached the bottom cleat to the wall using drywall anchors. It has a cool feature where there is a level bubble in it making it very easy to line everything up.

I already had put the top cleat on the back of the display so we were ready to hang it on the wall. We then added all of her medals and ribbons and stood back to see how it all looked.

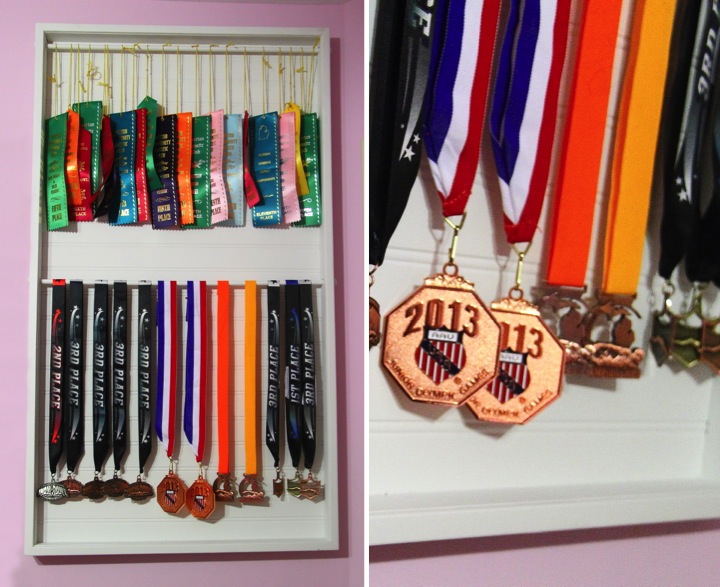
She loved it and was so proud to have the evidence of all of her hard work on display. She's a special little lady and I am so glad that she enjoyed her Christmas gift.

If you make this at home it is easy to change the dimensions for your needs. The length of your side pieces should be the desired height of your frame and the length of the top and bottom pieces should be 1-1/2" shorter than your desired width. The dowels should be about 1" longer than the top and bottom boards but it is dependant upon the wooden buttons you use so confirm that dimension before you cut. Happy building!