Welcome

My name is Lisa and I'm a crafty girl with wanderlust working as an engineer by day. My blog chronicles projects in my home as well as pictures and stories from my travels.

Search


Instagram

Blog Index
The journal that this archive was targeting has been deleted. Please update your configuration.
Navigation
Tuesday
Nov192013

10 Pictures From Halong Bay in July 2013

When I was visiting Vietnam two years ago I spent a few days in Hanoi. My time was limited but I squeezed in a day trip to beautiful Halong Bay. A bus picked me up a little after eight in the morning and three hours later we were at Bay Chai Wharf.

As we pulled out on the boat I was a bit bummed that it was a miserable rainy morning but in the hour that it took to get out to the islands the weather cleared a lot.

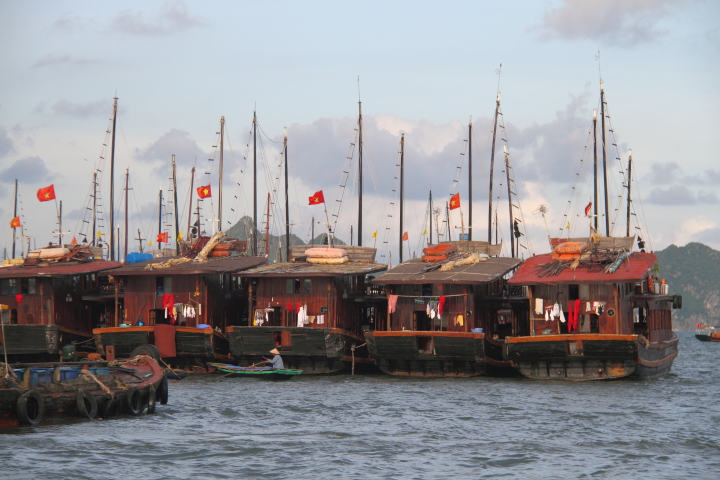
Our first stop was a small floating fishing village nestled in the water below towering limestone cliffs. It looked straight out of a picture book.

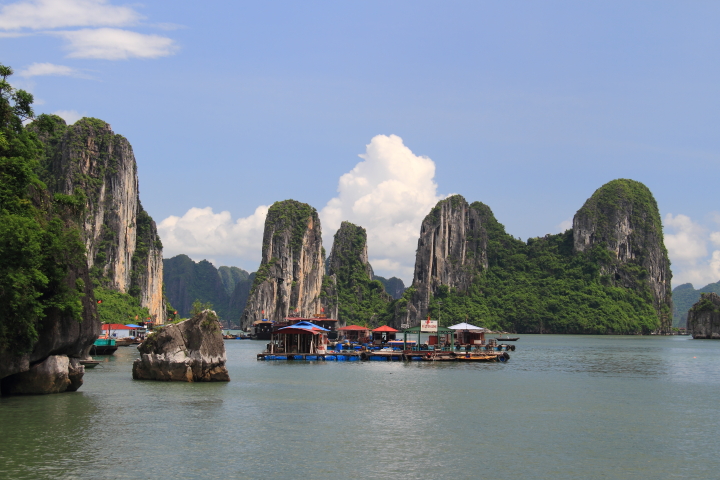
Floating Fishing Village in Halong Bay

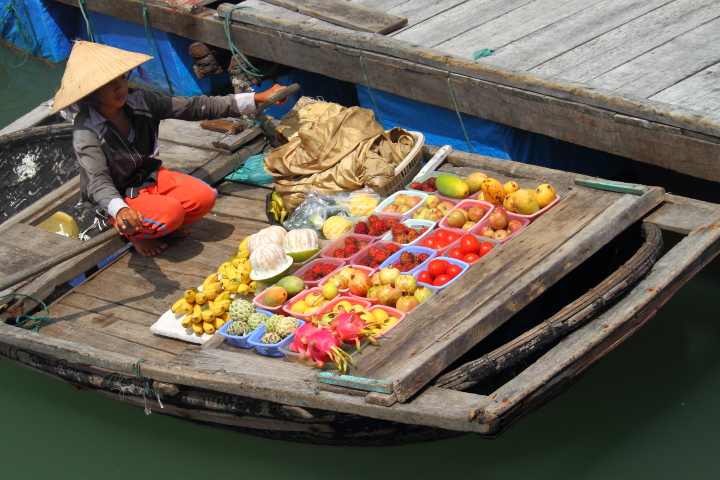
As we got closer to the village we could see several traditional bamboo boats filled with produce for sale.

When the boat docked we had the option of renting a kayak or hiring someone to take us out to Luon Cave in a bamboo boat. I was traveling alone and was in the mood to relax so I chose to go out in a bamboo boat.

Me on Bamboo Boat on Halong Bay

Luon cave has a height of only 2.5 to 4 meters depending on the tidal level which necessitates using a small boat to see it. In the bottom right of the photo below you can see the entrance at the bottom of the cliffs.

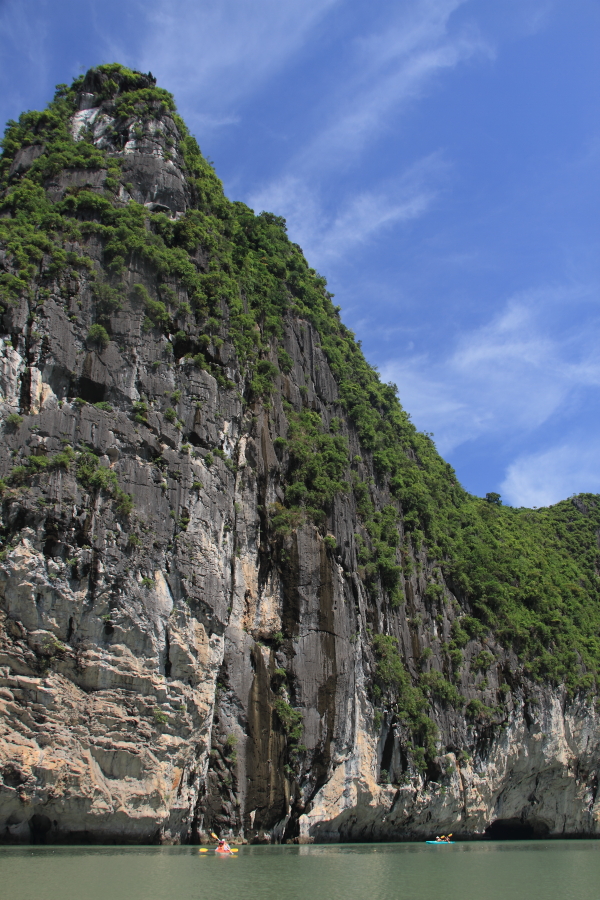
Entrance to Luon Cave Through Limestone Mountains in Halong Bay

Approaching the cave it was much bigger than it first appeared at 4 meters wide and 60 long. It was so peaceful paddling through and listening to the soft echoes of the lapping water.

Paddling Through Luon Cave

Passing through Luon Cave was a lake enclosed by limestone mountains. The water was a beautiful emerald green and combined with the beautiful cliffs it was truly idyllic.

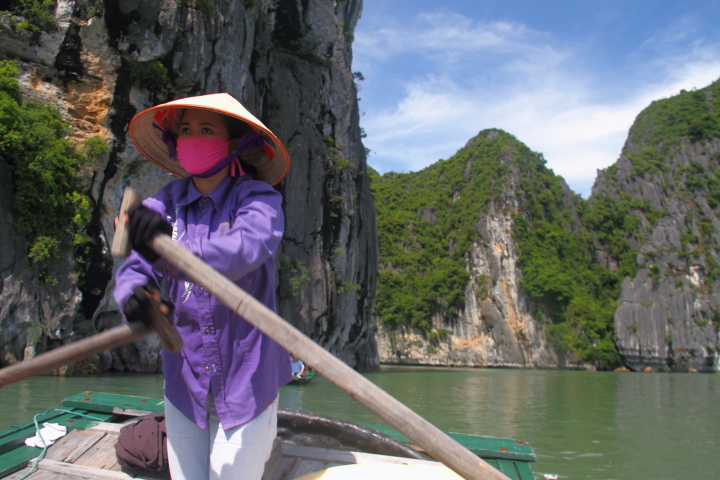
Woman Rowing Bamboo Boat on Lake Beyond Luon Cave

All too soon I was back at the dock and then back on board the boat setting off for other spots in Halong Bay.

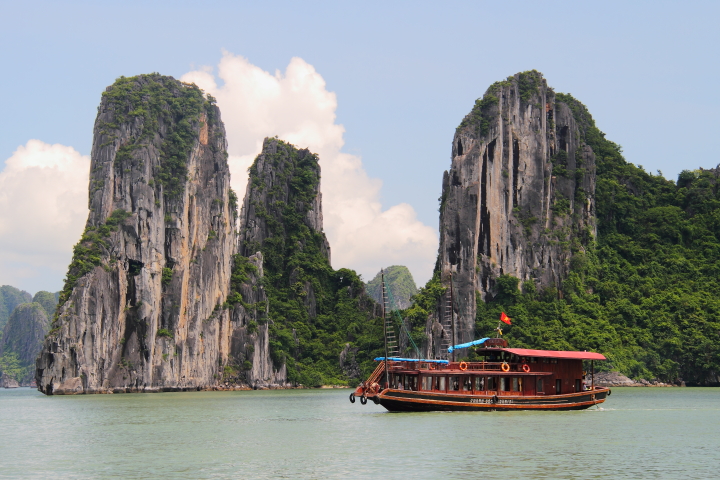
Boat Among Limestone Cliffs in Halong Bay

We sailed past Ga Choi Islet (or Trong Mai Islet), the two white rocks in the bottom left in the picture below. The rocks take their name, either fighting cocks or kissing cocks, based on the fact that at a certain angle the two rocks look like birds leaning in to touch beaks.

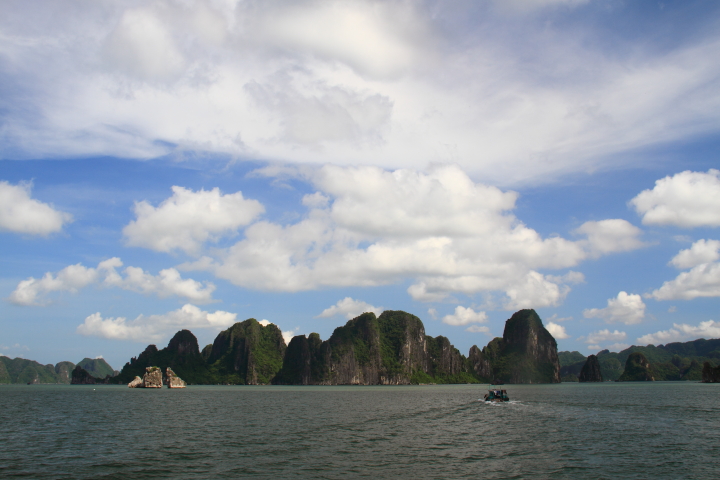
Ga Choi Island (Fighting Cock Island) in Halong Bay

We next docked to visit Thien Cung Grotto (Heavenly Cave). After a bit of a climb we entered an amazing cave complex illuminated with different colored lights. My favorite part was a spot where there was an opening in the cave roof allowing natural sunlight to stream in.

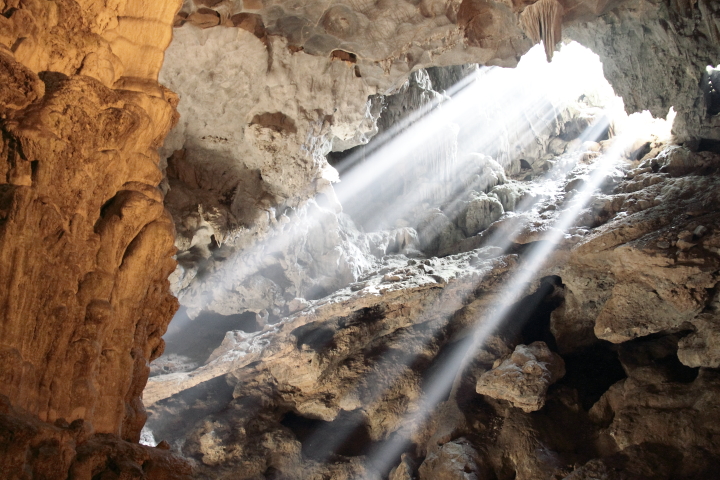
Sunlight Streaming Through Thien Cung Grotto (Heavenly Cave)

From Thien Cung we headed back to Bai Chai Wharf arriving at dusk. It had been a lovely day and my only regret is that I didn't have more time to explore the islands of Halong Bay.

Boats docked at Bai Chay Wharf at Dusk

Monday
Nov182013

Wedding and Honeymoon Pictures 

After waiting for three and a half months I finally got our wedding photos from our photographer. Apart from the long wait I am so disappointed in the quality of the photos which for the most part look like snapshots from a friend instead of professional photos. There are a handful of photos that are great, particularly the three I've posted but overall there is a lot of poor composition, visual clutter and bad lighting in the photos. The thing that makes me the saddest is that there aren't any formal photos of Frank and I on our wedding day that I love.

As someone who loves photography I've been pretty bummed about the wedding photos, but Frank being the awesome guy that he is helped me put things in perspective. We had an awesome wedding day that was relaxed and fun and I wouldn't trade one bit of that day to have better pictures. I had been waiting for my professional photos to include them in my posts about some of my handmade wedding details on the blog, like my flowers and favors, but as it turns out I shouldn't have bothered waiting and I will start posting those soon.

While we don't have the greatest wedding photos we did luck out in the honeymoon photo department. The resort we stayed at for the second half of our honeymoon, Iberostar Grand Hotel Bávaro, had a professional photographer and he would take people out for half an hour to take some pictures. Frank wasn't so keen on doing it but I talked him into it and I think in the end even he will admit it was a good idea. I love all of the the photos and have posted a few of my favorites below.

Now I just need to figure out which one of the honeymoon photos to frame for our house...

Friday
Nov152013

10 Pictures From Milwaukee in Summer 2013

This past summer I got to spend five days having a little reunion in Milwaukee with my friends, Trisha and Dani. We met when we were living in Japan and the last time all three of us got together was in New York four years ago. Dani, who is British, has spent the last year on a work assignment in Portland so we took advantage of her being state side to visit Trisha in Milwaukee.

We decided to go at the end of June/beginning of July so that we could go to Summerfest. With eleven stages and lasting for eleven days it is the world's largest music festival. We went every night while we were there seeing a crazy variety of acts including Pitbull, Cake, NKOTB, Far East Movement and Boys II Men. It was a great atmosphere and we had an awesome time dancing and enjoying the performances.

View of Summerfest from Marcus Ampitheater

We spent a great deal of time relaxing in restaurants and chatting. We made an art out of eating brunch as well as making frequent stops for afternoon appetizers. I definitely did not go hungry while we were there.

Bloody Mary Trio at The Comet Cafe

While we were in Milwaukee the three of us decided to go skydiving at Skydive Milwaukee. Trisha and her husband had done a Level 1 AFF jump recently and Trisha was excited to go again so Dani and I went with her to do tandem jumps while she did a Level 2 jump. I had never gone before and it was a really neat experience. I couldn't believe how beautiful it was to look over the landscape with an unobstructed view. It was very surreal.

Me Tandem Skydiving Over Milwaukee (picture from Skydive Milwaukee)

We stopped at the Milwaukee Public Market twice while we were in town. We headed there a for wine tasting at Thief Wine which was a lot of fun. We each got a different flight of red wines and tried each other's selections. While we were at the market for the wine tasting we saw the $13.95 lobster dinner special at St. Paul Fish Company so we decided to head back there for dinner a few days later. Delicious!

Milwaukee Public Market

Since Harley Davidson was founded in Milwaukee we had to stop at the Harley Davidson Museum while we were in town. Starting from the power cycle that William S. Harley and Arthur Davidson built in 1903 the museum traced the company's history through the decades. Not being a motorcycle rider I learned a lot of interesting things while I was there. One if the coolest unexpected things for me was that a lot of the very early motorcycles had white tires.

Dani, Me and Trisha at the Harley Davidson Museum

No visit to Milwaukee would be complete without taking a brewery tour so we headed to Lakefront Brewery. Started in 1987 by the Klisch brothers, the brewery has grown over the past twenty-five years reaching a production of over thirty three thousand barrels of beer last year. The tour was very relaxed and fun and we really enjoyed the beer as well.

Filling Kegs at the Lakefront Brewery

On not one, but two afternoons, we relaxed in the sun at Bradford Beach. The beach had a tiki hut with drinks and food and lots of volleyball courts as well. We rented chairs and a cabana and had a great time soaking up the beautiful weather, taking naps and reading. I wish Ann Arbor had a beach! (and a tiki hut!)

Bradford Beach on a Sunny Day

Trisha and I felt it was our duty to have Dani try some classic things that she as a Brit had never tried before like Wisconsin fried cheese curds and PBR. Isn't she lucky to have Trisha and I as friends?

PBR Tall Boys

One of our afternoon stops was to visit the Milwaukee Art Museum. We saw a great special exhibit, 30 Americans, which featured contemporary African American artists and then wandered around the permanent collection. My favorite thing was the Quadracci Pavilion itself. From the outside with its moveable, wing-like sunscreen to the inside with 90-foot-high glass ceilings and lovely views of the lake, it is really a stunning piece of architecture.

Quadracci Pavilion's Windhover Hall at the Milwaukee Art Museum

Although all the sights were awesome we really enjoyed the city itself. We walked all over the place clocking between six to nine miles each day. The Historic Third Ward was especially lovely with its beautiful brick buildings.

Mural on the Mercantile Building in the Historic Third Ward

All in all, the three of us had an awesome time together. It's no wonder that Trisha loves living in Milwaukee. Now we need to make some plans to visit Dani in Portland before she is done with her work assignment!

Thursday
Nov142013

10 Pictures Series

Recently I have been thinking a bit about what I want to do with my blog. One of the main things was that I wanted to document some of my travels for myself. Unfortunately, gathering up all the photos and details for me to make one of my travel posts takes me a while so I haven't kept up on it for the trips I have taken since I started the blog much less done a lot of documenting of trips that happened earlier. For example so far this year I've been to Japan twice, Colombia, the Dominican Republic, Florida, Atlanta, New York, Northern Michigan, Chicago, Arizona, Kentucky, Milwaukee and Connecticut but I've barely written about those travels.

On the flip side I have loved looking through my old travel pictures to post my Picture of the Day, but I wasn't really writing down anything other than the date and place of the photo and I haven't been too motivated to post them lately. After thinking about things I decided that I would replace my Picture of the Day with a 10 Pictures From (insert place here) series. This way I could share a few photos from a place and write a little bit with the idea that I could start more effectively documenting my travels. I still plan to write some detailed travel posts like I always have but I think this will be a good way to catch myself up on documenting some of my favorite travel photos and memories.

My plan is to start tomorrow. I just need to pick the first place to write about!

Monday
Nov112013

Michigan Tailgate Cake: Winged Helmet Cake

On Saturday Michigan played Nebraska and Frank's tailgate theme for the week was Soups and Stews since the weather here has gotten a little chilly. I couldn't figure out a way to easily translate that into a cake so I decided to make a cake inspired by Michigan's iconic winged helmet for the tailgate.

I used a two layer chocolate cake recipe with the Wilton Helmet Pan to make the cake. I used some thinned white buttercream icing for a crumb layer and then used white icing to create a background behind the facemask and ear hole. I sketched out the lines for the wings with some icing and once I was happy with the shape I filled it in with maize and blue icing with a #16 star tip. I finished the helmet off by piping the facemask with some extra whipped chocolate ganache from the chocolate chili cupcakes I had made the day before. The facemask of the Wolverines' helmet is actually blue but I didn't think it would show up very well on the cake if I made it blue plus I think it is a crime to waste leftover chocolate ganache.

The tailgate was a lot of fun. It was a bit chilly but the sun was out most of the day and there was no miserable rain like two weeks prior at the Indiana game. Frank made his cheddar sausage soup which was perfect to keep everyone warm.

The game, however, was not so much fun to watch. Michigan played pretty poorly and for the second week in a row had negative rushing yards. They pulled ahead in the fourth quarter but Nebraska had a touchdown late in the game to seal their 17-13 win over Michigan. Hopefully the Wolverines fare better next week at Northwestern. Go Blue!

On a positive side note, my beloved Duke Blue Devils had a pretty good weekend with the football team beating NC State and the basketball team trouncing Davidson. The football team is now 7-2 which guarantees them a winning record which will be a first since 1994. I watched the basketball game on TV and all I can say is that Jabari Parker is awesome and I am looking forward to a great season. Go Duke! 

Saturday
Nov092013

Chocolate Chili Cupcakes

Yesterday was the annual chili cook off in my department at work. I just moved into the department this past summer so this was my first year participating. I didn't prepare a chili for the competition but I did want to contribute a dessert so I thought that making some chocolate chili cupcakes would be perfect.

To make the cupcakes I adapted my go-to one bowl chocolate cupcake recipe from Good Housekeeping's Illustrated Cookbook. I've had that cookbook since I was in high school and I still love it as a reference for basic recipes.

I started off by omitting the vanilla from the recipe and then added ancho chili pepper powder, cinnamon and mini chocolate chips. After baking I finished the cupcakes by topping them with whipped chocolate ganache and some red dragees for a little fun.

I think that the cupcakes turned out great with the extra little kick. Some of my co-workers were a little hesitant about them when I told them about the chili powder but in the end they were a big hit with everyone.

Ingredients
2 cups flour
1-3/4 cups sugar
3/4 cups unsweetened cocoa
1-1/4 cups milk
3/4 cups butter
3 eggs
1 tablespoon ancho chili pepper powder
1 teaspoon cinnamon
1 teaspoon salt
1-1/4 teaspoons baking soda
1/2 teaspoon double-acting baking powder
1 cup mini chocolate chips (optional) 

Directions
Preheat oven to 350 degrees F
Beat together all ingredients except chocolate chips in a mixer at low speed until well mixed

Gently fold chocolate chips into the batter

Line two twelve cavity muffin tins with liners and fill halfway with batter
Bake for 20 minutes or until inserted toothpick in center of a cupcake comes out clean 

Let cupcakes cool and then ice with chocolate ganache or buttercream icing

Enjoy!

Wednesday
Nov062013

Behind the Walls: Insulation, Fireblocking and More

Before I was able to pass my building rough inspection for my laundry room and bathroom renovation I had to have everything up to code inside the walls. I hired out the plumbing, electrical and HVAC duct work to contractors but I pulled the building permit myself so that was all on me. 

I started with the insulation in the bathroom ceiling. When dealing with insulation I always wear work gloves to protect my hands from irritation. To cut an insulation batt place it vapor barrier side down on some scrap plywood or other surface you don't care about and cut with a utility knife against a straight edge.

My local box store only stocks 15" wide insulation batts but my ceiling joists were 24" on center. To solve the issue I cut the insulation into 26" strips and removed about 2" of insulation on each end to create tabs that I could staple to the ceiling joists. This was a bit tedious but it did the job for the small area I needed to insulate and beat trying to search around to find wider batts or tacking up furring strips until I put up the ceiling drywall.

The paper backing that acts as a vapor barrier on the batt is flammable so in any areas where it will not be directly touching drywall you need to remove the paper. Since I wasn't positive it would fully contact where it went over the walls into the adjacent rooms I pulled off the paper on those pieces just to be on the safe side. All in all it took me a little over a half hour to get the insulation up.

Next I had to make sure I had proper fireblocking in place which prevents movement of flame, smoke, gases through concealed spaces. When I remodeled the the main part of my house the way those walls had been originally framed meant that I had to add 2x4 lumber between all of the studs to isolate the first floor from the second.  Here I didn't need to deal with that which was nice. 

All of the openings through the floor around the wiring, pipes and ducts had to be sealed with an appoved fireblock material like a fire rated caulk or foam. This was done by my contractors as part of getting their rough approval, but I always like to check things over myself as well.

The caulks and foam are typically red or orange in color so that they are easily identifiable.  My electrician used caulk around all of the wires and the opening around the duct into the bathroom was sealed with foam by my HVAC contractor.

Next up was the dryer vent chase. The original plan had been to have the dryer vent go under the crawl space and out to the back of the house but it turned out that the foundation was so thick that it wasn't practical. The only solution was to go up and out the roof which meant that I then needed to frame out a chase around it.

I didn't take any pictures building the chase because it was the night before my building inspection and it didn't go quite as planned making me super frustrated. Long story short I built the front on the ground to make sure it was square. I then raised it in place adjusting the bottom plate until it was square to the adjacent wall and then secured it to the subflooring. I then had Frank help me to adjust it to be plumb using my four foot level and then screw it into the studs of the adjacent wall. This was easiest as a two person job with one person holding everything in place and keeping and eye on the level and the other person doing the attaching. Once the front was installed I built the side in place and added some cross pieces so that I could secure it to the back wall. 

Typical materials for fireblocking are 2-by lumber, 3/4-inch structural panels and 1/2-inch drywall but with the awkward cutouts needed to go around the dryer vent and plumbing vent stack those options didn't seem the best for the chase. Instead I used unfaced (vapor barrier removed) insulation which was easier to install. Building code specifies that 16" of secured unfaced insulation can serve as a fireblock but to be on the safe side I was closer to 20". 

On a side note, on the picture above on the left you can see an electrical outlet that I found buried in the wall. Later my electrician found a two way switch that turned off the existing lights in the room buried behind one of the cabinets. Electrical code specifies that all junction boxes must be accessible so this was a big problem. If that buried switch had failed I would have had no lights in the room and would have had a hard time figuring out why. Thankfully all of that bad wiring has now been fixed and is up to code.

While I am at it I thought I would point out a few other key items lurking behind the walls that my contractors have done. At every location where wiring or plumbing runs through a stud a steel stud guard plate was hammered into the stud. This is done to protect screws and nails from piercing the wiring and plumbing saving me from a potential electrical problem or leak.

It is also very important that all of the plumbing, wiring and ductwork is well secured. Below are examples of a strap anchoring wiring in my bathroom to a stud and the PEX supply lines for my sink being secured with clamps. 

After inspectors for each of the trades had come out and gave their rough approval I had the building inspector come to the house. He said that everything looked great and okayed me to close up the walls. It was such a good feeling to get the green tag with his signature for the building rough approval. Now that I am done with traveling for a little bit I am hoping I can get some traction to start knocking things out again. 

Disclaimer: I am not a licenced contractor. What I have done in my home meets the building code used by my city but building codes can vary by state and municipality so please do your own research to confirm the building code that would apply to you.

Tuesday
Nov052013

Autumn on My Street

I really love my little tree lined street. It is part of one of Ann Arbor's historic districts and is full of unique old houses built in the 1800s that have been painted with all manner of colors. Being only four blocks long traffic rarely comes down my street generally making it pretty peaceful. On the flip side because it is so close to downtown you see a fair number of people walking which makes it seem homey.

While I adore my street year round, it really is especially magical in the autumn as the tall old trees change their colors. There is a slight hill at the one end of my street and I love turning onto it and looking like I am descending into a sea of vibrant leaves. Sometimes I pinch myself thinking how unbelievable it is that I get to live in such a great neighborhood.

Since I was out of town for some of the peak colors this year I thought I would share a combination of pictures that I took this fall as well as some of my favorites from last year.

Although I took the dying tree in my backyard down I still have two enormous maple trees in my front yard that are truly lovely each fall. They turn a beautiful yellow and crimson making it a beautiful sight to look up as I walk in my front door everyday. I especially love it when the sun is right over head making the leaves so brilliant they seem on fire.

After a bunch of leaves fall they look so pretty I almost don't want to rake them off my steps. It looks a lot nicer than my cracked cement that I need to fix this summer!

The picture below on the right is the view from one of the windows in my master bedroom. Who can't help but smile looking out on that in the morning?

Although they aren't on my street I couldn't help but share these photos of a church and the elementary school that are around the block from me that I took on Sunday. The brick buildings look especially great surrounded by a little fall color.

My only wish is that the leaves would stay on the trees just a little longer, not just because I love the way my street looks but also so that I could put off raking leaves in my yard just a little longer...

Thursday
Oct312013

Kinkaku-ji

The image of gold clad Kinkaku-ji reflected in the waters of Kyoko-chi is one of the most recognizable in Japan so I thought it would be a great place to take my friend from work, Cassie, on her first trip to Japan while we were in Kyoto a month ago. I actually visited Kinkaku- ji on my very first trip to Japan and thought it would be fun to visit again over seven years later.

After the third Shogun of the Ashikaga Shogunate, Ashikaga Yoshimitsu (足利 義満), abdicated to his son he purchased the site from the Saionji family in 1397 to build his retirement villa which he called Kitayama-den. Kitayama-den was converted into a Zen Buddhist temple of the Rinzai sect upon Yoshimitsu's death in 1408 per his wishes. The official name of the temple is Rokuon-ji (鹿苑寺, Deer Garden Temple) after Yoshimitsu's posthumous name, Rokuon-in-den, however the gold pavilion became so famous that it is more popularly known as Kinkaku-ji (金閣寺, Temple of the Gold Pavillion).

Although the rest of the buildings in Ashikaga Yomitsu's complex were destroyed through war and fire, the golden pavilion stood the test of time until 1950 when it was burnt down by Hayashi Yoken, a 22 year old monk. The current pavilion was built in 1955 as a replica of the original and was restored with thicker gold leaf in the late eighties. In 1994 it was registered as a World Heritage Site.

Kinkaku-ji was our first stop of the day in Kyoto and as Cassie and I walked through the entrace gate we could see the first initial signs that the some of the leaves were just beginning to turn color.

The disc shaped end cap tiles, called gatou, on this building near the entry displayed the 5-7-5 leaf paulownia kamon (家紋, crest). Emperor Godaigo conferred this crest on the Ashikaga family in the 13th century during the Ashikaga Shogonate. In modern times this kamon, known in Japanese as go-shichi-no-kiri, is used by the Office of the Prime Minister of Japan and is a symbol of the Japanese government.

Soon we approched the lovely golden pavillion which serves as a shari-den (舎利殿, reliquary hall) to enshrine relics of the Buddha. During Ashikaga Yomitsu's time the pavilion served as a guest house where he met with foreign dignitaries and Japanese aristocracy.

Each of its three floors of the pavilion are designed in a different architectural style. The first floor, Hosui-in (The Chamber of Dharma Waters, 法水院), was built in the Shinden style used for palaces in the Heian period. With white plaster and unpainted wood it is the only floor not covered in gold leaf.

The second floor, Cho-on-do (The Tower of Sound Waves, 潮音洞), was built in the Buke style of samurai houses.

The top floor, Kukkyo-cho (Firmament Top, 空竟頂), was built in a Zen temple style with beautiful bell shaped windows. The tiled roof is topped with a bronze statue of a phoenix leafed in gold.

Set within Kyoko-chi (鏡湖, Mirror Pond) are several beautiful islands with pine trees.

These Jizo Buddha statues in the temple's garden are a popular place to toss coins for good luck. 

Built during the Edo period the Sekkaitei (夕佳亭, Place of Evening Beauty) tea house is perched on a hill with a lovely view of the golden pavilion and is currently the oldest building on the temple grounds. Inside features a famous pillar made from nandina wood.

After seeing Sekkatei Cassie and I stopped in the visitor's tea house so that she could try matcha for the first time. Matcha is finely milled green tea that is used for Japanese tea ceremonies. Because of matcha's bitter taste it is traditionally served with a wagashi sweet which you eat prior to drinking the tea.

Our last stop before leaving the grounds was to visit Fudo-do (不動堂). The small shrine houses a stone statue of the Buddhist deity Fudo-myo-o. Although it is normally not on public display the statue can be seen during Setsubun in early February and on August 16.

Kinkaku-ji is a truly beautiful spot and definitely a great place to visit while in Kyoto. Located in northern Kyoto you can get to Kinkaku-ji by taking the 101 or 205 bus from JR Kyoto Station and getting off at the Kinkaku-ji machi stop. From the bus stop it is a three minute walk marked by signs. Kinkaku-ji is open from 9 am until 5 pm every day with a 400 yen cost of admission for adults and 300 yen for children.

Tuesday
Oct292013

Installing the Vapor Barrier for the Bathroom Shower

With all of the plumbing in and the rough approval complete I set about installing a vapor barrier for the bathroom shower surround. I actually did this back in September before my crazy period of travel this fall, but I didn't have time to organize the photos and write about it until now.

Although the porcelain subway tiles that I will tiling the shower surround with are waterproof the grout and the cement backer board is not so it is important to protect the wood studs with a vapor barrier. I choose to use clear 6 mil polyethylene behind my cement backer board for my vapor barrier.

There are other ways to waterproof the shower, like using RedGard or Kerdi waterproofing membrane, but the important thing is that you should only install one vapor barrier (i.e. do not install sheeting behind the cement backer board and then RedGard over the cement backer board) so that moisture won't get trapped between the barriers.

Because this is a barrier against moisture throughout the installation process I used the least amount of staples needed to keep the sheeting in place in order to minimize staple holes in the sheeting.

I started by lining the soap/shampoo nook in the shower. I cut a piece that was larger than the nook and used my stapler to tack it to the back of the nook.  I folded the corners to lie flat and then trimmed off the excess sheeting around the nook.

Next I cut a single continuous piece of sheeting that would wrap around my whole shower with some excess at the top and bottom. I cut tight holes around the plumbing and secured it to the walls with a few more staples.

To finish the nook area I trimmed out a rectangle a few inches smaller than the nook out of the sheeting. I cut a diagonal slit at each corner and the folded the excess into the nook and stapled it down.

As a last step I trimmed the excess sheeting off of the top and bottom of the shower surround. To make sure that any water trapped by the vapor barrier would drain into the tub I lifted up the bottom of the sheeting, applied clear waterproof silicone caulk to the lip of the tub and then pressed the sheeting into the caulk making a nice water tight seal. I also added a dab of the silicone caulk over each of my staple holes and to seal where the two sheets met in the nook for good measure.

When I finished installing the sheeting Frank peeked into the bathroom to see what I had been up to and said it looked like something from the set of the TV show Dexter. Yes, it does look a little scary right now but I can already imagine it covered with beautiful subway tile. Next up is installing the cement backer board (the photo below aready has the first piece installed in the nook with one of my subway tiles propped up) and then the tiling fun will begin!

Page 1 ... 6 7 8 9 10 ... 98 Next 10 Entries »