Welcome

My name is Lisa and I'm a crafty girl with wanderlust working as an engineer by day. My blog chronicles projects in my home as well as pictures and stories from my travels.

Search


Instagram

Blog Index
The journal that this archive was targeting has been deleted. Please update your configuration.
Navigation
Monday
Feb102014

Taking the Bad with the Good

The past several weeks have really been a case of both the best of times and the worst of times for me. I got some really disappointing news at the start of the new year that was pretty tough to take and had a minor surgery two weeks ago. On the positive side of things right after Christmas Frank and I had a wonderful vacation to Arizona and Atlanta to see our alma maters' football teams play in their bowl games and then in January we had a great trip to Las Vegas. Over the last month I've either been depressed/not feeling well so I didn't feel like blogging or too busy having fun traveling with Frank to have a chance to post.

I'm feeling more like myself now and have so many things to share about our recent travels as well as a backlog of projects that I completed. I finished the master bedroom closet makeover (below is a sneak peak) back in December plus I have all of the gifts I made for Christmas and our wedding details to still write up. I'm looking forward to getting back in the swing of things!

Thursday
Jan022014

Homemade Spiced Rum Vanilla Extract

Now that Christmas has passed I can start sharing on my blog all of the Christmas gifts that I have been busy making the past several weeks. As a simple gift for friends and family I decided to make a bunch of bottles of homemade vanilla extract. The basic way to make it is to infuse a white alcohol, like vodka, with vanilla beans but I thought it would be fun to use spiced rum instead for a different flavor.

To make the vanilla I sliced Madagascar vanilla beans down the middle not quite to the end and trimmed the bottoms so they would fit in the bottles. I then placed two beans in each of the 8.5oz swing top square glass bottles that I had thoroughly scrubbed and then filled them up with spiced rum. I did this all back in November so that the vanilla beans would have enough time to infuse the spiced rum before I gave the bottles as gifts for Christmas.

To label the jars I made a simple design and used my Silhouette Cameo to cut it out from white vinyl. I then used transfer paper to apply the labels to the bottles and the vanilla extract was ready to give.

I made little cards with the following information to hand out along with the bottles:

Homemade Spiced Rum Vanilla Extract
Use in baking recipes just as you would with plain vanilla extract. Discard the vanilla beans when they are no longer covered in liquid or after two months when the beans are fully infused, whichever comes first. Shelf life for the homemade spiced rum vanilla extract is one year.

If you are making vanilla extract at home for yourself you can keep topping up your bottle with alcohol and replace the beans after they have finished infusing.

The homemade vanilla extract was a big hit with my friends and family this Christmas and I have to say that I loved the project so much that I saved a bottle for myself which I am excitedly using.

Friday
Dec272013

Merry Belated Christmas!

Merry belated Christmas! Frank and I had a great Christmas spending Christmas Eve at his sister's home and heading to his parents' on Christmas Day. We ate too much delicious food and had fun hanging out.

I've been busy the last week working on finishing making my Christmas gifts so I thought I would belatedly share our home's Christmas decorations. Frank and I didn't host anything but I still love to dress up the house a bit for the holidays.

Except for some new ornaments for the tree all of the decorations were things that I already had on hand or made previous years for Christmas. We got a noble fir from a local tree farm and set it up in the corner of our living room. We decorated it with silver and teal glass balls that I already had with a new collection of glass ornaments that we started this year representing places we've visited along with our hobbies and interests.

A few years ago I made some teal and white throw pillow covers for Christmas that I put out again this year. My favorite one is the corduroy one with the felt snowflakes on it.

I couldn't resist adding a little bit of holiday fun on our TV stand with some extra glass balls and a star.

I added some more glass balls in a wooden dish that I got in Honduras on our coffee table. I made the teal and white runner a few years ago and have matching ones on the dining table and buffet as well.

On the dining table I cut out teal felt circles to top candlesticks I had from IKEA for perches for silver spray painted pinecones. In between the candlesticks I placed goblets I found thrifting which I filled with more glass ball ornaments.

On the buffet I filled two glass jars, one with mini pine cones and the other with glass balls, and put some white bottle brush trees under a cloche behind them.

Because I already had everything on hand it didn't take me long to decorate and it was worth it to having everything look festive for Frank and I to enjoy for our first Christmas married.

How was your Christmas? Did you have a nice day with family or friends?

Thursday
Dec192013

2013 Holiday Cards

I am finally starting to get some of my holiday cards in the mail today. This is the first holiday for Frank and me to send a card together since it is our first Christmas married and I had a lot of fun making these cards for our friends and family.

To make the card I started with some blank cards that I had found a while back that had two folds with a cut out at the top. Since I have friends from a variety of religions I decided to make the card saying "Wishing you joy this season."

I thought it would be cute to have the "joy" pop out from the back of the card through the opening so I used my Silhouette Cameo to cut out circles with the word "joy" from red textured cardstock . I attached the circles to the center of the opening with some foam tape so they stood off from the card 1/8".

I added the rest of the words using my Silhouette Cameo to cut "wishing you" and "this season" from black vinyl and used transfer paper to add them just above and below the circle on the innermost part of the card. To make it all stand out I used some white polka dotted black washi tape to frame around the opening on second page of the card. 

I like how the card turned out. It was simple enough that I could make a bunch of them in a day (thank goodness I am on vacation this week!) but they are unique for Frank and I to send to the special people in our life.

Happy Holidays!

Tuesday
Dec172013

My Japanese Christmas Tree Decorated with Orizuru (Paper Cranes)

When I was living in Japan I was set on having a small Christmas tree for my apartment. Most Japanese people are not Christians but due to Western influences some Christmas customs like exchanging presents, particularly between couples on Christmas Eve, have become popular. As a result I was able to find myself a little table top tree with all the trimmings after hunting around for a bit. I found my little set-up at Nittori, which is home goods store kind of like a Japanese version of Ikea. My options were quite limited since the trees were sold as a package set including the lights and decorations, but at least I had a small Christmas tree plus it was a great deal at only ¥999 (about $10 US) for everything.

After taking the tree home and setting it up in the corner of my living room I thought it looked a little plain with just the silver balls and lights since I wasn't so keen on the red bows and garland that also came with my set. After thinking for a bit I decided to make some paper cranes to add to the tree's decorations. Orizuru (折鶴, folded crane) is a classic origami design and the paper cranes are symbols of peace, good fortune and good health among other things. It seemed like the perfect fit for my Christmas tree.

I pulled out a few sheets of red origami paper as well as some special red foil paper that I had and made about a dozen cranes to grace my Christmas tree. I nestled them in the boughs and loved the way they looked incorporating a bit of the Japanese culture from where I was living with my personal tradition of having a Christmas tree. 

When I moved back to the US I didn't have unlimited space to ship things back so I got rid of my little Christmas tree but I did save the menagerie of orizuru that I had made for the tree. While my Japanese Christmas tree wasn't the largest or most beautiful of the trees that I have had over the years it is definitely one that has a special place in my heart.

Monday
Dec162013

Fresh Coat of Paint for the House (Plus New Gutters!)

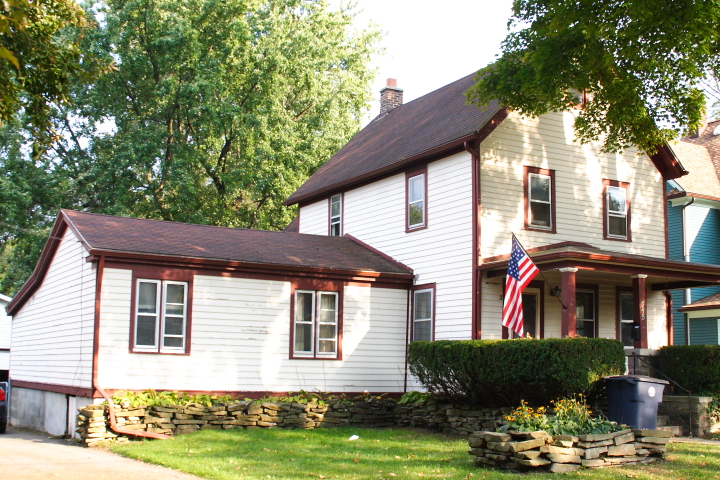
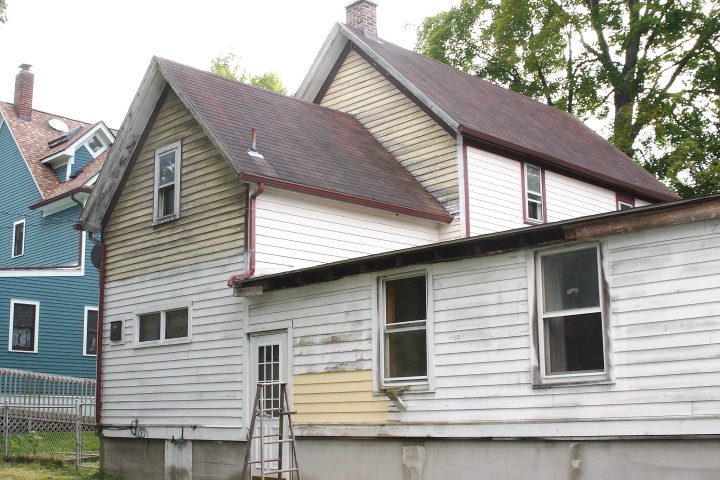
When I first got my house back in 2007 one of the first things I did was replace the rot on the house and get some paint on the exterior. The back had never been painted when the wood clapboard had been replaced and I was afraid of further rot if it didn't get painted before the winter came. It was pretty scary! Here's what it looked like when I bought it.

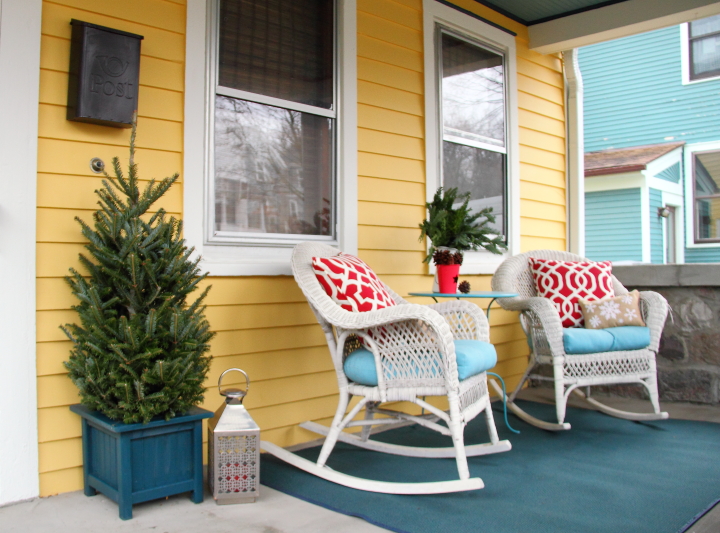
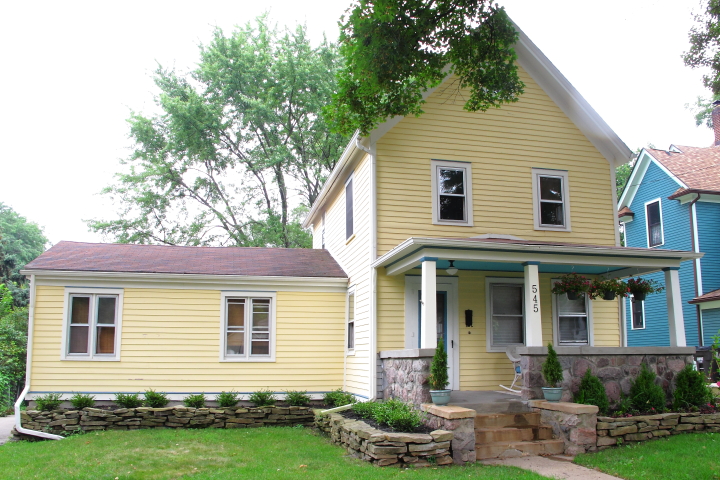
At the time I originally painted the house one of my neighbor's homes was white and one was blue so I thought that yellow would be a nice color so I picked a scheme with Valspar's Oatlands Yellow for the house with Chef White for the trim. For some added a color I painted the accent a teal color with a bright turquoise for the ceiling of the porch. Here are how things looked a few years ago after painting.

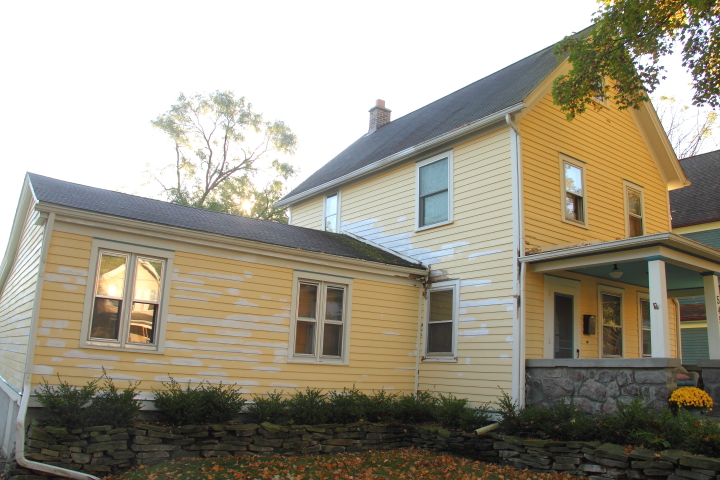
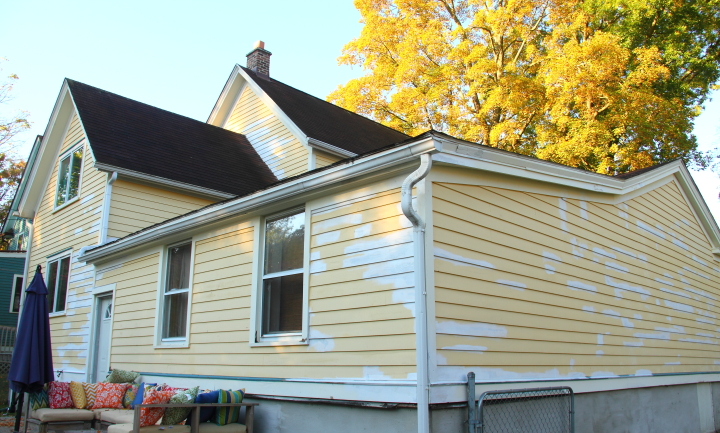
Fast forward a few more years and things have been looking a little sad. The paint had faded and some issues with the gutters caused some rot that needed to be fixed. It was time to repaint and give the exterior a little TLC.

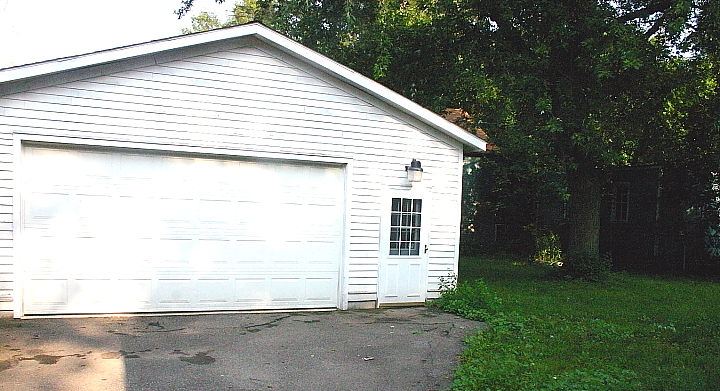
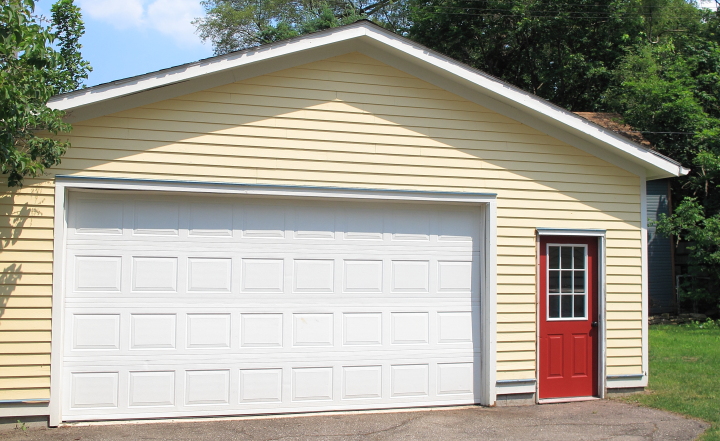
First up I needed to figure out my new house colors. In general I loved the color scheme that I had but I wanted some deeper, more vibrant shades of what I already had. I picked up a few test colors from the paint store and tried them out on the garage.

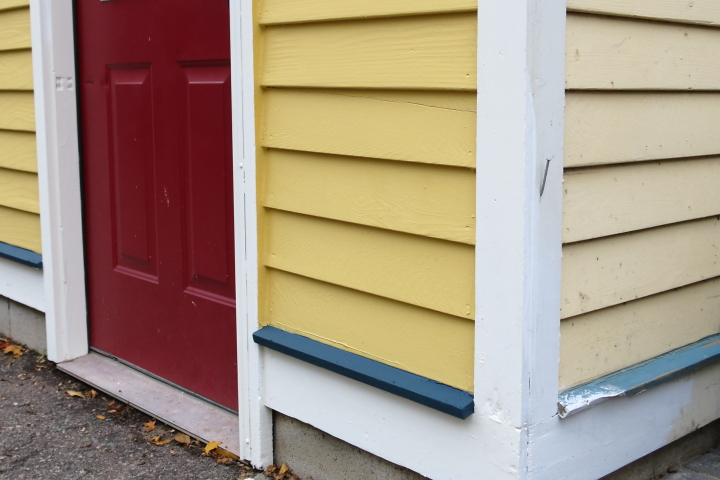
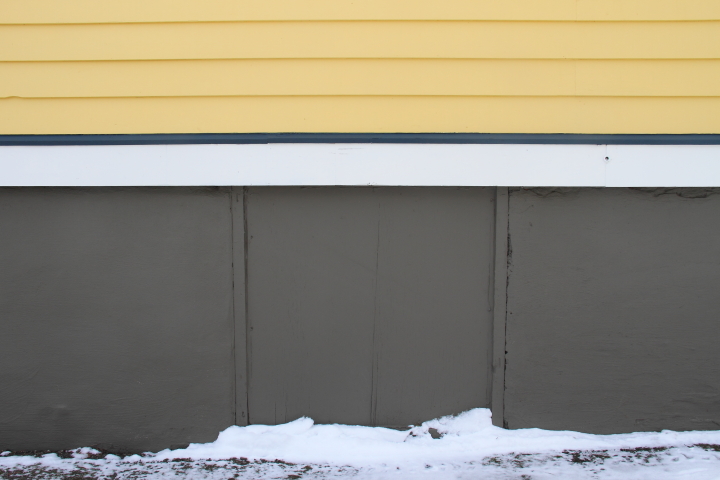
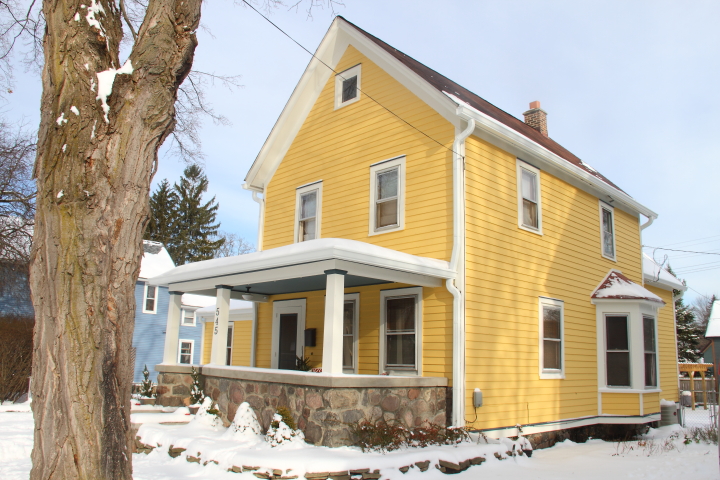
On the left was Benjamin Moore's Concord Ivory and the right was Marblehead Gold. Based on swatches I had been leaning toward the Concord Ivory but once it was on the garage I knew the vibrancy of Marblehead Gold was the winner. In the end to go with the Marblehead Gold on the siding I choose Soft Chamois for the trim and Narragasett Green for an accent. I also decided that to paint the concrete foundation a dark grey color, Cromwell Gray. For the porch ceiling Frank really didn't like the bright turquoise that I had originally painted it since he thought it was a bit feminine so I chose a more subdued dusky color with Aegean Teal.

Time was running out fast to get things finished before the cold weather hit so Frank and I decided to hire a local painter to complete the wood repairs and paint. We chose the painter that we did because he was going to sand by hand and paint with a brush which would be more gentle on our wood siding and be in keeping with the period of our 1800s house. He also painted our neighbor's house and did a beautiful job, plus he gave us a great quote for the job.

First up our painter sanded and primed all the spots with loose paint.

Our painter started by painting the front of the garage so we could make sure that we liked everything before he continued. Here's a shot of the corner so you can see the old and new colors together. Needless to say we loved the difference.

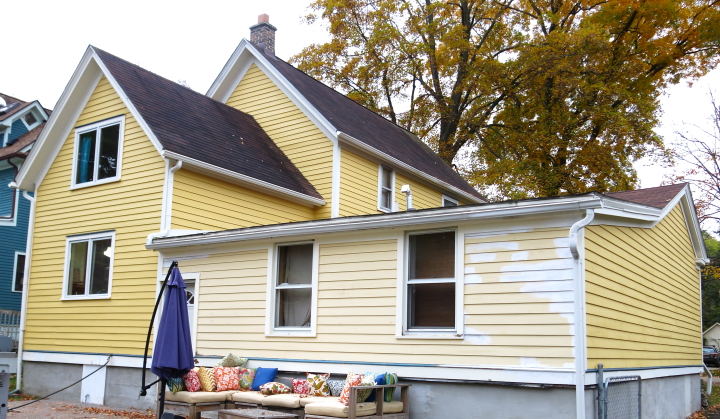
As time went by and more and more paint went up we knew we had made a great decision about not only the colors but also our painter.

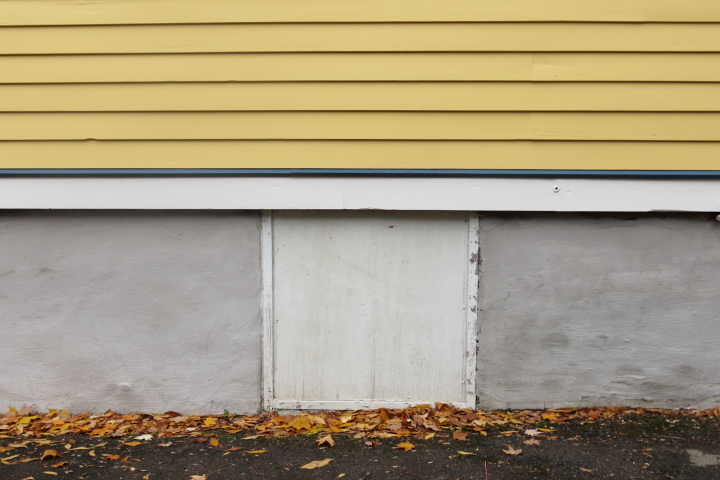
After the painting on the house was complete our painter painted the concrete foundation. Below is a picture before and then after the foundation was painted. As a side note this access door was used to bring produce into the basement when the side wing of the house was a local grocery store.

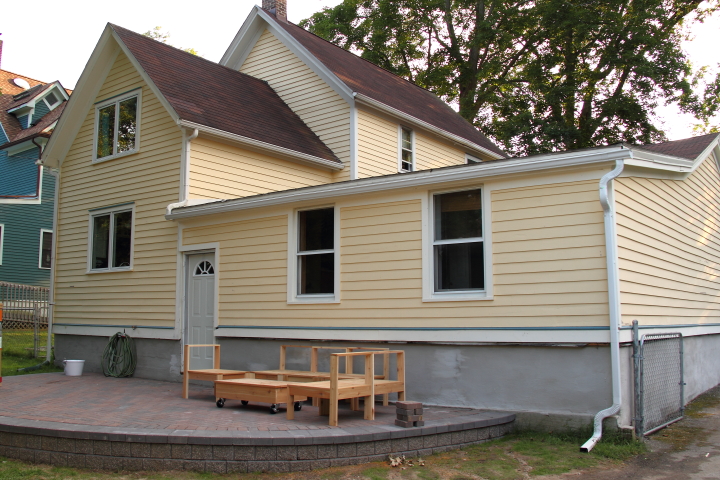
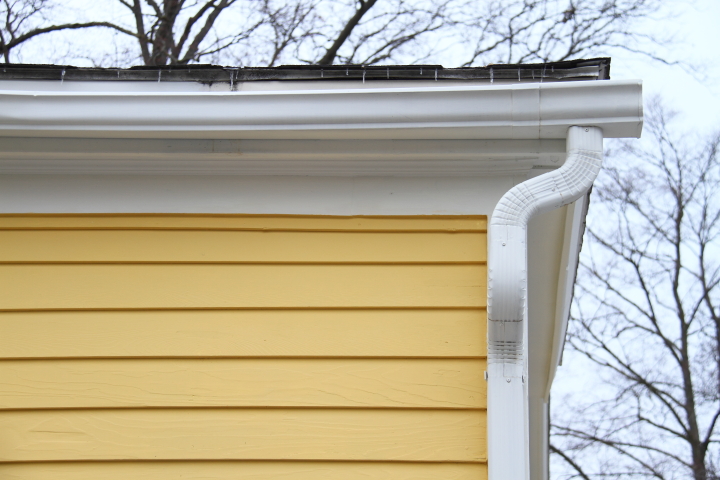
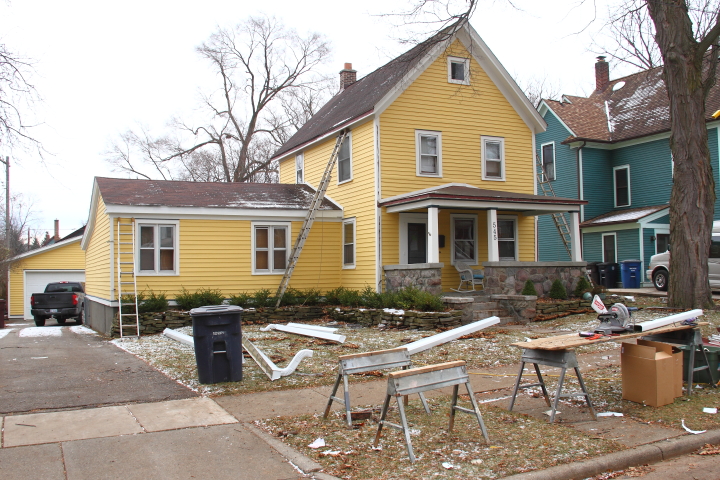
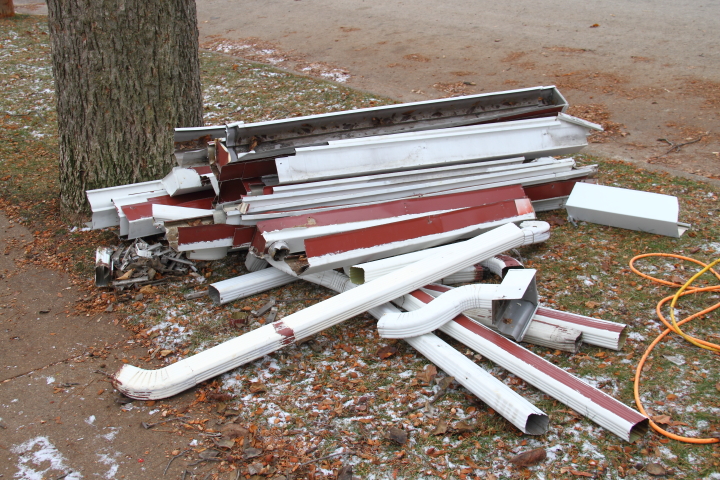
With the painting wrapped up at the beginning of November the gutters needed to be addressed. Not only were they undersized but they had seams, didn't slope properly toward the downspouts and had unneeded bends all of which you can see in the picture below.

Frank got a few quotes for seamless 6" gutters with 4" downspouts before we settled on a contractor. Amazingly they got installed at the end of November in just one day.

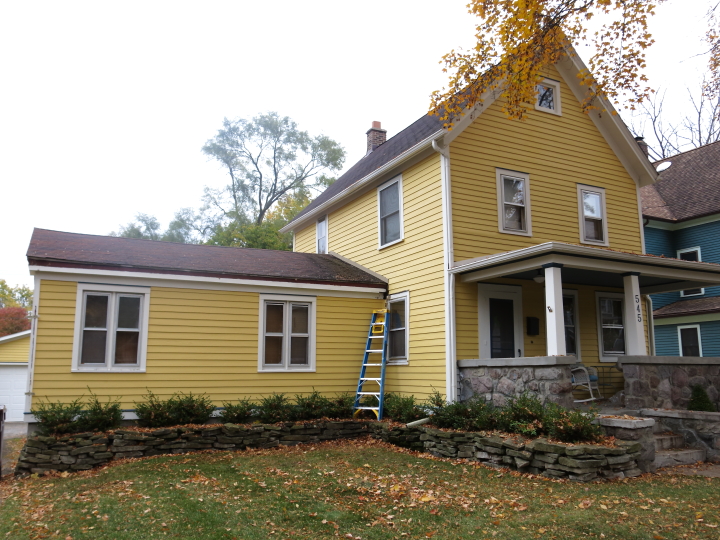
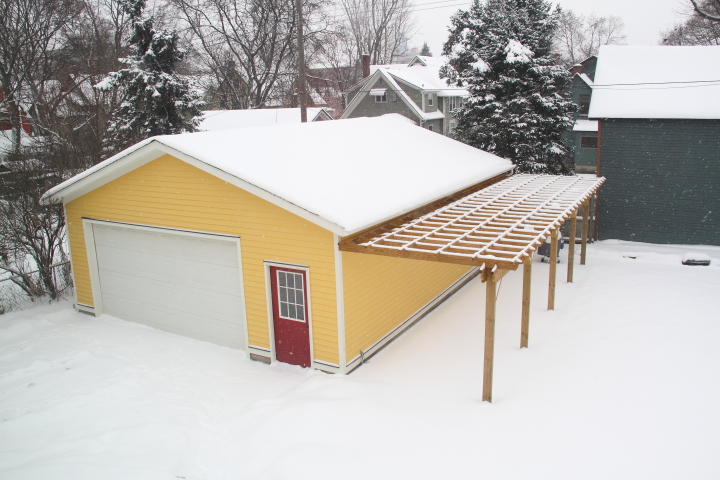
In the few weeks since then I haven't had much of a chance to get some pictures of the house during daylight hours (that whole engineer thing takes up a heck of a lot of my time) until now when we have seven inches of snow on the ground. Here is what it looks like today.

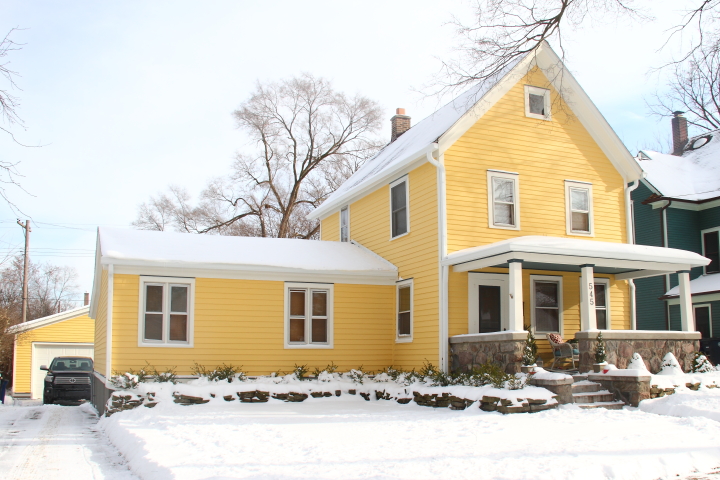
I love how the colors turned out and it really gives the house a facelift. My favorite part is how vibrant the new yellow is. In the past the pale yellow really looked bleak in the winter but this yellow is so bright and cheerful in the snow. Nothing exemplifies this more than the way the garage looks in the snow filled back yard.

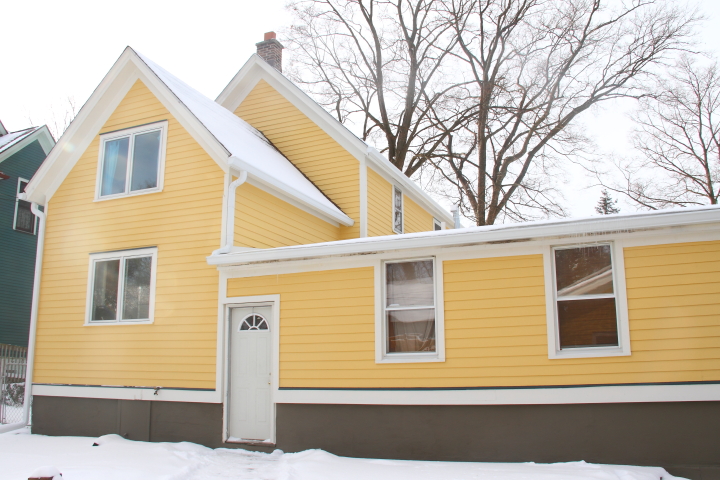
I think Frank's favorite part is the new porch ceiling color since he absolutely hated the bright turquoise (which I loved!) that I had painted it before.

This project wraps up our outdoor projects for the season, but upcoming I would like to add shutters to the house, a wood fence to replace the chain link one in our backyard plus we really need to stain the pergola. To 2014!

Tuesday
Dec102013

Beginning the Master Bedroom Closet Makeover

Since we got married and Frank moved in with me this summer he has been hanging up his clothes on a standing clothes rack in the bedroom. Originally our plan was to use a beautiful antique armoire to convert into a closet for him. It is enormous so we checked the measurements for everything to make sure it could get through our front door, the bedroom door and fit in the bedroom itself. What we didn't account for was the headroom in the stairway which is just a smudge too short.

So apart from figuring out a long term solution for the armoire on the first floor Frank needs some place to hang his clothes which is bringing about this closet makeover.

The old closet system doesn't work for a few reasons. Originally it had only one bar on each side with the shelves above. The shelves are largely useless and just gather my junk so I want to hang the rods higher. I hung a second rod on one side of the closet but because the top rod wasn't very high it works for my clothes but not for Frank who is a foot taller than me. All in all if this closet was going to work for us I needed to completely rework the organization to maximize the space for both of us.

To start I set about cleaning out the closet (no easy feat with my pack rat ways!) and then demoing the existing organizers last weekend. I was as careful as I could be but the walls were pretty scuffed up and had a number of holes in the walls from where the old shelf supports were attached.

Using a putty knife, I filled all of the holes plus a few small dents the closet had acquired with some joint compound. After it had dried I applied another thin layer and then sanded everything smooth once it was dry.

While I was at it I wanted to paint the trim white so a little prep work was required there as well. I applied a bead of paintable, sandable caulk in all of the gaps and then smoothed it with my finger.

If you don't use a caulk gun very often one thing I'll mention is that right after you are done applying caulk hit the release on the back otherwise when you set it down it will slowly keep oozing out. I learned my lesson about this several years ago with a construction adhesive mishap. In case you are wondering construction adhesive is very tough to get off your hands and will turn them black. It made for a slightly awkward few days at work.

Anyway, back to the closet! With a coat of primer and two coats of Benjamin Moore's Simply White on the trim followed by two coats of Valspar's Oxygen White on the walls my closet was a fresh blank slate.

Next up I have some fun plans for the ceiling and closet light plus I'm going to build organizers that maximize the space for our needs. I can't wait to get the clothes back in the closet!

Thursday
Dec052013

Michigan Tailgate Cake: Beat Ohio

Saturday was the last Michigan football game of the regular season playing against arch rivals, OSU. For the tailgate cake I baked a chocolate cake and iced it with buttercream icing that I tinted maize. I kept things simple and decided to decorate the top with the phase "Beat Ohio".

To make the words I rolled out some blue marshmallow fondant and traced around a bowl to make a circle just smaller than the cake. I then cut away a line across the middle to make the top and bottom lines for the words. I then trimmed away three vertical lines leaving me with eight blocks for my letters. I then cut each block into a letter to spell out "Beat Ohio". I finished up the cake by transferring the fondant letters onto the cake and piping a border of blue stars along the base of the cake.

Kickoff for the game was a noon so we had a short but fun tailgate. As is tradition for the last home tailgate of the year we ate filet mignon provided by Gus and grilled by Frank. Frank also made an awesome crab bearnaise to accompany the steaks.

For the week prior to the game everyone had Michigan pegged as a huge underdog. Ohio was undefeated and ranked #3 in the country while Michigan's season had been lackluster. The game, however, ended up being very exciting as opposed to the blowout that had been predicted. Michigan scored first and at the half it was tied 21-21. Things looked a bit bleak in the second half when Michigan was down by 14 but they rallied and with less than a minute left they scored a touchdown to bring the score to 41-42. Michigan went for a two point conversion but it was intercepted basically ending the game. It was a great game, but I wish that things had worked out a little better for Michigan.

My Duke Blue Devils had an exciting day on Saturday, beating rivals UNC. The Duke-UNC game was at the same time as Michigan-OSU so the whole game I was continuously checking my phone for Duke updates. With the win Duke ended the regular season with their best record, 10-2, and will head to the ACC Championship game this Saturday against Florida State. Go Blue Devils!

Wednesday
Dec042013

Decorating the Front Porch for Christmas

Now that December is here I am starting to get into the Christmas spirit. I started my decorating this year with my front porch swapping out my summer accessories for more festive things. 

I swapped out my multi color rug for an inexpensive solid teal rug that matches the accent trim on my house. On my accent table I placed some greens in a metal pitcher from Ikea. In front I had a little red pail that I got from the Target One Spot that I filled with pine cones. I picked up several of the red star pails a few summers back and love how versatile and festive they look.

I swapped out my pink pillows for red outdoor pillows layered with small burlap snowflake pillows I found at Target.

Just to the right of my front door I put a small Christmas tree in the planter I built this past summer along with an outdoor lantern that I used in the backyard this past summer.

It only took a few minutes but it makes me so happy and puts me in the Christmas mood when I walk up to my front door.

This weekend Frank and I are going to get a Christmas tree and hang Christmas lights on the house and I can't wait. Have you started any holiday decorating this year? 

Friday
Nov292013

Happy Belated Thanksgiving!

I hope that all the Americans out there had a wonderful Thanksgiving yesterday! Frank and I spent the morning making food, he smoked the turkeys and I made desserts, and then we headed over to his sister's house for dinner where she made the sides and appetizers with her girls.

We ate way too much delicious food and had a great time hanging out. Frank's two youngest nieces showed me how to make bracelets on their rainbow loom as they made bracelets for the whole family. It reminded me of being their age and making embroidery floss bracelets.

All in all it was a nice, relaxing day and I feel very lucky that Frank's family has taken me in like one of their own. 

Wishing everyone a wonderful holiday weekend! Let the Christmas preparations begin!

Page 1 ... 5 6 7 8 9 ... 98 Next 10 Entries »