Tuesday
Apr032012
Picture of the Day: Pope Benedict XVI Addressing the Crowd in St. Peter's Square From His Study Window
 Vatican City
03.18.2012
 Lisa | 2 Comments | Share Article | Email Article | Print Article

My name is Lisa and I'm a crafty girl with wanderlust working as an engineer by day. My blog chronicles projects in my home as well as pictures and stories from my travels.

Vatican City
03.18.2012
Lisa | 2 Comments | Share Article | Email Article | Print Article  As a part of a wedding shower gift for my friend, Kristen, I decided to make drink coasters. I had purchased some bar related items from her wedding registry and thought this would be a nice compliment to the gift.
To make the coasters I used white twill fabric, 3/8" navy grosgrain ribbon and white thread. I wanted the coasters to be 4" square so I started by cutting two 5" squares from my twill (4" plus 1/2" seam allowance) for each coaster.
I cut four 5" lengths of ribbon for each coaster and pinned them to the top of a twill square 1" from the edge. To tack the ribbons in place I sewed around the twill 1/4" from the edge and removed the pins. I then pinned a second twill square to the beribboned square with right sides together. I sewed around the edges with a 1/2" seam allowance leaving a 2" gap for turning the coaster right side out. After I finished sewing I clipped the corners and ironed the seams flat before turning it right side out. I ironed the coaster again and then finished it by using a blind stitch to close up the gap.
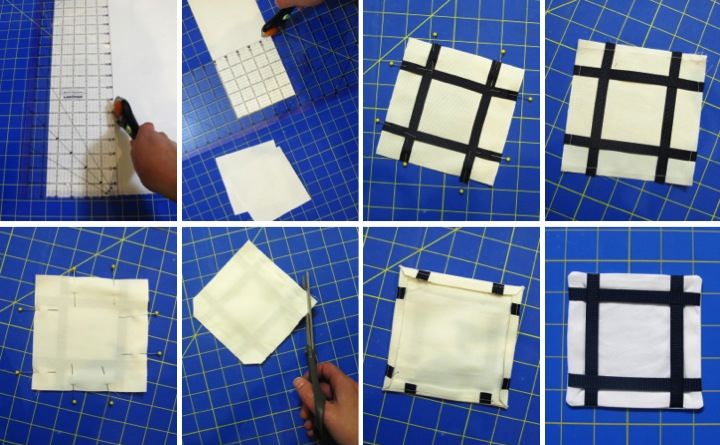
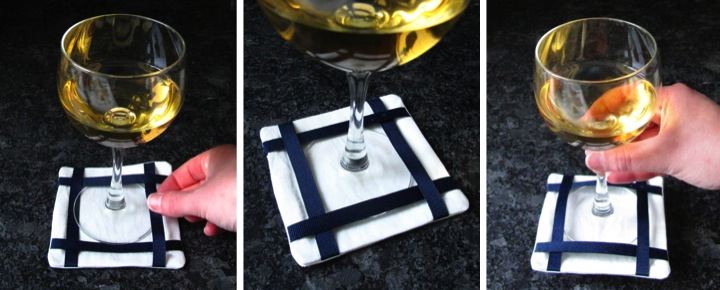
The fun thing about the coasters is that if you are using them for wine glasses you can slide the ribbons around the base of the glass and the coaster will stay attached to the glass. For wine glasses with a smaller sized base my pattern would need to be tweaked to place the ribbons closer to each other and for larger ones the ribbon should be a little farther apart. Cheers!
Lisa | 5 Comments | Share Article | Email Article | Print Article  Halong Bay, Vietnam
08.13.2011
Lisa | Post a Comment | Share Article | Email Article | Print Article  After doing a pretty good job on my 2012 New Year's resolutions of purging and organizing my home and finishing up projects around the house in January and February, March was pretty slow going. With going to Italy taking up a good chunk of the month, the remaining time didn't leave a lot of time for projects, especially after trip preparations were thrown into the mix.
Although I would liked to have accomplished more, I am happy that I did manage to get a few small things done in the time I had. The important thing to me is that I keep making forward progress, even if it is slow.
Resolution 1: Purge & Organize
For the two Mondays in March that I was in town I met my goal of having a volume of at least one trash cart (between my recycling and regular trash) out on the curb on garbage pick-up morning. Here's my breakdown:
- March 5: 3/4 full trash + 1/4 full recycle = 1 total
- March 12: 3/4 full trash + 1/2 full recycle = 1-1/4 total
- March 19: Nothing (In Italy)
- March 26: Nothing (In Italy)
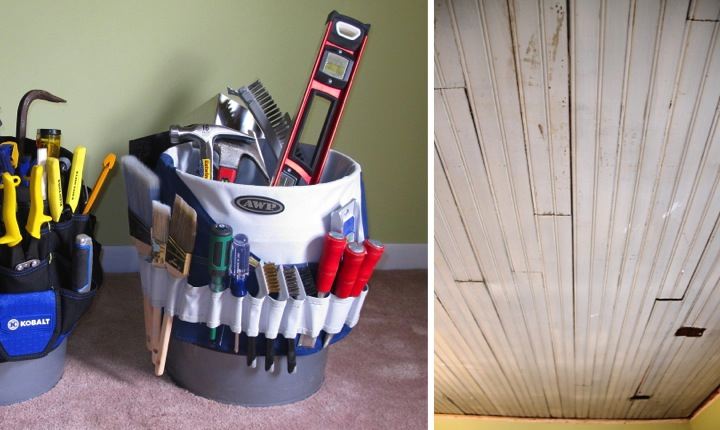
On the organizing front I finally got around to organizing my small tools which made a big impact in being able to quickly find things when I am working on projects.
Resolution 2: Finish Up Projects
After finishing up my bathroom in February, March was not so productive. I did do some planning about what I would like to accomplish in my study. I also prepped the ceiling and patched a large, gaping hole in the wall. In April I hope to finish up the ceiling by getting it patched, sanded and painted and then adding some crown molding.
Does anyone else out there have any resolutions they are trying to keep? What are your goals for the year and how is it going? I'd love to hear what other people are doing to stay motivated!
Lisa | 6 Comments | Share Article | Email Article | Print Article 
Montréal, Canada
03.17.2012
Lisa | 1 Comment | Share Article | Email Article | Print Article  Singapore
12.25.2008
Lisa | 1 Comment | Share Article | Email Article | Print Article To say that my small hand tools were in a bit of a mess would be the understatement of the year. Instead of having anything organized I would accumulate small piles of tools in various rooms depending on what projects I was working on. This system (or lack thereof) clearly wasn't working and I wasted a lot of time looking for things. Something had to be done. 
I set off to Lowe's in search of a storage solution. I wanted something inexpensive where I could easily see everything. Using five gallon buckets with an organizer completely fits the bill for me. Because I have a lot of stuff I got two buckets and generally organized painting and dry walling supplies into one and my clamps and other miscellaneous items into the other. I'm thinking that I need to get another one for storing my sanding discs and sanders as well. So far these buckets have worked well for me and the time I used to waste looking for things is now devoted to getting things done more quickly.
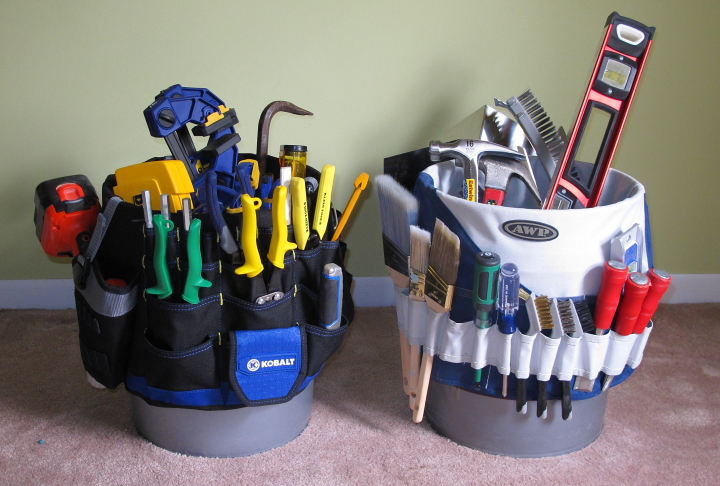
What do you do to keep your DIY supplies under control? Do you have creative ideas for storing your tools?
Lisa | 2 Comments | Share Article | Email Article | Print Article 
Paris, France
03.17.2012
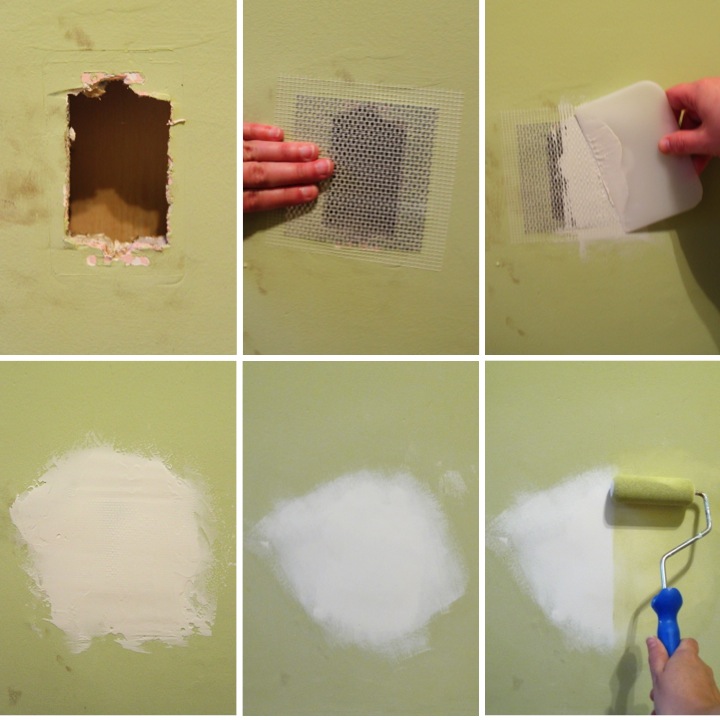
Lisa | 2 Comments | Share Article | Email Article | Print Article Now that I am back in town it is time for me to get working on my study again. Due to an outlet getting moved I had a nice big hole in my wall next to the closet that I needed to patch up and some dirty fingerprints left by the electrician to clean up and paint over.
Since it was a large hole I used a 4" x 4" aluminum wall patch to cover it. Generally, you should get a patch that is large enough to extend an inch past the hole on all sides. After removing the backing I placed the self adhesive patch over the hole. I then applied a layer of drywall compound over the patch feathering it out at the edges. It doesn't need to be perfectly smooth, but the smoother it is, the less you will need to sand.
After letting it dry overnight I put another coat of drywall compound on over the patch. Once that was completely dried I sanded it smooth. To make sure it was perfectly flat I ran my hand over it to check if I could feel any remaining unevenness or roughness.
With the patch complete I primed over it with a coat of Zinsser primer and then finished it off with two coats of wall paint. This was a simple and easy project requiring only about twenty minutes of hands on time, but it was something that I needed to get done in the room. I am now one tiny step closer along my way in getting the room together...
If you are interested, check out the rest of my study renovation posts: Study Blog Posts
Lisa | 3 Comments | Share Article | Email Article | Print Article 
Between Volcán Pacaya and Antigua Guatemala, Guatemala
07.03.2010
Lisa | Post a Comment | Share Article | Email Article | Print Article 