Welcome

My name is Lisa and I'm a crafty girl with wanderlust working as an engineer by day. My blog chronicles projects in my home as well as pictures and stories from my travels.

Search


Instagram

Blog Index
The journal that this archive was targeting has been deleted. Please update your configuration.
Navigation
Friday
Mar232012

Keeping My Plants Watered On Vacation

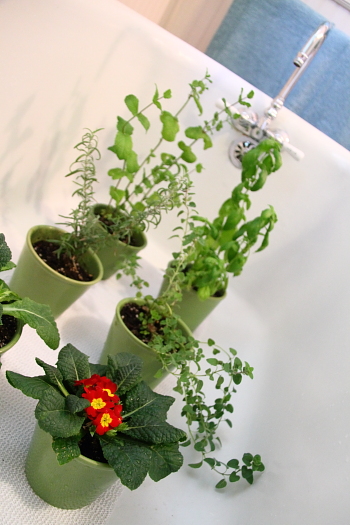
I love having my window herb garden but I always run into a problem when I am out of town. I hate returning home to a sad, half dead plants. My plants are currently thriving, including two little primroses that I brought back to life after rescuing them from a sale rack at Home Depot. I would hate to have them wither while I am in Italy so I decided to do some research before I left about how I can give them a fighting chance to survive my vacation.

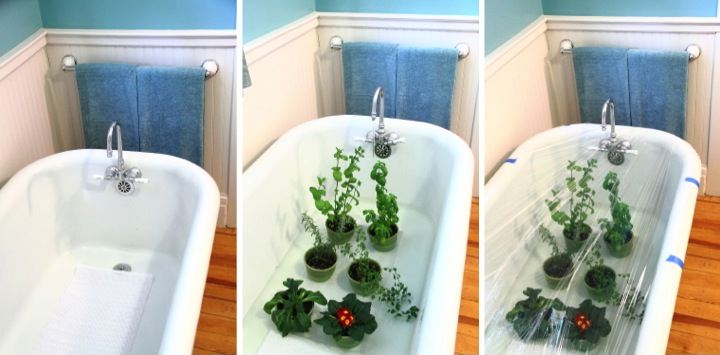
I read about all sorts of things from making watering systems out of a soda bottle to fancy self irrigation systems that you can buy. The idea that seemed the best to me was what is apparently known as the "bathtub trick." The basic idea is to make a terrarium with your plants in the bathtub by adding a few inches of to the bottom of the bathtub and covering it with plastic. The plastic seals in the humidity so that the plants don't dry out.

I decided to give it a try and gave my plants a good watering. I didn't want the pots to scratch my bathtub so I put some drawer liner down before placing my plants inside and filling it with about two inches of water I then covered the top of my tub with clear plastic wrap, taping down around the outside of the tub with painter's tape (I didn't want to risk messing up my tub's new paint job with duct tape). I poked a few ventilation holes in the plastic wrap to finish up.

I am hoping this plan works and that I come home from vacation to find my plants alive and well in their little bathtub terrarium. Have you ever tried the "bathtub trick"? What is your best method for keeping plants alive while you are on vacation?

Friday
Mar232012

Picture of the Day: Catedral de San José in Antigua Guatemala

Antigua Guatemala, Guatemala
07.03.2010 

Thursday
Mar222012

DIY Covered Papered Box

After making the puzzle for my grandma's birthday I decided to cover the puzzle box lid to finish off the gift.

I started by placing the box lid on top of a piece of face down scrapbook paper. Using a marker I traced the outline of the box and then extended the top and bottom lines to the edge of the paper. I cut along the extension lines to the edge of the box outline and then coated the whole back of the paper with a glue stick.

To wrap the lid I placed it back over the lid outline making sure that the paper was well adhered. Next I folded up the top and bottom, wrapping the excess paper around the sides of the box. I then folded up the sides and added a little extra glue in any areas that needed it. Once I was finished wrapping the box I used my scissors to trim off the paper that extended beyond the box lid edge.

To complete the project I put the puzzle pieces back into the box, placed the covered lid on top and tied it all up with a bow and a tag. 

Thursday
Mar222012

Picture of the Day: Buildings in Hanoi

Hanoi, Vietnam
08.2011 

Wednesday
Mar212012

Random Sights: Smart Car Parking in Rome

While Frank I were in Rome earlier this week we saw a lot of interesting parking jobs to most effectively utilize the limited space available. My particular favorite was the creativity used by two passenger Smart Car drivers.

On several occasions (like this picture I snapped next to Trajan's Forum) the Smart Cars parked perpendicularly on the side of the street where the other cars had parallel parked. Parking flexibility definitely seems to be an advantage of driving a two passanger car!

Wednesday
Mar212012

Picture of the Day: Skyscrapers Along the Chicago River


Chicago, Illinois, U.S.A. 
05.2011 

Tuesday
Mar202012

Spring is Sprouting

Happy first day of Spring! Even though this winter has been incredibly mild in Michigan I am so excited for Spring to be here. Before I left on my trip things were sprouting up everywhere in my garden and I thought I'd share a little bit of it.

It always amazes me how my perennials just spring back to life when the warm weather comes. Along my back bed I have daffodils popping up all over and that will probably bloom while I am gone. My lavender plant is on its third year in my herb garden and has become pretty large. It has developed a lot of new foliage so far this season. My rosemary is also looking strong and healthy and the oregano is growing like crazy. The chives are just starting to poke up and I am thinking about whether or not I should divide them.

It is so exciting to watch nature wake up in the spring and I can't wait to see how things are growing when I get home. I just hope some of the daffodils are still blooming!

How are things looking in your garden this spring? Have you had a rough or mild winter? How has your winter affected your plants?

Tuesday
Mar202012

Picture of the Day: Boats at Antigua Slipway

English Harbour, Antigua 
07.2009 

Monday
Mar192012

Random Sights: Bobble Head Souvenirs at the Vatican

As Frank and I were walking to St. Peter's Square on Sunday morning to see the pope greet the masses from his study window we ran across a souvenir stand just outside of the Vatican wall selling bobble head dolls. 

I'm not exactly the bobble head doll collecting type, but the back row of dolls consisting of a roman emporer, some gladiators and a member of the Swiss guard seemed like reasonable souvenirs. However, the front row of Pope bobble head dolls, complete with crucifix, seemed a little strange to me and perhaps bordering on sacrilegious. What do you think? Do you find it odd or would you want one?

Monday
Mar192012

DIY Puzzle Birthday Gift for Grandma

My grandma loves doing puzzles so this year for her birthday I thought I would make her a puzzle with a Happy Birthday message on it. Since her birthday is just after Frank and I get back from Italy I made this before we headed off on our trip and mailed it to her with strict notices on the outside of the box not to open until her birthday.

To make my puzzle I started by buying a kid's puzzle for a dollar from the Target One Spot. I liked this puzzle because the wide rectangle shape would work well with adding my message to it. 

When I got home from Target I covered a board with butcher paper and then put together the puzzle. I then took it outside and using light coats of matte spray paint I painted the puzzle white. Because of the colorful design it took five coats before it was completely white.

I let the puzzle dry over night and then started adding my design with pink and teal markers. To add the word "Grandma" I used pencil transfer. I printed the word out on a piece of paper and then lightly penciled over the areas of the letters on the back side of the paper. I then put the paper right side up in the position I wanted and traced the outline of the letter which caused a light graphite transfer onto the puzzle. From there I went over my pencil guidelines with dark pink marker and then filled in the letters with light pink. I used a teal marker to write "Happy Birthday" and "Love Lisa" and then used the pink and teal markers to make a border to finish it off.

I think the puzzle turned out cute and it was fun to make. At only a hundred pieces this is a much smaller puzzle than Grandma usually works but hopefully it is still fun for her. Happy Birthday, Grandma!