Welcome

My name is Lisa and I'm a crafty girl with wanderlust working as an engineer by day. My blog chronicles projects in my home as well as pictures and stories from my travels.

Search


Instagram

Blog Index
The journal that this archive was targeting has been deleted. Please update your configuration.
Navigation
Wednesday
Aug222012

Basket Night Stands for My Guest Bedroom

While working on my guest room I needed a solution for a pair of nightstands. Looking around it was hard to find a matching pair of anything and anything new that looked decent seemed too pricey. 

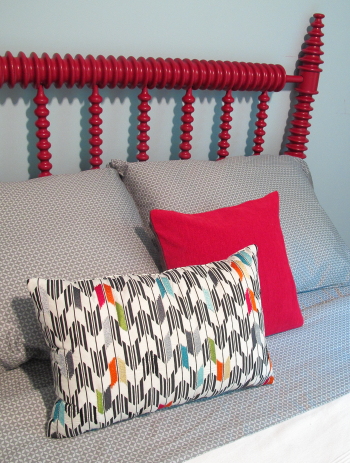
I wanted something on the small side since the room isn't very big and there isn't a lot of space. Color and finish was also an issue. With the red headboard I wanted something neutral that wouldn't compete too much. On the otherhand I didn't want wood because the wood from my console table and dresser from Japan seemed like enough in the room.

After thinking about it, floating baskets mounted on the wall seemed like a perfect solution. I hunted around looking for something that was large enough and didn't have angled sides. I also needed to find something with a tight weave that would be flat enough to act as a table top. Finally I found a pair of banana fiber baskets that fit the bill and were only $14.99 each. I couldn't put them in my cart and check out fast enough.

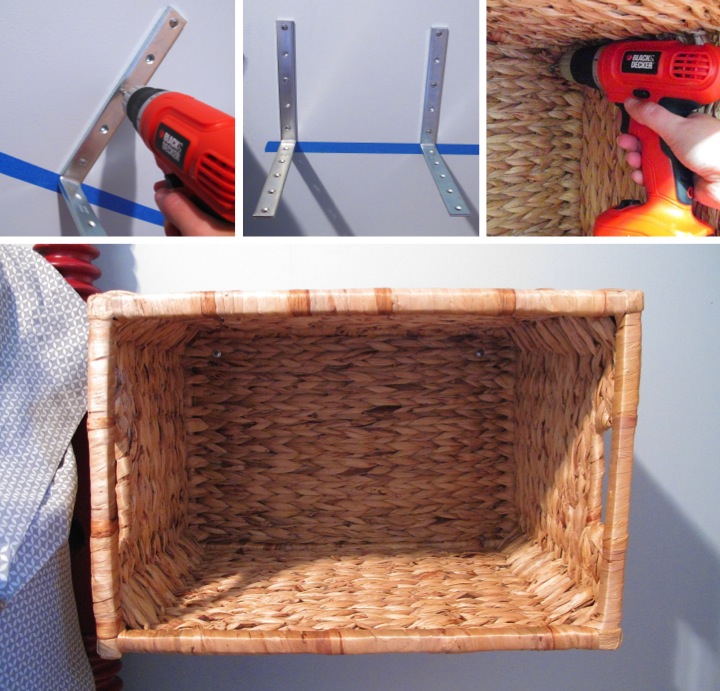
I now needed to figure out a way to secure them to the wall in a sturdy way. I looked around at Lowe's and found some sturdy 10" L brackets. The baskets are 12" deep so it was just the right length to give the baskets enough support without sticking out so far than the brackets would be visible once mounted.

I measured up 16" from the floor and used a level to tape off a level strip of painter's tape. I then used the tape as a guideline to mount the brackets to the wall. For each basket I used two brackets with one screwed into a stud and the other attached to the wall with anchors.

I set the baskets on the brackets and to make sure they didn't tip I secured them by screwing a screw in each of the top inside corners. Unless you look at the basket straight on you can't see the screws or brackets making the baskets look like they are floating on the wall.

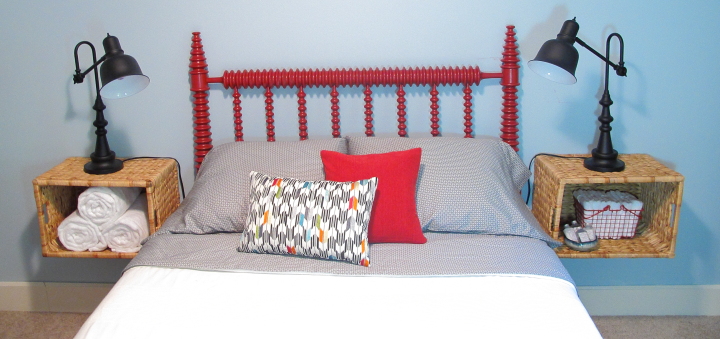
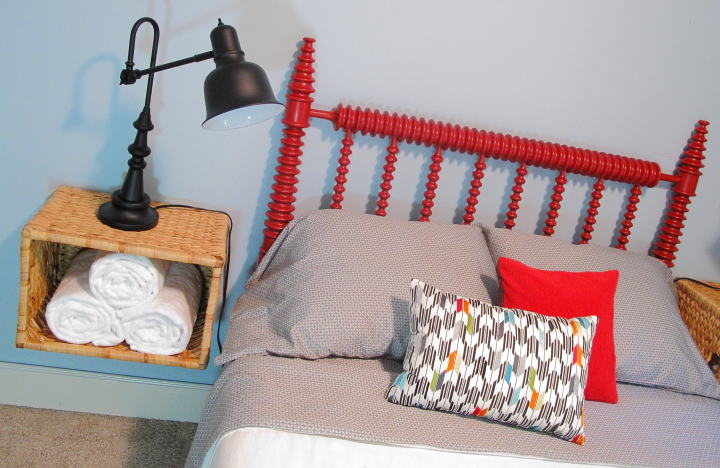
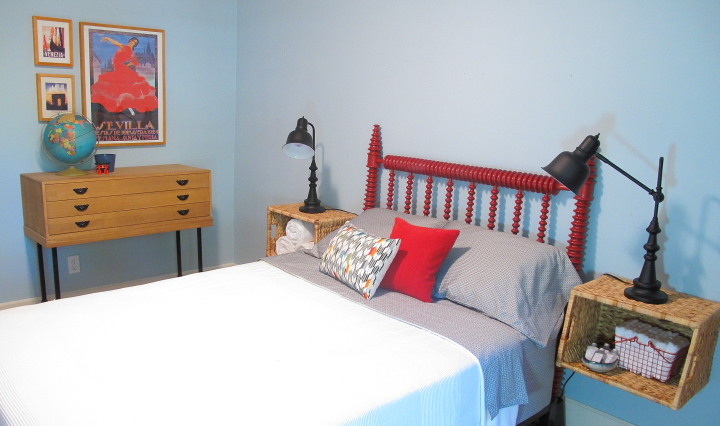
With my bedside tables installed I had some fun decorating. On each of the night stands I put a new lamp. I like the apothecary style of the lamps with the adjustable arms and shades. I also like how the oil rubbed bronze finish ties in with the hardware of the console table and dresser from Japan that I have in the room. 

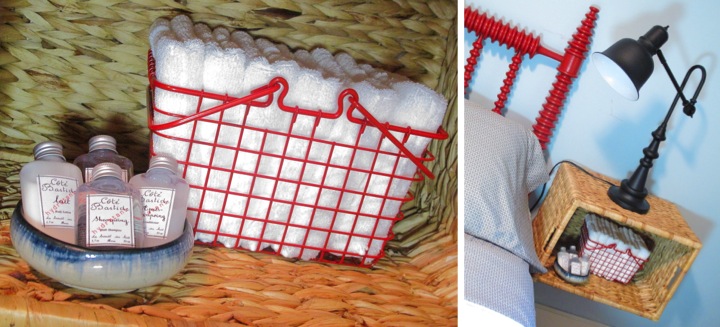
Using the baskets left me some nice open storage space that I wanted to use for some amenities for my guests. On the left side I rolled up some bath towels for guests.

On the right side I found a little red wire basket that I filled up with some wash clothes to match the towels. I also wanted to include some small bath products in case my guests had forgotten something. I took a little white and blue bowl that I made in Seto, Japan and filled with with some fancy hotel samples than I had saved from when Frank and I were in Sicily earlier this year.

I like how the baskets turned out. The make a great solution that doesn't take up much space. I also like the empty space underneath which keeps the room from looking too cluttered.

The room is starting to come together. I still have more to do, like make some art for above the bed and make some curtains. I can't wait to get it all finished.

Have you been doing any updates on your home? What have you done to make your guest room cozy?

Tuesday
Aug212012

Picture of the Day: Pigeons on Osu Kannon

Nagoya, Japan
7.2012 

Monday
Aug202012

Simple Pillow Customization

With my headboard painted red in my guest room I have been on the lookout for some throw pillows to add to the bed.

I ran across a cute little rectangular pillow at Target with a black and white design that had some colors embroidered over it. With red, orange, yellow and blue as the accent colors of the pillow it was almost perfect. It only needed a little green to be just right for the room.

I thought about it a bit and decided to buy the pillow. I grabbed some green embroidery thread and used a satin stitch to cover a few of the pattern shapes with green.

The change is a subtle one, but it pulls the pillow together to fit in with the color scheme that I have for the guest room. I'm really happy that I got the pillow and that this simple customization was so easy. Sometimes the little touches are just what is called for.

Have you made any little changes to something store bought recently to customize it for your home?

Monday
Aug202012

Picture of the Day: El Morro in the Rain


Isla Taboga, Panama
6.11.2012 

Saturday
Aug182012

Simple Bathroom Upgrades

Although my bathroom is pretty much done, I made a few simple upgrades recently that had a big impact on the usability of the bathroom for me.

First up was the toilet seat. My old toilet seat was a bit on the junky side and one of the plastic washers that helped keep it in place had developed a crack. As a result the seat would wobble a little bit every time that I would sit down on it. Even though it wasn't the end of the world it sure was really annoying.

I thought about just replacing the broken plastic washer, but then I found a nice inexpensive toilet seat at Lowe's that sure beat out my old cheap plastic one so I decided to replace it. The new seat is molded wood in white with chrome mounting hardware. It is definitely a much needed upgrade.

Replacing the toilet seat took just about five minutes. I removed the old seat, screwed on the hardware, put the seat in place and then tightened everything down. I can't believe I hadn't done this earlier. No more wobbles for me!

In addition to taking care of my toilet seat problem, I also found a solution for my toilet paper. There isn't much space on the wall around the toilet for a wall mounted toilet paper holder due to the door and my built in cabinet. On top of that I didn't want to put mounting holes in the bead board on my bathroom walls. As a result I've gone without a toilet paper holder and just set a roll on the top of the tank until now.

On a recent trip to HomeGoods I spotted an inexpensive chrome toilet paper holder that was free standing. The look matched well with the other chrome hardware in my bathroom so I brought it home to try it out. Because it is free standing I can angle it and it fits perfectly next to the toilet. Toilet paper holder problem solved!

Have you done any small upgrades around your home recently? What little things have you done that made a big impact for you?

Saturday
Aug182012

Picture of the Day: Painter on Isla Taboga

Isla Taboga, Panama
6.11.2012 

Friday
Aug172012

Flavored Water Three Ways

I love soda. Whenever I travel I try whatever sodas I can find. Melon soda in Vietnam? Why of course! Guaraná soda in Brazil? Absolutely delicious! If a drink is sugary and carbonated it's for me.

Unfortunately, drinking a lot of soda isn't the healthiest and I decided that I should try to cut down a little bit on my several soda a day habit.

I know that I should replace at least some of my soda intake with water but unfortunately plain water doesn't really do much for me. In an attempt to get more water into my life I've been trying out different homemade flavored waters. With my herb garden outside the sky is the limit for experimenting with different combinations.

I've made infusions with strawberry and mint, cucumber and watermelon and sage. All you need to do is cut up your ingredients, place them in a bottle of water and let the fruit and herbs steep for at least and hour.

I can't say that I still don't crave my soda, but the flavored waters are a tastier alternative to plain water for me. So far the strawberry and mint is my favorite.

Do you like flavored waters? What combinations are your favorite?

Friday
Aug172012

Picture of the Day: Temple Roofline at Tofuku-ji


Kyoto, Japan
12.04.2011 

Thursday
Aug162012

Picture of the Day: Zucchini For Sale at Mercato Trionfale


Rome, Italy
3.20.3012 

Wednesday
Aug152012

Simple Flower Arrangement With Washi Tape Vase 

Yesterday I made a simple flower arrangement for someone special who is going through a tough time right now. I went to the grocery store and picked out a bunch of colorful alstroemeria and a bunch of gerbera daisies and set to work.

I started by gussying up a plain glass vase to match the flowers that I had purchased. Since the flowers were fuchsia and deep pink I picked out a few different washi tapes from my craft stash in those hues.

Starting from the bottom, I wrapped one of the washi tapes around the vase, careful to keep it straight and even. It took a little bit of effort to make sure that by the time I wrapped it around the ends would meet up.

Once the first line of tape was level it was easy to wrap the remaining tapes, using the tape below as a guideline. I left about 1/4" between each line of tape so that a bit of the stems could peek through. 

With the vase completed I started arranging the flowers. I bunched up the gerbera daisies in the center and then started adding the alstroemeria around the outside edges. I adjusted the stems until I had them the way I wanted then secured them with a rubber band and trimmed them to fit in the vase.

I think that the flower arrangement turned out fun and bright and I hope it brings some cheer to the recipient.