Picture of the Day: Sun Setting Over Sydney
Sydney, Australia
11.2010
 Thursday, August 9, 2012 at 8:37AM | Posted by
  Lisa |
  Post a Comment | |
  Email Article |
  Print Article
 My name is Lisa and I'm a crafty girl with wanderlust working as an engineer by day. My blog chronicles projects in my home as well as pictures and stories from my travels.
Sydney, Australia
11.2010
 Thursday, August 9, 2012 at 8:37AM | Posted by
  Lisa |
  Post a Comment |
  Share Article |
  Email Article |
  Print Article
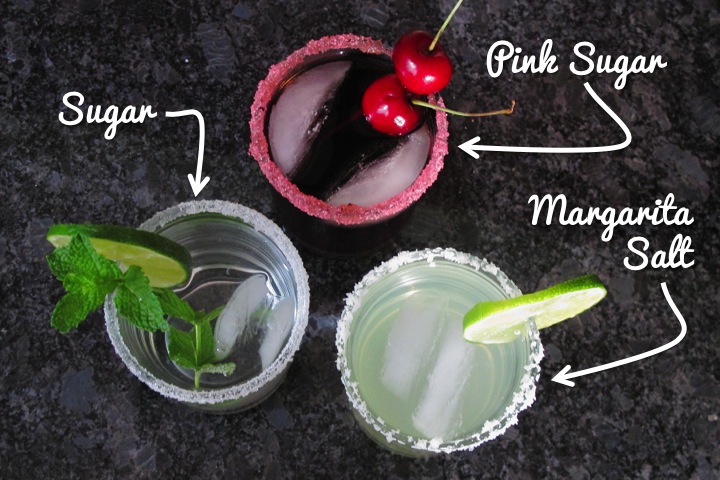
 After sharing about Trisha's going away dinner party I thought I would provide the details about how to do one of the party elements, namely how to rim a glass with sugar. Although I used sugar for the party since I was serving a sweet Sangria and flavored waters, this technique works equally well with salt.

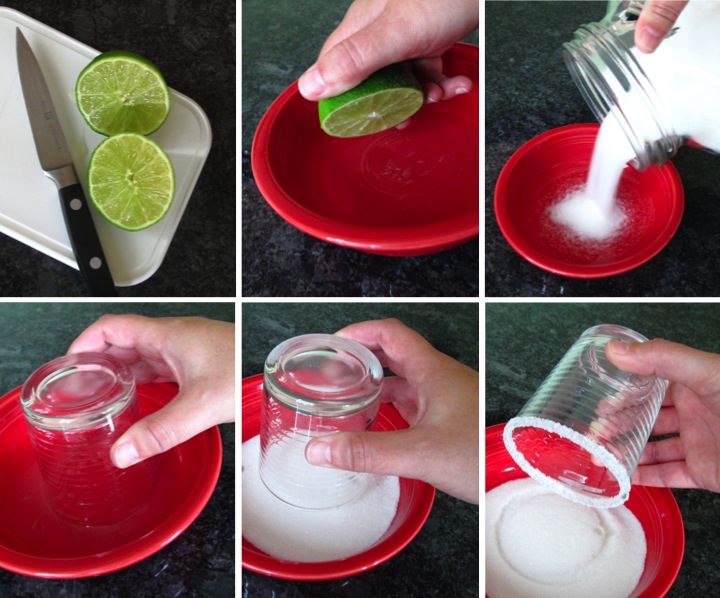
The process is really simple and easy. You just need limes, sugar or salt and two flat dishes with a lip that are larger in diameter than the cups or glasses that you intend to decorate.
Squeeze the limes over the first dish until it has a shallow covering of lime juice at least an eighth of an inch deep. Pour some sugar or salt in the second dish and tap it to level it out flat.
Dip the rim of your glass in the lime juice followed by dipping it into the dish of sugar or salt. Keep the glass upside down between dipping into the juice and the sugar or salt otherwise the juice will drip back into the glass. Also, only lightly dip the glass into the sugar or salt because if you hit the bottom of the dish you may rub off the sugar or salt on the very top of the glass. Very lightly tap the glass to gently shake off any excess granules. Turn the glass right side up and then fill it with your favorite party beverage.
You can also try this technique with colored or flavored sugars for something different. It is a super easy and fun way to dress up your drinks.
 Wednesday, August 8, 2012 at 9:04AM | Posted by
  Lisa |
  4 Comments |
  Share Article |
  Email Article |
  Print Article
Panama City, Panama
6.08.2012
 Wednesday, August 8, 2012 at 8:51AM | Posted by
  Lisa |
  28 Comments |
  Share Article |
  Email Article |
  Print Article
Ta Prom, Cambodia
8.2011
 Tuesday, August 7, 2012 at 8:55AM | Posted by
  Lisa |
  Post a Comment |
  Share Article |
  Email Article |
  Print Article
 This past week I've been under the weather and didn't feel like myself again until Friday. Because of that not a bunch happened this week, but I did have a fun, relaxing weekend.
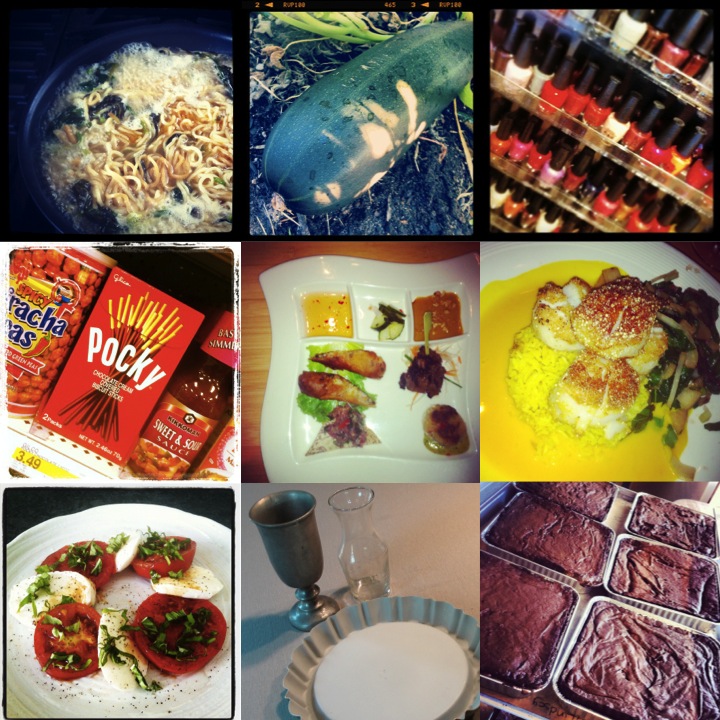
Collage One, First Row
- While I was sick I enjoyed some ramen. There is nothing like soup when you are sick.
- I have some large zucchini in my garden that I need to figure out what to make with.
- Friday after work I felt like I needed a little pampering after being sick for a week and a half so I got a pedicure.
Collage One, Second Row
- At Target on Saturday I spotted Pocky for sale. Pocky is a Japanese snack of long thin biscuits dipped in chocolate. They also have other variations like strawberry or green tea and it is a favorite treat that I like to eat when I am in Japan. I was pretty excited to find it at Target and be able to buy it in the US, but the $3.49 price tag means I'm not going to get it very often.
- Saturday evening Frank and I had dinner at Pacific Rim since I was too sick to celebrate my birthday last weekend. We both got a Monsoon Plate for an appetizer which was delicious.
- For dinner I ordered the seared scallops. I especially loved the curry sauce that accompanied the dish.
Collage One, Third Row
- For lunch on Sunday I made myself a Caprese salad with tomatoes and basil from my garden. There is nothing like a fresh picked tomato. Yum!
- I picked up a pewter vase, little carafe and tart pan at the Ann Arbor ReUse Center for a total of $2.
- Sunday afternoon we went to take a brownie class at Zingerman's with Frank's niece. Zingerman's is a famous deli in Ann Arbor and taking the class meant being able to have several of their amazing brownie recipes.
 Monday, August 6, 2012 at 8:15AM | Posted by
  Lisa |
  4 Comments |
  Share Article |
  Email Article |
  Print Article
 Nagoya, Japan
7.22.2012
 Monday, August 6, 2012 at 7:42AM | Posted by
  Lisa |
  Post a Comment |
  Share Article |
  Email Article |
  Print Article
 My grandpa loves trains so I usually make something train related (like this Soo Line fleece blanket) for him when I give him gifts.
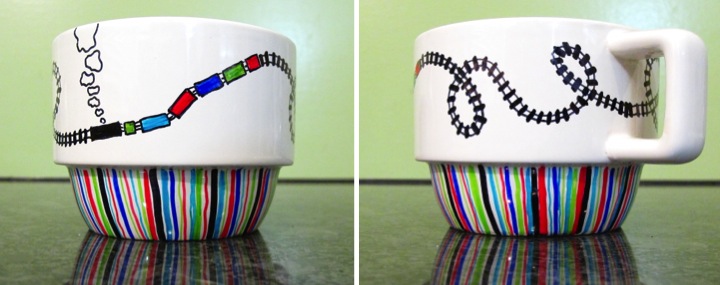
This year as I was trying to figure out what to make him for his birthday I was inspired by all of the links on the internet (like here and here) about customizing ceramics by drawing on them with a black Sharpie marker and then baking them in the oven to set the design. I thought this would be a perfect technique to make a train coffee cup for my grandpa. 
I brainstormed about what design I should make and decided that a cartoon aerial view of train tracks would be cute. I started by drawing a set of thin parallel lines for the tracks on the mug. At two spots I stopped and drew a series of rectangles to represent the top view of the train. I went back with a thicker black Sharpie and drew in the railroad ties over the tracks. I wanted a little color so I filled in the train cars with red, blue, green and aqua Sharpies (with the caboose being red of course!). I also added some puffy smoke coming from the train engine.
The cup still looked a little plain to me so I drew in stripes along the bottom part of the cup with the various colored Sharpies. I made a random pattern and alternated thin and thick lines.
Once I was happy with the design I popped the mug in the oven at 350° F for thirty minutes to set the design and then let it cool. The cup seems to hold up well to hand washing, but I've read that the dishwasher can cause the design to fade.
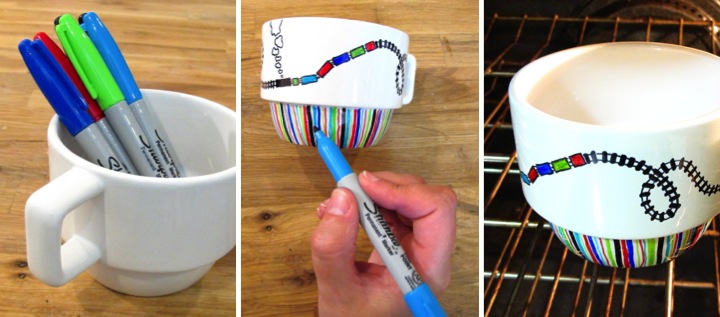
Since I free handed everything there is an inconsistent wave to some of my lines, but I like the look because it shows that it was a handmade gift. Hopefully Grandpa likes it!
Have you tried customizing anything with a Sharpie? What did you make?
 Sunday, August 5, 2012 at 10:15AM | Posted by
  Lisa |
  4 Comments |
  Share Article |
  Email Article |
  Print Article
 Bangkok, Thailand
8.20.2011
 Sunday, August 5, 2012 at 8:00AM | Posted by
  Lisa |
  Post a Comment |
  Share Article |
  Email Article |
  Print Article
Enryakuji, Japan
12.03.2011
 Saturday, August 4, 2012 at 9:30AM | Posted by
  Lisa |
  Post a Comment |
  Share Article |
  Email Article |
  Print Article
Siem Reap, Cambodia
8.2011
 Friday, August 3, 2012 at 7:04AM | Posted by
  Lisa |
  2 Comments |
  Share Article |
  Email Article |
  Print Article