Welcome

My name is Lisa and I'm a crafty girl with wanderlust working as an engineer by day. My blog chronicles projects in my home as well as pictures and stories from my travels.

Search


Instagram

Blog Index
The journal that this archive was targeting has been deleted. Please update your configuration.
Navigation
Thursday
Jan262012

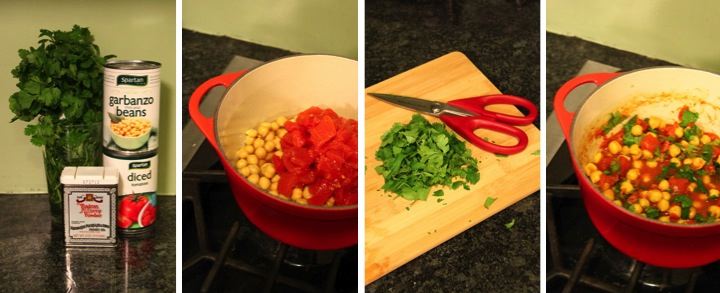
Curried Chick Peas

When I was in grad school I was broke and struggled to make ends meet with a small budget. A girl cannot live on macaroni and cheese and ramen noodles alone so I came up with this easy and cheap curried chick peas recipe.

I would watch the grocery store sales at my local Safeway and stock up on cans of chick peas and diced tomatoes when I could find a good deal. Besides being economical the chick peas provided me with some added protein in my diet and I ate this about once a week during grad school. Nowadays I still eat it once and awhile when I come home tired from work and want to make something fast and simple that I don't need to think about.  

Ingredients List
- 1 can of chick peas (garbanzo beans), drained and rinsed
- 1 can of diced tomatoes
- 1 Tbsp. curry powder
- 1/2 cup of fresh cilantro, chopped
- Salt to taste

Directions
- Combine chick peas, tomatoes, curry powder and salt in a pot
- Heat over a medium heat burner and allow to simmer for a few minutes
- After cooling a bit add cilantro and serve 

Tips and Tricks
- It is important to thoroughly rinse the chick peas in my opinion
- Although the recipe doesn't make a huge amount I find it filling so I would eat half of the recipe at a time. It tastes best if you add the cilantro just before you eat it so I would set aside half and only add cilantro to the amount I was going to eat right away
- To keep my cilantro fresh after bringing it home from the store I like to store it in a glass of water.

Thursday
Jan262012

Picture of the Day: Shelves of Vegemite in Melbourne


Melbourne, Australia
12.31.2008 

Wednesday
Jan252012

Kitchen Window Herb Garden

I love to cook and for me one of the joys of summer is being able to go out to my large herb garden and pick fresh herbs to use in whatever I am making.

Since I live in Michigan, winter, however, is a completely different matter. It can be bleak and the view that I love from my huge kitchen window over my sink can often become dreary. To liven things up and to also give me some limited access to having fresh herbs throughout the year I decided last year to make a little window herb garden.

I ordered a long 6" wide piece of glass from a local glass company and using some simple shelf brackets mounted it across my window flush with the bottom of my adjoining cabinets. With a few herb plants and some $1 pots from Ikea my window garden was complete.

Having the plants sitting in my window always cheers me up and it so nice to have a few fresh herbs on hand for cooking during winter. Right now I have basil, oregano, thyme and mint on my little glass shelf and I am thinking about whether I want anything else.

I would love to say that my window garden has always flourished, but truthfully I can't. Potted herbs are not as forgiving as those planted in the ground. With being out of town a lot and sometimes working long hours and forgetting to water them I have had some casualties, but luckily I can always plant more seeds when I screw up. 

Wednesday
Jan252012

Picture of the Day: Moss Covered Lanterns at Kasuga Taisha

Kasuga Taisha
Nara, Japan
08.15.2010

Tuesday
Jan242012

DIY Laptop Sleeve

This past fall my little netbook starting acting up and having troubles so I decided to splurge and buy myself a MacBook Air. I absolutely love how light and fast it is and although I was worried about spending the money it was the right decision in the end.

Since I drag it around with me everywhere and I wanted to keep its case shiny and new looking I decided to make a sleeve for it. In order to give it a little padding for protection I decided to use fleece for the lining and then just used a patterned cotton for the outside. 

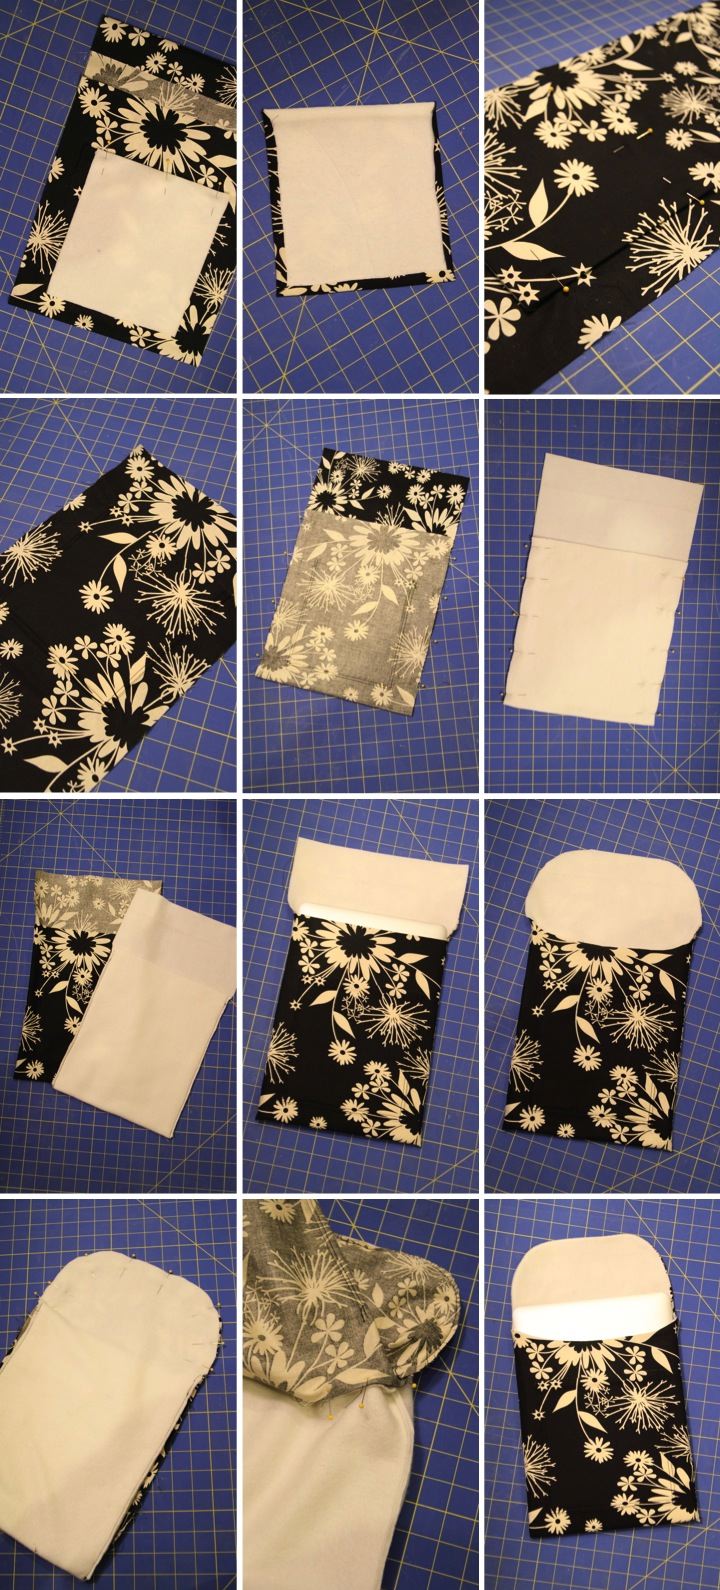
To start I cut a piece of the fleece and of the cotton. The width of the pieces was equal to the width of my laptop plus the height of my laptop plus 1" for the seam allowance.  The length of the pieces was equal to the twice the length of my laptop plus the height of my laptop plus 3" for the overlapping flap and seam allowance. My laptop is 9" x 13" x 1/2" so that meant my pieces were 10-1/2" wide (9" + 1/2" + 1") and 29-1/2" long (26" + 1/2" + 3").

Before assembling the sleeve I decided that I wanted to put a pocket on the front of the sleeve to hold a few small items like my iPhone connector and my USB to LAN connector. To make the pocket I cut a piece of the fleece that was 7" x 8". I wanted the pattern on my pocket to line up with the pattern on the sleeve so I found a section of the fabric remnant that matched up, cut it out, and lined it up on top of the sleeve so that the patterns matched. I then put the 7" x 8" piece of fleece (right side down) on the spot where I wanted the pocket to be and then pinned the top of it so it went through the pocket cotton but not the sleeve cotton. Unfortunately it is hard to see what I did in the pictures I took since the patterns are lined up.

I carefully removed the pocket cotton and fleece and then (while it was still pinned) trimmed the pocket cotton so that along the top of the pocket it was flush with the fleece and around the other three edges it was 3/8" wider than the fleece. I sewed a 1/2" seam across the top of the pocket and then flipped it right side out. Next I clipped the bottom corners of the cotton and then ironed them over the edge of the fleece. 

Now that the pocket was made it was time to attach it to the sleeve. I lined it up so the patterns matched and then sewed along the side and bottom at 1/2" and then 1/8" from the edge. I did this for two reasons. First, having double stitching would make the pocket sturdier. Second, the raw edge of the cotton that I had ironed over would be between the two rows of stitching so I would have clean look inside the pocket.

With the pocket attached I started working on assembling the sleeve. With right sides together I folded up the bottom 12" (length of my laptop minus 1") of the cotton, pinned it along the sides, sewed it with a 1/2" seam and then clipped the corners. I repeated the same thing with the fleece but because it was so bulky I also clipped down the seam allowance. I then did a dry fit to see how things were working out by turning the cotton right side out, placing the fleece lining inside and checking the fit with my laptop.

I wanted to make the overlapping flap rounded so while I had everything together I cut a curve through both layers of the flap and a scallop across the top of the opening. I then pulled apart the fleece from the cotton, pinned the right sides of the flap together and sewed it with a 1/2" seam. I then continued pinning the right sides of the top opening together (leaving a 3" gap in the middle so I could turn everything right side out) and then sewed it with a 1/2" seam. You could pin and sew the opening and flap at the same time, but it was easier for me to do it in two steps.

With everything all sewn up I turned the sleeve right side out through the gap I had left and positioned the fleece lining inside the cotton. I then used a blind stitch to sew up the gap and I was done. 

I am happy with the results but think I need to get a button or some velcro to secure the flap. I also think that if I did it again I would make the flap a little longer. At least my laptop will be safe from scratches and dents now.
Tuesday
Jan242012

Picture of the Day: North Rim of the Grand Canyon

Grand Canyon
Arizona, United States
09.02.2007

Monday
Jan232012

Wire Nail Michigan Map Art

My friend, Pam, is moving from Michigan to Minnesota this week. I love having her live down the street from me and although I am excited and happy for her I am sad for me and really going to miss her.

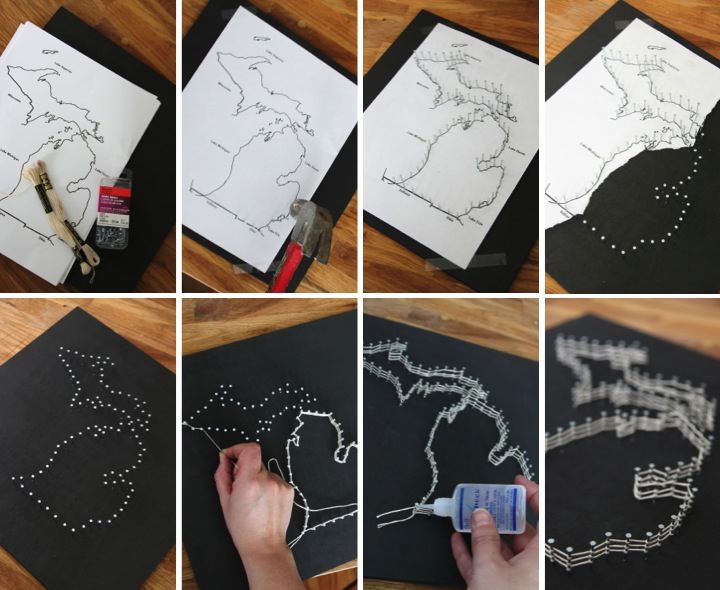
I wanted to make her something to remind her of the Mitten State and all of her friends and family here as a going away present. After thinking about it for a bit I came up with this idea to make a map of Michigan with wire nails and embroidery thread.

To start, I took a 12" x 12" piece of 1/4" plywood and spray painted it black. I then downloaded a map of Michigan from the internet and resized the image so it was approximately 8" x 8". I taped the paper to my plywood and then hammered wire nails (3/4 x 18 size) into the plywood following the map outlines. Due to the spacing I used some of the map detail was inevitably lost (sorry, Old Mission Peninsula!) but it still is unmistakably the Mitten State.

Once I had completed the wire nail outline I gently ripped the paper from around the nails. I think the nails alone look pretty neat and may use that for another project sometime. 

With the paper removed it was time to start adding the embroidery thread. I tied a knot on one of the nails and then started looping the thread around each nail. I learned the hard way that you have to keep the thread taut at all times otherwise you run the risk of the thread coming off the last few nails. I went around the outline three times with the thread before tying it off. I dabbed a little Fray Check on the knots to make sure they wouldn't come undone and then snipped the tails once the Fray Check had dried.

Pam really enjoyed the gift and I like how it turned out so much that I think I am going to make something for my house using some sort of variation of this.  

Monday
Jan232012

Picture of the Day: Steps at Epidavros


Epidavros, Greece
11.18.2009 

Sunday
Jan222012

DIY Draft Stopper

There are many things that I love about living in a house that is over a hundred years old, but drafts aren't one of them. With winter here I thought that making a draft stopper for my front door would help keep a bit of the chill out of the house.

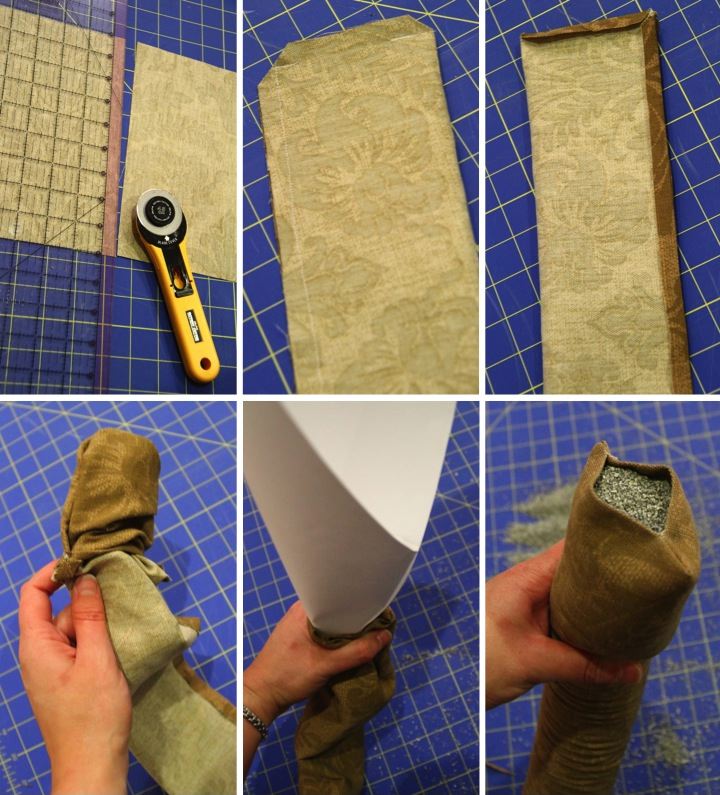
To start I used my rotary cutter to trim some fabric to 9" wide and a few inches wider than my door frame. I used outdoor fabric because I wanted something durable and I chose a subtle pattern that I thought would be fun but not too distracting in my entryway.

I folded the fabric lengthwise with right sides together and then sewed it shut, leaving a small opening at the top. I clipped the salvage at the corners, pressed open the seams and, pulling the stopper through the opening, turned it right side out. 

I chose a fine grain kitty litter to fill my draft stopper since it is heavy, compact, and inexpensive. To fill it I made a funnel with a piece of cardstock and poured the kitty litter into the stopper. I made a bit of a mess and I think if I did this again I would decant the kitty litter into something smaller, like a pitcher, to pour it into the stopper.

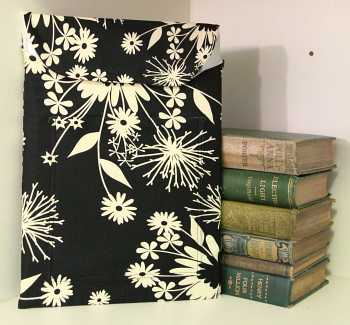
After filling up the draft stopper as much as I could I used a blind stitch to close up the opening and then placed it under my front door. Now my entryway is a little bit cozier.

P.S. If you are curious, the item hanging from my door knob is a wooden cow bell that I bought in Cambodia this past summer. I love the sound it makes when I open and close my front door.

Sunday
Jan222012

Picture of the Day: Great Stirrup Cay Beach


Great Stirrup Cay, Bahamas
01.2011