Wednesday
Apr252012
Picture of the Day: View Overlooking Rio de Janeiro
 Rio de Janeiro, Brazil
06.01.2007
 Lisa | Post a Comment | Share Article | Email Article | Print Article

My name is Lisa and I'm a crafty girl with wanderlust working as an engineer by day. My blog chronicles projects in my home as well as pictures and stories from my travels.

Rio de Janeiro, Brazil
06.01.2007
Lisa | Post a Comment | Share Article | Email Article | Print Article 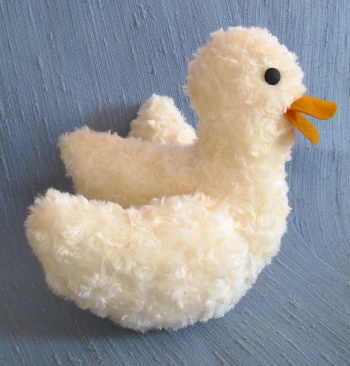 I made this little stuffed duck for a sweet young lady's sixth birthday. She loves ducks and has a stuffed duck collection so I thought that I would make her one to add to her growing flock.
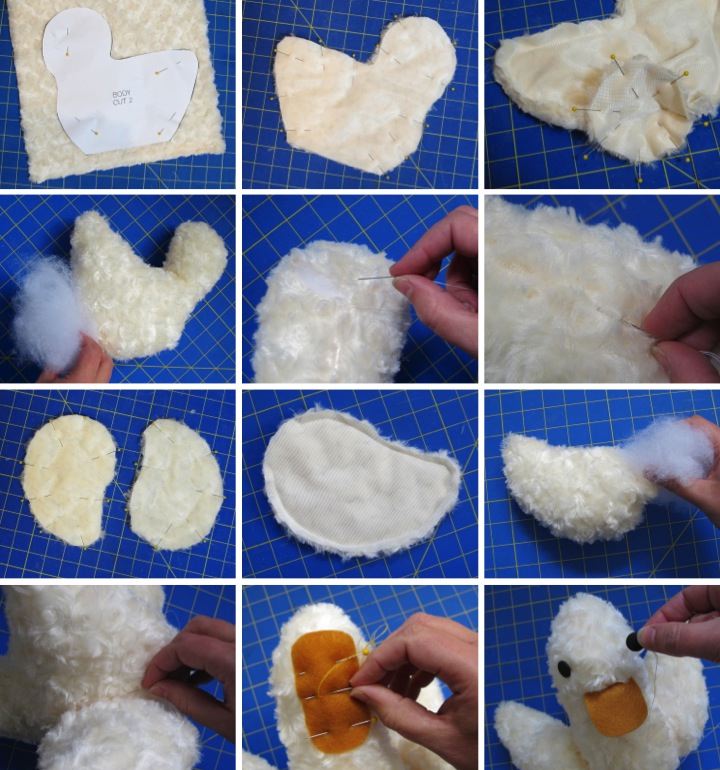
To make the little duck I started with the pattern from Martha Stewart's washcloth duckies and modified it to fit my needs. I enlarged the pattern by 400% on a photo copier, pinned the pattern to some cream colored fake fur and cut out the pieces. Later when I was piecing the duck together I found that with the pattern enlarged the oval bottom piece was way too big and I had to cut it down to a circle to make it all still work.
Duck Body Assembly
I pinned the right sides of the two duck body pieces together and sewed around the edges, leaving the bottom open. I then pinned the bottom circle to the opening of the body and sewed around the edge leaving an opening for turning. I pulled the body right side out through the opening, stuffed it using polyfill and hand stitched the opening shut. Wherever I had joined two pieces the fur was caught in the seam, so using the eye side of a needle I teased the trapped fur out which made the seam invisible.
Wing Assembly
For the wings I followed the same basic process as the body: pinned right sides together, stitched around the edge leaving a small opening, turned right side out, stuffed with filling and then hand sewed the opening shut. After finishing the wings I hand sewed them to either side of the body and then tweezed out the fur trapped in the wing seams just like I had on the body.
Final Touches
To make the duck bill I cut out an elongated oval from gold felt and then ironed it in half. I then pinned it open onto the front of the duck's head and attached it by backstitching along the iron line. I finished up the duck by sewing on black buttons for eyes.
Have you ever made any stuffed animals? How did they turn out?
Lisa | Post a Comment | Share Article | Email Article | Print Article  Tulum, Mexico
10.09.2005
Lisa | 2 Comments | Share Article | Email Article | Print Article 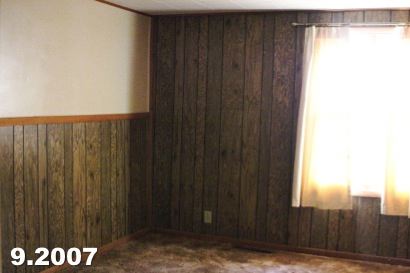 My friend, Erin, is going to be visiting in a little over two weeks so I thought I would switch gears from working on my study and cozy up the guest room before her arrival.
When I first bought my house this room in my side wing was one of the better of rooms in the house. It wasn't great but at least after I pulled down the fake wood paneling there was drywall hung (but not finished) underneath. The ubiquitous ceiling tiles were dingy looking and the carpet was stained and filthy.
I decided that I would live out of this room while the main part of my house was in full tear down to the studs mode so that meant I had to get it in shape quickly. After tearing down the fake wood paneling and I worked on mudding and sanding all of the drywall seams and screw holes. After that I primed and painted the walls blue and the ceiling white. With new trim work around the window and doors and some new carpeting the room was liveable. 
I remember when I had the carpet guy come in to quote the job I asked him how quickly he would be able to schedule me in. He replied, "Why does it matter? It's not like you are living here anyway," referring to the fact that my house was completely torn up and in shambles. I told him that actually I was planning on living there because I had to be out of my apartment by the end of the month. He laughed and told me he wouldn't live there and I must be a tough woman.
Since getting the room habitable, I haven't done much in there other than set it up as a guest room. I have long term plans to replace the pressed cardboard ceiling tiles with bead board or drywall and get rid of my cheap carpeting for hardwood. I also want to replace the old hallow core door and bi-fold closet doors with solid wood doors that match the rest of the house.
I won't be able to get to any of that before Erin comes but I would like to freshen up the room and make it more comfy and welcoming before she arrives. Right now the room seems too blue and yellow and too barren to me. I'd like to get some curtains to add to the bamboo blinds, make a headboard and add some art to the walls. I love my tansu chests that I bought for my apartment in Japan so I'll keep those in the room but the current night stand is doing nothing for me (I bought it from the As-Is section of Ikea when I was in grad school). Back in Japan the short tansu chest was my coffee table and it worked well because my couches were also low to the ground. Now with the scale of U.S. sized furniture it looks a little short and out of place so I am thinking of seeing if I can turn it into a console table.
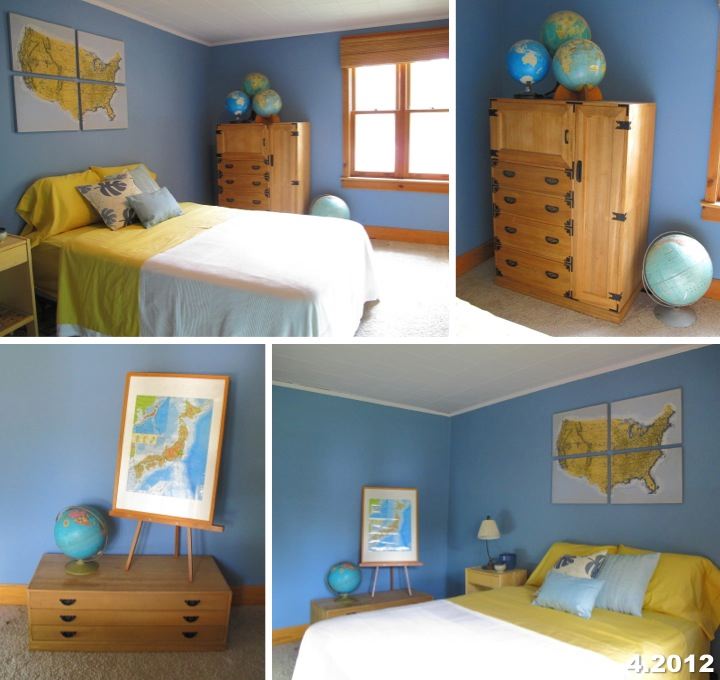
I have lots of plans and am short on time but hopefully I can knock a few items off the list before Erin comes. Wish me luck!
Lisa | 3 Comments | Share Article | Email Article | Print Article  Yellowstone National Park
Wyoming, United States
09.27.2005
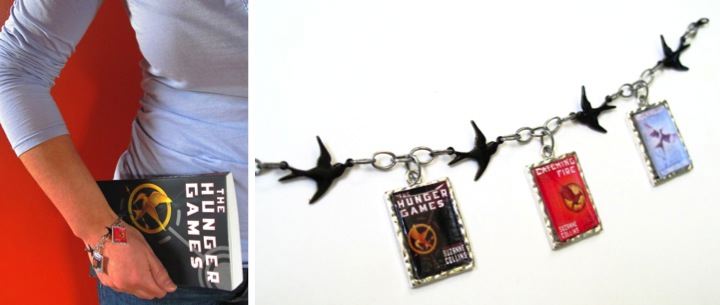
Lisa | Post a Comment | Share Article | Email Article | Print Article 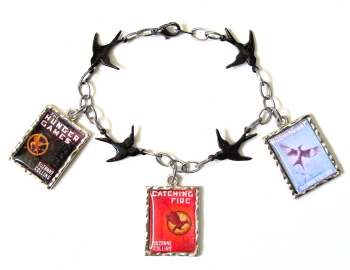 As I was trying to figure out what to get a special young lady for her thirteenth birthday I was really stumped. It's been over twenty years since I was thirteen and I have no idea what is cool for that age. I did know that she has read the The Hunger Games trilogy multiple times and had a Hunger Games themed party with her friends so I came up with the idea of making her a Hunger Games charm bracelet.
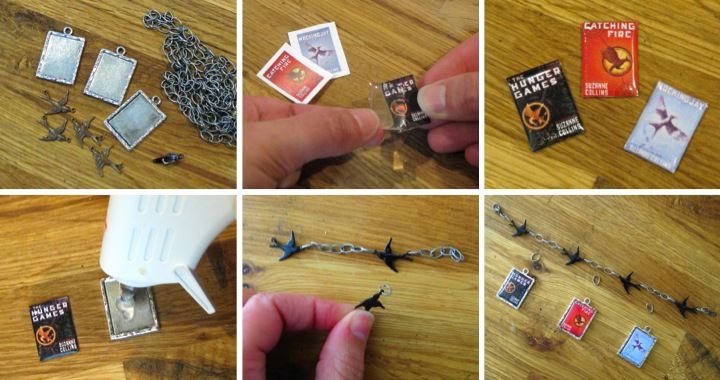
To start I bought some rectangle picture frame charms, chain and a clasp. I also found some cute little birds that looking like mockingjays but they were brass and wouldn't match the rest of the silver toned pieces I bought. I quickly fixed that with some coats of spray paint on the front and the back to turn the birds black.
To make the Hunger Games charms I downloaded pictures of the book covers from the internet and printed them out small enough to fit inside the picture frame charms. I cut them out and adhered the clear plastic that came with the charms over the little print outs. I then secured the book covers to the picture frame charms using a little dab of hot glue.
I started assembling the bracelet by putting five links in between each bird and two on the ends. The links were easy to open up using a small needle nose pliers. I added a clasp on the end of the chain and then added the book cover charms with an additional link.
I think that the bracelet is cute and I hope it is cool enough for a newly minted teenager. It would be easy to adapt to another theme and I just may have to make one of a different style for myself.
Lisa | 13 Comments | Share Article | Email Article | Print Article 
Todaiji (東大寺)
Nara, Japan
08.15.2010
Lisa | 2 Comments | Share Article | Email Article | Print Article  Tongariro National Park, New Zealand
09.2005
Lisa | Post a Comment | Share Article | Email Article | Print Article 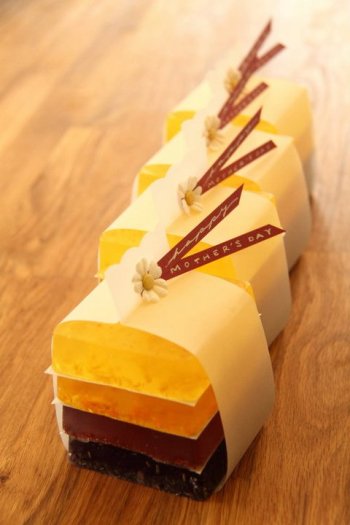 I just booked a flight to head down to my grandparent's place in Florida for Mother's Day which has prompted me to start brainstorming about what to make this year for gifts.
Last year for Mother's Day I decided to make some fruit soaps for the special ladies in my life. I bought some square molds and tried the soap instructions from the April 2011 Martha Stewart Living. I decided to make lemon, orange, strawberry and raspberry. The instructions were clear and the soaps were easy to make but I found that they darkened up a lot as the fruit purees sat in the warm soap. If you try this, less is better when you add the fruit purees. You can see in my picture that the raspberry soap on the bottom turned out a really deep burgundy color.

After the soaps cooled I popped them out of the molds and stacked them with squares of vellum between each soap. To package the soaps I wrapped a strip of vellum around each stack, trimming the ends with scalloped scissors. I threaded white paper flowers on small yellow brads and used them to secure the vellum. To finish I wrote "Happy Mother's Day" with a white gel pen on strips of cranberry cardstock and tucked them behind the flowers.
The soaps were a big hit with everyone and something I may make again for myself sometime.
Are you making any gifts for Mother's Day this year? What are you going to do to celebrate?
Lisa | 2 Comments | Share Article | Email Article | Print Article  Hanauma Bay, O'ahu
Hawai'i, United States
02.06.2005
Lisa | Post a Comment | Share Article | Email Article | Print Article 