Welcome

My name is Lisa and I'm a crafty girl with wanderlust working as an engineer by day. My blog chronicles projects in my home as well as pictures and stories from my travels.

Search


Instagram

Blog Index
The journal that this archive was targeting has been deleted. Please update your configuration.
Navigation
Thursday
Apr192012

DIY Etched Glass Bottles for Limoncello

After making my limoncello I couldn't just store it in any old bottles so I decided to gussy up some bottles that I bought at Ikea with some glass etching.

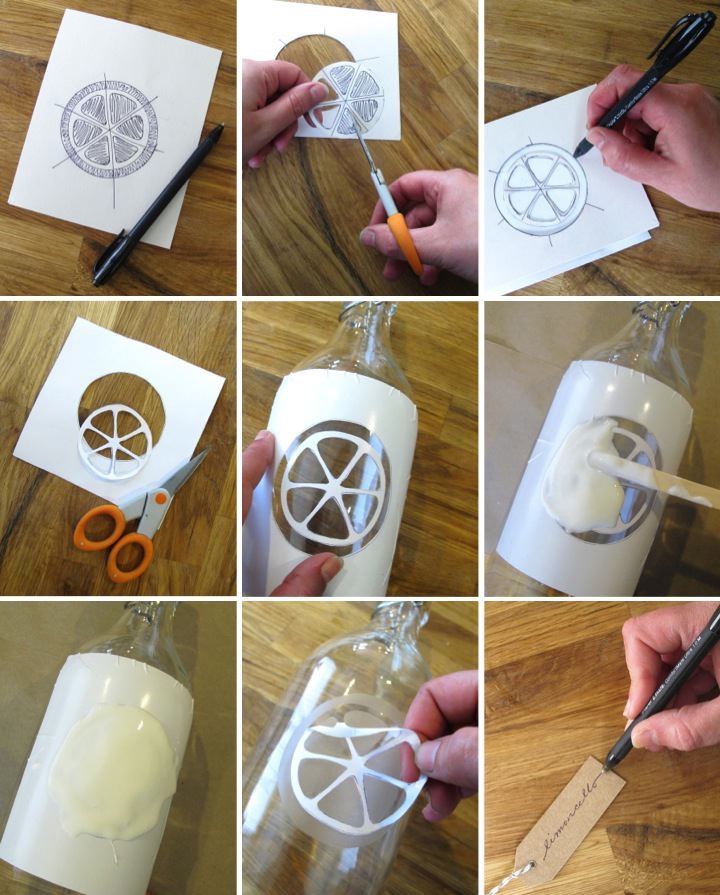
To start I sketched out a lemon slice design on a piece of cardstock. I traced around the bottom of two different sized bottles to make the inner and outer circles. I then drew three lines through the circles to mark where I wanted to draw the segments and then sketched them in. Once I was satisfied I colored in the areas to discard and then cut it out to make a template. I then traced the pattern onto pieces of shelf liner vinyl, cut it out and then adhered it to my glass bottles.

Following the instructions, I applied a thick layer of etching cream to the bottle over the design area not masked by the vinyl. The etching cream is corrosive so it is important to take safety precautions by using gloves and protecting your work surface. Also with the round bottle I had problems with the cream sliding down the side so I had to keep an eye on it and wipe drips before they went past the vinyl and onto the glass.

After the cream set on the bottle for 10 minutes, I rinsed it off and removed the vinyl from the bottle. By being careful when I was removing the vinyl I was able to reuse it on another bottle. The etching is light so it is a subtle look, but I like it. Also, since this could be any citrus slice I can easily reuse the bottles later for lemonade at a party or orange juice at a brunch.

To finish off my bottles I added a little tag with "limoncello" written on them and tied them to the bottles with some string. Now my bottles look cute enough to match the deliciously sweet limoncello inside.

Have you ever done any glass etching? Did it work well for you? Did you try a different method?

Thursday
Apr192012

Picture of the Day: Butterfly in Monteverde


Monteverde Cloud Forest,
Costa Rica
05.28.2005 

Wednesday
Apr182012

Picture of the Day: Hiking in the Drakenberg

The Drakenberg, South Africa
07.24.2004

Tuesday
Apr172012

My Favorite Kitchen Gadgets: Old & New

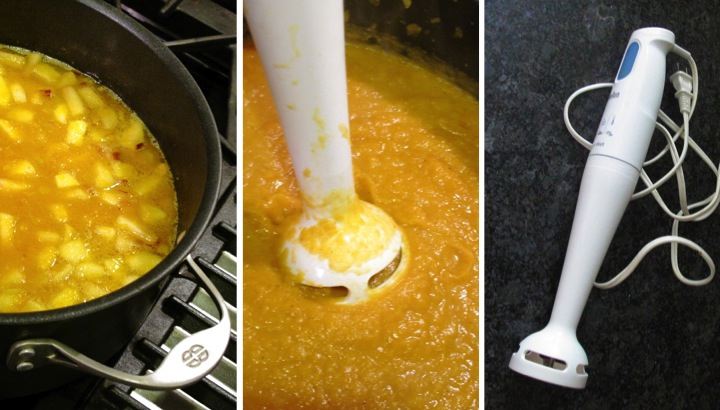
I am not a huge kitchen gadget collector, but I do have some favorites. I thought I would share about my favorite old standby, my hand blender, as well as a new recent favorite, my olive wood grater.

I absolutely love my hand blender which I've had for years upon years. It is such a truly wonderful time saver. When I used to purée soups I would have to transfer hot broth and vegetables from my stock pot to my blender in several small batches. This would always take a decent amount of time and make a big mess while also adding to the dishes I would need to clean. On several occasions I also over filled my blender and had a blow up mess and burnt my hand.

Because of this I was reluctant to make creamed soups too often but that all changed with my hand blender. It was $30 at Bed, Bath & Beyond and I purchased it with one of their 20% off coupons. For how much time it has saved me it is some of the best money I have ever spent.

A double batch of soup now takes me about five minutes to purée and I can do it right inside the stock pot which eliminates the extra dishes. Saving time + reducing dishes = awesome!

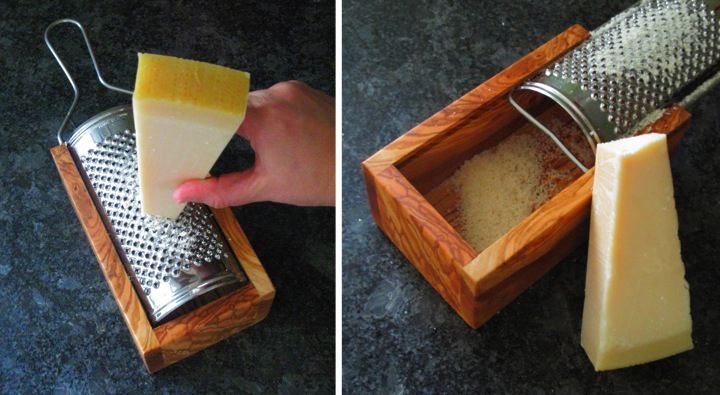
My cheese grater is a recent acquisition from my trip to Italy that I am quickly falling in love with. My old grater had become rusty so when I spotted this at a little shop in Sorrento  for €12 I knew I had to get it. The olive wood box the grater slides into holds whatever you are grating keeping me from accidentally making a mess. Pretty and functional: kitchen gadgets don't get better than that!

Linked To: Centsational Girl's Favorite Kitchen Gadgets Link Party

Tuesday
Apr172012

My Vegetable and Herb Garden

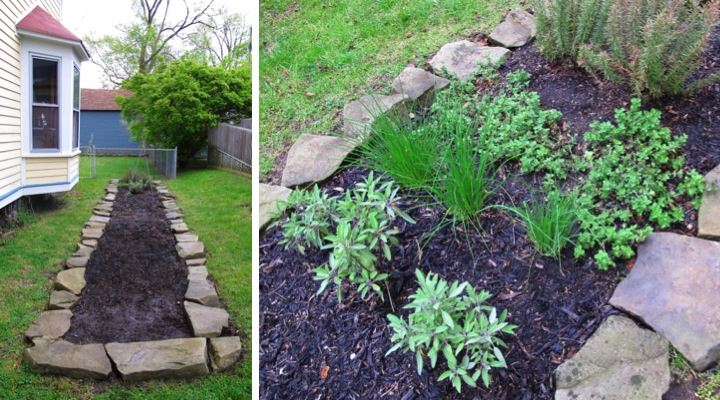
After I moved home from Japan at the end of April 2009 the first thing that I tackled (after I repainted my living room) was to make a vegetable and herb garden along the side of my house. With my backyard almost completely in shade it was really the only place to put it.

I hauled extra rocks from my backyard stone bed to edge a 4' x 30' plot for my vegetable and herb garden. Some of those rocks (actually just about all of them) were really heavy and I thought it was going to kill me. I couldn't pass up using them though since they tied in with my front and back beds, plus they were free and who can resist that! With the border set I then removed the grass, rototilled (is that a word?) the plot and set about planting all sorts of goodies.

I made an A frame trellis out of bamboo in the back part of the garden and planted pumpkins and squash to climb it. That was an epic fail and I killed all of those plants. In the front part I planted a bunch of different herbs and tomatoes which did well, so that partially made up for it. I also planted a border around the whole garden of marigolds. This was an homage to my great-grandmother who would always do the same. She said that the "stinky flowers," as she called them in reference to their pungent smell, kept bugs away. I loved how pretty the bed looked with the marigolds, but with the plot being so narrow they took up a lot of my available space. Somehow I never took any pictures of my garden that year which is a huge bummer.

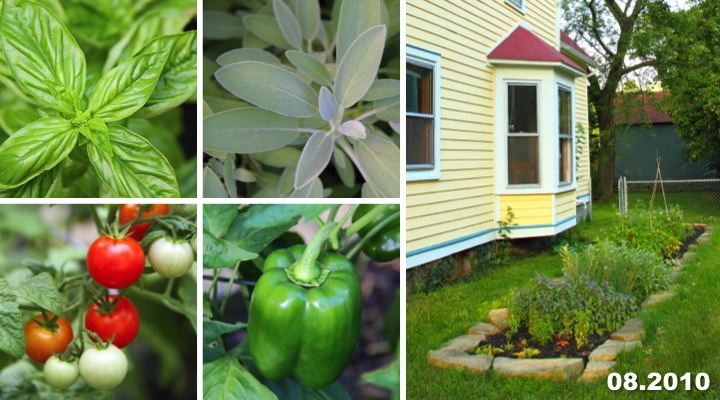
The next summer (2010) I took down the A frame trellis but kept a bamboo teepee trellis I built. Some of the herbs I planted the year before, like sage and chives, came back again and grew to be quite healthy plants. I had so much sage, in fact, that I dried it and made little jars of hand rubbed sage for Christmas gifts that winter. I also planted some more herbs, tomatoes and peppers which all did well. My only big fail that year was a rhubarb plant that I killed. I also planted things too close together so the garden looked a little overgrown by the time fall arrived.
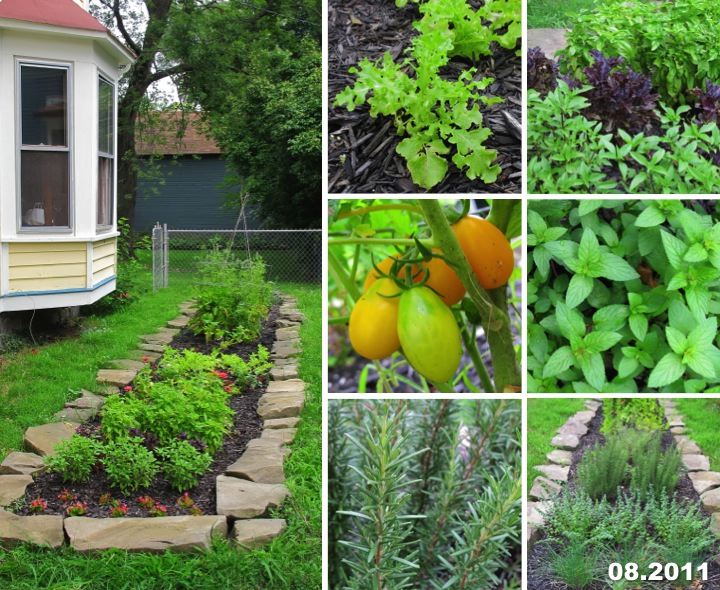
Last summer (2011) I decided I needed a little more organization to my garden. I had previously just planted rows of things wherever I liked so my perennials were scattered around the garden. I decided I wanted to put all of the perennials in the back and the annuals all up front. This required some transplanting and my enormous sage plant didn't survive the relocation unfortunately. 

My other herbs and vegetables all did well with the exception of my scarlet runner beans. I planted them to climb up my teepee trellis and they grew fabulously for the first half of the summer. Then one day I went out to my garden and saw that a little critter had nibbled right through one of the vines close to the ground and killed the plant. A few days later it happened to another one, then another, until all four of them were killed. Very sad!
This year spring came while I was on Italy and tons of little weeds sprouted during the eighty degree heat wave in Ann Arbor. My garden bed was a mess full of weeds, remnants of dead leaves from fall and grass growing up between the stones of my border. For the first few weeks after I came back I kept putting it off because it was such a mess that I was completely discouraged and just didn't want to touch it.
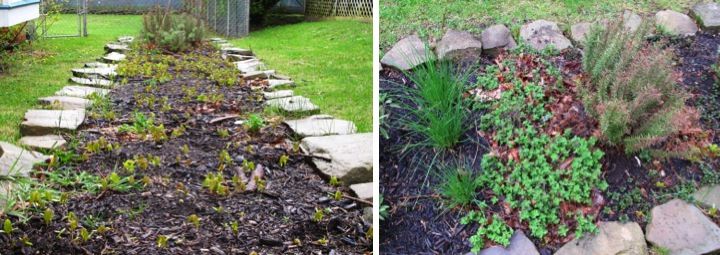
On Sunday I decided I finally needed to get my bum in gear. I was just getting over a bad cold I caught in Las Vegas last week, but something had to be done so I sucked it up and got to work. It was in the seventies and had rained the night before so it was perfect time for weed pulling since it was warm and the ground was soft. I dread pulling weeds so anything that makes it a little easier is a plus.

The grass growing up between the rocks is also always a pain and a few times every summer I lift up the stones so I can pull out the grass that has developed roots under them. The stones look pretty but are a lot of maintenance because of this. In the long term my plan is to replace my chain link fence around my backyard with a wood privacy fence and replace the gate with an arched trellis. I then want to make a shorter wooden fence around my vegetable and herb garden and replace the grass enclosed by this area with stones. I think it will look really pretty, keep out pesky rabbits and squirrels that munch on my garden and eliminate the grass between the stones problem. Someday...(sigh!) Until then I just have to be a weeding machine.

Anyway, after a few hours I was very sore but had the garden all cleaned up and looking nice again. Now I need to work in some peat moss into my soil and I'll be ready to get to the fun part of planting.
How are your garden plans coming along this spring? Do you hate weeding as much as I do? How has your garden evolved over the years? Did your great-grandma call marigolds "stinky flowers"?

Tuesday
Apr172012

Picture of the Day: View of the Apostles From a Cliff


Victoria, Australia
12.29.2009 

Monday
Apr162012

Making Limoncello

Having recently come back from being on vacation in Italy, I have been missing sipping on some limoncello after finishing my dinner. When I spotted some Sorrento lemons on sale at my grocery store for half of the price of regular lemons I knew it was a sign that I had to make some.

Although it requires some time for the lemon peels to steep in the alcohol, limoncello is really quite easy to make and is wonderful either by itself or as part of a mixed drink.

Limoncello is a lemon flavored liqueur from Southern Italy that is often served chilled as an after dinner digestivo. Traditionally made with Sorrento lemons it is especially famous in Sorrento, Capri and along the Amalfi Coast.

My first time drinking limoncello was when I was in Italy ten years ago and a waiter brought me a tiny glass for free after a meal.  The sweet, lemony flavor always bring back memories of that trip and now memories of my recent trip as well. Salute!

P.S. If you want to know how I made the lemon design on my bottles, check out my DIY glass etching tutorial.

Ingredients List
- 10 lemons
- 750 ml bottle of vodka
- 2-1/4 cups sugar
- 3 cups water

Directions
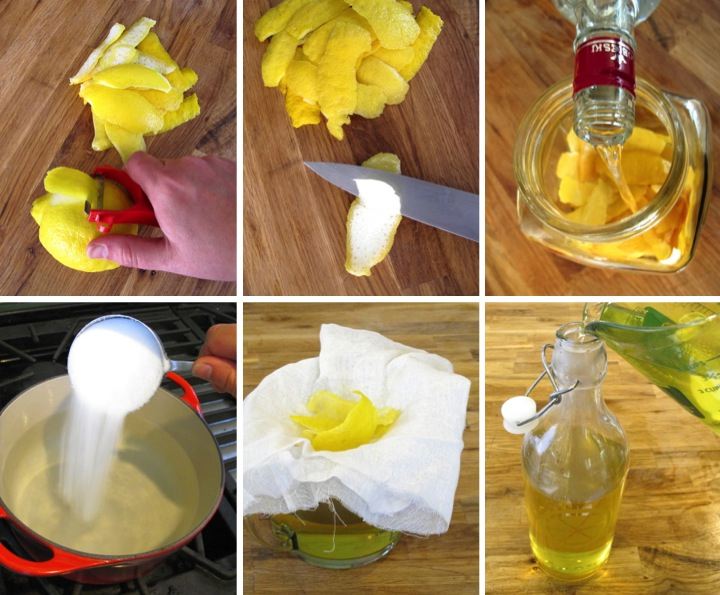
- Clean lemons and then using a peeler, peel the skin in wide strips
- Using a paring knife, remove all traces of the pith (white part)
- Place peels in a glass jar with vodka and let sit at room temperature for at least seven days
- Make simple syrup by bringing water and sugar to a boil
- After boiling for 15 minutes, allow simple syrup to cool to room temperature and stir in vodka mixture
- Using a cheesecloth, strain and then pour into glass bottles 

Tips and Tricks
- If you can, try to use Sorrento lemons, but if you can't find them the recipe still works great with other lemons
- Ten lemons is based on a typical sized lemon so if your lemons are much bigger or smaller you can adjust the number
- Make sure to remove all of the pith otherwise the limoncello may have a bitter taste
- Instead of peeling the skin, you can use a zester but I like the large strips because I can save them to make into candied lemon peel
- After peeling the lemons, squeeze them for their juice which you can use in other recipes
- Allowing the lemon peels to steep longer is supposed to give a better flavor, but the most I can usually make myself wait is a week 
- Adjusting the sugar to water ratio will make the limoncello more or less sweet depending on personal preference
- Storing your limoncello in the freezer ensures that it is always ready to be served 

Monday
Apr162012

Picture of the Day: Flying into DTW at Sunset


Michigan, United States
08.2011

Sunday
Apr152012

DIY Grow Light for Starting Seeds

Every spring I mean to start some seeds indoors for my garden, but each spring comes and goes and I never seem to be able to find enough time to get around to it. This year, however, I decided was the time to finally make it happen.

I got some flats and soil for seed starting and picked out some fun packets of seeds to try but then I was stumped when it came to finding a grow light. I didn't see anything that I liked that was in the price range I was willing to pay so I ended up making the grow light myself.

The concept I came up with is just a simple frame that holds up a fluorescent work light. I made the plans using 2x4s, but I actually ended up using some scrap wood that I had in my garage that wasn't quite as thick but was free. This is a pretty good project for using scraps and I actually only had to buy the light fixture, bulbs and wooden button plugs for a total cost of about $15.

With the 48" light I can easily fit two flats under the grow lamp. By using button caps to hide my screw holes, I can easily disassemble the frame to store it after spring. The chains on the work light hang from J hooks so I can adjust the height of the light as my seedlings grow. Making the grow light took me less than an hour, not including time for paint drying and I am happy with how it turned out. Hopefully my seeds like it, too!

Supply List:
1 - 2x4 @ 8 feet long
1 - 1x6 @ scrap at least 2 feet long
1 - 48" fluorescent work light
2 - Daylight fluorescent bulbs
4 - 3/8" wooden button plugs
2" screws 

Cut List:
1 - 2x4 @ 53" for top
2 - 2x4 @ 20" for side supports
2 - 1x6 @ 12" for base feet

Frame Assembly:
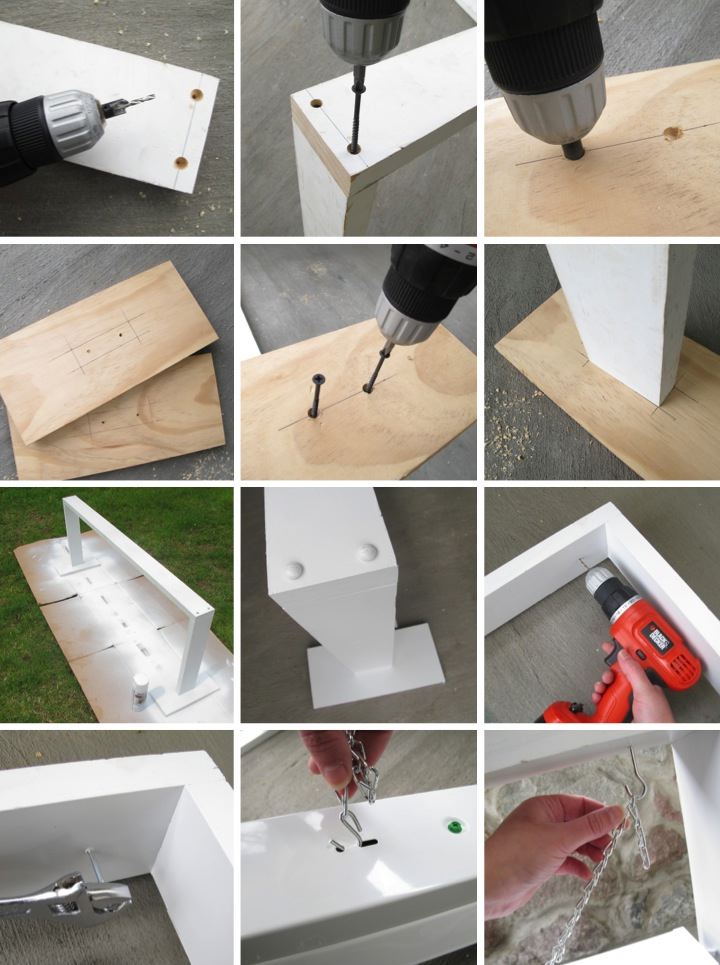
To start the frame I used a countersink bit to drill two holes on the top of each end of the top piece. I then used 2" screws to attach the top to the side supports.

Base Assembly:
On each base foot I marked out where to drill on one side and where the side support would be positioned on the other side. I used a countersink bit to then drill two holes in each base foot and started the 2" screws in the holes. I then lined up my markings with the side supports and attached the base feet by driving in the screws the rest of the way. 

Finishing:
To finish the stand I primed it and then used three light coats of white spray paint. I did not fill in my screw holes at the top of the frame since I wanted to be able to take off the top piece for easy storage. Instead, to hide the holes I spray painted some wooden button plugs and pushed them into the holes. I can then remove the plugs when I need to access the screws for disassembly.

Lamp Assembly:
I drilled two small pilot holes in the bottom of the top piece of the frame for the J hooks at the distance indicated in the work lamp assembly instructions. It was 45" apart for the lamp I used, but if you are doing this check your instructions as they could vary. I started twisting in the J hooks into the holes by hand and then finished tightening them using a wrench.

Once the J hooks were attached I put the bulbs into the light fixture and slipped the chain hooks into the holes at the top of fixture. I finished hanging the light by slipping the chain onto the J hooks.

Once my grow light was done I was pretty eager to plant some seeds. I chose two different types of sunflowers, one that grows really tall and one that is a deep red color. I also planted zinnias in a variety of warm colors and a selection of lettuces. I can't wait for everything to sprout!

Have you started any seeds this year or in the past? Has it worked well for you? What did you plant?

Sunday
Apr152012

Picture of the Day: Istanbul Skyline with Galata Tower at Dusk

Istanbul, Turkey
11.28.2009