Every spring I mean to start some seeds indoors for my garden, but each spring comes and goes and I never seem to be able to find enough time to get around to it. This year, however, I decided was the time to finally make it happen.
I got some flats and soil for seed starting and picked out some fun packets of seeds to try but then I was stumped when it came to finding a grow light. I didn't see anything that I liked that was in the price range I was willing to pay so I ended up making the grow light myself. 
The concept I came up with is just a simple frame that holds up a fluorescent work light. I made the plans using 2x4s, but I actually ended up using some scrap wood that I had in my garage that wasn't quite as thick but was free. This is a pretty good project for using scraps and I actually only had to buy the light fixture, bulbs and wooden button plugs for a total cost of about $15.
With the 48" light I can easily fit two flats under the grow lamp. By using button caps to hide my screw holes, I can easily disassemble the frame to store it after spring. The chains on the work light hang from J hooks so I can adjust the height of the light as my seedlings grow. Making the grow light took me less than an hour, not including time for paint drying and I am happy with how it turned out. Hopefully my seeds like it, too!
Supply List:
1 - 2x4 @ 8 feet long
1 - 1x6 @ scrap at least 2 feet long
1 - 48" fluorescent work light
2 - Daylight fluorescent bulbs
4 - 3/8" wooden button plugs
2" screws
Cut List:
1 - 2x4 @ 53" for top
2 - 2x4 @ 20" for side supports
2 - 1x6 @ 12" for base feet
Frame Assembly:
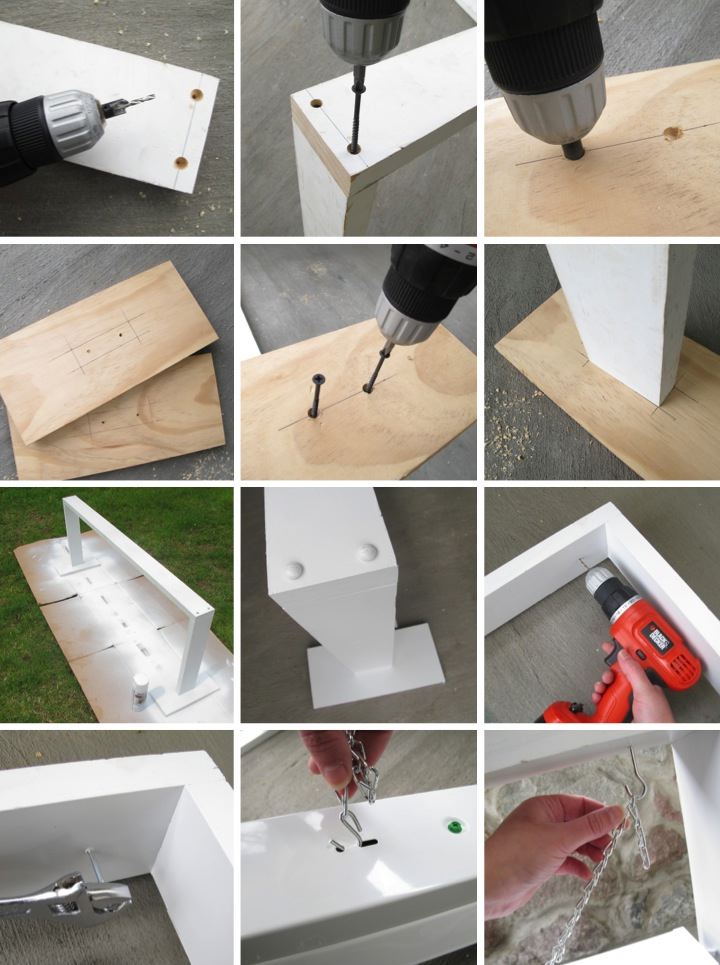
To start the frame I used a countersink bit to drill two holes on the top of each end of the top piece. I then used 2" screws to attach the top to the side supports.
Base Assembly:
On each base foot I marked out where to drill on one side and where the side support would be positioned on the other side. I used a countersink bit to then drill two holes in each base foot and started the 2" screws in the holes. I then lined up my markings with the side supports and attached the base feet by driving in the screws the rest of the way.
Finishing:
To finish the stand I primed it and then used three light coats of white spray paint. I did not fill in my screw holes at the top of the frame since I wanted to be able to take off the top piece for easy storage. Instead, to hide the holes I spray painted some wooden button plugs and pushed them into the holes. I can then remove the plugs when I need to access the screws for disassembly.
Lamp Assembly:
I drilled two small pilot holes in the bottom of the top piece of the frame for the J hooks at the distance indicated in the work lamp assembly instructions. It was 45" apart for the lamp I used, but if you are doing this check your instructions as they could vary. I started twisting in the J hooks into the holes by hand and then finished tightening them using a wrench.
Once the J hooks were attached I put the bulbs into the light fixture and slipped the chain hooks into the holes at the top of fixture. I finished hanging the light by slipping the chain onto the J hooks.

Once my grow light was done I was pretty eager to plant some seeds. I chose two different types of sunflowers, one that grows really tall and one that is a deep red color. I also planted zinnias in a variety of warm colors and a selection of lettuces. I can't wait for everything to sprout!
Have you started any seeds this year or in the past? Has it worked well for you? What did you plant?