Welcome

My name is Lisa and I'm a crafty girl with wanderlust working as an engineer by day. My blog chronicles projects in my home as well as pictures and stories from my travels.

Search


Instagram

Blog Index
The journal that this archive was targeting has been deleted. Please update your configuration.
Navigation

Entries in Cooking (35)

Thursday
Jun282012

Spice Organization

I am overwhelmed with the unorganized disaster zone that is my home so I am trying to get some sense of accomplishment by attacking some easy items on my list. First up, I present my spice shelf in my kitchen.

At first glance it isn't so bad but since my kitchen upper cabinets are glass fronted I wanted things to look a little nicer and more uniform. The biggest issue was that I have a lot of bulk spices in bags that I just ended up storing in a heap in a mesh colander which was not so convenient.

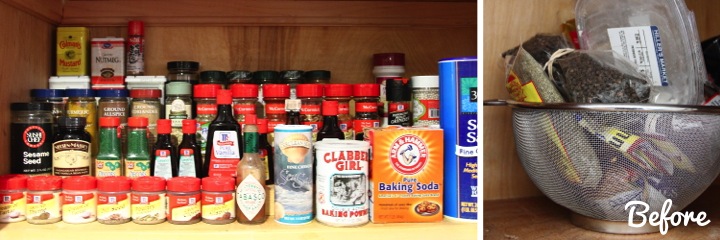
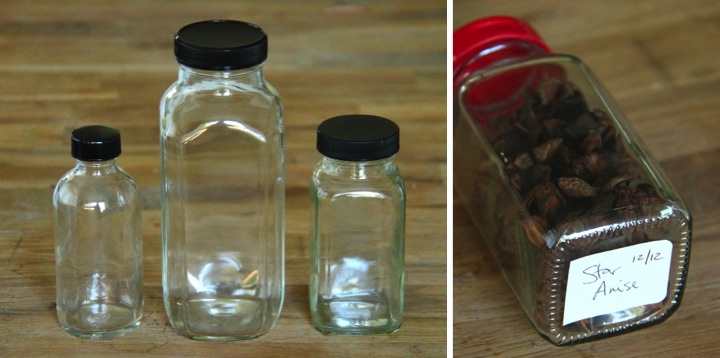
As a solution I ordered a bunch of spice bottles from Specialty Bottle. I got 6 oz French square glass bottles for most of my spices with a few 16 oz French square bottles for my larger quantity bulk spices. For my baking extracts I bought some 4 oz Boston round glass bottles.

The glass bottles came with black lids which didn't really go with the red lidded glass jars that I use for storing my dry goods. As luck would have it the red lids from my McCormick spices fit perfectly on the 6 oz spice bottles. For the 4 oz and 16 oz bottles I used some red spray paint to transform the lids. I haven't decided if I want to add labels to the front of the jars but in the meantime I cut down some cheap labels and put them on the bottom of the jars with each spice's name and expiration date.

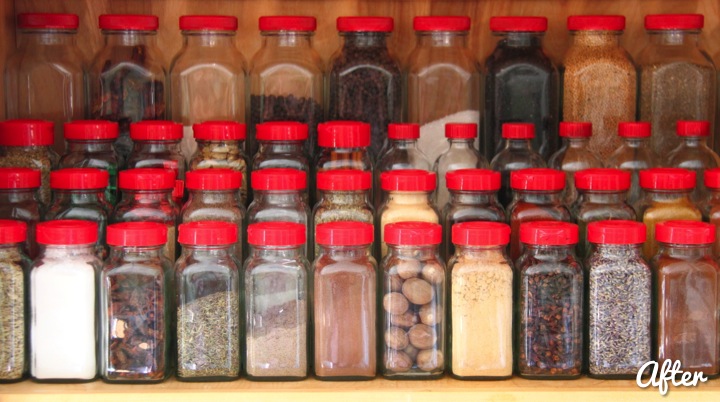
Everything is much neater plus I can find what I am looking for quickly now. There's nothing better than a project that is both pretty and functional.

Have you been tackling any organization projects? How is it going? Are you naturally neat or naturally messy like me?

Saturday
May052012

National Scrapbook Day Cupcakes


Happy National Scrapbook Day! Today I am excited to be heading off to scrapbook with some friends at a little overnight getaway. I haven't been to a crop in several years so I am really looking forward to this.

I thought for fun I would bring some cupcakes to share at the crop. I made some yellow cupcakes and then while they were baking and cooling I made Happy NSD cupcake picks to decorate them.

Using powerpoint I made little pink circles that said "Happy NSD" on them. For fun I also added a pair of grey scissors (from the webdings font). After printing out the circles I used my large circle punch to punch them out. I glued them to some cranberry cardstock with a glue stick and  then cut them out leaving a thin border. 

To make them into picks I attached small skewers to the back of them with double sided tape and then layered another pink circle on top of the back to finish them off. 

By this time the cupcakes had cooled so I iced them with some pink icing. To get the right color to match the picks I used some burgundy color paste and a tiny, tiny amount of blue. After inserting the Happy NSD picks into the cupcakes they were all finished and ready to take to the crop.

What are you doing to celebrate National Scrapbooking Day? Are you going to a crop with some friends or scrapbooking at home?

Tuesday
Apr172012

My Favorite Kitchen Gadgets: Old & New

I am not a huge kitchen gadget collector, but I do have some favorites. I thought I would share about my favorite old standby, my hand blender, as well as a new recent favorite, my olive wood grater.

I absolutely love my hand blender which I've had for years upon years. It is such a truly wonderful time saver. When I used to purée soups I would have to transfer hot broth and vegetables from my stock pot to my blender in several small batches. This would always take a decent amount of time and make a big mess while also adding to the dishes I would need to clean. On several occasions I also over filled my blender and had a blow up mess and burnt my hand.

Because of this I was reluctant to make creamed soups too often but that all changed with my hand blender. It was $30 at Bed, Bath & Beyond and I purchased it with one of their 20% off coupons. For how much time it has saved me it is some of the best money I have ever spent.

A double batch of soup now takes me about five minutes to purée and I can do it right inside the stock pot which eliminates the extra dishes. Saving time + reducing dishes = awesome!

My cheese grater is a recent acquisition from my trip to Italy that I am quickly falling in love with. My old grater had become rusty so when I spotted this at a little shop in Sorrento  for €12 I knew I had to get it. The olive wood box the grater slides into holds whatever you are grating keeping me from accidentally making a mess. Pretty and functional: kitchen gadgets don't get better than that!

Linked To: Centsational Girl's Favorite Kitchen Gadgets Link Party

Saturday
Mar172012

Royal Icing Recipe

My grandma passed on this royal icing recipe to me. It is a pretty standard recipe and she used it to make roses for wedding cakes that she made and sold out of her home kitchen. When I was little I was absolutely mesmerized by the way she would turn out the roses so quickly and methodically.

With my baking I don't have much need for royal icing roses, so instead I typically use this recipe for icing sugar cookies. I pipe an outline onto my cookie with stiff icing and then flood the design with thinned icing. It is a really easy way to make pretty designs on your cookies.

Another fun thing you can do is pipe royal icing into lacy designs on wax paper and then attach the designs to your baked goods once they are dry. The decorations are quite fragile, though, so it is always wise to make spares in case you break a few.

Ingredients List
- 1 lb. powdered sugar
- 3 egg whites
- 1/2 tsp. cream of tartar
- Food coloring (optional)

Directions
- Put powdered sugar, egg whites and cream of tartar in a mixing bowl
- Beat for 10 minutes for icing to achieve desired consistency
- Tint icing with food coloring if desired

Tips and Tricks
- Royal icing can dry out quickly start crusting over so using plastic wrap to cover the top of the icing with the plastic completely covering the surface of the icing
- If the icing is too thin, add more sugar; if it is too thick, add a bit of water or more egg whites
- If you are leery of using egg whites, there are recipes that use meringue power instead 

Wednesday
Mar142012

Pie for Pi Day

Being an engineer, I am a math nerd so on Pi Day I usually make a pie to celebrate. Also, I like any excuse possible to make and eat pie. For non-math nerds, March 14 is Pi Day because the first few significant digits of the mathematical constant pi are 3.14. Pretty cute, huh?

This year I am pretty busy with work before I leave for Italy tomorrow night so I sadly don't have time to make a pie but I thought I would share my pie from last year. I made a mixed berry pie with a double crust and had a lot of fun decorating the top crust.

Using a knife I cut out the symbol for pi, π, in the center of my crust and placed it on my pie. I then used mini fondant number cutters to make a border with the value of pi out to 36 significant digits (=3.14159265358979323846264338327950288). "Why 36 and not 35 or 37?" you may ask. Well, 36 digits is what fit on the pie. After cutting out the numbers I attached them to the crust with a little egg yolk brushed on the back. I finished the edge by trimming it, folding it under and then pinching it with my fingers to make it look pretty. Tasty + nerdy = awesome! 

By the way, if anyone has any ideas for a fun baked good I can make to celebrate Mole Day on October 23, I am open to suggestions. Pi Day is easy, but Mole Day has me stumped...

Tuesday
Mar062012

Before & After: Cookbook Stand

I love cookbooks. I have a ton of them and I enjoy flipping through them for inspiration. Some of the cookbooks that I have had forever naturally fall open at my go to recipes and a stranger looking through them would be able to spot my favorites by the amount of splatters on the page.

I have been meaning to make myself a cookbook stand in the hopes it would keep my cookbooks a little cleaner and out of the way when I am using them. When I found this little white cookbook stand with decorative painting for fifty cents at the Ann Arbor ReUse Center on Sunday I thought it would be an easier alternative to just buy it and give it a little make over.

The fruit design was a little to cutesy for me  and the finish looked worn and shabby so I thought a fresh coat of paint would spruce it up. First, I thought I'd add a little extra interest to it by adding a top border of drilled holes. I wanted to follow the curve of the top piece of wood so I traced it on a piece of paper and cut it out for a pattern. I then lined it up about 3/4" below the top of the wood and traced the line. I marked my drill holes along the line every 1/2" starting from the center. To protect my work surface I put a piece of scrap wood under the cookbook stand to drill into.

After I finished making my decorative holes I sanded the piece smooth (the previous decorative painting was a bit raised) and then wiped it down to remove and sanding dust. I used a grey spray paint primer and then finished it off with two coats of red spray paint.

I like how the cookbook stand turned out and this was way cheaper and faster than building something from scratch myself. Now I'll just have to start using it to see if keeps things a little tidier when I am cooking...


Tuesday
Feb142012

Valentines Day Mini Heart Cupcakes

Happy Valentine's Day! Last night I made these mini cupcakes to give to Frank today for Valentine's Day. Since it was a week night I wanted to do something simple but festive so I made little candy hearts to top the cupcakes for decoration.

While my cupcakes were baking I melted some red candy melts in a squeeze bottle on low heat in the microwave. I laid out a sheet of wax paper on my work surface and drew hearts on it with using the melted candy. If you have to use too much pressure to get the candy to come out of the bottle, just pop it back into the microwave for a few more seconds. Conversely, if it is coming out too easily and making a mess, a little time in the refrigerator will get the candy to the right consistency.

When I am making candy designs like this I like to make extras in case I don't like how some turn out or some break. Any that you don't use you can melt down to use again or you can just eat them like me. Also, I did mine free hand but if you want a little more consistency or have a more elaborate design, draw or print out your design on paper. You can then place the paper under the wax paper and just trace your design. 

The hearts will firm up pretty quickly, but if you want to speed up the process placing them in the refrigerator will do the trick. Once the hearts are completely cooled you can just peel them off the wax paper.

To decorate my cupcakes I iced the top with buttercream icing using a #18 star decorating tip and then placed one of the candy hearts on top. I think they look cute and I hope that Frank likes them.

Is anyone else making some sweets for their sweet? What kind of homemade treats do you like best?

Sunday
Feb052012

High Rise Apple Pancakes

When I was growing up high rise apple pancakes were made in my family for breakfast for weekend special occasions. It was my favorite breakfast food and I loved watching the batter puff up in the oven. It seemed like magic.

As an adult this high rise apple pancake recipe is my go to dish for when I host brunches or have weekend guests at my home. Preparing it is simple and easy plus it is delicious and makes for a pretty presentation on the dining table. Serving it with eggs, bacon and a fruit salad creates a great spread for any morning meal.

Ingredients List
- 2 large apples: peeled, cored and cut into 1/4" slices
- 2 tsp. lemon juice
- 1/4 cup sugar
- 6 eggs
- 1-1/4 cup flour
- 1-1/4 cup milk
- 5 Tbsp. butter
- Powdered sugar (optional)
- Maple syrup (optional) 

Directions
- Preheat oven to 425° F (220° C)
- Toss apples with lemon juice and sugar in a bowl and set aside
- Melt butter in a 9" x 13" pan in the oven
- Combine eggs, flour milk and beat lightly
- Pour batter into pan once butter is sizzling and bake for 15 minutes
- Add apple mixture on top of the risen batter and bake for an additional 10 minutes
- Sprinkle with powdered sugar and serve with maple syrup 

Tips and Tricks
Baking apples, like Jonathan, Honeycrisp, Granny Smith or Golden Delicious, all work well with this recipes
- I like to use two different varieties of apples when making the recipe instead of two of the same kind
- For my workflow management I mix up my batter and start peeling my apples while the butter is melting and then slice the apples and toss them with the sugar and lemon juice while the batter starts baking
- When you mix the batter it will be a little lumpy
- The longer you bake the batter before adding the apples, the higher it will rise

Thursday
Jan262012

Curried Chick Peas

When I was in grad school I was broke and struggled to make ends meet with a small budget. A girl cannot live on macaroni and cheese and ramen noodles alone so I came up with this easy and cheap curried chick peas recipe.

I would watch the grocery store sales at my local Safeway and stock up on cans of chick peas and diced tomatoes when I could find a good deal. Besides being economical the chick peas provided me with some added protein in my diet and I ate this about once a week during grad school. Nowadays I still eat it once and awhile when I come home tired from work and want to make something fast and simple that I don't need to think about.  

Ingredients List
- 1 can of chick peas (garbanzo beans), drained and rinsed
- 1 can of diced tomatoes
- 1 Tbsp. curry powder
- 1/2 cup of fresh cilantro, chopped
- Salt to taste

Directions
- Combine chick peas, tomatoes, curry powder and salt in a pot
- Heat over a medium heat burner and allow to simmer for a few minutes
- After cooling a bit add cilantro and serve 

Tips and Tricks
- It is important to thoroughly rinse the chick peas in my opinion
- Although the recipe doesn't make a huge amount I find it filling so I would eat half of the recipe at a time. It tastes best if you add the cilantro just before you eat it so I would set aside half and only add cilantro to the amount I was going to eat right away
- To keep my cilantro fresh after bringing it home from the store I like to store it in a glass of water.

Wednesday
Jan252012

Kitchen Window Herb Garden

I love to cook and for me one of the joys of summer is being able to go out to my large herb garden and pick fresh herbs to use in whatever I am making.

Since I live in Michigan, winter, however, is a completely different matter. It can be bleak and the view that I love from my huge kitchen window over my sink can often become dreary. To liven things up and to also give me some limited access to having fresh herbs throughout the year I decided last year to make a little window herb garden.

I ordered a long 6" wide piece of glass from a local glass company and using some simple shelf brackets mounted it across my window flush with the bottom of my adjoining cabinets. With a few herb plants and some $1 pots from Ikea my window garden was complete.

Having the plants sitting in my window always cheers me up and it so nice to have a few fresh herbs on hand for cooking during winter. Right now I have basil, oregano, thyme and mint on my little glass shelf and I am thinking about whether I want anything else.

I would love to say that my window garden has always flourished, but truthfully I can't. Potted herbs are not as forgiving as those planted in the ground. With being out of town a lot and sometimes working long hours and forgetting to water them I have had some casualties, but luckily I can always plant more seeds when I screw up.