Welcome

My name is Lisa and I'm a crafty girl with wanderlust working as an engineer by day. My blog chronicles projects in my home as well as pictures and stories from my travels.

Search


Instagram

Blog Index
The journal that this archive was targeting has been deleted. Please update your configuration.
Navigation

Entries in Cooking (35)

Wednesday
Sep252013

Kalustyan's 

A few year's ago my friend, Sarah, visited me in Ann Arbor. Her friend and her friend's college friend (both Penn State alumni) happened to coming to Ann Arbor that very same weekend to watch Penn State play Michigan in football. Having a big house all to myself I invited them to also stay at my house and the four of us had a lot of fun making dinner together and hanging out.

Knowing that I love to cook, one of ladies, who was from New York, mentioned that next time I was in New York I should really go to Kalustyan's as she was sure that I would love it. Of course I went on my next trip to the city and ever since I've made it a tradition to stop there every time I am in New York.

Kalustyan's is a specialty food shop that has all sorts of wonderful goodies, especially from India and the Middle East. The narrow aisles are lined floor to ceiling with just about every dry good imaginable. On top of the wonderful selection the prices are really great as well.

The best part of Kastulyan's for me is the amazing selection of bulk spices sold by the bag. The store smells amazingly fragrant with all of the spice smells mingling together.

Frank likes Kastulyan's because it is the only place other than a few expensive online sites that he has been able to buy smoked paprika, which is a staple in his cooking. Just as an example of the extensive selection of spices, the picture below is only showing different types of paprika that Kastulyan's stocks.

Although we could have easily bought out the store, Frank and I settled on getting two large bags of smoked paprika, pickling spice and some chia seeds. I've never made anything with chia seeds before but I thought they would be fun to try.

Before leaving Frank and I headed upstairs for a stop at the deli. Along with olives and cheeses, they also have a selection of vegetarian and meat options that make a great lunch.

Frank and I shared a combination plate of chick peas, grape leaves, a samosa and kasseri cheese. We enjoyed our delicious food while sitting in the window overlooking Lexington Avenue.

The most surprising thing happened after we had paid for our spices and headed outside to hail a taxi. Although I have been to Kalustyan's several times I never noticed before that there was a New York Historical Society plaque outside providing a little background to the building.

It turns out that at that spot on September 20, 1881 Chester A. Arthur took the oath of office to become the 21st President of the United States after President James A. Garfield was assassinated. William Randolph Hearst (inspiration for the famous movie, Citizen Kane) also later lived in the building. Fabulous spices and some history, too!

If you are in New York and love to cook I would definitely recommend a stop at Kalustyan's located at 123 Lexington Avenue. At the time of this writing the hours are Mondays - Saturdays 10am-8pm, Sundays/Holidays 11am-7pm.

Thursday
Nov222012

Happy Thanksgiving!

Happy Thanksgiving!

I am in charge of desserts for the meal this year so I have been having a fun morning in the kitchen baking. I was hoping to do some of the prep work earlier this week but work was crazy (I worked nearly 40 hours in three days) so I had to do everything today.

I'm making pumpkin pie, apple pie and a cranberry upside down cake. I'm actually waiting for the pumpkin pie to finish baking right now so that I can head over to the festivities.

After spending today with Frank I am heading out to St. Thomas to visit my sister for the rest of the holiday weekend. I am so excited to see her and can't wait. My first trip to visit her on her island was actually for Thanksgiving in 2006. It was so hot and her stove wasn't working so we decided to make turkey sandwiches to celebrate Thanksgiving that year. It wasn't very traditional but it was a lot of fun!

What are you doing to celebrate Thanksgiving this year? Are you making anything tasty? What do you usually do to celebrate?

Monday
Oct082012

Zucchini Bread Recipe

Every year as soon as summer fades and the weather cools down I get bitten by the baking bug. Yesterday was a chilly, rainy day and was perfect for turning on the oven. I decided to make a batch of zucchini bread since I had one last large zucchini from the end of summer harvest from my garden.

I love to make quick breads and in particular zucchini bread has a special place in my heart and stomach. It was something that my family made often when I was a kid and is a childhood favorite. As an adult a slice of zucchini bread with a dab butter and a cup of tea makes the perfect treat for me on a rainy afternoon.

The recipe I use today is essentially the same as my traditional family one but I replaced half of the oil with applesauce to make it a little lighter. It makes the zucchini bread a titch sweeter and moister but retains all the flavors of my youth.

Ingredients List
- 3 cups flour
- 1 tsp. salt
- 1 tsp. baking soda
- 1-1/2 tsp. baking powder
- 3 tsp. cinnamon
- 1/2 cup oil
- 1/2 cup applesauce
- 3 eggs, beaten
- 3 tsp. vanilla
- 2 cups sugar
- 3 cups zucchini, grated
- 1/2 cup nuts, chopped 

Directions
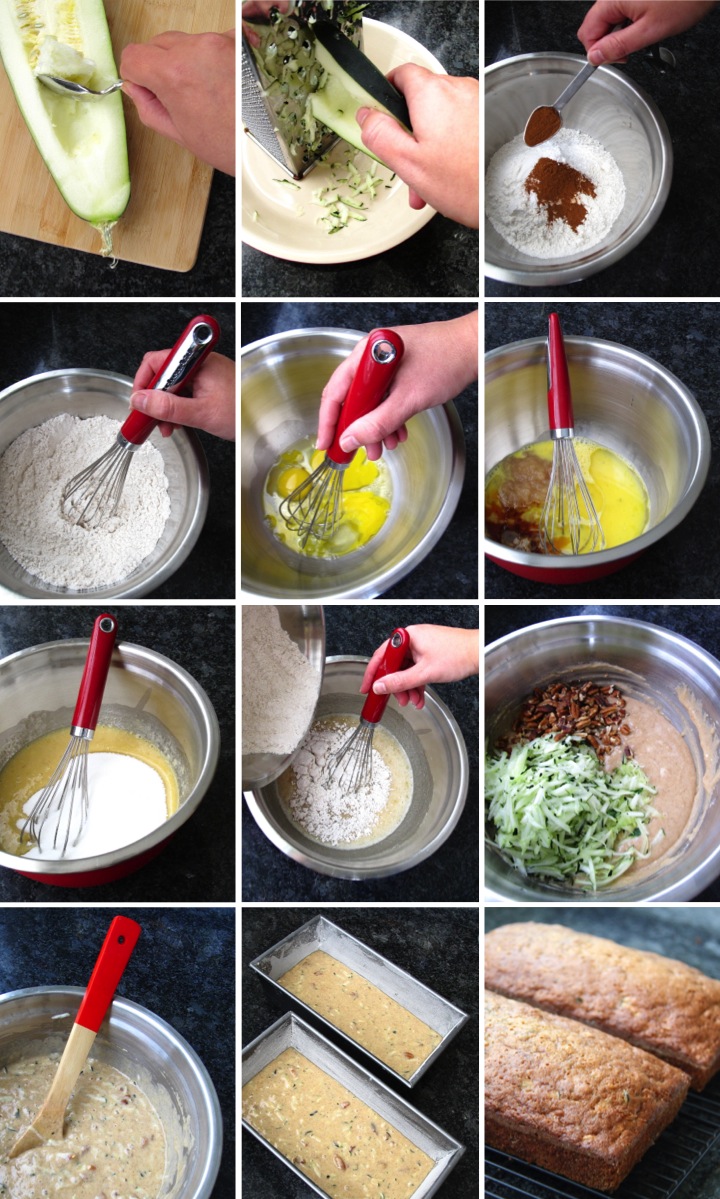
- Preheat oven to 350 and grease and flour two loaf pans
- Slice zucchini in half, remove seeds and grate using a large box grater or the coarsest grater in a food processor
- Stir together flour, salt, baking soda, baking powder and cinnamon
- In a separate bowl beat together eggs, applesauce, oil, and vanilla and then stir in sugar
- Add dry ingredients to the wet ingredients and mix until fully incorporated
- Stir in zucchini and nuts and then pour batter into prepared pans
- Bake for 40-50 minutes until tester inserted in the center comes out clean 
- Let cool for 15 minutes, remove loaves from pans and then let them cool completely on wire racks 

The recipe makes two loaves, so feel free to share one or since it freezes well, wrap one up and freeze it for a later day. I've also baked up the batter in mini loaves and muffins with great success.

Are you doing any fall baking? What is in your oven?

Tuesday
Oct022012

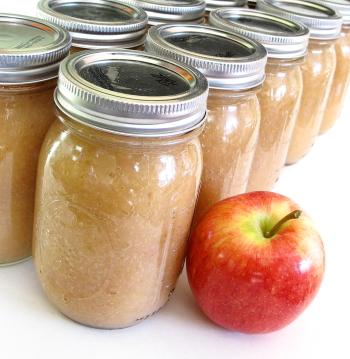
Homemade Applesauce Part 2: Canning

After yesterday's post about how you can prepare your own applesauce it's time to delve into canning it. Successful canning is all about keeping things hot and sterile. If you are new to canning The National Center for Home Food Preservation website is a wonderful resource sponsored by the government for explaining proper and safe methods as well as answering questions about preserving food. I would highly recommend reading their basic canning information.

To begin with you need proper canning jars with lids and bands. Mason jars with a single piece lid or bail jars look super cute but are not appropriate for safe canning. You can reuse jars and bands after cleaning them, but you cannot reuse lids because the sealing surface (gasket) will have already been compressed from the first time it was used. If you use a lid again you won't be able to guarantee a proper seal which could lead to the food spoiling.
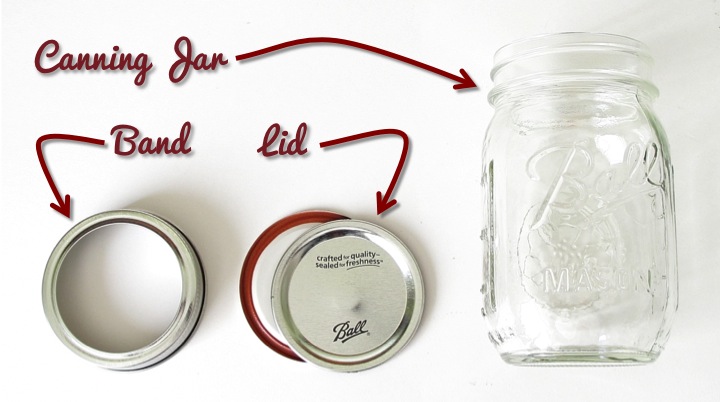
Some basic tools are also required for canning. For applesauce because it is high in acidity we can use a boiling water canning method which requires a large pot and jar rack. You can buy a water-bath canning pot with a jar rack pretty inexpensively (about $20). I actually have two canning pots, one which I use for preparing whatever food I am going to can and one for the jars. The jar rack comes with the canning pot and sits in the bottom of the canner. It keeps the jars from sitting on the bottom of the pot so that the boiling water can flow underneath them. It also allows you to raise the jars up so that loading and unloading jars is easier.

A few more tools are needed to get started. In order to grab the jars out of the boiling water a jar lifter is essential. It clasps around the neck of the jar so that you can pull it out securely and not worry about slipping. A magnetic lid lifter is just a long stick with a strong magnet on the end which allows you to pull the rings and lids out of the water. A funnel helps you pour your applesauce into the jars without making a complete mess. A headspace ruler has notches on in in 1/4" increments so that you can measure the headspace (distance between the top of what you are canning and the rim of the jar). Headspace is specified in each recipe and is important. If you leave too little you may have difficulty getting a seal and if you leave too much you could have some discoloration on the top of your food. These tools are generally sold as a canning utensil set which runs a little over $10.

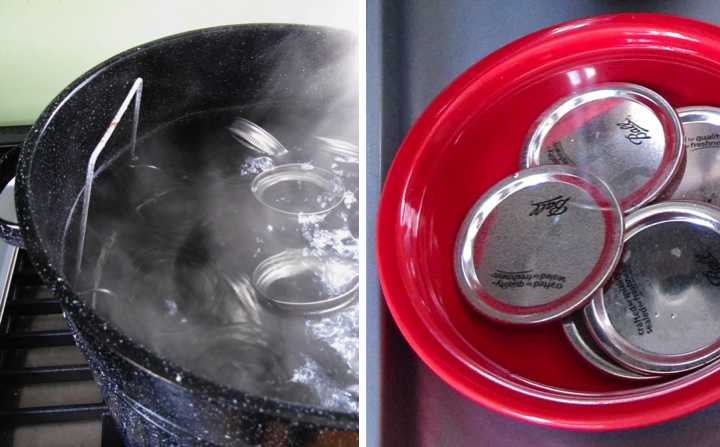
Now that we've covered the background, let's start canning. First you need to thoroughly clean your jars. You can wash them with hot soapy water or run them through the dishwasher. To sterilize the jars place them in the canner, cover them with water and bring it to a boil, boiling for at least ten minutes (longer if you are above sea level). I also boil my bands in the pot. My general process is that after I put whatever I am canning on the stove to cook I start boiling my jars. After the ten minutes has elapsed I turn the heat down to a simmer on the jars, keeping the water and the jars hot. The jars need to stay hot so that when you pour your hot liquid into the jars they won't break.

Lids should not go in the boiling water which could compromise the gasket which makes the seal. Instead after washing them, place them in a bowl of hot, but not boiling, water until you are ready to use them. 
After you have prepared the applesauce it is important to keep it hot while you are in the process of filling the jars. A simple way to do this is to put it in a pot on the stove over medium heat. 

To start filling the jars, pull a hot jar from the water using the canning jar lifter and place it on your work surface. Place your funnel in the jar and ladle in applesauce, leaving 1/4" of headspace (distance between the top of the applesauce and the rim of the jar). Use the headspace ruler to scrape against the inside of the jar to release any air bubbles and then check your headspace. If you spilled any applesauce on the rim, use a cloth to wipe it off so that you have a good surface for your seal.
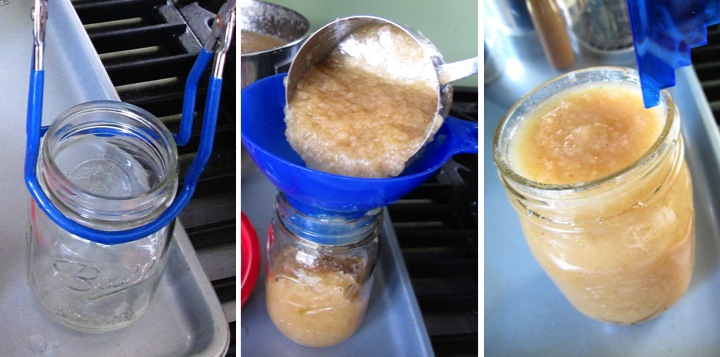
Using the magnetic lifter, pull a lid out of the hot water and place it on top of the jar. Pull a band from the simmering water in the same way and place it on top of the lid. Screw down the band over the jar.
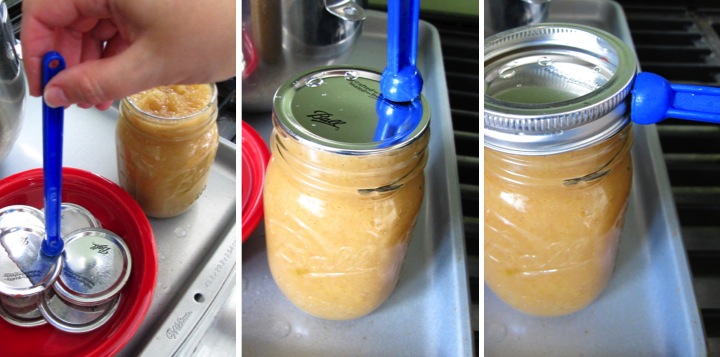
The jar of applesauce is now ready to go back into the canner using the jar lifter. Once you have filled all of your jars, lower the jars into the water with the jar rack. Make sure that you have at least one inch of water covering the top of the jars. Place the lid on the canner and turn the heat on high to boil the water.

Processing time starts from when the water begins vigorously boiling. If you are at sea level (altitudes less than 1000 feet) then you will need to process pint jars for 15 minutes and quart jars for 20 minutes. If you are at a higher altitude check the NCHFP processing times for applesauce. The water must remain boiling for the entire processing time, otherwise you need to bring the water back to boiling and restart the processing time. If the water level appears that it will drop to less than an inch over the jars, add additional boiling water. 
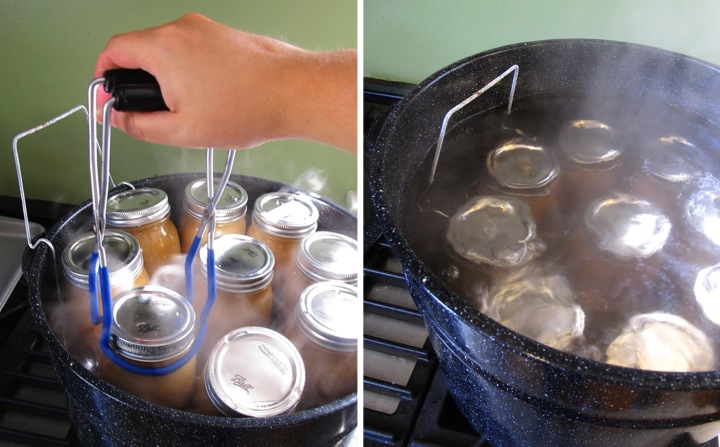
Once processing is complete, turn off the heat and remove the lid of the canner. Let the jars sit in the hot water for five minutes before pulling them out with the jar lifter. Place the jars with an inch between them and allow then to cool undisturbed for at least twelve hours.

As the jars cool and seal you will probably hear them making a little pop sound. After they have completely cooled you should check your seals by pressing on the top of the lids. If the lid springs back after you lift your finger, your jar did not seal. If your jar did not seal, place it in the refrigerator and eat the applesauce within the next few days.

The sealed jars no longer need the bands and can be stored without them. If you do want to keep the bands on it is a good idea to loosen them a bit so they won't get stuck on. Properly sealed applesauce can be safely stored for a year.
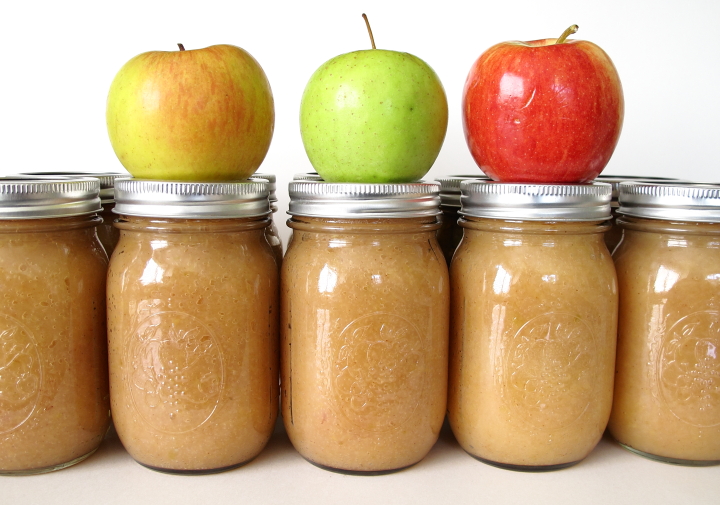
Now you can sit back and enjoy your beautifully canned applesauce and have the taste of fall all throughout your winter. Happy canning!

If you are interested in canning, check out Homemade Applesauce Part 1: Cooking & Sieving

Monday
Oct012012

Homemade Applesauce Part 1: Cooking & Sieving

After coming home with several bags of apples yesterday I set about doing one of my favorite fall activities, making and canning homemade applesauce.

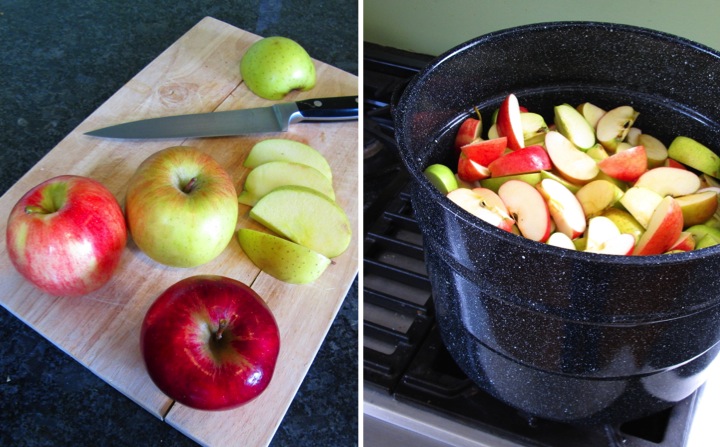
One of the key things in making tasty applesauce is to use a variety of apples instead of just one. Also, it is best to use sweet apples instead of tart ones so that you don't need to add any sugar to your applesauce. From year to year the apples that I use vary based on what is reasonably priced and available. This year my applesauce is a combination of Jonathon, Yellow Delicious, Gala and Honeycrisp apples. Red Delicious, Fuji, McIntosh, Winesap and Pink Lady apples are also wonderful for making applesauce.

With my apples picked out I set about preparing them. After washing them in cold water, I cut them into eighths and tossed them into my large canning pot with an inch or two of water in the bottom. Because I use a strainer with my food grinder, there is no need to peel or core the apples. Super easy!

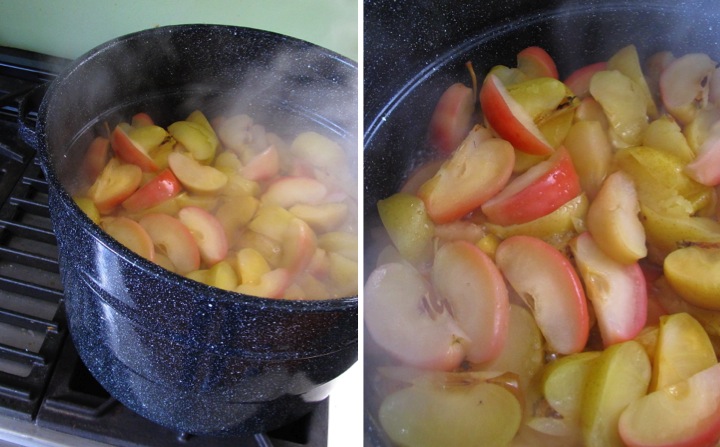
I put the pot on the stove with high heat, turning it down to medium-high once it started bubbling. I just love the smell of the apples cooking on the stove top. When the apples are nice and soft it's time to sieve the apples. If I am planning on canning my applesauce I put the canning jars on to boil at this time (more on canning is coming tomorrow). 

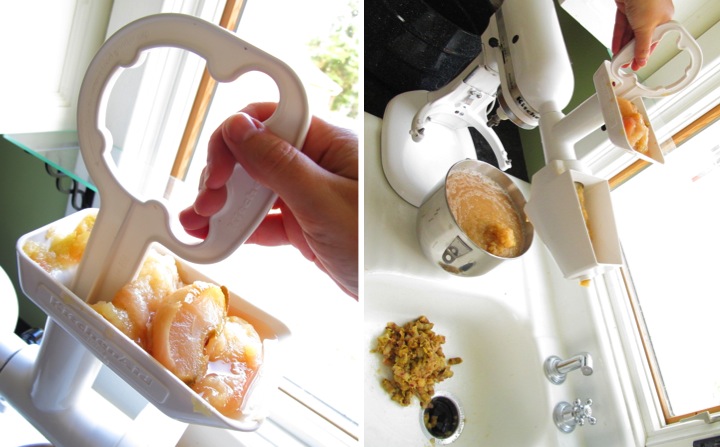
As I mentioned before, my setup combines a food grinder with a strainer so I don't need to peel or core the apples. I use my KitchenAid mixer (a college graduation present from my grandparents) with the KitchenAid Food Grinder Attachment and the KitchenAid Fruit and Vegetable Strainer Attachment. I know that this is pricey, but I use these tools a lot and they are a big time saver for me so over the years I've decided it was worth investing in them. If the expense of the KitchenAid tools is not for you, fear not, you can still make tasty applesauce with a Foley Mill. They are pretty reasonably priced at anywhere between $20-$40 and you can build up some arm muscles with the hand cranking. I am lazy, however, so I will continue on with my powered method.

My setup is pretty simple. I attach my food grinder to the front of my KitchenAid mixer with the fruit and vegetable strainer added in front. I then position my mixer so that the front end of the strainer sticks out over my sink and then place a bowl under the strainer. I ladle the soft apples into the top of the food grinder tray and then use the stomper (yeah, I think it is strange that is what is called, too) to push the apples down into the grinder. The seeds and peels spit out the front of the strainer right into my sink where I can wash it down my garbage disposal. Meanwhile the tasty applesauce spills out underneath and is caught into my bowl.

Once all the apples have been sieved I just stir in some cinnamon to taste and I am ready to start canning. If you like you can also add some sugar, but if you chose sweet apples it probably isn't necessary. Stay tuned and tomorrow I will share how to can the applesauce using a boiling water canner.

Do you make applesauce at home? What apple varieties do you like?

If you are interested in canning, check out Homemade Applesauce Part 2: Canning

Saturday
Sep222012

Herb Compound Butter Three Ways

I love compound butters. They are so easy to make and add a little something extra special to any meal whether you are just having a simple home meal or having a fancy dinner party with company.

With the abundance of herbs in my garden I decided to make a few different compound butters since they freeze so well and I  can use them later. You just need to pull them out of the freezer about fifteen minutes before you want to use them, slice off what you need and you are ready to go.

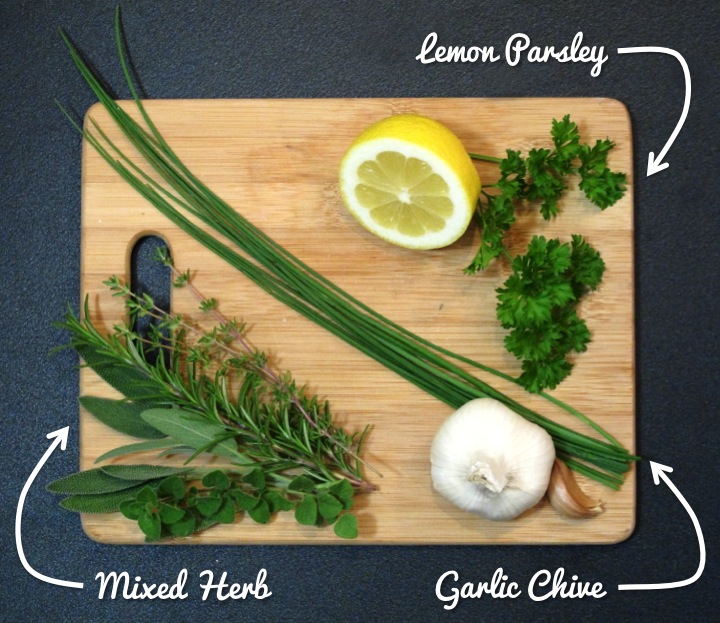
I went out to my garden and picked a bunch of different herbs and set to work.

When it comes to making combinations, the sky is really the limit and it is fun to experiment with different ingredients. Yesterday I made a lemon parsley butter, garlic chive butter and mixed herb butter using a variety of herbs from my garden.

Lemon Parsley Butter
- 1/2 cup (1 stick) unsalted butter
- 1/4 cup parsley, finely chopped
- 1 Tbsp. freshly squeezed lemon juice
- Salt and pepper to taste

Garlic Chive Butter
- 1/2 cup (1 stick) unsalted butter
- 2 Tbsp., finely chopped
- 2 cloves garlic, minced
- Salt and pepper to taste

Mixed Herb Butter
- 1/2 cup (1 stick) unsalted butter
- 1/4 cup herbs, finely chopped
- Salt and pepper to taste

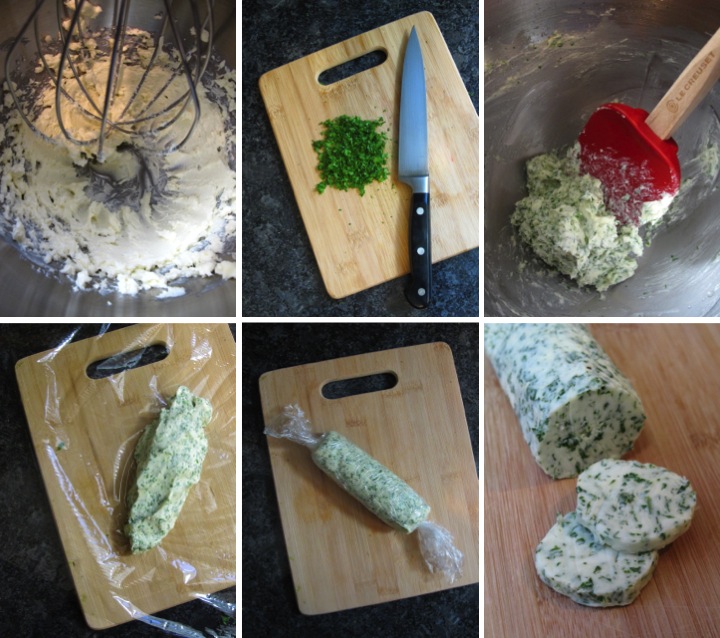
To make the butters, leave the butter out until it is room temperature. Whip the butter with a mixer or by hand and then stir in the other ingredients until they are evenly dispersed in the butter.

Spread the butter out on a piece of plastic wrap and shape into a cylinder. Twist the ends of the plastic wrap and place in the freezer until needed. You can then easily slice the butter into round pats.

If I am planning to use the butter within the next day, I will usually scoop it into a small ramekin and keep it in the refrigerator.

What herb combinations do you like to try for making compound butter? Do you have any creative ways to use up your herbs from your garden before it gets too cold? 

Friday
Sep072012

Strawberry Ricotta Salad with Mint

Back in November 2010 I visited Sydney, Australia with my friends Erin and Andy for a vacation. We were staying in the Potts Point area and on our first morning we discovered a wonderful little cafe down the street from our hostel called Cafe DOV for breakfast. The food was so wonderful that we ended up grabbing breakfast there every day for our whole stay so that we could everything on their awesome menu.

On one of those mornings I tried their bread pudding which was served with a side of strawberries and ricotta. It was absolutely delicious and ever since eating it I have thought about trying to recreate something similar at home.

After seeing some wonderful looking strawberries for sale at the grocery store I decided to buy them, pick a bunch of mint from my garden and have a go at putting a recipe together.

I like how my dish turned out and I think it would make a nice little side for a pancake brunch or a great dessert served with some pound cake.

Ingredients List
- 6 cups strawberries, cut in half and stems removed
- 1 cup ricotta
- 1 Tbsp. cream
- 2 Tbsp. powdered sugar
- Scant 1/4 cup of fresh mint leaves, loosely packed

Directions
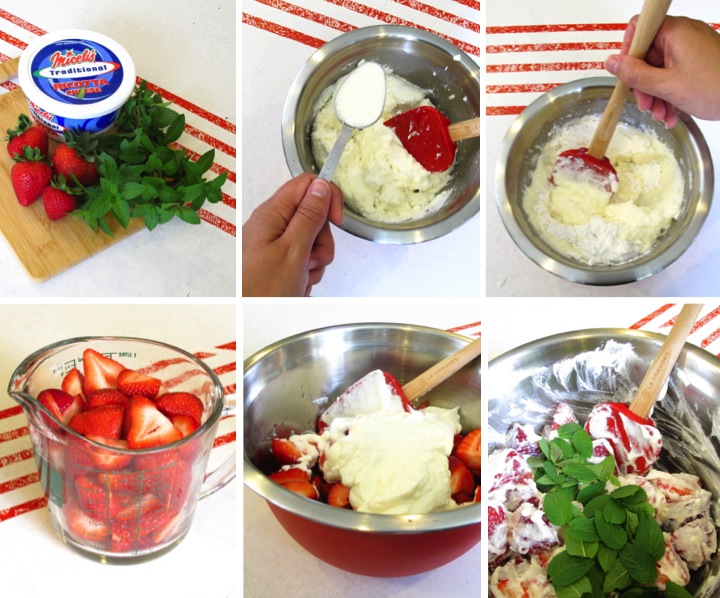
- Put ricotta in a small bowl and mix in cream and powdered sugar until smooth
- Place 4 cups of the strawberries in a bowl with ricotta mixture and gently stir to coat
- Add in mint and gently stir again
- Serve salad with remaining strawberries scattered on top plus a garnish of mint


Monday
Jul092012

Smoking in the Backyard (Pulled Pork That Is...)

Frank just got a smoker this past weekend and decided to break it in by making pulled pork yesterday. I luckily got to be the beneficiary of the tasty food and also documented everything in pictures.

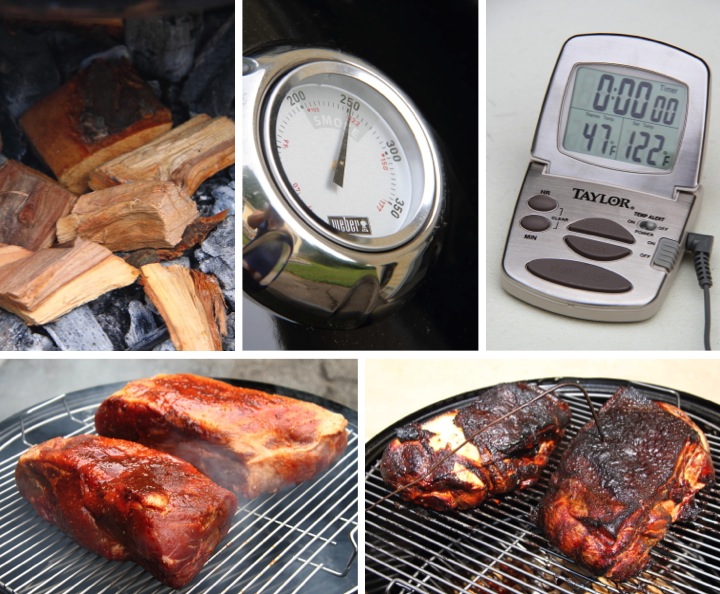
The night before Frank applied a dry rub on two pork butts and then let them marinate in the refrigerator overnight.

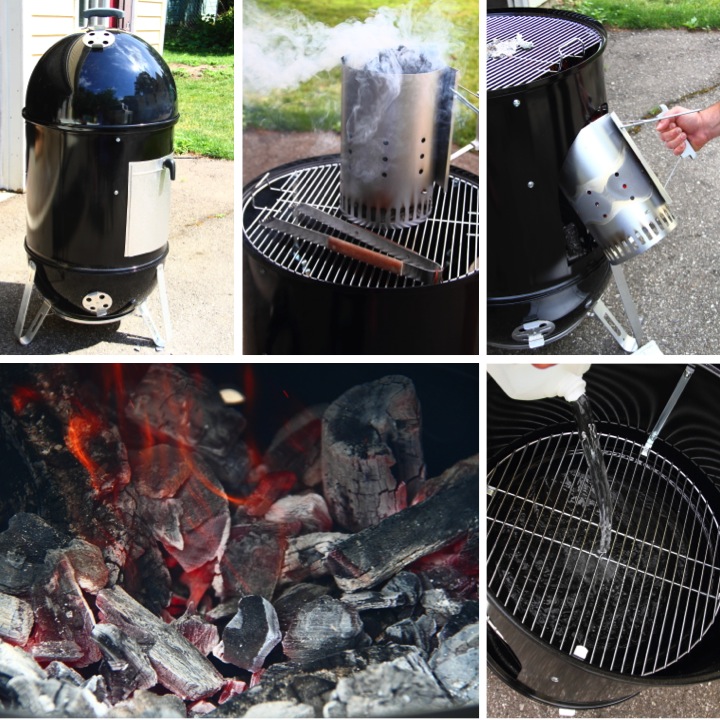
Yesterday morning Frank started by setting up the smoker and placing a layer of hardwood lump charcoal along the bottom of the smoker. He then filled a chimney with paper in the bottom and hardwood lump charcoal in the top.

After lighting the paper he waited until the fire burnt down and then poured the hot charcoal from the chimney onto the bottom of the smoker. Frank then filled up the water pan placed inside of the smoker.

Frank added some apple wood on top of the charcoal, closed up the smoker and then waited until it heated up to 250 degrees. Frank placed the pork butts on the top rack of the smoker, put the probe of a digital thermometer in the center of one of the cuts of meat and then placed the lid on top of the smoker. After a few hours the meat had a wonderful crust on it.

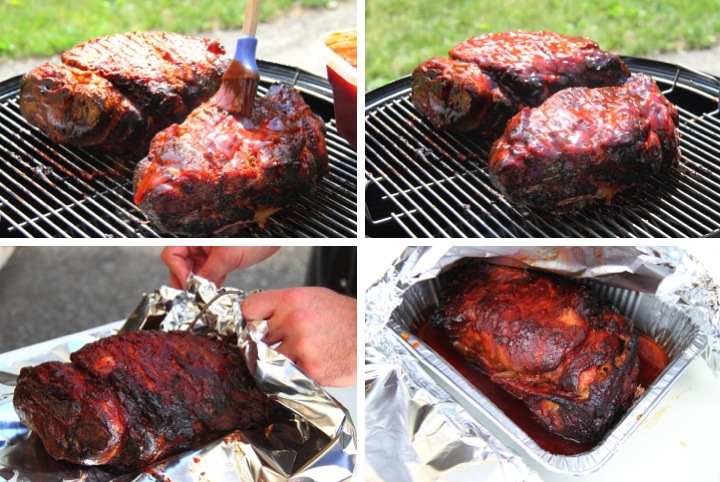
Frank flipped the pork butts, basted the top of them and then placed the lid back on the smoker to let it cook some more. He then placed them in foil tents before putting them back in the smoker for a final time. Once the pork butts reached an internal temperature of 190 degrees, Frank took them out, placed them in covered metal pans and poured a pre-finishing sauce over them to soak up while the meat rested.

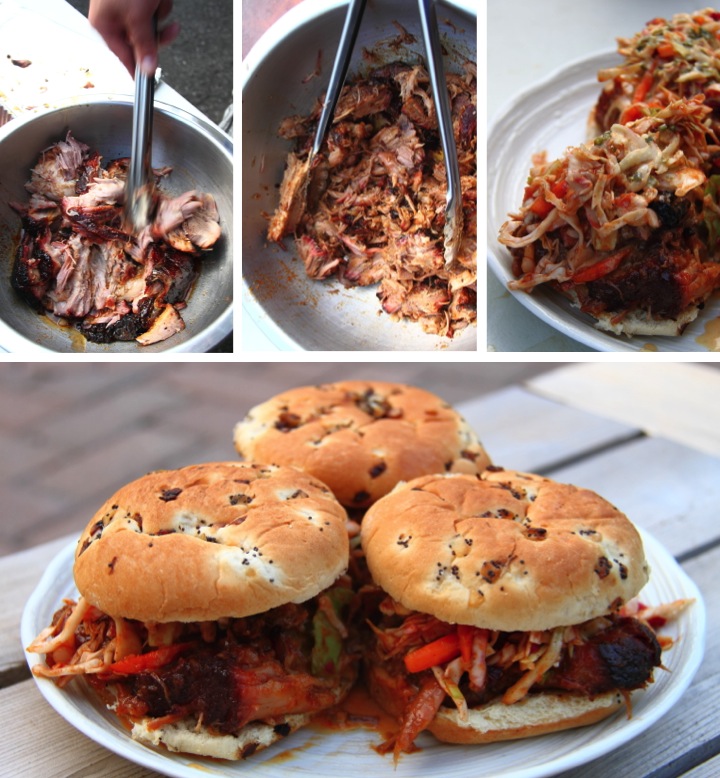
After the meat rested, Frank shredded the pork with tongs and then added his finishing sauce to the meat. He toasted some buns on the smoker and then started assembling the sandwiches. He put a generous layer of pulled pork on the bun topped by a deliciously spicy coleslaw than he made. 

Having gone to undergrad in North Carolina I absolutely love pulled pork and was really excited about Frank making these amazing sandwiches. They turned out fabulously and I hope he makes them again soon.

Have you been doing any grilling or smoking this summer? What have you been making? 

Linked To: Centsational Girl's BBQ Link Party

Thursday
Jul052012

Buttercream Icing Recipe

I love cake. Not only is cake tasty delicious by itself, but it is a wonderful vehicle for one of my favorite things: frosting. I'm particularly partial to buttercream icing. It's whipped up butter and sugar with a little flavoring. What could possibly be better than that?

This recipe is based off of the Wilton buttercream icing recipe that my grandmother taught me to use when I first started decorating cakes. The Wilton recipe calls for a using mixture of half shortening and half butter, but I prefer to use all butter for my frosting. It makes the icing a little more cream colored, but I am all for sacrificing a little prettiness in the name of taste.

I love homemade buttercream icing because it is nice and sweet without having the sickeningly sweet taste that store bought frosting can have. It is also super simple and easy to whip up a batch and it keeps well in the fridge. To use it after you have refrigerated it, just let it warm up a bit and then whip it up again by hand or with a mixer. I always have bags of powdered sugar and sticks of butter on hand because you never know when you may need some icing.

Ingredients List
- 1 cup butter
- 1 tsp. vanilla extract
- 1 tsp. almond extract
- 4 cups powdered sugar (about 1 lb.)
- 2 Tbsp. milk 

Directions
- Cream butter in mixer with vanilla and almond extract
- Mix in powdered sugar one cup at a time
- Stir in milk to achieve desired consistency

Tips and Tricks
- I use butter so this recipe has a slight cream color instead of a true white. I don't mind because I prefer the taste, but if you want a true white icing you can substitute Crisco and butter flavoring
- To thin icing for spreading on a cake add 3-4 extra tablespoons of milk

Tuesday
Jul032012

Making A Child's Apron from a Tea Towel

A special little lady that I know is turning ten so I decided to make her an apron for her birthday since she loves to cook and help out her mom in the kitchen.

As I was trying to figure out what fabric to use I happened to see this cute tea towel and I thought it would be perfect to turn into the apron. The tea towel is made from durable twill and I love the graphic silverware motif along the bottom.

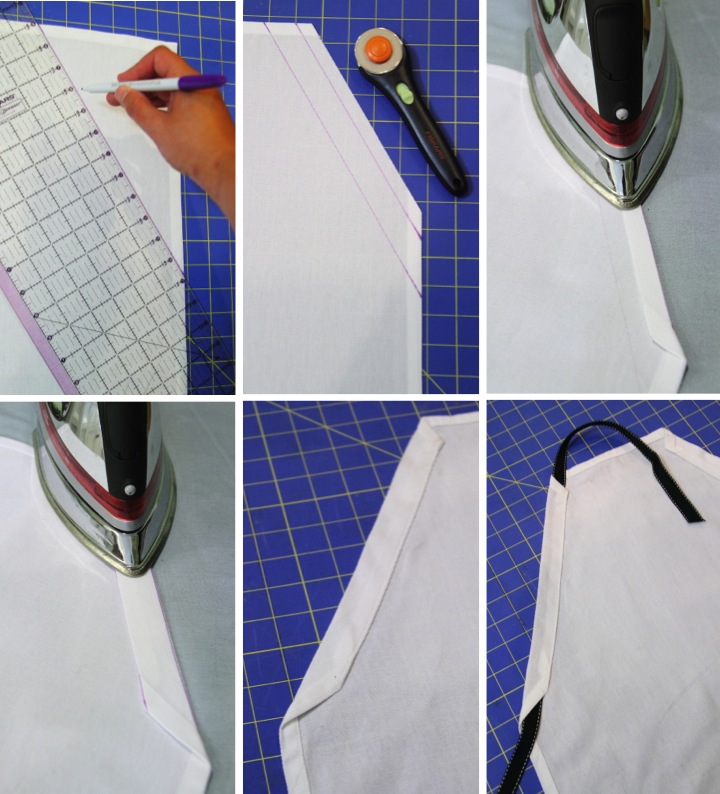
I started by measuring 6" in from the top of the towel and 10" down on each side and used a disappearing ink marker to draw a line between the marks. I drew a parallel line 1" (my ribbon width plus a little extra for my seam) from the original line and then used my rotary trimmer to cut off the excess 1/2" past the second line.

I placed the tea towel right side down on my ironing board and then ironed over the edge along the outermost line. I then folded over the edge again, ironing along the inner line. I pinned it down and then sewed 7/8" of an inch from the folded edge which gave me a channel for my ribbon. I then repeated the same step for the other side. When I was finished I used some water to rinse away the marking guidelines that I had made.

I cut 7' of ribbon and threaded it from the bottom of one channel up to the top and then from the top of the other channel back down. This gave me a loop to go over the neck and then ties for around the back. I trimmed the ribbon on an angle and then used a dab of fray check to make sure it wouldn't unravel.

The measurements that I used worked for the dimensions of my tea towel and the size of the little lady I am making this for. If you are trying this, you may need to adjust according to your needs to make things proportional. Also, my ribbon is grosgrain and seems to stay in place, but if you use something more satiny that is slippery, you may want to add a stitch or two to keep the ribbon in place or knot the ends of ribbon so it doesn't slide out.

The project was really easy to make and I think it turned out cute. I hope that the birthday girl likes it!