Welcome

My name is Lisa and I'm a crafty girl with wanderlust working as an engineer by day. My blog chronicles projects in my home as well as pictures and stories from my travels.

Search


Instagram

Blog Index
The journal that this archive was targeting has been deleted. Please update your configuration.
Navigation

Entries in Cooking (35)

Wednesday
Dec282011

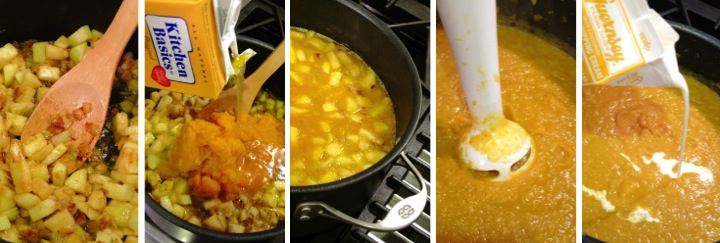
Canned Goods for Christmas

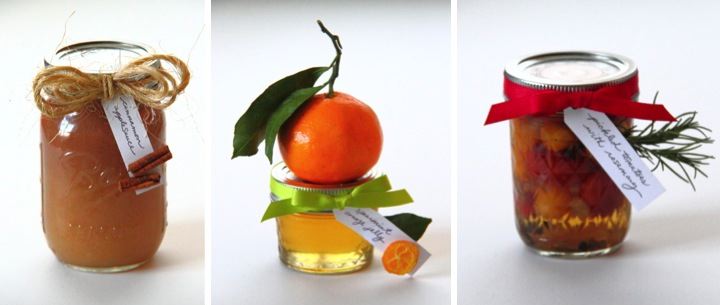
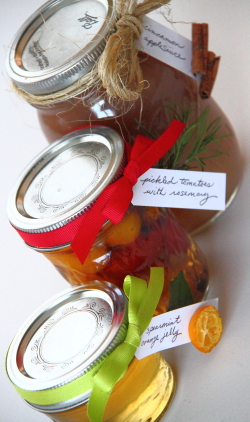
This year for Christmas I gave canned goods that I made at the end of the summer and early fall. I made cinnamon applesauce, pickled tomatoes with rosemary, and spearmint orange jelly. The last two are from recipes from Better Homes and Gardens Special Interest Publication Canning which I picked up at my grocery store last summer. I love canning and it seemed like a perfect gift to give this year.

To make the tags I cut 3/4" x 2-3/4" strips of cardstock. clipped the corners on one end to make a tag shape and used my 1/8" hole punch to create a hole for threading. I then wrote the contents of each jar on the tag.

For the cinnamon applesauce, I embellished the tag with some sticks of cinnamon and tied the tag to the jar with twine for a rustic look. To cut the small pieces of cinnamon I scored the stick with a serrated knife and then snapped off the piece.

To decorate the pickled tomatoes with rosemary I used red ribbon to attach the tag to the jar. I then hot glued some rosemary that I had dried from garden this summer to the back of the tag.

On the spearmint orange jelly, I used my hot glue gun to add an orange leaf to the back of the tag and a dried kumquat slice to the front. I then tied the tag to the jar with a lime green ribbon. To make the dried kumquat slices I cut some kumquats into 1/4" slices and then baked them on a cooling rack (not a cookie sheet - they will stick!) at 250 F (125 C) for about half an hour.  

Of course even though I have given away a lot of canned goods this year, I still have plenty left for myself. In fact I couldn't help but keep all of my vanilla pickled sweet cherries. Is that bad?

Monday
Dec262011

Seafoam Salad

I think it has to be a law of nature that every family in the Midwest of the US must have a time honored, treasured family Jell-O recipe. For my family that recipe is none other than the fabulously delicious seafoam salad.

Trotted out only for the special occasions of Thanksgiving and Christmas dinner, seafoam salad was the highlight of the holiday meals for my sister and I while we were growing up. For a seemingly disastrous period in the nineteen-eighties my grandmother tried an experiment where seafoam salad was served for Thanksgiving and a red and green Jell-O ribbon salad was substituted for seafoam salad at Christmas. Needless to say there was a major revolt in the ranks.

Even though my tastes have changed and grown, as an adult I still love this simple Jell-O recipe. Seeing the pale green Jell-O salad topped with whipped cream and maraschino cherries is like a time machine for me. It just tastes like the joy and magic of the holidays and makes me feel like a little kid again.

Ingredients List
- 1 can of sliced pears in heavy syrup, drained with juice reserved
- 1 package of lime Jell-O
- 1 package of cream cheese (8 oz.)
- 2 Tbsp. warm water
- 1 pint heavy whipping cream 
- Pear halves (optional)
- Maraschino cherries (optional)

Directions
- Over a medium heat burner heat pear juice to a simmer
- Remove pear juice from heat, stir in Jell-O until dissolved and set aside
- In a separate bowl, use a potato masher to mash cream cheese with warm water
- Add slightly stiff Jell-O and beat until fairly smooth
- After Jell-O mixture has cooled, use potato masher to mash pear slices into the mixture
- Whip up whipping cream and fold half into the Jell-O mixture
- Pour Jell-O mixture into a dish and place into the refrigerator
- After Jell-O has set up (about a half hour) finish by spreading the remaining whipped cream on top 

Tips and Tricks
- Although a potato masher works best with this recipe, in a pinch you could use a dinner fork to mash up the cream cheese and pears.
- For best success with whipping up whipping cream make sure that both the whipping cream and bowl are very cold. I like to pop my mixer bowl in the freezer for a few minutes prior to using it.
- I like to garnish my seafoam salad with pear halves that I have thinly sliced and maraschino cherries.
- To make sure that the maraschino cherries don't bleed red juice all over the whipped cream I rinse my cherries and blot them dry with a paper towel before adding them on top of the seafoam salad. 

Thursday
Dec152011

Curried Apple Pumpkin Soup

With winter well underway I am constantly craving soups. There is nothing like a hot bowl of soup to warm you up after coming in from the chilly weather. It makes me feel all warm and cozy inside.  

My favorite soup in the fall and winter is my Curried Apple Pumpkin Soup which I made last night for dinner. It is rich and creamy with a great slightly spicy flavor. With a baguette of crusty bread it is a perfect comfort food meal for me.

It is a pretty simple soup to make, especially if you have an immersion blender to puree the soup. Without further ado, here is the recipe.

Ingredients List
- 1/2 c. butter
- 1 bunch of leeks (2 big leeks or 3 small leeks): white part chopped
- 1 small sweet onion: chopped
- 1 Tbsp. curry powder
- 3 apples: peeled, cored and chopped 
- 2 c. pumpkin puree
- 4 c. chicken stock
- 1 pint heavy cream
- Salt and pepper to taste
- Cayenne pepper (optional)
- Pumpkin seeds (optional)

Directions
- Over a medium heat burner melt butter in a stock pot and then add leeks, onion and curry powder, cooking until nearly translucent
- Add apples and cook for a few minutes more so that apples are soft and onions are translucent
- Stir in pumpkin and chicken stock and simmer for 20 minutes until all vegetables are very soft and tender
- Remove from heat and use a blender to puree soup
- Finish by stirring in cream and adding salt and pepper to taste

Tips and Tricks
- I like to use pumpkin puree that I made from sugar pumpkins but you can also used canned pumpkin
- For blending I love using my immersion blender (best $24 I ever spent!) since I can puree it right in my stock pot which means less clean up 
- If you do use a traditional blender be sure to only fill the blender less than halfway otherwise you could potentially make a hot, exploding mess (unfortunately, I know this from personal experience)
- If you are vegetarian you can substitute vegetable stock for the chicken stock 
- For a little extra zing try adding some cayenne pepper to the soup
- I like to reserve a little cream and use it along with some pumpkin seeds to garnish the soup

Monday
Dec122011

Holiday Party

With being out of town to Japan, New York and New Orleans this month I'm not going to be able to host a holiday party this year but I thought I'd share my Christmas decorations and food from my party last year.

For decorations I made table runners out of teal and white fabric. I also made pillows out of coordinating fabric and used white felt to add a snowflake motif on one of the pillows.

I kept things simple for my tree decorations with white lights, teal and silver ornament balls, pinecones that I spray painted silver and teal, and silver pipe cleaners that I twisted into spirals.

For the tables I filled vases with extra ornaments and some extra branches I trimmed from my tree. I also put some of the painted pinecones and ornaments in a wooden bowl on my serving table. 

I like to try to make some food ahead for my parties so I made three different cheese balls a few days before that just required garnishing before serving.  The lemon-parsley gougeres can be made ahead and then baked right before the guests come. I also made individual shrimp cocktails by putting a little bit of cocktail sauce in the bottom of a small glass with shrimp and a slice of lemon.  For something sweet I made honey-poached pears with marscapone drizzled with chocolate. I used whole small pears and cored them from underneath to keep the pear intact for presentation. I was happy that with so much I could make ahead everything was stress free for me at the party and I could spend my time enjoying the food with my guests instead of in the kitchen cooking.

Friday
Nov252011

Making Pumpkin Puree

With Thanksgiving over the plentiful supply of sugar pumpkins in my local grocery is coming to an end so I decided to take some time to make and freeze some pumpkin puree for use over the winter.  The process is pretty simple and it tastes so much better than using pumpkin puree from a can in recipes.

To start I scrubbed the outside of my sugar pumpkins, sliced them in half, and then scooped out the seeds to save for toasting later.  For cleaning out the membrane I usually use a melon baller which makes the scraping easier.  After prepping the pumpkins I placed them cut side down in a greased baking dish and put them in a 350 degree oven.

After baking the pumpkins until the flesh was soft (about an hour) I took them out of the oven and then scooped out the flesh when the pumpkins were cool enough to handle.  Using a potato masher I pureed the pumpkin until it had a smooth consistency.  Since the puree is a little watery I lined a colander with some cheesecloth and let the puree drain for a bit before packing it.  Since most of my recipes call for two cups of pumpkin puree I measured out two cup portions into freezer bags and stored them in the freezer.  Now I am all set for a winter of making pumpkin pie, pumpkin bread and pumpkin soup.        

Page 1 ... 1 2 3 4