Wednesday
Feb222012
Picture of the Day: Bridge Reflection at Chiang Kai-shek Memorial Park
 Chiang Kai-shek Memorial Park
Taipei, Taiwan
4.10.2009
 Lisa | Post a Comment | Share Article | Email Article | Print Article

My name is Lisa and I'm a crafty girl with wanderlust working as an engineer by day. My blog chronicles projects in my home as well as pictures and stories from my travels.

Chiang Kai-shek Memorial Park
Taipei, Taiwan
4.10.2009
Lisa | Post a Comment | Share Article | Email Article | Print Article The mild winter this year has given me severe case of spring fever and has me thinking about what else I want to do with the front of my house. Over the few years I've had the house it has come along way but I have more plans that I would like to work on this year.
When I first bought my house in September 2007 the best thing it had going for it besides its solid foundation was its curb appeal. I'm not saying it was great (in fact it was actually a bit gloomy and foreboding) it's just that the back of the house was rotting because it hadn't been painted and the inside was a disaster of crumbling plaster infused with a strong smoky smell from two life long smokers who had lived there since the 1960s. I think that the reason I got the house for such a great deal is because it scared any other sane person away.

As soon as I got ownership of the house one of the first things that I had to do was get the rotten wood replaced and paint the house before winter came so that there wouldn't be any more deterioration to the siding and trim. With a blue house on one side of me and white house on the other I decided on painting the house a pale yellow with white trim and dark teal accents. For extra fun I painted the ceiling of my porch an aqua color. I kept the screen door and painted it but the 1960s door with the 3 staggered rectangle windows had to go in favor of an old reclaimed door with pretty glass windows. The funky front porch light was replaced with something more in keeping with the style of the house and I put up a vintage cast iron mailbox that I found on eBay. Not much was done with the landscaping at that time other than planting some bulbs, removing the half dead enormous bushes that flanked the front porch, hiding the stonework and getting rid of the stone planter in the middle of the front yard. I left for Japan at the end of February 2008 so I didn't even have a chance to see my bulbs come up that year. 
After I got back from Japan at the end of April 2009 I set about doing some landscaping. I took some of the stones that had been removed from the front planter and used them to edge a bed that I made around the base of the tree in my front yard as well as a 4' x 30' vegetable and herb garden that I planted along the side of my house. I moved the hostas that were in the bed in front of the side wing to the new bed under my front tree and replaced them with impatiens.
In the fall of 2009 a local nursery was selling small Korean boxwood for 1/2 off because it was the end of the season so I scooped up a bunch and planted them all along the side wing and sides of the front porch.
During the summer of 2010 I didn't do a lot out front since I was focused on my back patio and building my patio furniture. I did however plant some annuals as well as some azaleas in the bed in front of the porch. I also hired someone to patch the concrete front steps, but once winter came the freezing and thawing made the skim coat crack off.
Unfortunately the azaleas didn't end up doing too well so in the summer of 2011 I replaced them with some larger boxwood. I like the boxwood because they are evergreens so they add some color and life during the winter. I also planted some annuals in the front including a climbing plant with pink blooms on a bamboo trellis that I made. Most of my plantings were a success except for the plants that I put in the bed on the south side of the porch that didn't take too well despite being a full sun variety. The other big thing that I did was tear out the ivy that was embedded into the stone bed in front of the porch and then rebuild the bed. That was exhausting, back breaking work.
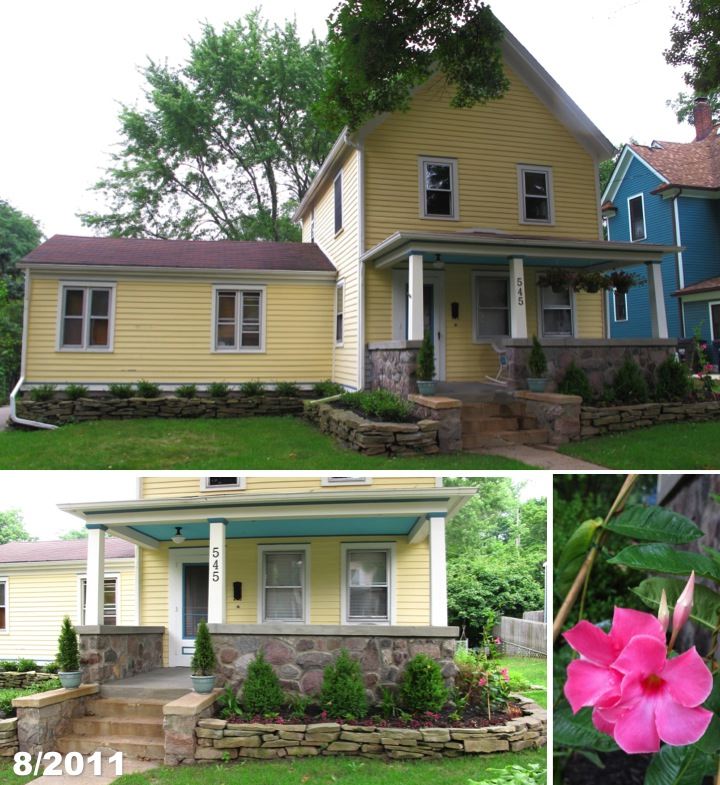
Still to come I would like to replace the windows on the side wing with double hung windows to match the rest of the house and add some shutters if I can get approval with the historic district commission. The side windows are clearly not original and I found shutters in the crawl space as well as some shutter hardware on some of the windows so I think I have a good shot of getting my petition approved. I also need to replace the front steps and figure out what to do with the plantings on the side bed. Hopefully I'll have it looking nice this summer.
What are you planning on working on this summer? Are you going to do any landscaping or other fun projects outdoors?
Lisa | 2 Comments | Share Article | Email Article | Print Article 
Lamanai, Belize
11.23.2004
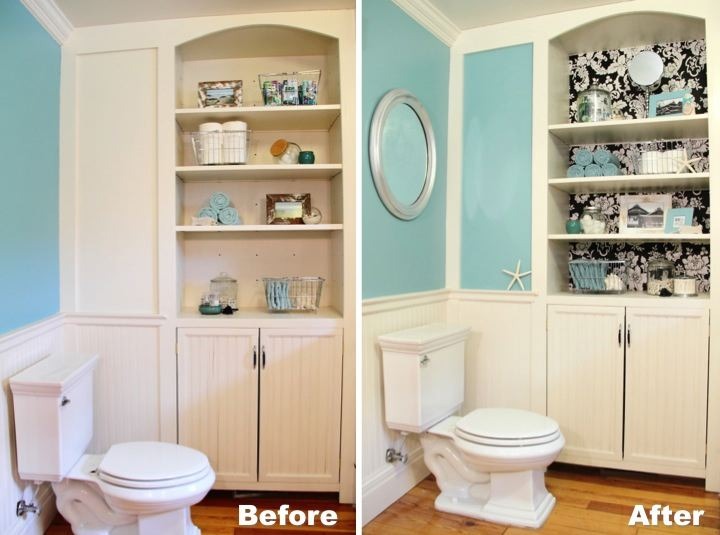
Lisa | Post a Comment | Share Article | Email Article | Print Article 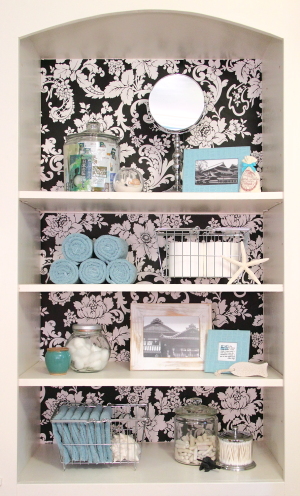 With my many projects (hanging wallpaper and painting the built-in, adding shelves and organizing the built-in cabinet and hanging a mirror on the wall) completed there was only one thing left for me to finish up in this corner of the bathroom; organize the built-in shelves. After all of the more mundane things this was definitely the fun part for me.
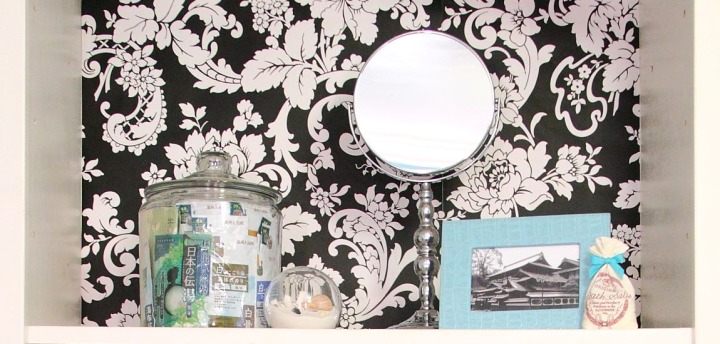
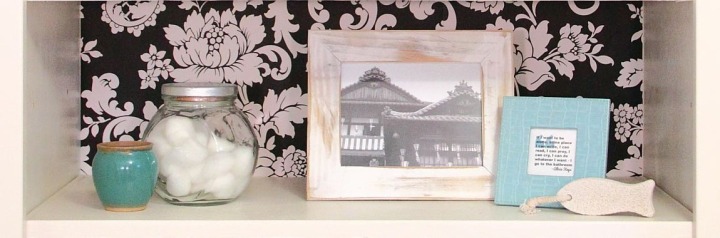
On the left side of my top shelf I have a large glass canister from Target for storing my packets of Japanese bath salts. Previously I had them in a wire basket but they kept slipping out so I got this canister instead and moved the basket to my craft room for storing fabric. Japan has a strong bathing culture and going to hot springs (onsen) for bathing is very popular. When I was living in Japan it was well known among my friends that I loved going to onsen so I got lots of bath salt packets with minerals from different famous onsen for going away presents.
Next to my bath salts I have a glass bubble filled with shells and sand that my sister gave to me for Christmas one year. On the right side I have a photo that I took of Dogo Onsen (one of the oldest hot spring baths in Japan) in a teal faux alligator frame that I picked up on sale at Papyrus years ago. Next to the frame I have a little muslin bag of bath salts that I bought in Bath, England. It originally had a royal blue ribbon on it so I swapped it out for a teal one. My last item on the top shelf is a new standing mirror at I picked up at HomeGoods this past week. I've been wanting to get a mirror like that for a while and decided that as a reward to myself for my bathroom progress I would get it.
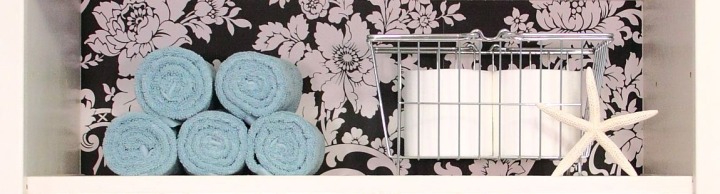
On my second from the top shelf I rolled up my extra hand towels and stacked them up on the left side. The right side has a wire basket from Target with extra rolls of toilet paper in it and a little starfish.
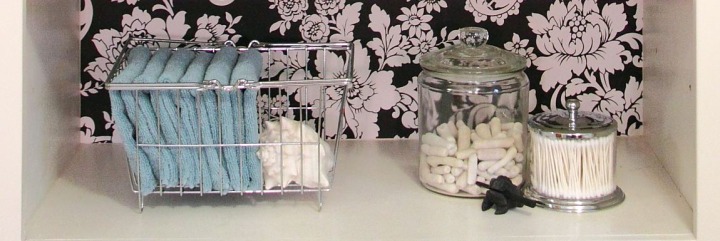
On the left side of my second from the bottom shelf I have an old glass canister whose lid I spray painted silver. I have it filled with cotton balls next to a little teal ceramic jar that was a thrift store find. On the right side I have another photo of Dogo Onsen in a white reclaimed wood frame that I picked up at an art fair on the Mornington Peninsula in Australia. I also printed out an Alicia Keys quote, "If I want to be alone, some place I can write, I can read, I can pray, I can cry, I can do whatever I want - I go to the bathroom,” that I used for a previous blog post and put it in another teal frame that I bought at the same time as the one on the top shelf. Last but not least I have a little fish shaped pumice stone.
On my bottom shelf I have another wire basket from Target with my extra wash cloths folded up in it. I also tucked in a conch shell that my paternal grandfather gave me years ago when I was a little girl. On the right side I have a glass canister filled with white coral that I picked up on a beach in the USVI when visiting my sister. In a smaller glass and chrome container from HomeGoods I have my cotton swabs and for fun I have a little wooden frog I got on another one of my trips to the Caribbean with my sister.
It feels so nice to have this part of the bathroom all organized and finished now. Almost all of the items I already had and my only new purchases were the large glass container for my bath salts, the standing mirror and the little container for my cotton swabs. I love that everything on the shelves either has some functional bathroom purpose or has a special memory for me. With just a few small things that I've done, this corner of my bathroom now looks a lot more polished and finished than it did just a month ago. Now if only I could get some motivation to finish up my bathtub...
If you are interested, check out the rest of my bathroom posts here: Bathroom Blog Posts
Lisa | 3 Comments | Share Article | Email Article | Print Article 
London, United Kingdom
11.28.2003
Lisa | Post a Comment | Share Article | Email Article | Print Article 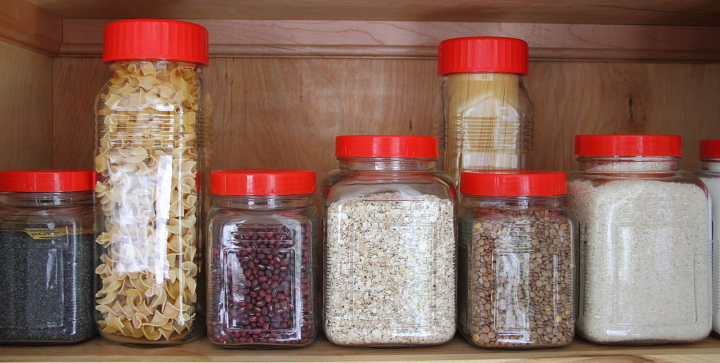
When I lived in Japan I found glass jars with red plastic lids and I thought they would be perfect for storing my dry goods. I didn't have much storage space in my tiny Japanese kitchen so I had bought an inexpensive wire shelving unit to hold the jars and some other kitchen goods. I love that the jars are square which maximizes shelf space and they also look cute with the ribbed design on the glass and the bright, cheery tops. Although I had to spend a few dollars at a home store for the tall ones with the pasta and some bigger ones for flour and sugar, I found the small and medium sized jars for only about dollar at the Seria Hyaku-en Store in Toyota City (Hyaku-en store in Japan ≈ Dollar store in US). 
Back home in the US when I redid the kitchen I chose to have glass fronts for all of my upper cabinets. I love it because I always know where to find things, but I have to try to keep things organized and looking nice. My red lidded Japanese jars are perfect for this and they are a perfect combination of practical storage while also looking nice on my shelves. Jars full of delicious ingredients just make me happy and I like being to be able to easily see what's inside. It inspires me to cook.
Unfortunately, the number of things that I would like to store in my Japanese jars has exceeded my supply. What is a girl to do?!? I have searched high and low online and in stores to find something similar but with no luck. When I was back in Japan in December I actually went to the Hyaku-en store and bought three more of the medium sized ones to bring back home with me. In case you were wondering, they made it home safely in my luggage with my socks stuffed inside.
So imagine my surprise when I was at HomeGoods earlier this week and I saw some glass jars that were remarkably close to my Japanese ones. They are the same size as my small Japanese ones and have the same exact ribbed pattern on the glass. The lid is metal instead of plastic and doesn't have the indented design on it but all in all they are a fairly close match. I immediately bought up all five that they had. They were $2.99 each, so triple my Hyaku-en price, but well worth it. When I got home I used some red glossy spray paint that I had to paint the lids.
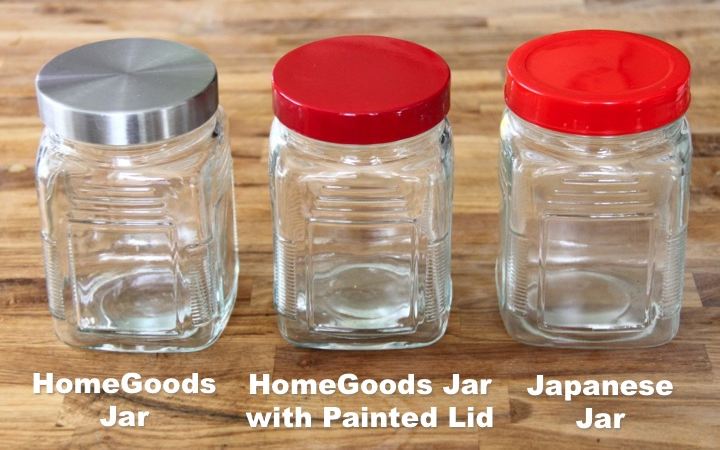
It's a pretty close match, don't you think? My spray paint is a little dark compared to the Japanese lids so I think that I'll try to find something that matches a little better, but otherwise I am pretty happy. My search is still not over though, because I would like to get some more large ones as well. If anyone happens to see some cute glass storage jars with red plastic lids, please let me know! I would be forever grateful and send you chocolate.
Lisa | 2 Comments | Share Article | Email Article | Print Article 
Kruger National Park, South Africa
07.26.2004
Lisa | 2 Comments | Share Article | Email Article | Print Article 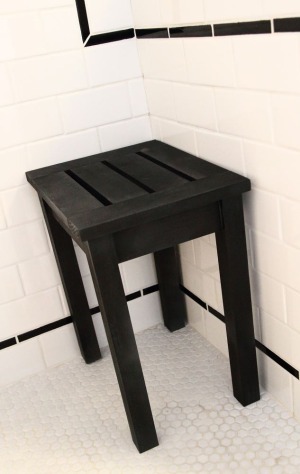 As I have been working on finishing up projects in my master bathroom as part of my New Year's resolutions I found a few extra items that I wanted to do before I would feel like the bathroom is complete. One of those additions was to make a shower stool for my shower.
I love my 3' x 5' shower and with all that space I thought that having a little spot to sit down would be really nice. After looking around online and at some stores I couldn't find anything that I liked that was also reasonably priced so in the end I decided to make my own.
The design is a pretty standard stool design, just made to fit shower dimensions. Completed it stands at 18" tall, 15" wide and 11-1/2" deep. To assemble everything I used pocket holes made with my Kreg Jig which is an awesome tool I learned about on Ana White's amazing and inspiring website. All the pocket holes were under the seat and inside the aprons so I didn't have any holes to patch which was really nice.
It only took about an hour to build the shower stool not including drying time for the spray paint. I already had screws so with the lumber and spray paint I spent less than $20 on the project. I am happy with the results and I think it looks cute in my shower as well as being functional and sturdy.
Supply List:
2 - 2x2 @ 3 feet long
2 - 1x3 @ 6 feet long
1-1/4" pocket hole screws
Cut List:
4 - 1x3 @ 10" for seat slats
2 - 1x3 @ 11-1/2" for seat sides
2 - 1x3 @ 11 for front and back aprons
2 - 1x3 @ 7-1/2" for side aprons
4 - 2x2 @ 17-1/4" for legs
Seat Assembly:
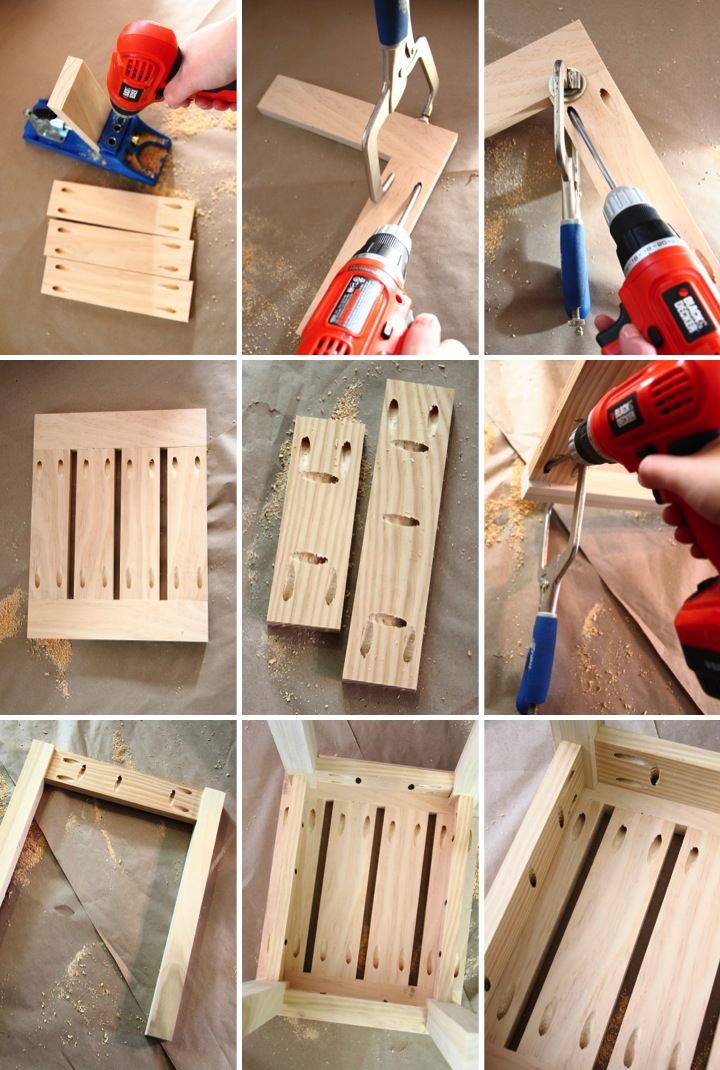
To start I drilled 2 pocket holes on each end of the four seat slats. Leaving 1/2" between each slat I clamped and screwed the slats to the sides.
Leg and Apron Assembly:
For each of the aprons I drilled 2 pocket holes on the ends (for attaching to the legs) and then a few more pocket holes along the top edge (for attaching to the seat). Using a scrap piece of 3/8" plywood as a guide, I marked lines on each of the legs 3/8" in from the edge as guidelines for aligning my aprons.
I lined up the front apron to one of the legs, clamped it and then screwed them together. I then attached another leg to the other side of the apron in the same manner. I attached the back apron to the remaining two legs using the same process as the front.
I clamped and screwed the side aprons onto the front legs and finished making the base by then clamping and screwing the back legs to the side aprons.
Finishing Up:
I laid the seat face down and then centered the base on top of it. I used the already drilled pocket holes to screw the seat and base together.
With all the pocket holes under the seat or inside the apron I just did a light sanding on the piece before finishing it. I used a dark grey spray paint primer on the stool first before applying two light coats of black spray paint.
If you are interested, check out the rest of my bathroom posts here: Bathroom Blog Posts
Lisa | 5 Comments | Share Article | Email Article | Print Article 
Horyu-ji (法隆寺)
Nara, Japan
08.15.2010
Lisa | Post a Comment | Share Article | Email Article | Print Article 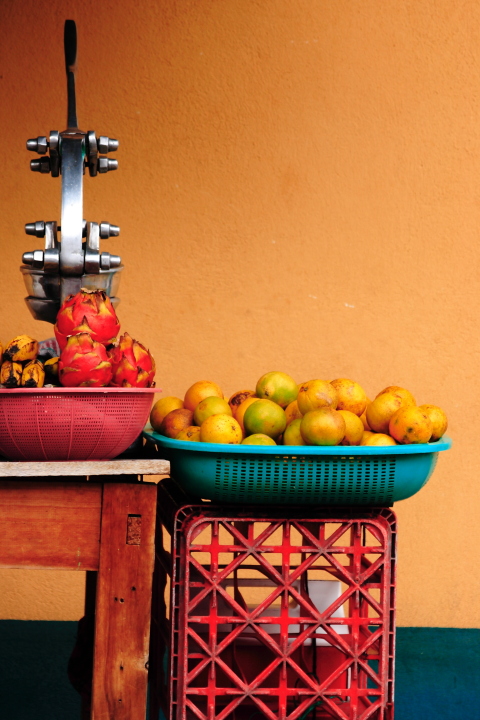
San Pedro, Guatemala
07.05.2010
Lisa | 4 Comments | Share Article | Email Article | Print Article 