Plans for My Study
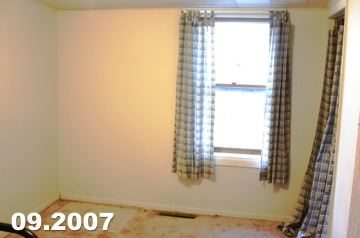 With my bathroom complete I am excited to get going on my next home project. I thought that fixing up one of the rooms in my side wing to make into a study for myself would be nice.
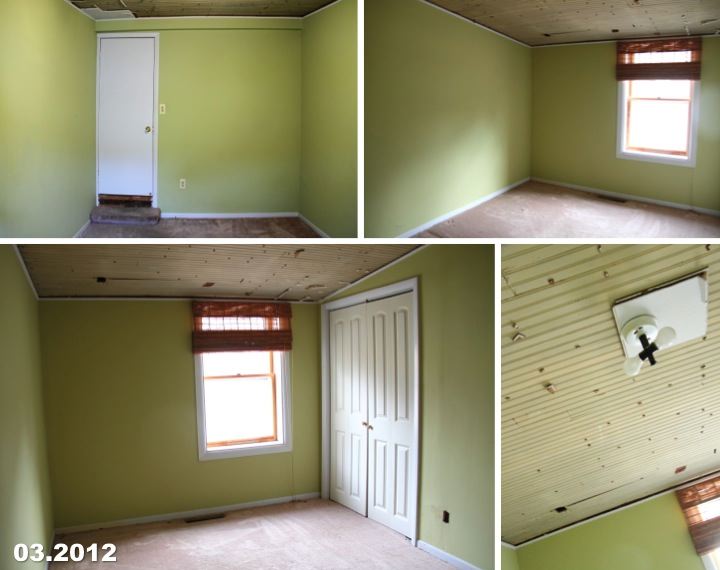
When I bought the house this room was by far in the best condition so I haven't done much with it. Unlike the rest of the house the walls were finished drywall so apart from patching an excessively large plumbing access hole in the wall that had been covered with a cork board (honestly, what were the previous owners thinking?) all I did to the walls was paint them pale green. With fresh paint throughout the room, a cheap temporary closet door and a bamboo blind that I bought on super sale the room was passable and I moved on to more pressing things. 
Now I'd like to make this room into something usable for me. I already pulled down the pressboard ceiling tiles that the previous owners had stapled to the ceiling and found beadboard. Based on that discovery along with the ceiling slope and the fact that the room is set down two steps below the rest of the house makes me think that it was once a porch that was later enclosed. I love the beadboard so I am planning on trying to salvage it by pulling out the staples, patching the holes and refinishing it.
After the ceiling the biggest project in the room will be replacing the flooring. This is also the only room in the house where I haven't replaced or refinished the floor and I would like to add hardwood. I want to do the same for the rest of the side rooms (they currently have some cheap carpet I had put down for a short term solution in 2007) so I may wait and do all the floors at the same time.
I have a few other to do list items for the room like new trim for the door, closet and window, new doors for the closet and room (flimsy hollow core doesn't fit in with the solid wood five panel doors I have elsewhere) and crown molding. I'm also excited to make the room functional with a desk and daybed and then decorate, which is always the most fun. I can't wait to get started!
 Saturday, March 3, 2012 at 12:58PM | Posted by
  Lisa |
  2 Comments |
  Share Article |
  Email Article |
  Print Article
 Picture of the Day: Schönbrunn Palace in Vienna
Vienna, Austria
05.31.2006
 Saturday, March 3, 2012 at 9:57AM | Posted by
  Lisa |
  Post a Comment |
  Share Article |
  Email Article |
  Print Article
 Picture of the Day: View of the Temple of Warriors from the Top of El Castillo
Chichén Itzá, Mexico
10.09.2005
 Friday, March 2, 2012 at 6:23AM | Posted by
  Lisa |
  Post a Comment |
  Share Article |
  Email Article |
  Print Article
 Reason I ♥ A2 # 37: San Street Pop Up
It's no secret that I love living in Ann Arbor so I thought that I would start sharing some of the things that make it such a special place for me. 
One of the things that make Ann Arbor so great for me is the food. This past summer a food cart courtyard, Mark's Carts, opened up just around the block from my house and I was in heaven. This being Michigan, the food carts are closed for the winter for obvious reasons.
One of the food carts that I love, San Street, (amazing pork buns!) has periodically been doing a pop up restaurant at Zingerman's Events on Fourth and last night was my first chance to go. The pop up typically runs from 5 until 9:30 pm but we had heard they usually run out of food early so Frank and I headed over at 6:30.
I love the Zingerman's Events on Fourth space. It is really charming and intimate with lovely exposed brick and used to house Eve which was one of my favorite Ann Arbor restaurants prior to its closing. Run by Eve Arnoff (who was on Top Chef Season 6) the menu was full of amazing dishes including my favorite, curried mussels. As a random aside one time when I was having dinner there with my friends, Erin and Andy, I saw Emilio Estevez. Actually, I only kind of recognized him.
Me: That guy that just walked in with all those people looks like Emilio Estevez
Erin (turning to look): That is because it is Emilio Estevez
Me: Oh
Yeah, I am a dork. Anyway, enough with my side tangent. The pop up had a cool set up with the bar and serving staff being provided by Zingerman's and San Street providing the food. Everything looked great on the simple menu but Frank and I decided to each get a bowl of the pho bo and an order of chicken buns. The chicken buns were fabulous and definitely gave the San Street pork buns a run for their money. The soy garlic marinade was awesome and I loved that they were a little spicy. The pho was fabulous as well. The bowl was packed with noodles that were perfectly cooked and the broth was very flavorful.
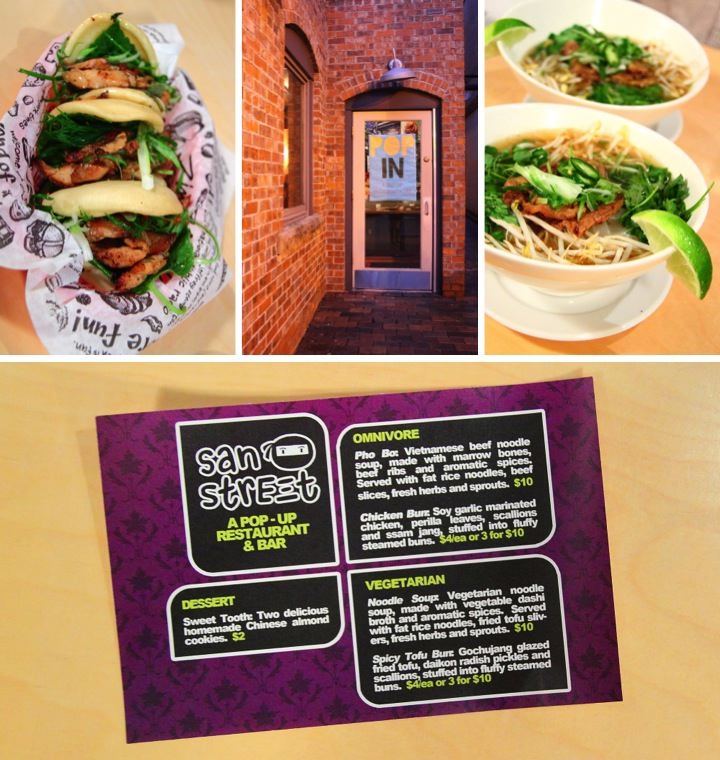
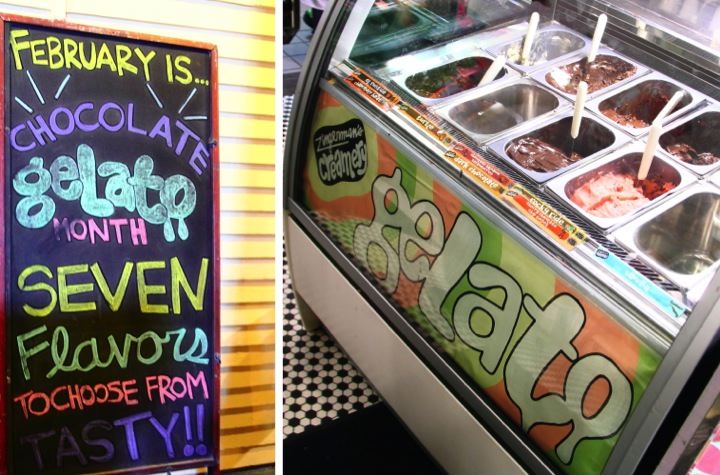
After eating Frank and I were tempted by the almond cookies on the menu, but decided to walk over to Zingerman's Next Door for some gelato. They make wonderful gelato locally at their creamery and the flavors change seasonally. February is chocolate gelato month at Zingerman's and we were not disappointed by the chocolate options. Frank immediately chose the turtle while I tried tastes of the chocolate basalmic strawberry and cherry chocolate chip before settling on rocky ride (dark chocolate with peanuts and marshmallows). It was a sweet way to end a nice night out.
 Thursday, March 1, 2012 at 12:05PM | Posted by
  Lisa |
  Post a Comment |
  Share Article |
  Email Article |
  Print Article
 Resolution Recap: February 2012
I'm just two months into my 2012 New Year's resolutions of purging and organizing my home and finishing up projects around the house. I have made some good progress in February and am feeling happy about how things are going even though it is still early on.

Having my blog has been a really good motivator for me and done a lot to help keep me on track with things. After I've publicly written that I am going to do something it makes me feel accountable to follow through and actually get it accomplished. Without further ado, here is a recap of how I fared with my resolutions in February.
Resolution 1: Purge & Organize
For three out of four Mondays in February I met my goal of having a volume of at least one trash cart (between my recycling and regular trash) out on the curb on garbage pick-up morning. Here's my breakdown:
- February 6: 3/4 full trash + 1/2 full recycle = 1-1/4 total
- February 13: 1/4 full trash + 1/2 full recycle = 1 total
- February 20: Full trash + 3/4 recycle = 1-3/4 total
- February 27: 1/2 full trash = 1/2 total
Although I faltered this past week I am still happy with what I've been able to get rid of this month. Hopefully I'll do better next month.
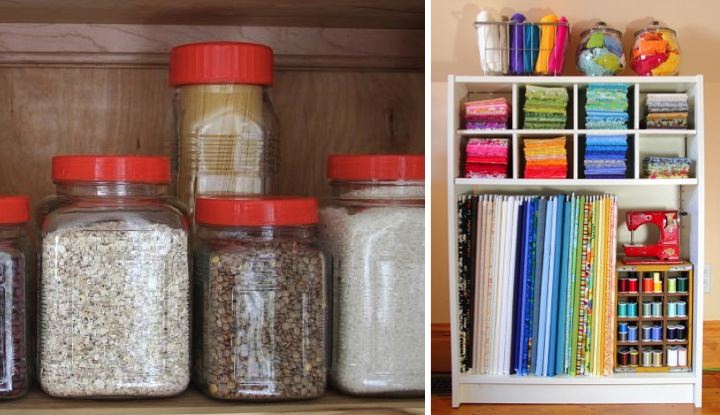
On the organization front I front I got my fabric in my craft room organized using things I already had. In my kitchen I found some additional storage jars to get more of my dry goods in order. Also, while I was working on my bathroom I got everything organized in my built-in and new medicine cabinet.
Resolution 2: Finish Up Projects
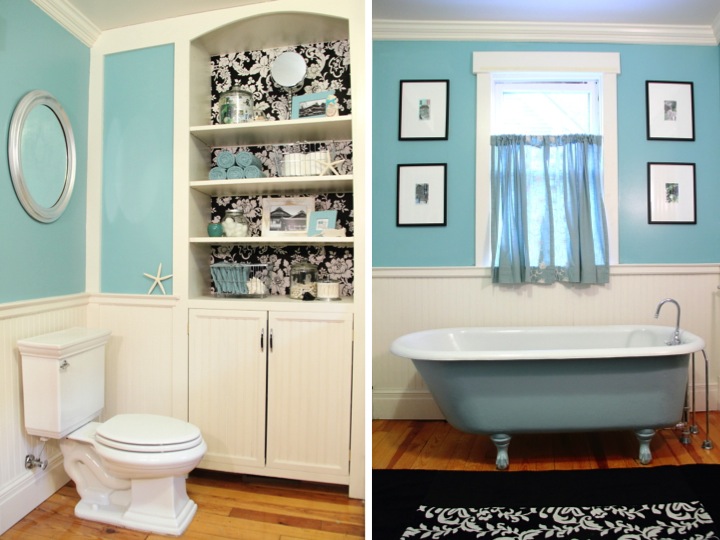
A month after starting work on finishing up my master bathroom I got everything done and it feels wonderful. Here's what I did to complete the room:
- Paint the outside of the tub teal: Done!
- Replace the cheap, temporary mirror with a medicine cabinet: Done!
- Add shelving to the inside of the built-in cabinet: Done!
- Jazz up the built-in with some color: Done! (Plus it is now organized)
- Make a wood vent cover to go over the ceiling fan: Done!
- Make a rug to go in front of the bathtub: Done!
- Add some wall art and do some paint touch-ups: Done! (wall mirror + framed Japanese bath salts)
- Build a shower stool: Done!
I'm really excited about having my bathroom completely finished and organized. I have a couple things that I want to do in my kitchen and then I think that the next room that I'll tackle is one of my first floor back bedrooms that I want to make into a study for myself.
Is anyone else trying to keep New Year's Resolutions? What are they and how are you doing on them? I'd love to hear what you are doing to keep motivated.
 Thursday, March 1, 2012 at 6:22AM | Posted by
  Lisa |
  2 Comments |
  Share Article |
  Email Article |
  Print Article
 Picture of the Day: Cruising in Milford Sound
Milford Sound, New Zealand
09.18.2005
 Thursday, March 1, 2012 at 6:04AM | Posted by
  Lisa |
  Post a Comment |
  Share Article |
  Email Article |
  Print Article
 The Original State of my Master Bathroom
Since I have finally completed all the finishing touches on my bathroom I thought that I would share a little bit about where I started back when I bought the house in Fall 2007. Unfortunately, due to a hard drive crash that happened when I was in Japan I only have a few pictures from when I first bought my house and started remodeling. 
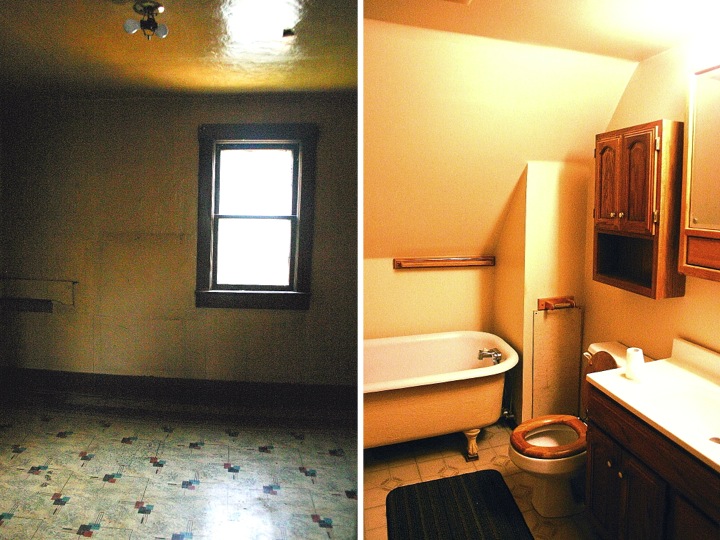
The picture below on the left is of the room that I turned into my bathroom. The plaster on the walls and ceiling were crumbling and the hardwood floor was covered with a funky linoleum. I actually kind of like the pattern on the linoleum but it was cracked, dirty and in no way salvageable. There was a light fixture but no electrical outlets in the room. Judging by some remnants of plumbing sticking out of the wall and some teacup wallpaper in the adjoining closet it appeared that the room had been used as a kitchen at some point. At 10' x 10' it was a nice size room and the linoleum had kept the hardwood floor underneath in good condition.
On the right side is a picture of the old upstairs bath in my house. It was a really strange set up. In the back of the upstairs there was a 13' x 13' room and the previous owners had partitioned off 5' x 8' to make this bathroom leaving a strange L-shape space leftover that was unfinished. Very bizarre! I ended up salvaging the tub to use in the bathroom I was making in the next room over and then gutting everything else to make myself a nice sized craft room out of the whole 13' x 13' space.
It's fun to look back and see just how far my house has come. As I mentioned before when talking about my house's curb appeal, the inside of my house was downright scary. I think it would have made a really great set for a 1970s horror film. I put a lot of thought and effort into making a good floor plan and dreaming of the possibilities for the space. It feels so great to have one room in my house exactly the way I want it and all that hard work has definitely been worth it. Now I need to use this momentum to tackle another room!
If you are interested, check out the rest of my bathroom posts here: Bathroom Blog Posts
 Wednesday, February 29, 2012 at 8:09AM | Posted by
  Lisa |
  Post a Comment |
  Share Article |
  Email Article |
  Print Article
 Picture of the Day: Crocodiles Along Río Tárcoles in Costa Rica
Río Tárcoles, Costa Rica
05.30.2005
 Wednesday, February 29, 2012 at 7:07AM | Posted by
  Lisa |
  Post a Comment |
  Share Article |
  Email Article |
  Print Article
 DIY Bathroom Fan Vent Cover
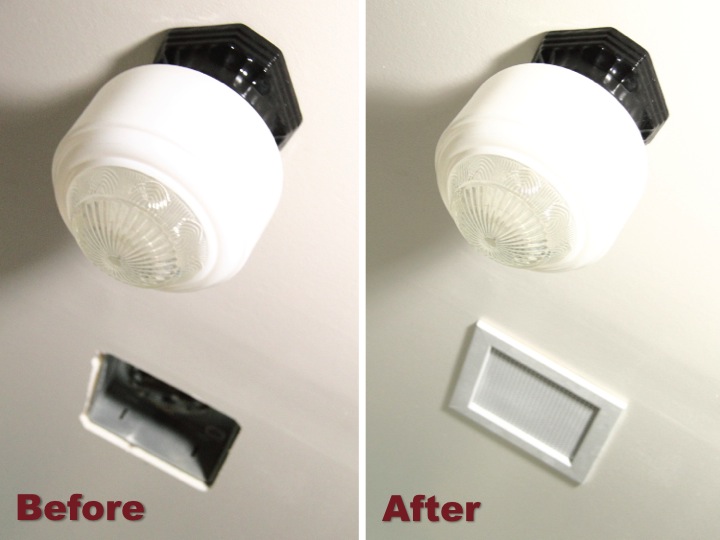
Today I am so excited to share that I finished up my last project in my bathroom: making a vent cover for my bathroom fan. The plastic cover that came with the fan looked cheap and flimsy and really didn't fit in with the vintage style of my bathroom. I searched around to try and find something else that would work but was unsuccessful so I decided that I needed to make something myself. 
To make the vent cover I found some wood trim 3/8" thick and about 1-1/4" wide with slightly a slightly rounded edge to make the frame. I thought about using some craft wood to make a wood lattice but when I saw this metal with perforated holes resembling a caning pattern I knew it would be perfect.
I mitered the corners of the wood trim, used wood glue to assemble it and then clamped it while it was drying. After the glue was set I cut a piece of the metal with some tin snips and then used 1/4" cut tacks to nail the metal to the back of the frame. After a coat of spray paint primer and two coats of my ceiling paint I hung the cover over my opening.
Having the gaping hole in my bathroom ceiling finally covered up makes me really happy and I am so glad that my bathroom is finally finished up. My goal was to complete everything in a month and by doing a little bit everyday I did it. After I get everything cleaned up I'll post some pictures of the whole room.
Has anyone else finished up a big project recently? Are you in the midst of doing some fun things around the house? I'd love to hear what you are up to to get me motivated for my next project.

If you are interested, check out the rest of my bathroom posts here: Bathroom Blog Posts
 Tuesday, February 28, 2012 at 7:10AM | Posted by
  Lisa |
  17 Comments |
  Share Article |
  Email Article |
  Print Article
