Welcome

My name is Lisa and I'm a crafty girl with wanderlust working as an engineer by day. My blog chronicles projects in my home as well as pictures and stories from my travels.

Search


Instagram

Blog Index
The journal that this archive was targeting has been deleted. Please update your configuration.
Navigation

Entries in Recipes (26)

Monday
Oct082012

Zucchini Bread Recipe

Every year as soon as summer fades and the weather cools down I get bitten by the baking bug. Yesterday was a chilly, rainy day and was perfect for turning on the oven. I decided to make a batch of zucchini bread since I had one last large zucchini from the end of summer harvest from my garden.

I love to make quick breads and in particular zucchini bread has a special place in my heart and stomach. It was something that my family made often when I was a kid and is a childhood favorite. As an adult a slice of zucchini bread with a dab butter and a cup of tea makes the perfect treat for me on a rainy afternoon.

The recipe I use today is essentially the same as my traditional family one but I replaced half of the oil with applesauce to make it a little lighter. It makes the zucchini bread a titch sweeter and moister but retains all the flavors of my youth.

Ingredients List
- 3 cups flour
- 1 tsp. salt
- 1 tsp. baking soda
- 1-1/2 tsp. baking powder
- 3 tsp. cinnamon
- 1/2 cup oil
- 1/2 cup applesauce
- 3 eggs, beaten
- 3 tsp. vanilla
- 2 cups sugar
- 3 cups zucchini, grated
- 1/2 cup nuts, chopped 

Directions
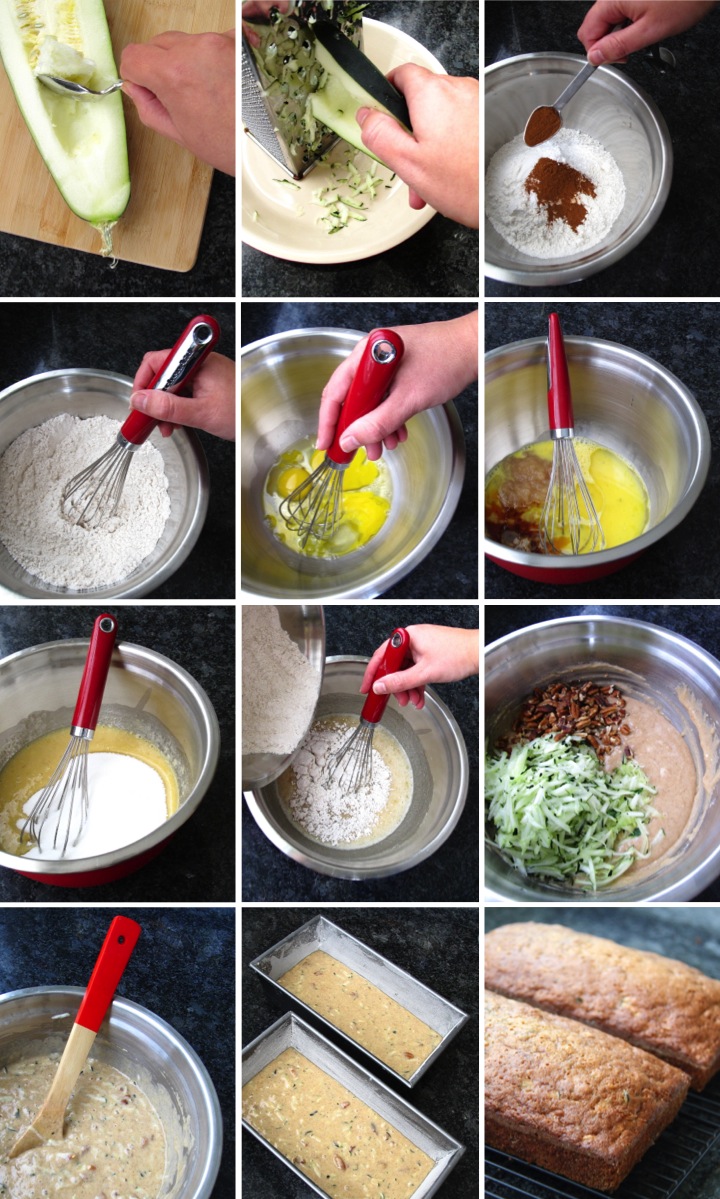
- Preheat oven to 350 and grease and flour two loaf pans
- Slice zucchini in half, remove seeds and grate using a large box grater or the coarsest grater in a food processor
- Stir together flour, salt, baking soda, baking powder and cinnamon
- In a separate bowl beat together eggs, applesauce, oil, and vanilla and then stir in sugar
- Add dry ingredients to the wet ingredients and mix until fully incorporated
- Stir in zucchini and nuts and then pour batter into prepared pans
- Bake for 40-50 minutes until tester inserted in the center comes out clean 
- Let cool for 15 minutes, remove loaves from pans and then let them cool completely on wire racks 

The recipe makes two loaves, so feel free to share one or since it freezes well, wrap one up and freeze it for a later day. I've also baked up the batter in mini loaves and muffins with great success.

Are you doing any fall baking? What is in your oven?

Tuesday
Oct022012

Homemade Applesauce Part 2: Canning

After yesterday's post about how you can prepare your own applesauce it's time to delve into canning it. Successful canning is all about keeping things hot and sterile. If you are new to canning The National Center for Home Food Preservation website is a wonderful resource sponsored by the government for explaining proper and safe methods as well as answering questions about preserving food. I would highly recommend reading their basic canning information.

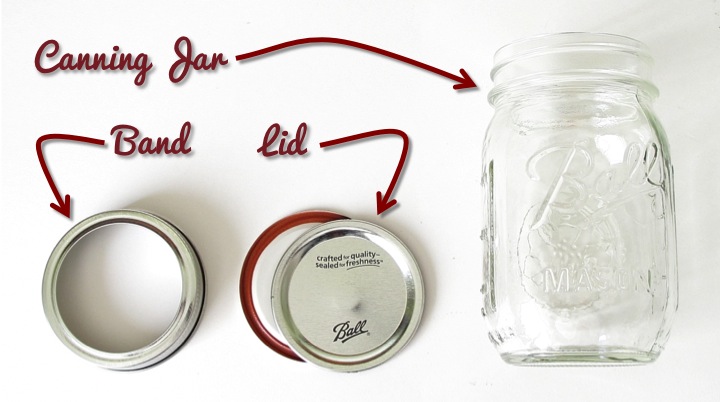
To begin with you need proper canning jars with lids and bands. Mason jars with a single piece lid or bail jars look super cute but are not appropriate for safe canning. You can reuse jars and bands after cleaning them, but you cannot reuse lids because the sealing surface (gasket) will have already been compressed from the first time it was used. If you use a lid again you won't be able to guarantee a proper seal which could lead to the food spoiling.
Some basic tools are also required for canning. For applesauce because it is high in acidity we can use a boiling water canning method which requires a large pot and jar rack. You can buy a water-bath canning pot with a jar rack pretty inexpensively (about $20). I actually have two canning pots, one which I use for preparing whatever food I am going to can and one for the jars. The jar rack comes with the canning pot and sits in the bottom of the canner. It keeps the jars from sitting on the bottom of the pot so that the boiling water can flow underneath them. It also allows you to raise the jars up so that loading and unloading jars is easier.

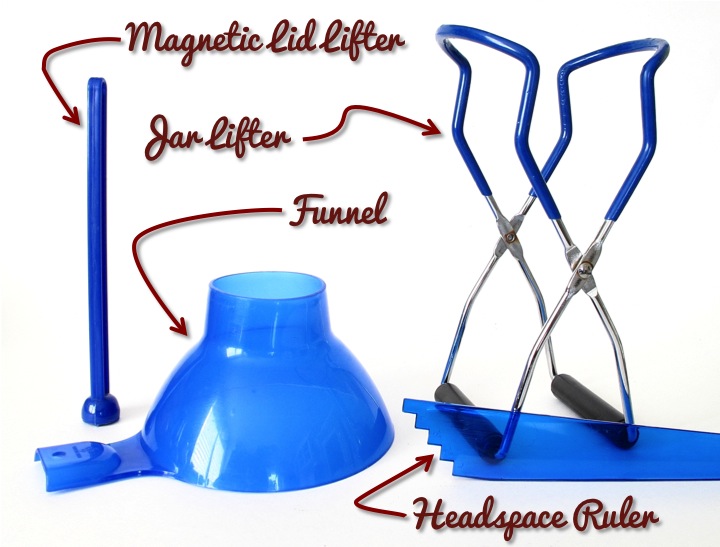
A few more tools are needed to get started. In order to grab the jars out of the boiling water a jar lifter is essential. It clasps around the neck of the jar so that you can pull it out securely and not worry about slipping. A magnetic lid lifter is just a long stick with a strong magnet on the end which allows you to pull the rings and lids out of the water. A funnel helps you pour your applesauce into the jars without making a complete mess. A headspace ruler has notches on in in 1/4" increments so that you can measure the headspace (distance between the top of what you are canning and the rim of the jar). Headspace is specified in each recipe and is important. If you leave too little you may have difficulty getting a seal and if you leave too much you could have some discoloration on the top of your food. These tools are generally sold as a canning utensil set which runs a little over $10.

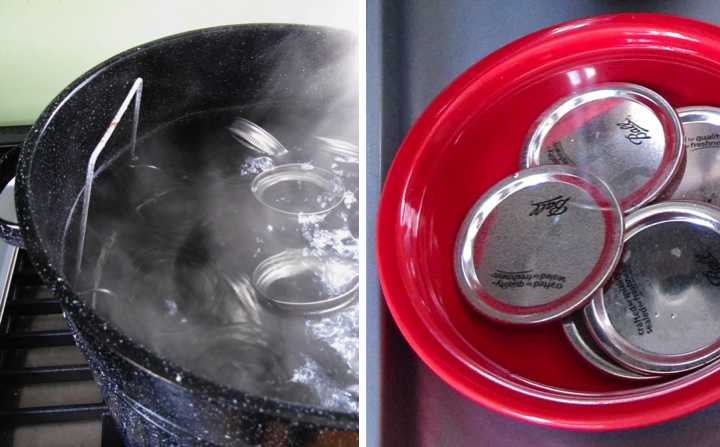
Now that we've covered the background, let's start canning. First you need to thoroughly clean your jars. You can wash them with hot soapy water or run them through the dishwasher. To sterilize the jars place them in the canner, cover them with water and bring it to a boil, boiling for at least ten minutes (longer if you are above sea level). I also boil my bands in the pot. My general process is that after I put whatever I am canning on the stove to cook I start boiling my jars. After the ten minutes has elapsed I turn the heat down to a simmer on the jars, keeping the water and the jars hot. The jars need to stay hot so that when you pour your hot liquid into the jars they won't break.

Lids should not go in the boiling water which could compromise the gasket which makes the seal. Instead after washing them, place them in a bowl of hot, but not boiling, water until you are ready to use them. 
After you have prepared the applesauce it is important to keep it hot while you are in the process of filling the jars. A simple way to do this is to put it in a pot on the stove over medium heat. 

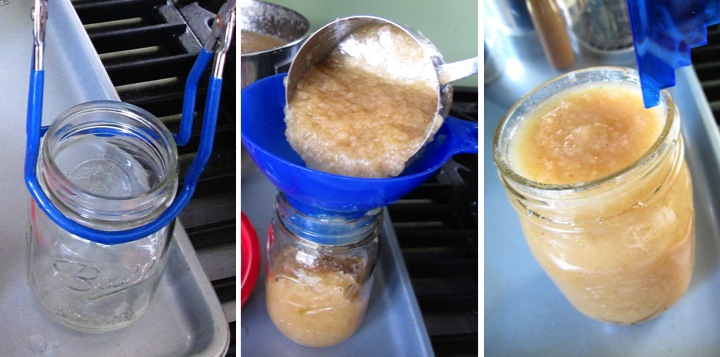
To start filling the jars, pull a hot jar from the water using the canning jar lifter and place it on your work surface. Place your funnel in the jar and ladle in applesauce, leaving 1/4" of headspace (distance between the top of the applesauce and the rim of the jar). Use the headspace ruler to scrape against the inside of the jar to release any air bubbles and then check your headspace. If you spilled any applesauce on the rim, use a cloth to wipe it off so that you have a good surface for your seal.
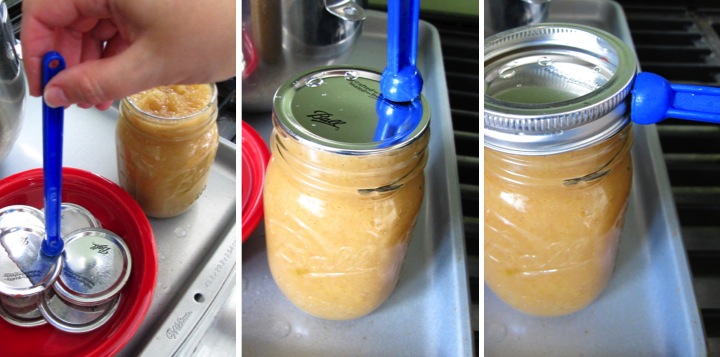
Using the magnetic lifter, pull a lid out of the hot water and place it on top of the jar. Pull a band from the simmering water in the same way and place it on top of the lid. Screw down the band over the jar.
The jar of applesauce is now ready to go back into the canner using the jar lifter. Once you have filled all of your jars, lower the jars into the water with the jar rack. Make sure that you have at least one inch of water covering the top of the jars. Place the lid on the canner and turn the heat on high to boil the water.

Processing time starts from when the water begins vigorously boiling. If you are at sea level (altitudes less than 1000 feet) then you will need to process pint jars for 15 minutes and quart jars for 20 minutes. If you are at a higher altitude check the NCHFP processing times for applesauce. The water must remain boiling for the entire processing time, otherwise you need to bring the water back to boiling and restart the processing time. If the water level appears that it will drop to less than an inch over the jars, add additional boiling water. 
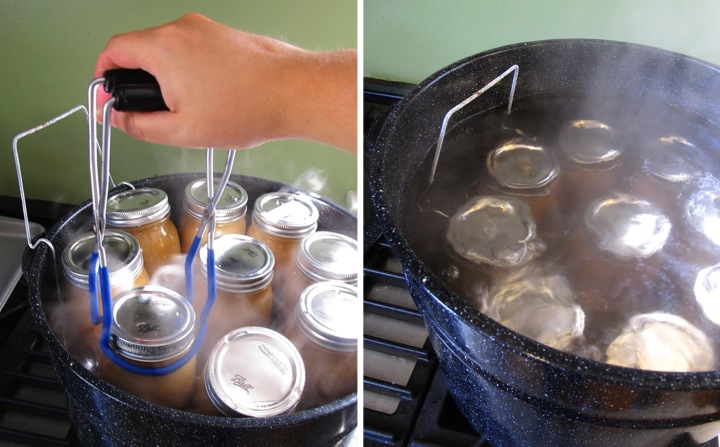
Once processing is complete, turn off the heat and remove the lid of the canner. Let the jars sit in the hot water for five minutes before pulling them out with the jar lifter. Place the jars with an inch between them and allow then to cool undisturbed for at least twelve hours.

As the jars cool and seal you will probably hear them making a little pop sound. After they have completely cooled you should check your seals by pressing on the top of the lids. If the lid springs back after you lift your finger, your jar did not seal. If your jar did not seal, place it in the refrigerator and eat the applesauce within the next few days.

The sealed jars no longer need the bands and can be stored without them. If you do want to keep the bands on it is a good idea to loosen them a bit so they won't get stuck on. Properly sealed applesauce can be safely stored for a year.
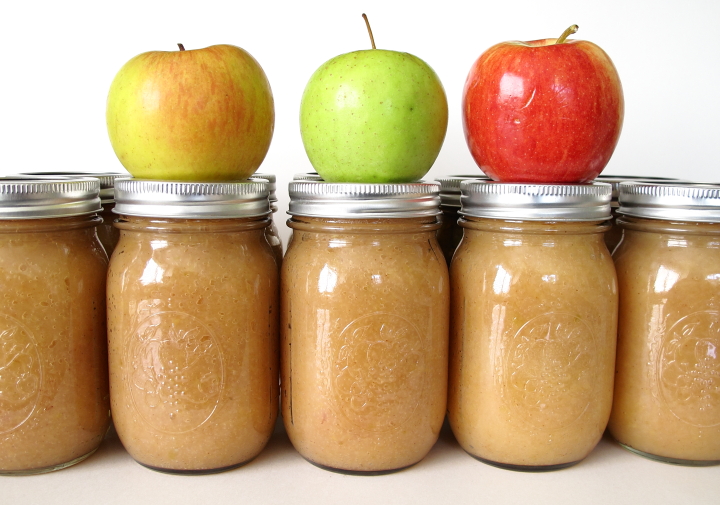
Now you can sit back and enjoy your beautifully canned applesauce and have the taste of fall all throughout your winter. Happy canning!

If you are interested in canning, check out Homemade Applesauce Part 1: Cooking & Sieving

Monday
Oct012012

Homemade Applesauce Part 1: Cooking & Sieving

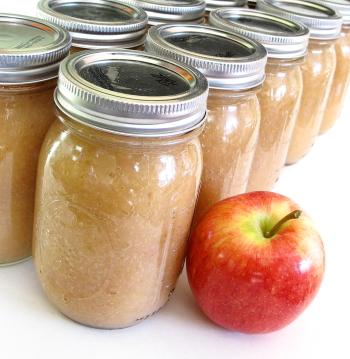
After coming home with several bags of apples yesterday I set about doing one of my favorite fall activities, making and canning homemade applesauce.

One of the key things in making tasty applesauce is to use a variety of apples instead of just one. Also, it is best to use sweet apples instead of tart ones so that you don't need to add any sugar to your applesauce. From year to year the apples that I use vary based on what is reasonably priced and available. This year my applesauce is a combination of Jonathon, Yellow Delicious, Gala and Honeycrisp apples. Red Delicious, Fuji, McIntosh, Winesap and Pink Lady apples are also wonderful for making applesauce.

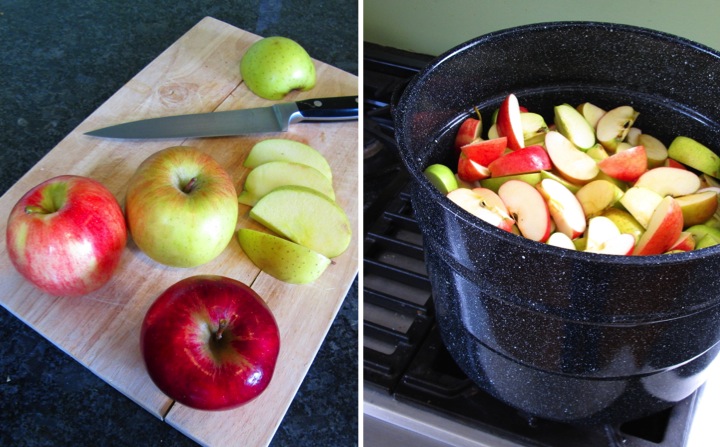
With my apples picked out I set about preparing them. After washing them in cold water, I cut them into eighths and tossed them into my large canning pot with an inch or two of water in the bottom. Because I use a strainer with my food grinder, there is no need to peel or core the apples. Super easy!

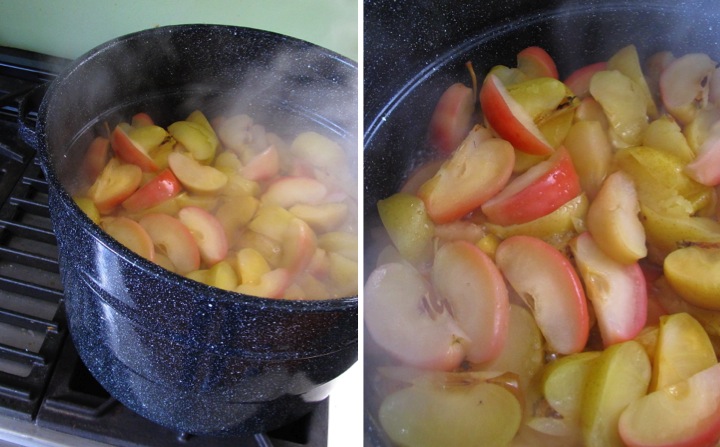
I put the pot on the stove with high heat, turning it down to medium-high once it started bubbling. I just love the smell of the apples cooking on the stove top. When the apples are nice and soft it's time to sieve the apples. If I am planning on canning my applesauce I put the canning jars on to boil at this time (more on canning is coming tomorrow). 

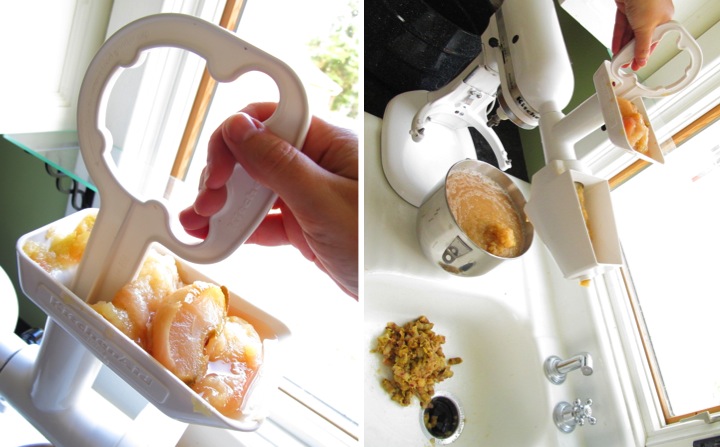
As I mentioned before, my setup combines a food grinder with a strainer so I don't need to peel or core the apples. I use my KitchenAid mixer (a college graduation present from my grandparents) with the KitchenAid Food Grinder Attachment and the KitchenAid Fruit and Vegetable Strainer Attachment. I know that this is pricey, but I use these tools a lot and they are a big time saver for me so over the years I've decided it was worth investing in them. If the expense of the KitchenAid tools is not for you, fear not, you can still make tasty applesauce with a Foley Mill. They are pretty reasonably priced at anywhere between $20-$40 and you can build up some arm muscles with the hand cranking. I am lazy, however, so I will continue on with my powered method.

My setup is pretty simple. I attach my food grinder to the front of my KitchenAid mixer with the fruit and vegetable strainer added in front. I then position my mixer so that the front end of the strainer sticks out over my sink and then place a bowl under the strainer. I ladle the soft apples into the top of the food grinder tray and then use the stomper (yeah, I think it is strange that is what is called, too) to push the apples down into the grinder. The seeds and peels spit out the front of the strainer right into my sink where I can wash it down my garbage disposal. Meanwhile the tasty applesauce spills out underneath and is caught into my bowl.

Once all the apples have been sieved I just stir in some cinnamon to taste and I am ready to start canning. If you like you can also add some sugar, but if you chose sweet apples it probably isn't necessary. Stay tuned and tomorrow I will share how to can the applesauce using a boiling water canner.

Do you make applesauce at home? What apple varieties do you like?

If you are interested in canning, check out Homemade Applesauce Part 2: Canning

Saturday
Sep222012

Herb Compound Butter Three Ways

I love compound butters. They are so easy to make and add a little something extra special to any meal whether you are just having a simple home meal or having a fancy dinner party with company.

With the abundance of herbs in my garden I decided to make a few different compound butters since they freeze so well and I  can use them later. You just need to pull them out of the freezer about fifteen minutes before you want to use them, slice off what you need and you are ready to go.

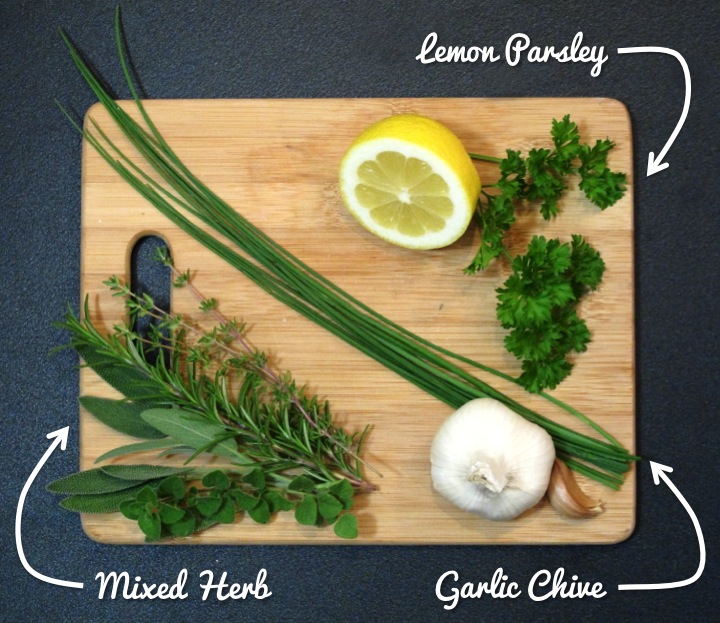
I went out to my garden and picked a bunch of different herbs and set to work.

When it comes to making combinations, the sky is really the limit and it is fun to experiment with different ingredients. Yesterday I made a lemon parsley butter, garlic chive butter and mixed herb butter using a variety of herbs from my garden.

Lemon Parsley Butter
- 1/2 cup (1 stick) unsalted butter
- 1/4 cup parsley, finely chopped
- 1 Tbsp. freshly squeezed lemon juice
- Salt and pepper to taste

Garlic Chive Butter
- 1/2 cup (1 stick) unsalted butter
- 2 Tbsp., finely chopped
- 2 cloves garlic, minced
- Salt and pepper to taste

Mixed Herb Butter
- 1/2 cup (1 stick) unsalted butter
- 1/4 cup herbs, finely chopped
- Salt and pepper to taste

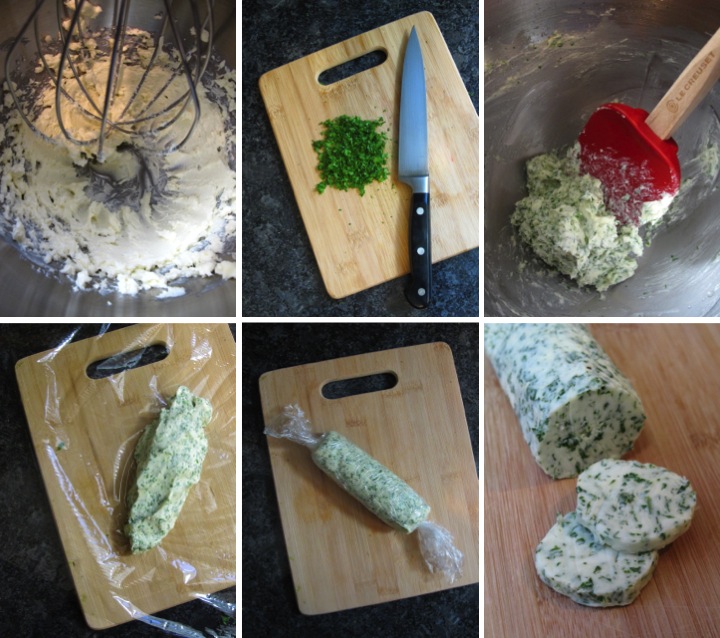
To make the butters, leave the butter out until it is room temperature. Whip the butter with a mixer or by hand and then stir in the other ingredients until they are evenly dispersed in the butter.

Spread the butter out on a piece of plastic wrap and shape into a cylinder. Twist the ends of the plastic wrap and place in the freezer until needed. You can then easily slice the butter into round pats.

If I am planning to use the butter within the next day, I will usually scoop it into a small ramekin and keep it in the refrigerator.

What herb combinations do you like to try for making compound butter? Do you have any creative ways to use up your herbs from your garden before it gets too cold? 

Friday
Sep072012

Strawberry Ricotta Salad with Mint

Back in November 2010 I visited Sydney, Australia with my friends Erin and Andy for a vacation. We were staying in the Potts Point area and on our first morning we discovered a wonderful little cafe down the street from our hostel called Cafe DOV for breakfast. The food was so wonderful that we ended up grabbing breakfast there every day for our whole stay so that we could everything on their awesome menu.

On one of those mornings I tried their bread pudding which was served with a side of strawberries and ricotta. It was absolutely delicious and ever since eating it I have thought about trying to recreate something similar at home.

After seeing some wonderful looking strawberries for sale at the grocery store I decided to buy them, pick a bunch of mint from my garden and have a go at putting a recipe together.

I like how my dish turned out and I think it would make a nice little side for a pancake brunch or a great dessert served with some pound cake.

Ingredients List
- 6 cups strawberries, cut in half and stems removed
- 1 cup ricotta
- 1 Tbsp. cream
- 2 Tbsp. powdered sugar
- Scant 1/4 cup of fresh mint leaves, loosely packed

Directions
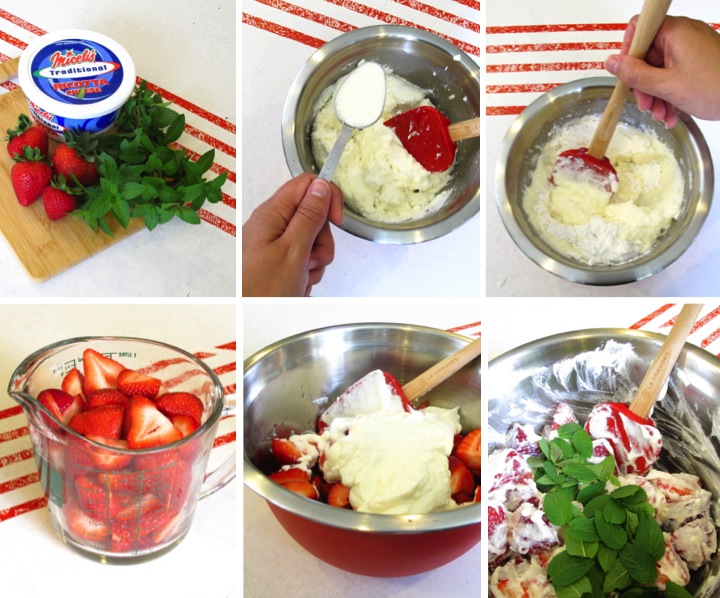
- Put ricotta in a small bowl and mix in cream and powdered sugar until smooth
- Place 4 cups of the strawberries in a bowl with ricotta mixture and gently stir to coat
- Add in mint and gently stir again
- Serve salad with remaining strawberries scattered on top plus a garnish of mint


Friday
Aug172012

Flavored Water Three Ways

I love soda. Whenever I travel I try whatever sodas I can find. Melon soda in Vietnam? Why of course! Guaraná soda in Brazil? Absolutely delicious! If a drink is sugary and carbonated it's for me.

Unfortunately, drinking a lot of soda isn't the healthiest and I decided that I should try to cut down a little bit on my several soda a day habit.

I know that I should replace at least some of my soda intake with water but unfortunately plain water doesn't really do much for me. In an attempt to get more water into my life I've been trying out different homemade flavored waters. With my herb garden outside the sky is the limit for experimenting with different combinations.

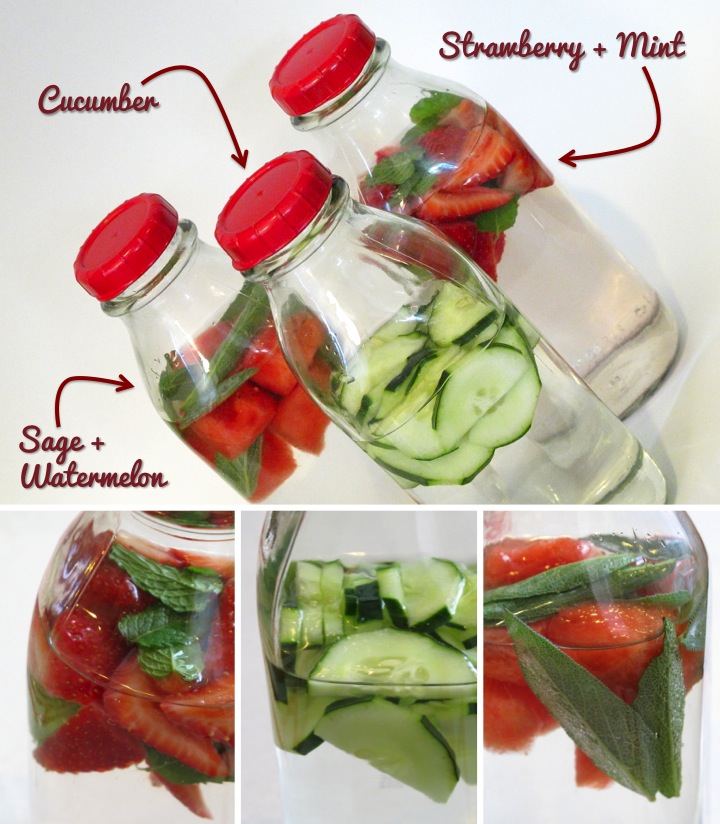
I've made infusions with strawberry and mint, cucumber and watermelon and sage. All you need to do is cut up your ingredients, place them in a bottle of water and let the fruit and herbs steep for at least and hour.

I can't say that I still don't crave my soda, but the flavored waters are a tastier alternative to plain water for me. So far the strawberry and mint is my favorite.

Do you like flavored waters? What combinations are your favorite?

Thursday
Jul052012

Buttercream Icing Recipe

I love cake. Not only is cake tasty delicious by itself, but it is a wonderful vehicle for one of my favorite things: frosting. I'm particularly partial to buttercream icing. It's whipped up butter and sugar with a little flavoring. What could possibly be better than that?

This recipe is based off of the Wilton buttercream icing recipe that my grandmother taught me to use when I first started decorating cakes. The Wilton recipe calls for a using mixture of half shortening and half butter, but I prefer to use all butter for my frosting. It makes the icing a little more cream colored, but I am all for sacrificing a little prettiness in the name of taste.

I love homemade buttercream icing because it is nice and sweet without having the sickeningly sweet taste that store bought frosting can have. It is also super simple and easy to whip up a batch and it keeps well in the fridge. To use it after you have refrigerated it, just let it warm up a bit and then whip it up again by hand or with a mixer. I always have bags of powdered sugar and sticks of butter on hand because you never know when you may need some icing.

Ingredients List
- 1 cup butter
- 1 tsp. vanilla extract
- 1 tsp. almond extract
- 4 cups powdered sugar (about 1 lb.)
- 2 Tbsp. milk 

Directions
- Cream butter in mixer with vanilla and almond extract
- Mix in powdered sugar one cup at a time
- Stir in milk to achieve desired consistency

Tips and Tricks
- I use butter so this recipe has a slight cream color instead of a true white. I don't mind because I prefer the taste, but if you want a true white icing you can substitute Crisco and butter flavoring
- To thin icing for spreading on a cake add 3-4 extra tablespoons of milk

Wednesday
Jul042012

Mixed Berry Pie for Fourth of July

Happy Fourth of July! Although it is blisteringly hot and humid here in Michigan I felt compelled to make a pie this morning to bring to the Independence Day get-together that I am going to this afternoon. The first reason is that so many wonderful berries are in season and just begging me to bake with them. The second reason is that pie is delicious.

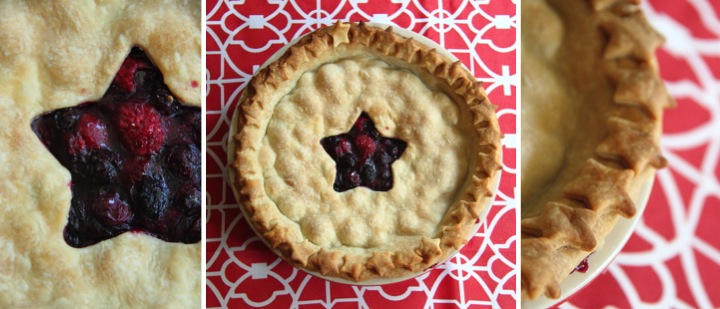
I love making mixed berry pies with all sorts of fruit combinations: strawberries, black raspberries, blueberries, rasperries, blackberries... you get the picture. It is a great and delicious way to use up whatever fruit you have on hand. Today I paired some blueberries and raspberries since it makes a festive color combination. The pie smells delicious and I am having some serious will power issues not cutting into it before I head to the party. 

Ingredients List
- 4-5 cups berries (depending on the size of your pie pan)
- 2/3 cup sugar
- 3 tablespoons cornstarch
- Double pie crust pastry

Directions
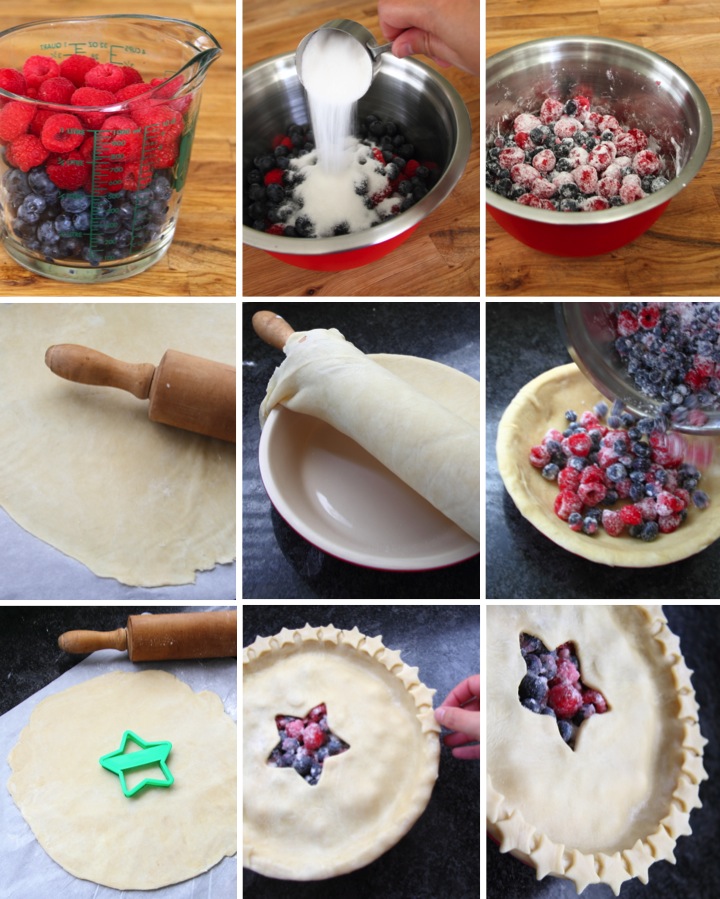
- Toss the berries with the sugar and cornstarch to coat and let sit for at least fifteen minutes
- Roll out half of the pastry and line the bottom of a pie plate with it, trimming off excess
- Roll out remaining half of the pastry
- Add berries to the pie plate and then top with pastry
- Trim excess pastry, crimp the edges and cut vents in top crust for steam to escape
- Bake for 45-55 minutes at 375° F until the crust is golden and the filling is bubbling 

Tips and Tricks
- I make my own crust (I'll share the recipe in another post) but you can also use store bought
- To make your pastry easier to deal with, keep it in the refrigerator until you are rolling it out
- To prevent your crust from browning too much, wrap it in tin foil for the first 25 minutes of baking
- Part of the fun of making pie is being creative with the vents on your top crust. I love making a woven top, but since today is Fourth of July I used star shaped cookie cutters to make my vent. Any large vents should be made before you place your top crust on your pie 

Wednesday
Jun062012

Peanut Butter Balls

When I was a little kid I absolutely loved peanut butter balls. Since the recipe is no bake I could make them myself with no adult help needed for the oven. Shaping the balls was also a lot of fun for me and I would make all sorts of variations like hearts and cubes. As much fun as making them was, eating peanut butter balls was even better. In my world peanut butter + chocolate + sugar = delicious any day of the week.

As I've grown older the amount of sugar in the original recipe became a little too much for me so I have reduced it to accomodate my tastes. Don't worry, though, they are still plenty sweet!

The recipe is fast and easy to make. Using the mini chocolate chips is nice because it is super quick unlike some other recipes that call for dipping peanut butter balls in melted chocolate.

The recipe also freezes well so I like to keep some unformed dough in ziplock bag in my freezer. After a little bit of thawing I form as many as I need and then pop the rest back in the freezer. As a word of caution, these can be terribly addictive so be careful!

Ingredients List
- 1 cup butter (softened)
- 2 cups creamy peanut butter 
- 4 cups powdered sugar (about 1 lb.)
- 2 cups miniature chocolate chips

Directions
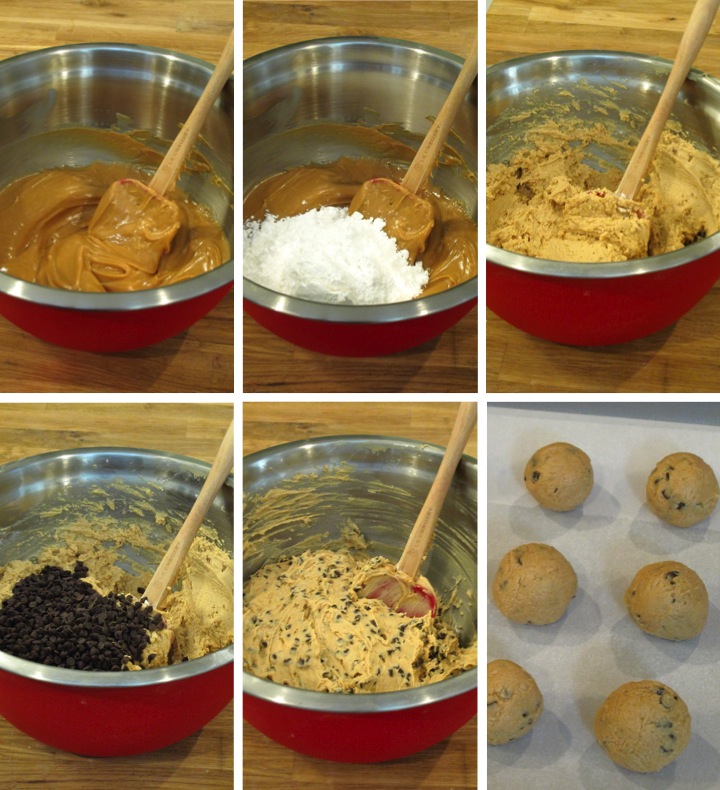
- Cream softened butter and peanut butter in a bowl until smooth
- Mix in powdered sugar one cup at a time and stir until thoroughly mixed
- Stir in chocolate chips
- Place in refrigerator for at least 30 minutes to chill
- Roll teaspoon sized amounts of the dough into balls and place onto cookie sheet lined with wax paper or parchment paper
- Place in refridgerator to chill
- After balls have firmed up stack in a container and store in refrigerator until ready to eat 

Tips and Tricks
- If you would like the peanut butter balls sweeter, feel free to add more powdered sugar. I wouldn't recommend using less, however, since the dough might not be stiff enough to form into balls anymore.
- When you are forming the balls if the dough starts getting sticky you can either dust your hands with powdered sugar or pop it back in the refrigerator for a bit
- The balls are fine at room temperature but they can get a little sticky if it is hot out so I like to store them in the refrigerator until they are ready to be eaten
- This recipe makes a fairly large quantity so I like to put about half in the freezer. You can either put the unformed dough in the freezer or put already formed balls in the freezer. 

Saturday
May122012

Making Banana Boats

When I was a little girl my absolute favorite thing about Girl Scout campfires was making and then eating banana boats.  They were a wonderful special treat and absolutely delicious.

As an adult camping still means banana boats to me and I never head out on a camping trip without bringing banana boat ingredients along. What could be better than melted chocolate and marshmallows with bananas? Only eating it around a campfire.

Ingredients List
- Bananas
- Miniature marshmallows
- Chocolate chips
- Aluminum foil

Directions
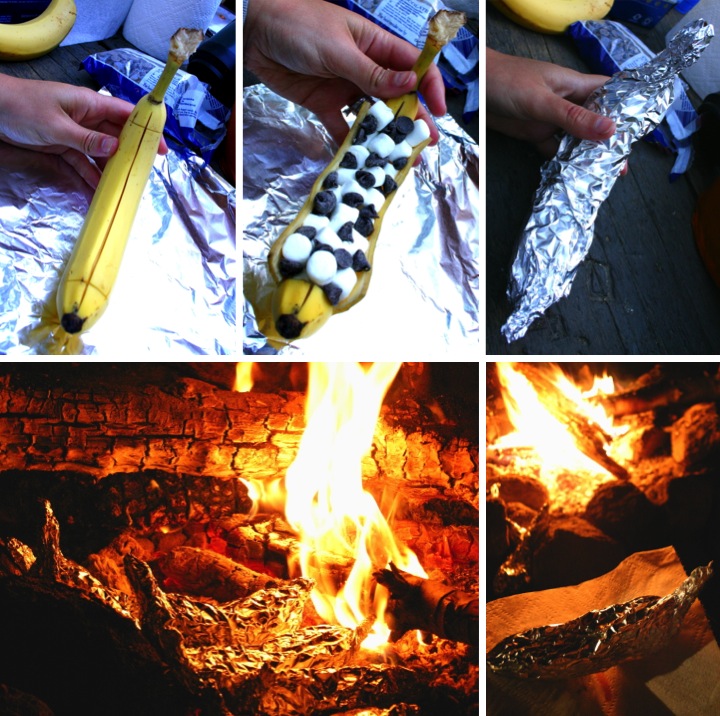
- With a paring knife, make a score down the center of the banana peel and across the top and bottom 
- Peel back the banana peel and stuff the banana full of marshmallows and chocolate chips
- Carefully wrap the banana with aluminum foil and place in campfire coals
- After five to ten minutes, use tongs to pull the banana from the fire
- Once the banana has cooled enough to eat, peel back the foil and use a spoon to scoop out the softened banana 

Tips and Tricks
- While amazing delicious, banana boats are very messy so beware!
- If you aren't going camping any time soon and you are craving banana boats, you can try baking the bananas in the oven

Have you ever made banana boats while camping? What is your favorite camping food?