Welcome

My name is Lisa and I'm a crafty girl with wanderlust working as an engineer by day. My blog chronicles projects in my home as well as pictures and stories from my travels.

Search


Instagram

Blog Index
The journal that this archive was targeting has been deleted. Please update your configuration.
Navigation

Entries in Baking (36)

Sunday
Sep092012

Michigan Tailgate Cake: All American Theme

Yesterday was the home opener for the 2012 Michigan Football season. We played Air Force so the tailgate theme was "All-American".

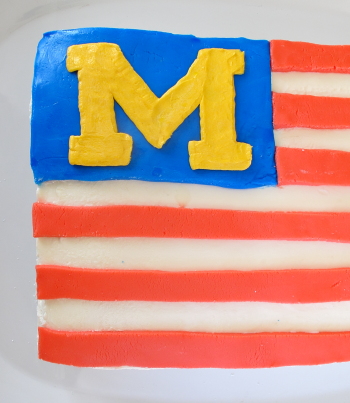
After a long and stressful work week I decided to make a simple design for the cake, taking an American flag and modifying the white star field on blue to be a maize and blue Michigan logo.

I made a chocolate cake using Beatty's Chocolate Cake recipe from Ina Garten. I baked it in a sheet cake pan and then cut it in half to make a two layer, rectangular shaped cake.

Next, I made up a double batch of buttercream icing. I used a Wilton #789 decorating tip to ice the cake, smoothing it with a large offset spatula.

With my cake iced, I turned to making my flag design on the cake. Although fondant looks prettier and is easier to work with I decided to use rolled buttercream because it tastes yummier. I made up a batch and tinted some of it red and some of it blue. I rolled out the blue first, cut out a rectangle and placed it in the top left of the cake. I then rolled out the red, cut it into strips and layered it onto the cake to make the stripes of the flag.

My final step was to tint some of my leftover buttercream from icing my cake a maize color. I used a flat basketweave tip to make a block M shape on the blue rectangle and then used a small spatula to smooth together the seams.

Although I always notice the imperfections on my cakes, I think it turned out pretty cute and most importantly it tasted delicious. The icing on the cake (if you excuse my terrible pun) was that Michigan beat Air Force. It wasn't a pretty win, but after the loss to Alabama last week we'll take what we can get. Go Blue!

Saturday
Jul072012

Happy Birthday Song Cake

This past week was Frank's birthday so I thought that I would share the cake I made for him last year.

I made a chocolate cake using the recipe for Beatty's Chocolate Cake and then made a chocolate ganache filling between the layers. To cover the cake I made rolled buttercream icing in chocolate and vanilla. I rolled out the vanilla, cut a strip of it and placed it across the middle of the cake. I then did the same for the chocolate and used it to cover the top and bottom.

With a base of icing on the cake I set about decorating it. Using icing that I tinted black, I piped five parallel lines across the cake to make a music staff. I looked up the sheet music for the happy birthday song online and then piped the notes for the song onto the music staff, writing the words "Happy B-Day Dear Frank" under the corresponding notes.

To finish off the cake I added a little color by tinting some icing blue and using it to add a border above and below the music and then piped blue stars along the base.

Trying to use rolled buttercream to cover the cake instead of fondant was quite a challenge, and it wasn't as smooth as fondant, but it tasted really wonderful. The rolled buttercream is so soft that it really wasn't feasible to deal with very large sections and the only way I was able to manage it was doing in the three sections that I did. The taste made it worthwhile though, and it is definitely something that I'll have to try again.

Thursday
Jul052012

Easy Blueberry Topped Mini Cupcakes

Frank and I are headed to his friend's family cottage for a few days on the lake so I wanted to bring a fun treat with me to share. Everyone loves cupcakes so I decided to make some chocolate mini-sized ones with buttercream icing.

I didn't have a lot of time to make them, but wanted them to be cute. Things taste better if they are cute, wouldn't you agree?

I had some blue mini cupcake liners on hand plus some leftover blueberries from the pie I made yesterday that did the trick.

I baked the cupcakes in the blue mini liners and then made the frosting while they cooled. Using a large start tip I piped the icing on each cupcake and topped it with a juicy blueberry. The cupcakes were quick, easy and delicious: just how I like things!

Thursday
Jul052012

Buttercream Icing Recipe

I love cake. Not only is cake tasty delicious by itself, but it is a wonderful vehicle for one of my favorite things: frosting. I'm particularly partial to buttercream icing. It's whipped up butter and sugar with a little flavoring. What could possibly be better than that?

This recipe is based off of the Wilton buttercream icing recipe that my grandmother taught me to use when I first started decorating cakes. The Wilton recipe calls for a using mixture of half shortening and half butter, but I prefer to use all butter for my frosting. It makes the icing a little more cream colored, but I am all for sacrificing a little prettiness in the name of taste.

I love homemade buttercream icing because it is nice and sweet without having the sickeningly sweet taste that store bought frosting can have. It is also super simple and easy to whip up a batch and it keeps well in the fridge. To use it after you have refrigerated it, just let it warm up a bit and then whip it up again by hand or with a mixer. I always have bags of powdered sugar and sticks of butter on hand because you never know when you may need some icing.

Ingredients List
- 1 cup butter
- 1 tsp. vanilla extract
- 1 tsp. almond extract
- 4 cups powdered sugar (about 1 lb.)
- 2 Tbsp. milk 

Directions
- Cream butter in mixer with vanilla and almond extract
- Mix in powdered sugar one cup at a time
- Stir in milk to achieve desired consistency

Tips and Tricks
- I use butter so this recipe has a slight cream color instead of a true white. I don't mind because I prefer the taste, but if you want a true white icing you can substitute Crisco and butter flavoring
- To thin icing for spreading on a cake add 3-4 extra tablespoons of milk

Wednesday
Jul042012

Mixed Berry Pie for Fourth of July

Happy Fourth of July! Although it is blisteringly hot and humid here in Michigan I felt compelled to make a pie this morning to bring to the Independence Day get-together that I am going to this afternoon. The first reason is that so many wonderful berries are in season and just begging me to bake with them. The second reason is that pie is delicious.

I love making mixed berry pies with all sorts of fruit combinations: strawberries, black raspberries, blueberries, rasperries, blackberries... you get the picture. It is a great and delicious way to use up whatever fruit you have on hand. Today I paired some blueberries and raspberries since it makes a festive color combination. The pie smells delicious and I am having some serious will power issues not cutting into it before I head to the party. 

Ingredients List
- 4-5 cups berries (depending on the size of your pie pan)
- 2/3 cup sugar
- 3 tablespoons cornstarch
- Double pie crust pastry

Directions
- Toss the berries with the sugar and cornstarch to coat and let sit for at least fifteen minutes
- Roll out half of the pastry and line the bottom of a pie plate with it, trimming off excess
- Roll out remaining half of the pastry
- Add berries to the pie plate and then top with pastry
- Trim excess pastry, crimp the edges and cut vents in top crust for steam to escape
- Bake for 45-55 minutes at 375° F until the crust is golden and the filling is bubbling 

Tips and Tricks
- I make my own crust (I'll share the recipe in another post) but you can also use store bought
- To make your pastry easier to deal with, keep it in the refrigerator until you are rolling it out
- To prevent your crust from browning too much, wrap it in tin foil for the first 25 minutes of baking
- Part of the fun of making pie is being creative with the vents on your top crust. I love making a woven top, but since today is Fourth of July I used star shaped cookie cutters to make my vent. Any large vents should be made before you place your top crust on your pie 

Saturday
May052012

National Scrapbook Day Cupcakes


Happy National Scrapbook Day! Today I am excited to be heading off to scrapbook with some friends at a little overnight getaway. I haven't been to a crop in several years so I am really looking forward to this.

I thought for fun I would bring some cupcakes to share at the crop. I made some yellow cupcakes and then while they were baking and cooling I made Happy NSD cupcake picks to decorate them.

Using powerpoint I made little pink circles that said "Happy NSD" on them. For fun I also added a pair of grey scissors (from the webdings font). After printing out the circles I used my large circle punch to punch them out. I glued them to some cranberry cardstock with a glue stick and  then cut them out leaving a thin border. 

To make them into picks I attached small skewers to the back of them with double sided tape and then layered another pink circle on top of the back to finish them off. 

By this time the cupcakes had cooled so I iced them with some pink icing. To get the right color to match the picks I used some burgundy color paste and a tiny, tiny amount of blue. After inserting the Happy NSD picks into the cupcakes they were all finished and ready to take to the crop.

What are you doing to celebrate National Scrapbooking Day? Are you going to a crop with some friends or scrapbooking at home?

Saturday
Mar172012

St. Patrick's Day Sugar Cookies

Happy St. Patrick's Day from Paris! Frank usually observes St. Patrick's Day back home by celebrating at our local Irish Pub, Conor O'Neills, starting with a traditional Irish breakfast. This year since we are out of town I knew Frank would be a little bummed about not being at Conor's so I thought that I would make him some shamrock cookies before we left and surprise him with them on St. Patrick's Day.

To make the cookies I made up a batch of sugar cookie dough, rolled it out and then cut out shapes with a shamrock cookie cutter. For best results, I find it is important to let your dough sit in the fridge for a few hours before rolling it out. To make sure I have evenly baked cookies I make sure to have the dough rolled out an even thickness because any thinner part will brown too quickly. I also keep a close eye when I am baking and pull the cookies out of the oven as soon as I see a little browning on the edge.

After the cookies cooled I decorated them with royal icing. I tinted the icing with green coloring and then piped an outline around the shamrock's edge. I let the outline icing set and then used water to thin the royal icing for filling in the design. To thin the icing I add the water in small amounts until a drip of icing will disappear back into the bowl. It's important not to thin the icing too much otherwise the icing will be hard to control. Once the icing is sufficiently thinned I put it in a piping bag, trace just inside my outline and then fill in the rest of the design. To finish off the cookies I sprinkled green sugar on top of them and then tapped off the excess when the icing was dried. Simple, easy and tasty! I hope Frank likes them!

Saturday
Mar172012

Royal Icing Recipe

My grandma passed on this royal icing recipe to me. It is a pretty standard recipe and she used it to make roses for wedding cakes that she made and sold out of her home kitchen. When I was little I was absolutely mesmerized by the way she would turn out the roses so quickly and methodically.

With my baking I don't have much need for royal icing roses, so instead I typically use this recipe for icing sugar cookies. I pipe an outline onto my cookie with stiff icing and then flood the design with thinned icing. It is a really easy way to make pretty designs on your cookies.

Another fun thing you can do is pipe royal icing into lacy designs on wax paper and then attach the designs to your baked goods once they are dry. The decorations are quite fragile, though, so it is always wise to make spares in case you break a few.

Ingredients List
- 1 lb. powdered sugar
- 3 egg whites
- 1/2 tsp. cream of tartar
- Food coloring (optional)

Directions
- Put powdered sugar, egg whites and cream of tartar in a mixing bowl
- Beat for 10 minutes for icing to achieve desired consistency
- Tint icing with food coloring if desired

Tips and Tricks
- Royal icing can dry out quickly start crusting over so using plastic wrap to cover the top of the icing with the plastic completely covering the surface of the icing
- If the icing is too thin, add more sugar; if it is too thick, add a bit of water or more egg whites
- If you are leery of using egg whites, there are recipes that use meringue power instead 

Wednesday
Mar142012

Pie for Pi Day

Being an engineer, I am a math nerd so on Pi Day I usually make a pie to celebrate. Also, I like any excuse possible to make and eat pie. For non-math nerds, March 14 is Pi Day because the first few significant digits of the mathematical constant pi are 3.14. Pretty cute, huh?

This year I am pretty busy with work before I leave for Italy tomorrow night so I sadly don't have time to make a pie but I thought I would share my pie from last year. I made a mixed berry pie with a double crust and had a lot of fun decorating the top crust.

Using a knife I cut out the symbol for pi, π, in the center of my crust and placed it on my pie. I then used mini fondant number cutters to make a border with the value of pi out to 36 significant digits (=3.14159265358979323846264338327950288). "Why 36 and not 35 or 37?" you may ask. Well, 36 digits is what fit on the pie. After cutting out the numbers I attached them to the crust with a little egg yolk brushed on the back. I finished the edge by trimming it, folding it under and then pinching it with my fingers to make it look pretty. Tasty + nerdy = awesome! 

By the way, if anyone has any ideas for a fun baked good I can make to celebrate Mole Day on October 23, I am open to suggestions. Pi Day is easy, but Mole Day has me stumped...

Thursday
Feb162012

Japanese Going Away Cake 

My friend, Don, is moving over to Japan so I am bringing in this cake that I made to work today as part of his going away celebration. If his time there is anything like my time living in Japan it is going to be a life changing experience and I am excited for him.

I started by making a two layer 8" round yellow cake and icing it with buttercream icing that I had tinted light blue. I then rolled out some green fondant and cut out a map of Japan's four main islands to put on the right side of the cake. I marked where he was moving to with a little icing dot on the map and wrote on the cake in Japanese 「ドンさん、行ってらっしゃいお元気で」which means "Bon Voyage, Don. Take care." This was my first time piping in Japanese so it's a little messy but I think it turned out okay. Plus I've discovered over time that while I can be a perfectionist about things, no one else cares as long as the cake tastes good.

To finish up the cake I piped a line and some dots for a border around the top and used stars for a border around the bottom. Although I am going to miss having Don in town I am sure that he is going to have a wonderful experience living in Japan and I truly wish him the best of luck. 

If you are interested, check out some of my other cake posts here: Cake Decorating Blog Posts